Table of Contents
LCP by Subpart is one of the new insight audits in Google’s performance testing tools. It aims to provide more granular information about how to improve Core Web Vitals and site speed.
As the name suggests, the insight helps you better identify bottlenecks in the different phases of loading your Largest Contentful Paint (LCP) element so you can take targeted action to eliminate them.
In this guide, you’ll learn how to do so. We’ll cover what exactly the LCP by Subpart is, how to measure it on your site, and steps to ace it — both manually and with the help of a WordPress plugin.
| TL;DR Want to get straight to the good parts? Here is what you need to know in a nutshell: ✅ LCP by Subpart is a Google performance insight that breaks down Largest Contentful Paint (LCP) into up to four phases — Time to First Byte, Resource Load Delay, Resource Load Duration, and Element Render Delay — to pinpoint bottlenecks more accurately. ✅ You can measure it in PageSpeed Insights and Chrome Developer Tools. A good LCP score overall is under 2.5s, with most time spent on loading rather than delay. ✅ Improving LCP by Subpart involves steps like faster hosting, fewer redirects, caching, CDNs, preloading, fetch priority, compression, optimized fonts and images, and eliminating render-blocking resources. ✅ For WordPress users, WP Rocket automates most of these optimizations making it possible to fix LCP bottlenecks with just a few clicks. |
What Is the LCP by Subpart Insight?
To understand LCP by Subpart, you need to be familiar with Largest Contentful Paint or LCP first. It’s one of the main metrics in Google’s Core Web Vitals and tracks how long it takes for the largest visible element on a page to appear. That’s usually a hero image, headline, or another large visual above the fold.
Why is this element so important?
Because it has a big impact on perceived page loading time. If the LCP element is slow to appear, visitors end up looking at a blank or incomplete page for longer. This can make it seem like the entire page is taking very long to load, which may lead to higher bounce rates and poor engagement.
A slow LCP also affects other Core Web Vitals, like Interaction to Next Paint (INP), because it can block files from loading that are required for page interactivity. So, if you want to improve your site’s user experience and search performance, optimizing its LCP is an important step.
What Does the Insight Measure?
LCP by Subpart breaks LCP down into phases so you can see exactly where delays are happening. These stages are:
- Time to First Byte (TTFB): How long the server takes to respond and deliver the first byte of the page’s HTML document. Besides the LCP resource itself, the HTML document that contains it is one of the most important factors for LCP performance.
- Resource Load Delay: The waiting time before the browser starts downloading the LCP element (e.g., image or font).
- Resource Load Duration: Actual download time of the LCP resource.
- Element Render Delay: The time it takes for the browser to render the element on screen after it has been downloaded.
LCP by Subpart provides separate timing data for each phase, so you can diagnose bottlenecks more precisely and fix them in a targeted manner instead of guessing.
Note that you will only see all four phases if your LCP element is an image. If it’s a heading or other text component, the insight will only show Time to First Byte and Render Delay.
The new insight replaces the “Largest Contentful Paint element” audit in Google’s speed testing tools from October 2025.
How to Measure LCP by Subpart
If you want to understand the LCP phases on your website, you can measure this insight in different ways. One is to run your page URL through PageSpeed Insights. Look for LCP Breakdown under Insights in the results.
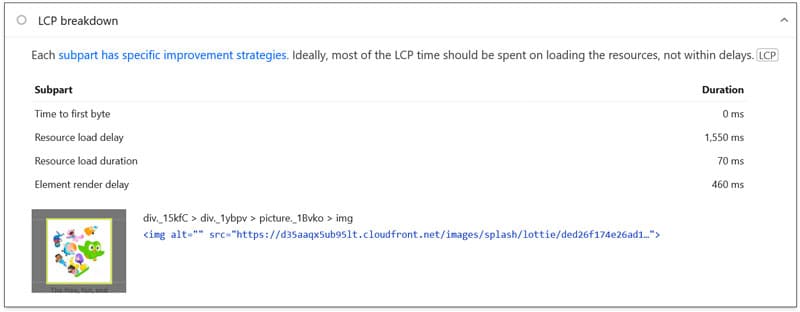
This will show you the durations of the different LCP subparts and also identify the part of the page that is your LCP element.
(Note: Before October 2025, you may have to switch the tool from “Audits” to “Insights” to see this metric.)

You can also measure LCP by Subpart using Chrome Developer Tools. Open your site, then open the Performance tab in the developer tools and record a performance trace using the Record and reload button.
Once done, the LCP by Subpart panel will appear in the left sidebar. It shows the different loading phases with their duration in milliseconds as well as the LCP element. You can also see the position of the loading stages in the network timeline when you hover over them.
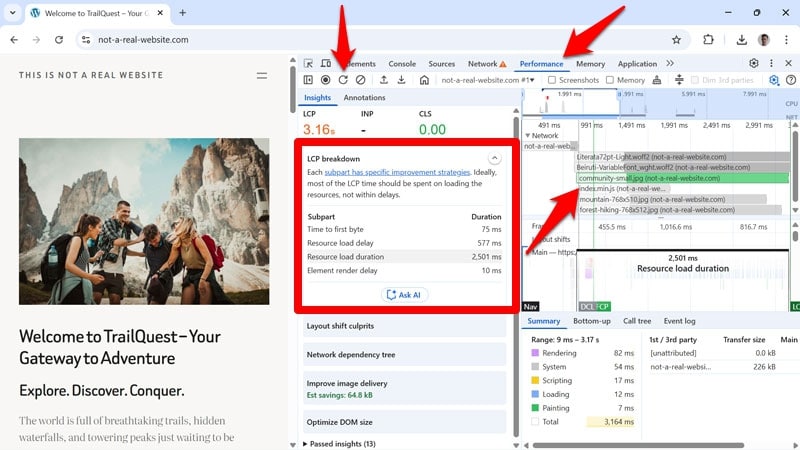
This allows you to easily identify areas where you can focus your efforts to improve Largest Contentful Paint on your website.
If your website gets enough traffic, you might also see field data from the Chrome User Experience Report (CrUX), meaning the real experience of users visiting your site using the Chrome browser.
What Are Good Timings?
The final question is, how long should each subpart of LCP take to load? What are good values to aim for?
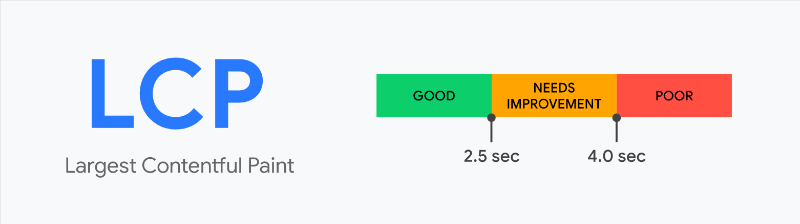
Overall, Google considers an LCP score of less than 2.5 seconds to be good.
Beyond that, they don’t make recommendations for how long each subpart should take. They only give guidelines for the share of the overall LCP timing each part should ideally represent:
| LCP subpart | % of LCP |
| Time to first byte | ~40% |
| Resource load delay | <10% |
| Resource load duration | ~40% |
| Element render delay | <10% |
| Total | 100% |
As you can see, in an ideal world, browsers should spend the least time in the “delay” phases. Instead, most of their time should be spent actually loading the necessary data.
How do you accomplish that?
In the following sections, we’ll cover what steps you can take to improve each LCP subpart individually, first manually, then via a plugin.
How to Improve Time to First Byte
TTFB is the first phase of the LCP loading process. As already discussed, receiving the initial HTML document as quickly as possible is one of the main factors for your LCP timing. Here’s what you can do if this phase is dragging down your score.
Improve Your Hosting
Your hosting determines how fast your website’s server responds to requests, which directly impacts Time to First Byte (TTFB) and LCP. Both the connection speed to the server as well as server processing time play a role here.
If you suspect site hosting is a bottleneck, here are steps you can take to improve the situation:
- Talk to your hosting provider about the lack of performance.
- If you are on a shared hosting plan, switch to one with dedicated resources.
- Upgrade to a higher plan with better or more hardware, such as additional memory.
- Make sure all server back-end software (PHP, HTTP, MySQL, etc.) is up to date.
- Regularly monitor your server response time and switch providers if performance is consistently poor.
Eliminate Redirects
Redirects send site visitors from one URL to another. They are a tool often used when moving websites to a new domain or changing the URL of pages on your site. However, they add extra steps to the loading process, which increases TTFB. And while some redirects are necessary, others delay your LCP timing for no good reason.
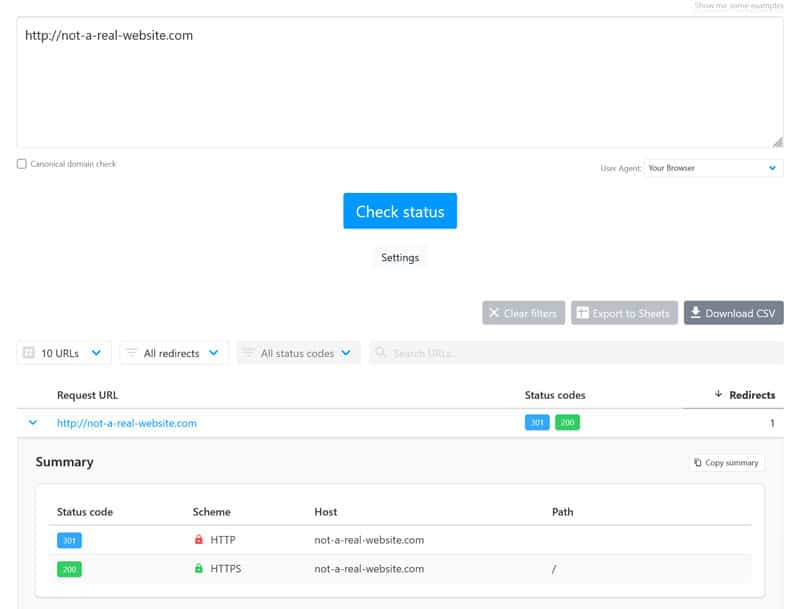
To find redirects on your site, you have several options. One is to input your page URLs into a redirect checker.
To test your site in bulk, crawl it with a tool like Screaming Frog, Sitebulb, or Ahrefs Site Audit. They flag all 3xx redirect responses across your site.
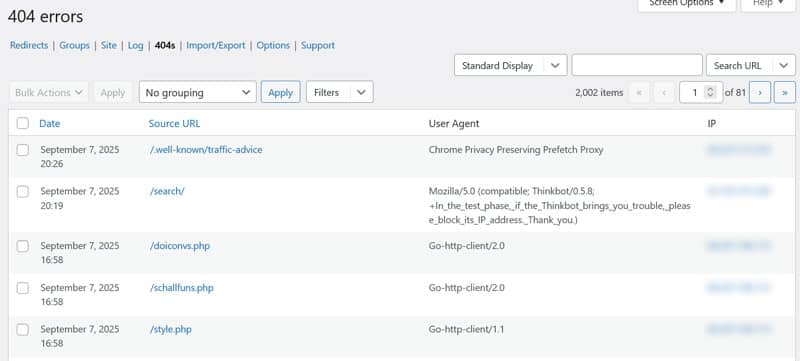
Visitors may also use faulty URLs (for example, from an incoming link) that lead to redirects. To find those, check your server access logs. WordPress users can also opt for a plugin like Redirection, which automatically logs redirects and 404 errors.
Once you’ve identified them on your site, it’s up to you to minimize redirects as much as possible:
- See if they are necessary at all. If they aren’t, eliminate them by directly linking to the final URL.
- For those redirects that need to stay, make sure there is only one URL hop, not several. Avoid so-called “redirect chains.”
- Regularly scan your site for redirects.
A frequent source of redirect timing is directing visitors from HTTP to HTTPS. You can get around that by using the Strict-Transport-Security header (HSTS). It enforces HTTPS on the first visit and also tells the browser to use HTTPS on future visits.
Reduce Plugins and Custom Code
Excess plugins, custom scripts, and third-party resources add server-side and client-side processing, which increases TTFB and slows LCP. To avoid that, make your website as lean as possible:
- Audit your plugins regularly and remove any that are outdated, redundant, or not essential.
- Replace heavy plugins with lightweight alternatives that perform the same function more efficiently.
- Consolidate functionality into fewer plugins to reduce overhead from multiple scripts.
- Optimize custom code by removing unused functions and following best practices.
- Remove or defer non-critical third-party resources, keeping only those essential for business goals.
Implement Server Caching
Caching means storing frequently needed data in a separate storage for quick access. for websites several types of caching are available. The most relevant form for improving TTFB is server caching.
In WordPress that means saving ready-compiled HTML versions of your pages on the server instead of generating them from scratch every time. That way, the server has less to process and can start sending the data much quicker, thereby reducing TTFB.
Your host may have options to switch on server caching for your website. It’s especially powerful when combined with the next step.
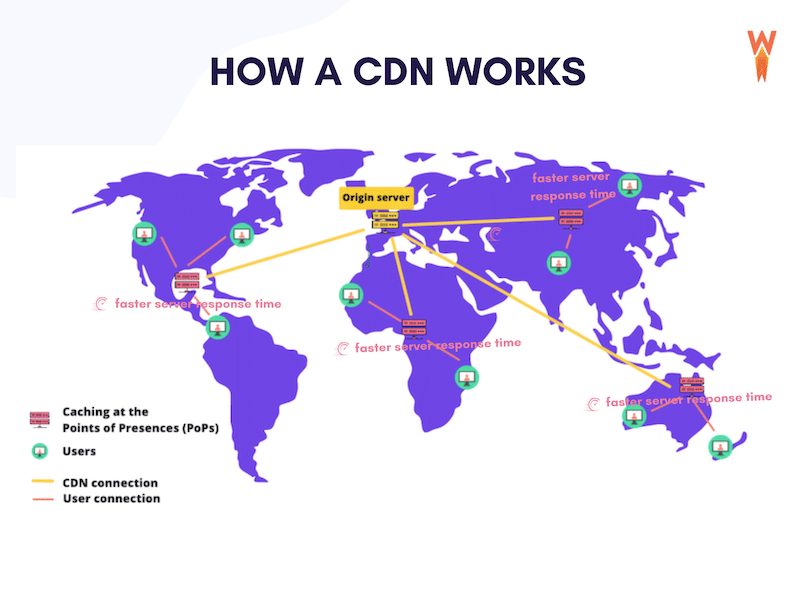
Use a Content Delivery Network (CDN)
A Content Delivery Network or CDN is a network of servers around the globe that host your website data. It allows visitors to receive it from the source closest to them, thereby reducing loading time.
CDNs are an effective way to improve Time to First Byte when you cache full HTML pages on them.
To connect your site to one, create an account and change your site’s DNS records to point to that of the CDN.
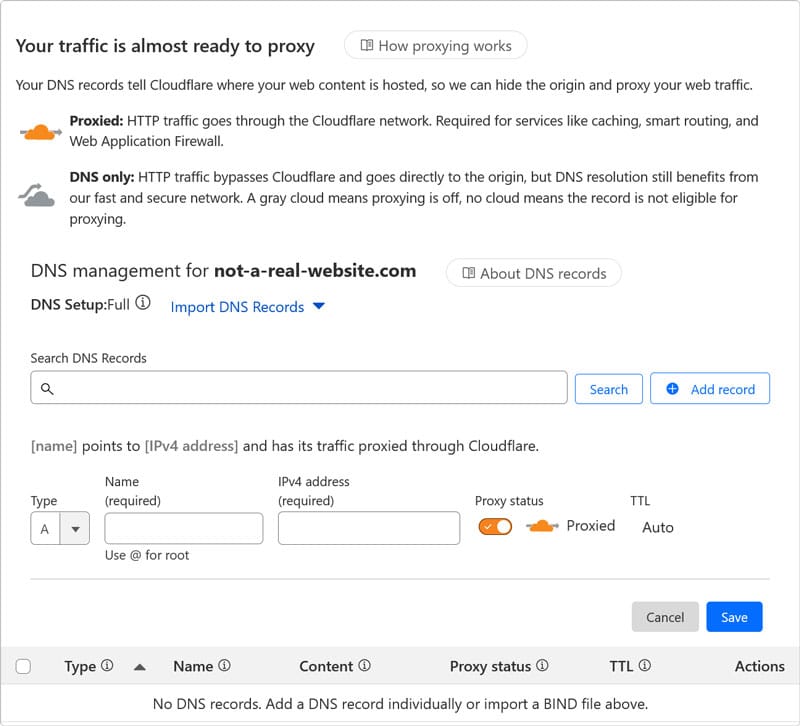
That way, traffic can start flowing through it instead. Be sure to exclude truly dynamic pages (shopping cart, checkout, account) so they always come from your origin server when needed. In addition, use the CDN’s “purge/refresh” option to update your cached pages after publishing or updating content.
Reducing Resource Load Delay Step by Step
The goal of this subpart is to have the LCP resource start loading as early as possible, ideally as one of the first resources on the page, right after TTFB. If that’s not the case, you have room for improvement.
Load the LCP Element in the Initial Document
It’s possible to load page elements in different ways. For example, if your LCP element is an image, you can load it:
- As an HTML request, using an <img> tag.
- Via CSS, for example, using the background-image property.
- Dynamically, with JavaScript.
The method your site uses affects Resource Load Delay because of how browsers process websites. The first resource they receive is the HTML document. If your LCP image or other element is included there, browsers will discover it immediately.
If it’s not, a browser first needs to find, download, and process another file to be aware that it’s supposed to load an image. This leads to delay. For that reason, ensure your LCP element call is located directly in the initial HTML whenever possible.
Take Advantage of rel=”preload”
Adding rel=”preload” to an HTML call, such as your LCP element, marks it as critical to the browser and tells it to load it early — earlier than it would usually discover it on its own.
Here’s what it looks like:
<link rel="preload" as="image" href="/images/hero.jpg"> You can use this as an alternative for including the LCP resource in the HTML document, e.g. to load a CSS background image or critical web font before the browser finds it in a style sheet or JavaScript file.
A few points:
- Place this in the <head> section of your website and use the correct “as=” value: as=”image” for images, as=”font” for fonts, etc.
- Preload only the single element that is most likely to be your LCP to avoid wasting bandwidth.
- For images, preload the exact file used above the fold (not a placeholder or a different size).
- For fonts, preload only the font files used for the above-the-fold heading.
Optimize Fetch Priority
Fetch priority is another attribute you can use to prompt the browser to load your LCP element early. It’s especially important if the element is an image, since browsers consider images low priority by default.
So, even if you preload the image, it can still end up at the end of the queue of critical assets. Adding fetchpriority=”high” to it tells the browser to prioritize it above others instead. You can combine it with rel=”preload” in the same call.
<link rel="preload" as="image" href="/images/hero.jpg" fetchpriority="high"> As with preloading, prioritize the element Google considers the Largest Contentful Paint (not your logo, small icons, or below-the-fold images) and not multiple elements. Set non-critical images to normal or low priority so they don’t compete with the LCP image.
Note: If you are on WordPress, since version 6.3, the CMS automatically adds fetchpriority=”high” to images it deems most likely to be the LCP image.
Avoid Lazy Loading Your LCP Element
Lazy loading is a popular method to improve website loading speed. It means elements that aren’t visible at the start of a web page visit aren’t loaded, and the browser only pulls them when they are about to appear (because a visitor is scrolling down). This saves a lot of bandwidth that’s then available for more prominent page elements.
You can apply this technique with the loading= attribute like so:
<img src="/images/gallery-photo.jpg" alt="Gallery photo" loading="lazy" width="600" height="400"> This approach is especially effective for images, as they tend to consist of a lot more data than text. However, when used for your LCP element, it’s counterproductive. You want your LCP image to load as early as possible and adding this attribute signals exactly the opposite to the browser, directly contributing to Resource Load Delay.
Compress Website Files
Compression is the process of shrinking the size of files to make them faster to transmit. You can implement this on your server for your website files. That way, they finish loading sooner, so the browser can start fetching your LCP asset earlier.
Not sure if your site already has compression activated? Run it through a compression checker to find out.
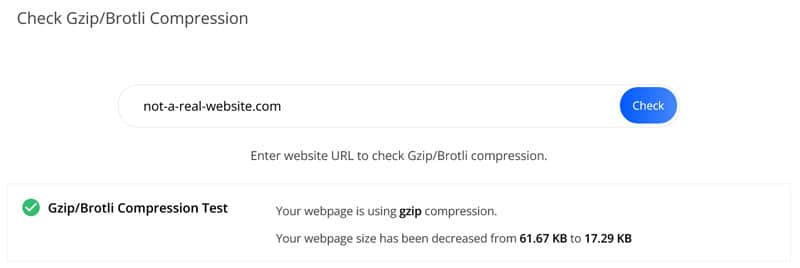
If it’s not, there are several ways to enable it. Your hosting provider may have an option to simply switch it on. Or you can do it by adding some code to a server file, such as .htaccess (for Apache servers).
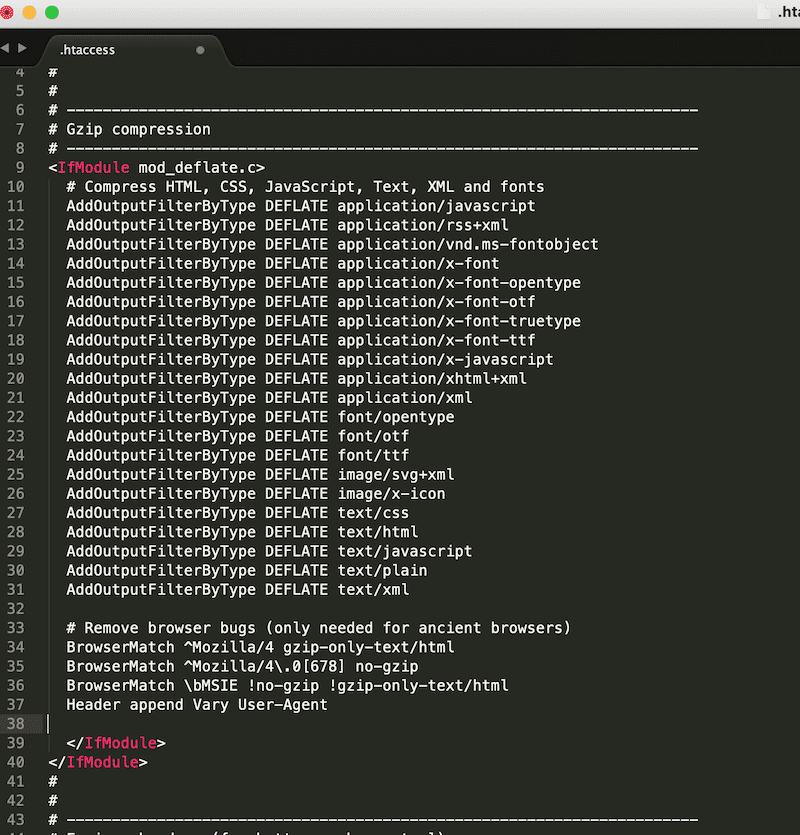
Compression works best in combination with other techniques, such as minification, which further reduces file size for CSS and JavaScript files.
Improving Resource Load Duration for Faster Downloads
The objective in optimizing Resource Load Duration is to speed up the transfer time of the LCP resource as much as possible.
We already mentioned one method to do so, which is using a CDN. It helps reduce the distance between the resource and its recipient. For this particular LCP subpart, the CDN needs to contain the actual LCP font or image file instead of the cached HTML.
Aside from that, you can use the following ways to improve Resource Load Duration.
Shrink the Footprint of Your LCP Images
How do you reduce the load duration of an image? By making it as small as possible. You can do that in the following ways:
- Use modern formats like WebP or AVIF, they have a smaller footprint than JPG or PNG.
- Resize the image to match its actual display dimensions. Don’t load a 4000px-wide image for a 1200px container.
- Serve different sizes with srcset so mobile devices download smaller files (WordPress does this automatically)
| 💡For more detailed advice, read our image optimization tutorial. |
Optimize Web Fonts on Your Site
Though in many cases the LCP element ends up being an image, that’s not always the case. It can also be text, often a heading.
If not configured correctly, font files that load slowly can keep it from appearing. They can also lead to “Flash of Unstyled Text” (FOUT) or “Flash of Invisible Text” (FOIT), which negatively impact Cumulative Layout Shift (CLS).
Use these methods to stop it from happening:
- Use system fonts or a small, fast web-font family for the above-the-fold heading if possible.
- Limit variants (e.g., only regular and bold) and subsets to reduce font file number and size.
- In your CSS, set font-display to “swap” so text shows with a fallback font immediately and switches to the web font when it’s ready.
- Preload the one font file used for the hero heading (and only that) so it starts earlier.
- Serve modern, compressed font formats (like WOFF2) to shrink file size.
- Host fonts locally or on a CDN so they load quickly and reliably.
| 💡 If you want to take a deep dive into really technical ways you can further reduce web font size, Google has a tutorial for that. |
Implement Browser Caching
We already discussed caching earlier. A kind of caching that’s most relevant for reducing Resource Load Duration is browser caching.
It means directing browsers to save data, such as images or icons, on visitors’ local hard drives, making them accessible directly without the need to download them again. This helps reduce Resource Load Duration on repeat visits.

The way to achieve that is using cache control headers. They allow you to define how long browsers should save different file types like images, CSS, JavaScript, and font files before downloading them again.
You can define cache control rules via server configuration files or directly using PHP. Many CDNs also automatically implement browser caching or offer settings for it.
Optimizing Element Render Delay
And finally, the last subpart of the LCP loading process. This one is all about making sure your LCP element can render immediately after its resource has finished downloading. The most frequent reason this doesn’t happen is because something is blocking it. Therefore, improving Element Render Delay mostly comes down to eliminating such blocks.
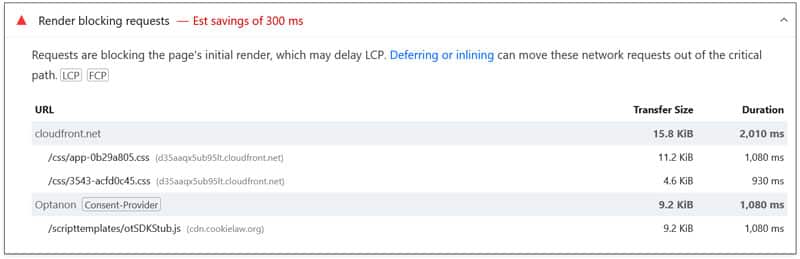
Eliminate Render-Blocking Resources
As the name suggests, render-blocking resources are files that interfere with the rendering of a web page. They are usually CSS and JavaScript files that aren’t important for initial page load but are still fetched early, slowing down everything else.
Several ways exist to stop them from doing that. The first step is to find them. You can do that using PageSpeed Insights or the Chrome Developer Tools Coverage tab.
Once identified, here’s how to stop files from render blocking:
- Remove unused CSS and JavaScript files entirely. What doesn’t load can’t block anything.
- Split large CSS files into critical CSS (for above-the-fold) and the rest (loaded later).
- Inline critical CSS and defer non-critical markup so the browser can show content sooner.
- Move non-essential JavaScript to the bottom of the page or load it asynchronously using defer and async.
- Delay JavaScript execution to when users interact with the page.
- Minify and compress CSS and JavaScript files to make them faster to load
| 💡 Learn more about eliminating render-blocking resources in our tutorial. |
Switch on Lazy Rendering
Lazy rendering works like lazy loading but for non-image page elements. It helps reduce Element Render Delay because it saves bandwidth and server processing for parts that appear early on the page. Elements further below load as visitors scroll towards them.
Implementing this for different page components is possible through a variety of techniques:
- Using the content-visibility CSS property (together with contain-intrinsic-size).
- Via the Intersection Observer API.
- Splitting code and loading it in chunks only when needed (for example, using import()).
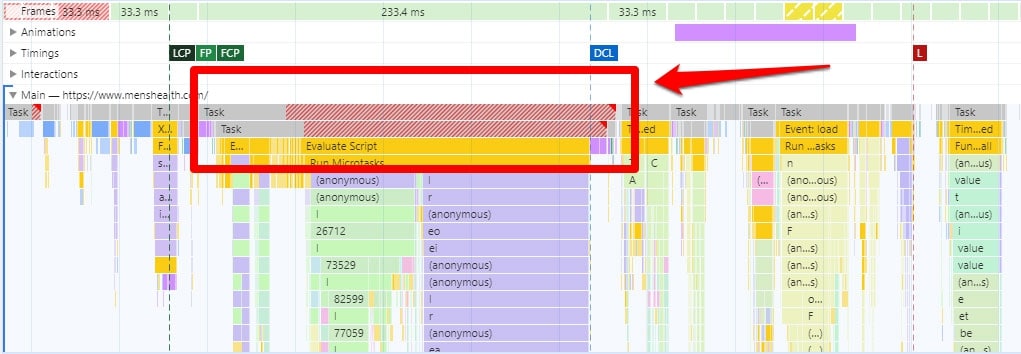
Break Up Long JavaScript Tasks
Large scripts that run for too long block the main thread (the browser’s main data pipeline), delaying the LCP element from appearing. Everything that takes longer than 50ms to load is considered a “long task.” They are marked in red in Chrome Developer Tools when you do a performance trace.
If they are a factor in Element Render Delay on your site, you have the following options to address them:
- Remove or disable features you don’t need, especially from heavy plugins or third-party tags.
- Split big scripts into smaller pieces that run in steps instead of all at once.
- Delay non-critical code to run after the page shows (on idle or on first interaction).
- Replace bulky libraries with lighter options or built-in browser features.
| 💡 Web.dev has a dedicated article on this topic. |
How to Improve LCP by Subpart With a Plugin
The good news is, if the LCP by Subpart insight is triggered on your website, there are plenty of things you can do to improve each phase. The bad news is, if you are not a developer or technically versed in website maintenance, it might seem a bit overwhelming and beyond your skill set.
But fear not: if your website is running on WordPress, there is a simpler way — using a performance plugin like WP Rocket. It has many features needed to directly address this performance audit.
For example, when you activate it on your site, WP Rocket implements the following performance optimization steps automatically:
- Caching, including a separate mobile cache
- Critical image optimization (images above the fold aren’t lazy loaded)
- Automatic lazy rendering
- GZIP compression
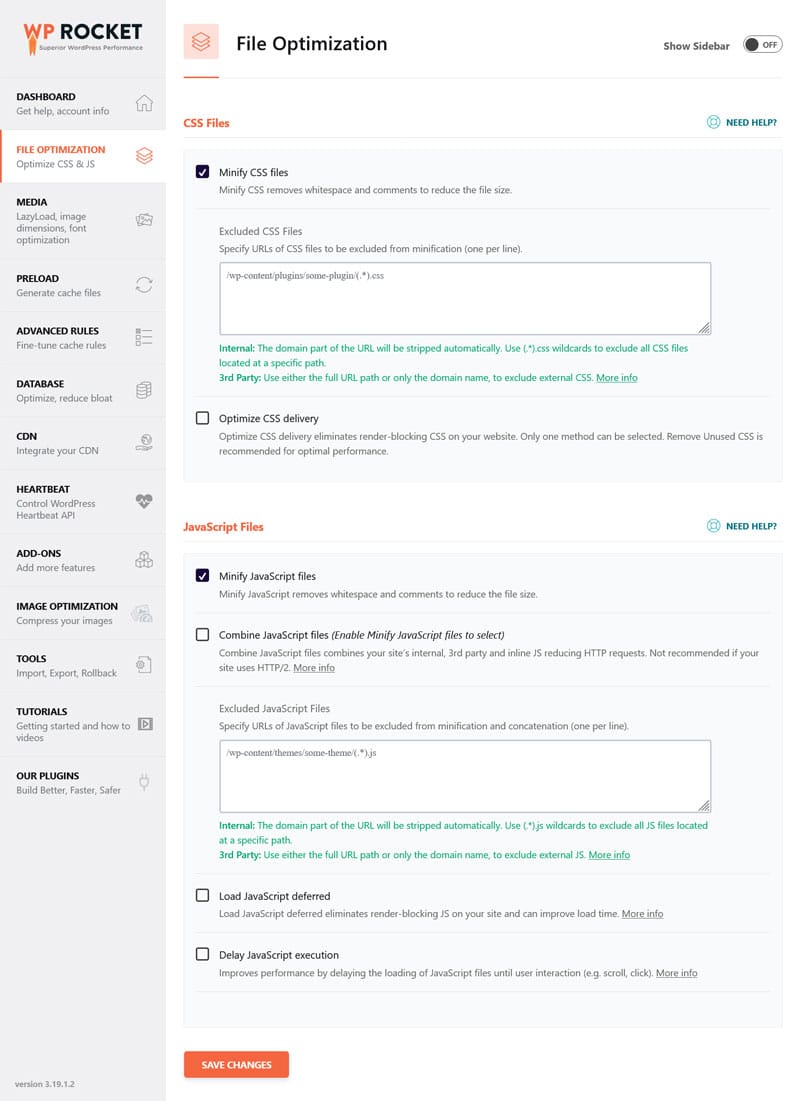
- Minification for CSS and JavaScript files
In fact, just having the plugin active on your site implements 80% of performance best practices and makes your website faster without having to lift a finger.
But that’s not all. You can additionally activate these features to further improve LCP by Subpart:
- Preloading for external files and fonts
- Combining, deferring, and asynchronously loading JavaScript
- Delaying JavaScript execution until the user interacts with the page
- Removing unused CSS
- Lazy loading for images, including CSS backgrounds, videos, and iframes
- Self-hosting Google Fonts
The best part: implementing these is mostly as easy as checking a few boxes.
Want to take it a step further?
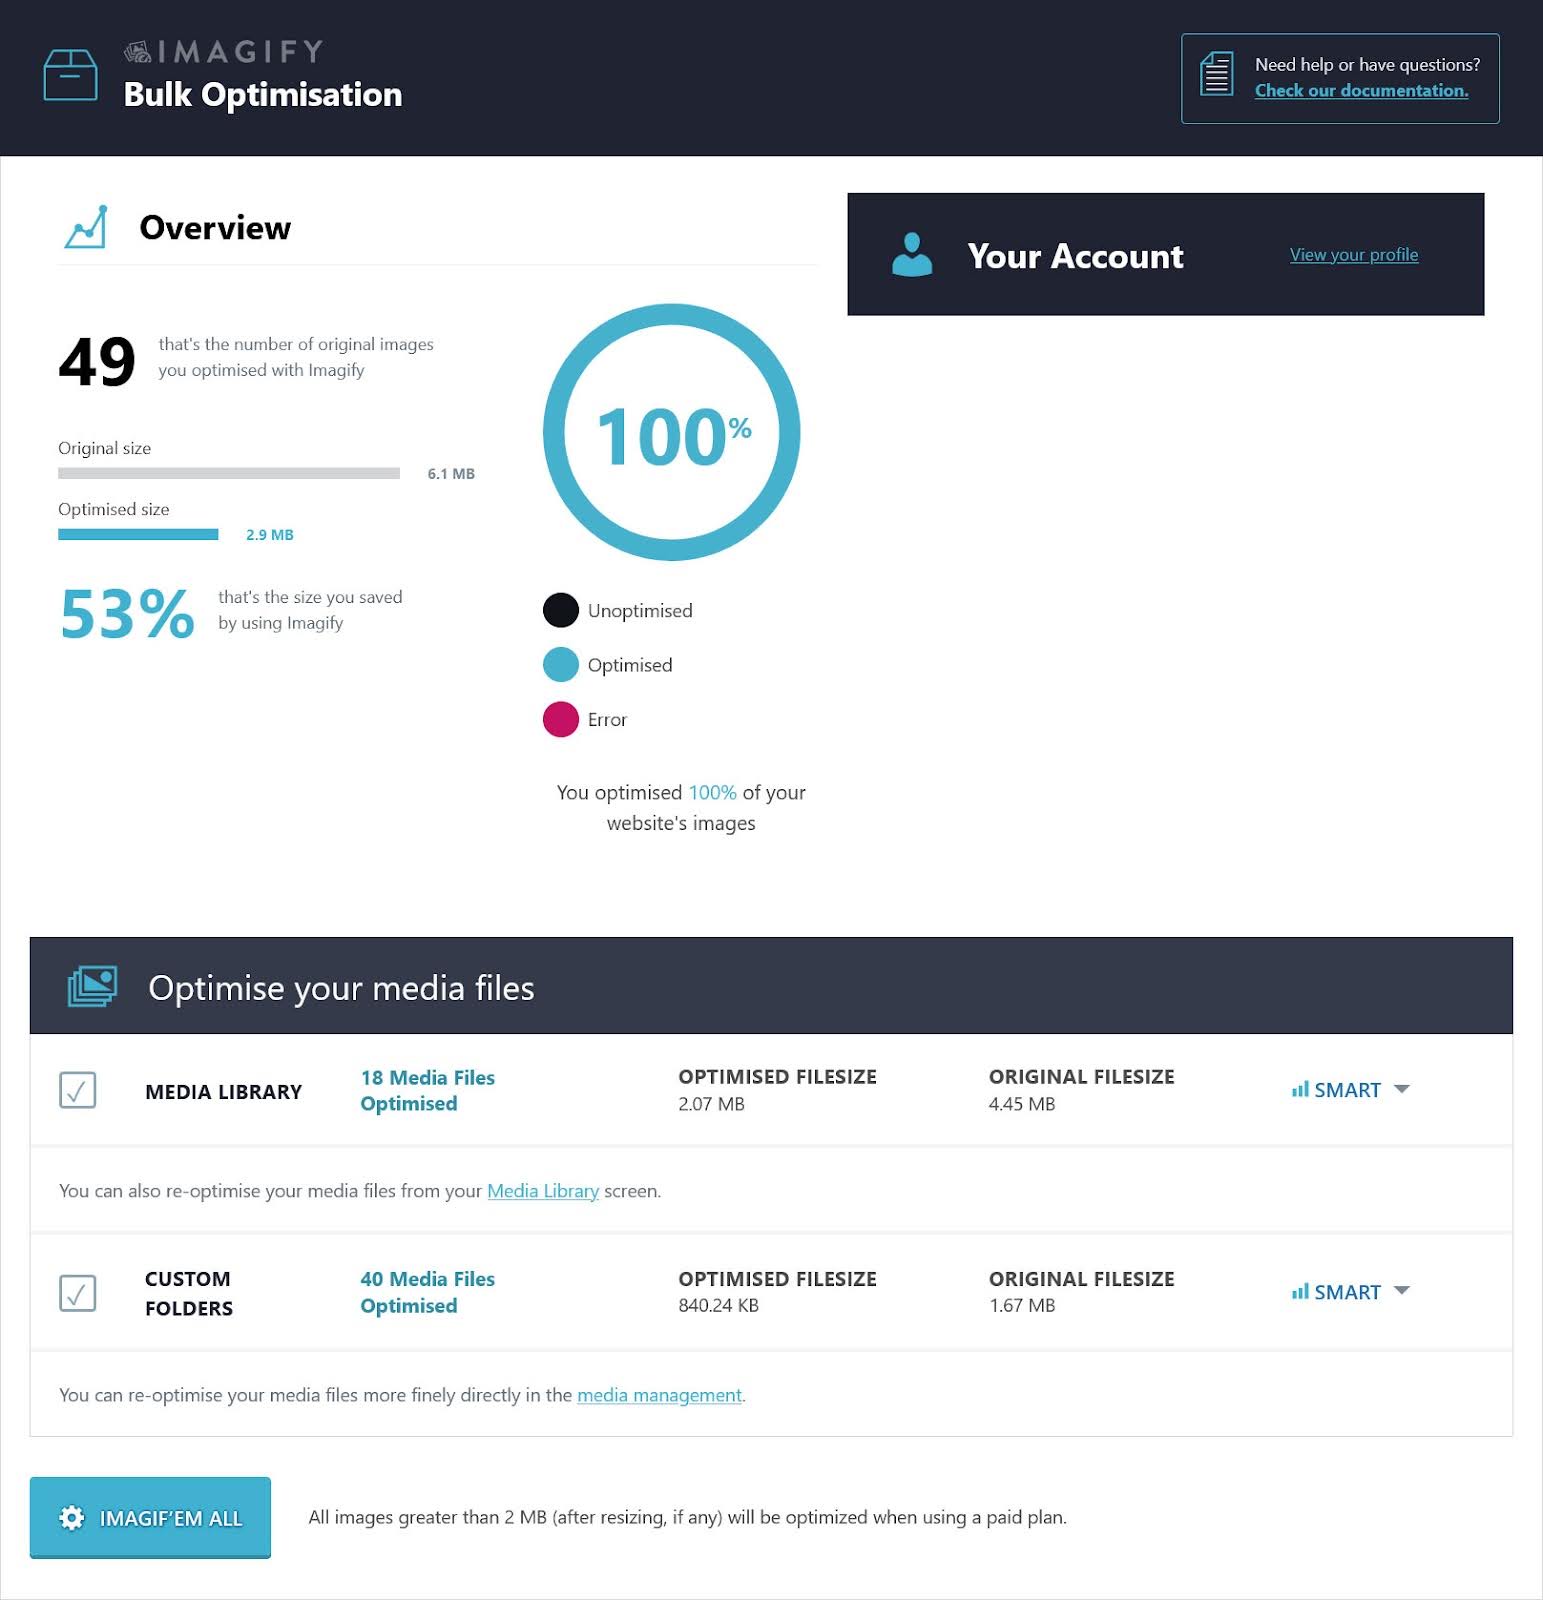
Combine WP Rocket with Imagify to automatically compress, resize, and convert images uploaded to your site to modern image formats — individually or in bulk without loss of quality.
Case Study: Improve LCP Subparts Using WP Rocket
Want to see what kind of impact WP Rocket can have on LCP by Subpart and your site performance? To test it, we set up a demo WordPress site using a default theme and several popular plugins. Then we ran a baseline performance test using PageSpeed Insights.
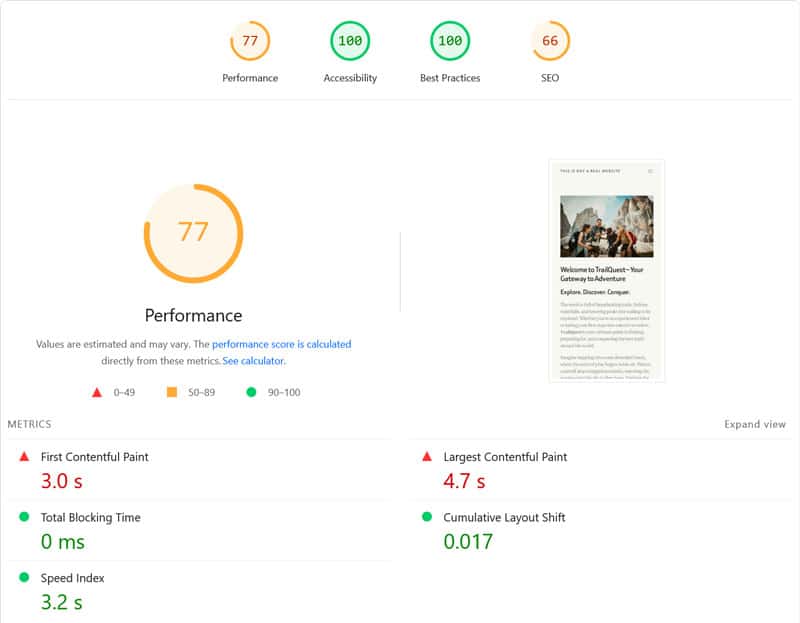
The results were as follows:
| Mobile Performance score | 77 |
| First Contentful Paint | 3.0s |
| Largest Contentful Paint | 4.7s |
| Speed Index | 3.2s |
Next, we enabled WP Rocket. This automatically activates the key optimization techniques mentioned above (caching, critical image optimization, code minification, text compression, etc.). In addition, we turned on the following features:
- Remove unused CSS
- Load JavaScript deferred and delay execution
- Lazy loading for images
- Preloading fonts and self-hosting Google Fonts
After implementing these changes, we re-ran the test on the same page. PageSpeed Insights showed noticeably improvements.
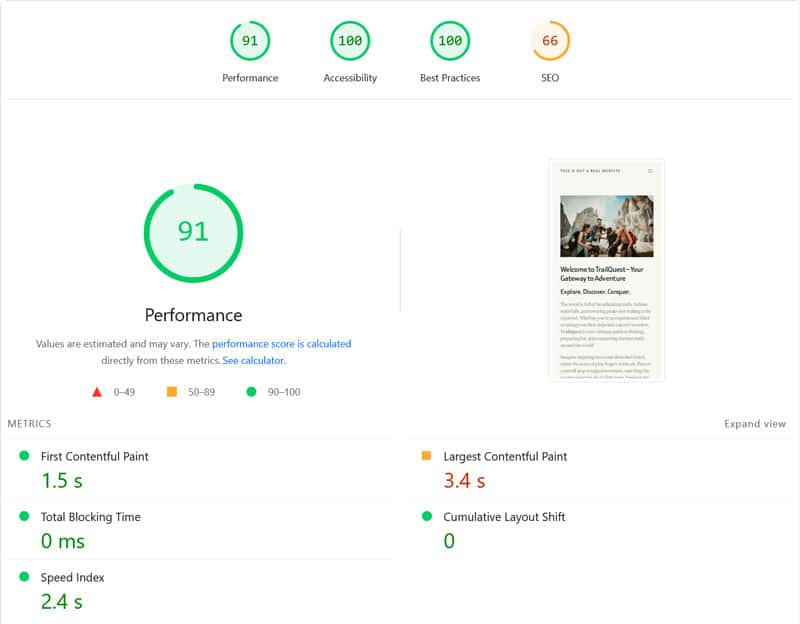
| Mobile Performance score | 91 |
| First Contentful Paint | 1.5s |
| Largest Contentful Paint | 3.4s |
| Speed Index | 2.4s |
That’s quite the improvement for about two minutes of work, don’t you think? Plus, one of the remaining insight suggestions is to improve image delivery by converting visuals on the page to more efficient image formats. That means, in combination with Imagify, the score would be even better.
Optimize LCP by Subpart Now for a Better Website
The LCP by Subpart performance insight gives you detailed information on what’s delaying the LCP Core Web Vital on your website and allows you to take targeted action. Through that, it helps you improve your site’s user experience and performance in search engines.
Above, we have given you a big box of tools to optimize each subpart. Still need help? Try WP Rocket risk-free for 15 days and make optimizing LCP by Subpart as easy as checking a few boxes.