Table of Contents
Last update on
Last update: July 2021
Images are a crucial element of every website: they make posts and pages more interesting and appealing to read, but they can quickly become a burden for your performance and PageSpeed score. Google is always wary and ready to judge your moves when it comes to web performance, and you don’t want to disappoint it, right?
That’s why we’re here to provide you with all the insights about image optimization for WordPress!
You’re going to learn everything about how to resize and compress your images, maintain their quality, and how to choose the best online image optimizers. We’ll dig even deeper recommending a very useful WordPress image optimization plugin, Imagify. Last but not least, you’ll learn how to improve your site’s performance even more through lazy loading.
Ready to start the ball rolling? Let’s go!
Large Images Are One of the Biggest Drains on Load Time
Images are typically one of the biggest (and overlooked) performance issues. Even with caching and a CDN, an unoptimized image will still drag down your page loading time and affect the Largest Contentful Paint score, one of the Core Web Vitals metrics.
But, as the website owner, images are completely under your control. So, if you can get a handle on how to work with and optimize images, you can improve the speed of your site and optimize the Core Web Vitals’ performance.
Based on our experience with WP Rocket customers, we know that one of the most common problems is related to heavy pages, which sometimes come packed with high-resolution pictures, photo widgets, and hefty image sliders.
To give you an idea: images contribute, on average, about 30% of the total page load time. Often this is the single largest factor of the loading time. In extreme cases, it could be closer to 60% of the loading time.
Here’s an example of what un-optimized images will do to your site:
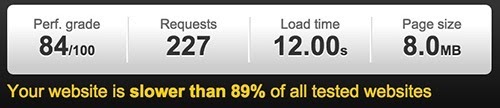
The load time is 12 seconds, and the size of the page is 8MB. Of those 8MB, images account for 6.7MB. This is out of control!
The number of HTTP requests is commonly cited as a factor in load time, and while it is important, ultimately, it’s the page size that is the real indicator of speed or slowness. You can have a small number of HTTP requests, but you will have a problem with your hands if those requests summon giant images.
| 🚀 Reducing page size by reducing image size is a simple and effective strategy for improving load time. And it can be a real game-changer for your WordPress site performance. |
File Size Matters: Why You Should Resize and Compress Images
Understanding image dimensions and file sizes
The dimensions of the image, i.e., how much space on the screen an image takes up, are measured in pixels, and while they do not 100% dictate file size, they are related. The larger the dimensions of your image, the larger the file size.
The file size is measured in kilobytes (KB) and megabytes (MB)
1MB = 1000KB
To give you a point of reference, the main content column of this blog is 796 pixels wide.
If you take a photo with your smartphone, depending on your settings, that photo could be in the region of 2500 pixels wide (or even more) with a file size of 3MB (or 3000KB). If I were to take a photo with my phone and upload it to this blog without any editing, I’m going to be uploading a file that is about 3 times as big as it needs to be – a total waste of resources and a drag on page load.
So while snapping phone pics and uploading to your blog might be simple, it creates a real problem if you want a fast site by adding tons of unnecessary weight.
Before you upload that photo, you need to do two things: resize it and compress it. Here’s how.
How to Resize Images Online
So the first thing you need to do is resize your images to the correct size for your site. For blog images, figure out how wide your blog’s content area is, and never upload an image wider than that. If it’s going to be used in a slider, make sure you first determine the slider’s dimensions.
How Do You Know How Wide Your Content Area Is?
If you know how to use the developer tools built into Chrome or Firefox, you can use that. But if that sounds scary, there are simpler tools available.
If you’re on a Mac, there is a screen capture tool, Grab, already built-in, and when you outline an area on the screen, it will tell you the pixels.
Or you can install the easy Page Ruler add-on for Chrome.
Once you’ve figured out what dimensions your images should be, you can use any of the below tools to resize your images accordingly:
Resizing Applications and Tools
- Photoshop
- GIMP – free, Windows & Mac
- Irfan View- free for Windows
- Preview for Mac – it’s already installed!
- Developers on Macs can check out sips, a command-line tool
Online Tools for Resizing
- Picmonkey.com
- Pixlr.com (also has a mobile app)
- Fotor.com (also has a mobile app)
It doesn’t matter which one you use – all you need to do is locate the resize feature. You’ll be able to enter the desired pixel width, and the application will make sure the image stays in proportion by adjusting the height automatically.
Common Image Formats
Images on the web should be saved in either .jpg, .png, or possibly .gif
- JPEGs are best used for photographs and general-purpose images where you do not need any transparency. You can compress them easily and get a smaller file size suitable for the web.
- PNGs will often generate a larger file size, so they should only be used when you have an image that requires transparency.
- GIFs are less frequently used. They have a limited range of colors, so they can only be used for very simple images but can produce a small file size.
| 💡 Performance tip: you should convert your images to the WebP format to make them load faster. WordPress doesn’t support WebP, and you can’t just upload them — but you can use a plugin and easily reduce your images’ size. |
How to Compress Images On the Web
So we’ve dealt with the image’s physical dimensions, now let’s deal with the ‘weight’ of the image. We want to compress the image to make it as lean and fast-loading as possible. The goal is to reduce the file size. There isn’t a magic number as to what each image should be since it depends on how it will be used. Images being used in a hero banner or slider will be bigger, but I’d aim to get each one down to 100KB or less if you have a few of them.
Small images that will be used for thumbnails, logos, etc., will be much smaller. The logo at the top of this blog, for example, is 3.8KB.
There may be a slight loss in quality with compression, so you’re looking for a balance between quality and file size. But always remember: the smaller the file size, the faster the load time will be.
Applications to Compress Images
- Photoshop – make sure to use the Save For Web option
- GIMP
- ImageOptim (Mac)
Online Tools
Using professional image optimization tools like Photoshop or Gimp is indeed a very effective way to manage your images and prepare them for the web: but the learning curve of these tools can sometimes be overwhelming.
Most of the time, leaning towards an online image optimization tool is the best and most affordable choice.
A WordPress Plugin that Makes Your Life Easier
The cons of most online image optimization tools are that you don’t have full control of your images after they’re optimized. After you download your optimized images, you’ll have to sort them on your folders manually.
Moreover, some online tools don’t clarify how your images are stored on their servers and for how long: not so cool!
More natural will be to optimize and store your images right inside the Media files of your WordPress site, right?
In fact, it’s preferable to resize and compress your image before you upload it to WordPress.
On the other hand, if your site is already live, you will need to deal with the images that are already there.
For the crucial images such as logos, headers, and others that load on every page of your site, it would be best to make new versions of the images, then install the Enable Media Replace plugin. This will allow you to simply replace existing images in your media library with the new, optimized ones without breaking any links.
For the other images sitting in your media library, where it would be unrealistic to go through and fix them all individually, you can take a look at the best image optimization plugins for WordPress.
Let’s take a closer look at one of them, Imagify.
Lighter Images for a Faster Website with Imagify

Opting for a WordPress plugin instead of an online image optimization tool will save you a lot of time. Once installed, a good optimization plugin usually works autonomously, avoiding manual tweaks. Your images should be optimized upon upload and always be ready for when you decide to add them to a post or a page.
One of the most complete image optimization plugins for WordPress is Imagify: it’s developed by WP Media, the same company behind WP Rocket. So, if you already know and love our caching solution, you won’t be surprised by the same simplicity and usability we also poured into Imagify.
All your jpg, png, and gif files will always be in perfect shape and ready to be uploaded on your pages with this tool! You can also convert your images to the Avif format and improve performance, or let the plugin automatically convert them to WebP.
Because images greatly impact load times, a compression tool is the perfect complement to a caching plugin. We offer the Smart Compression mode to help you gain real control over your load time performance by automatically balancing quality and performance.
Imagify can optimize your existing media library in bulk, or you can manually select which images to optimize.
If you build sites for clients or have a site with multiple users where you cannot ensure that everyone is using best practices and uploading nicely optimized images, Imagify can assist by automatically compressing and resizing multiple images as they are uploaded.
Lazy Loading to Make Your Images Faster
Compressing and resizing your images are crucial actions to take before uploading your files to your site.
But what happens after optimized images are uploaded? Is there still a margin of improvement in terms of performance?
How can you gain a little more speed and make your pages load faster, even when they have to host several images?
Finding a technique that can save even a few extra milliseconds of waiting for your users could be key. Remember that when we browse between websites, we all tend to be impatient and almost never perceive the real loading time of the site we’re visiting.
The answer, in this case, is one: apply a lazy load script to your images.
The Lazy-Loading Script
The answer is the lazy-loading script. This is a beneficial technique that defers the loading of offscreen images, considered as non-critical resources, and leaves them ”off-screen” until the user needs them. If users don’t scroll the page, images placed at the bottom won’t be loaded.
You can see lazy-loading in action on several popular blogs or websites; let’s take, for example, Unsplash.com: when you scroll their collection of pictures, you’ll see the placeholders getting replaced by the high-res original photo.
Applying the Lazy-Loading Through WP Rocket
The lazy-load script can be added programmatically: there are several possible techniques to achieve that if you can tweak the code. Google Guides for developers, for example, give a good overview of the different methods.
But since you’re using WordPress, a plugin will come to the rescue, allowing you to lazy-load your images without touching the code. For instance, you can take a look at the best lazy loading plugins for WordPress.
However, if you’re already using WP Rocket, we have good news for you: our cache plugin includes the LazyLoad feature, which, once enabled, applies the lazy-loading behavior to your images.
| 📖 If you want to learn more about lazy loading, check out our article: How to Lazy Load Images on WordPress. You’ll learn how lazy loading works and how you can make the most of it. |
Optimized Images With WP Media Plugins
Since its beginning, WP Media has developed plugins for WordPress following three basic principles: simplicity, usability, and speed.
Our plugins are easy to use, have a clean design, and don’t require complex configuration processes: WP Rocket, our premium cache plugin for WordPress, was the first to be launched, and since then, has gained thousands of users around the world.
Its caching system has boosted millions of pages on the Internet, and its lazy load script is helping image-rich web pages to load straightforwardly.
You can also find a free stand-alone Lazy Load plugin, which is based on the same script used by WP Rocket.
We launched Imagify aiming to make the Internet a lighter place. Imagify is wholly devoted to image optimization, and it’s been recognized as one of the best optimization tools for images. You can use its web application, download it as a free plugin for WordPress or buy an extra quota if you need to optimize many MBs of images.
We’re striving to make the web a more sustainable place with our products, with faster web pages thanks to caching and optimized images: learn more about WP Rocket and Imagify!