
10 Proven Ways To Improve First Contentful Paint (FCP) in WordPress
Table of Contents
In early 2019, Google announced that they would evaluate a website’s speed ranking by focusing on two performance metrics: First Contentful Paint (FCP) and First Input Delay (FID).
Over time, the performance scenario has evolved. Google announced the three Core Web Vitals: Largest Contentful Paint (LCP), Cumulative Layout Shift (CLS), and First Input Delay (FID).
Nonetheless, the First Contentful Paint metric has continued to play an important role as a Lighthouse (and user experience) metric. It accounts for 10% of the overall performance score.
Your website may load under 2 seconds in a speed test, but if that’s not the case for a majority of your audience, then Google will still penalize you.
In this article, you’ll learn what’s First Contentful Paint and why it’s important. Next, we’ll move on to various ways you can improve your First Contentful Paint grade on WordPress and reduce its loading time.
Sounds exciting? Let’s dive in!
What is First Contentful Paint (FCP)?
First Contentful Paint (FCP) is a user-centric metric for measuring perceived page load speed. FCP measures how users perceive the performance of a website, rather than what a speed test tool measures.
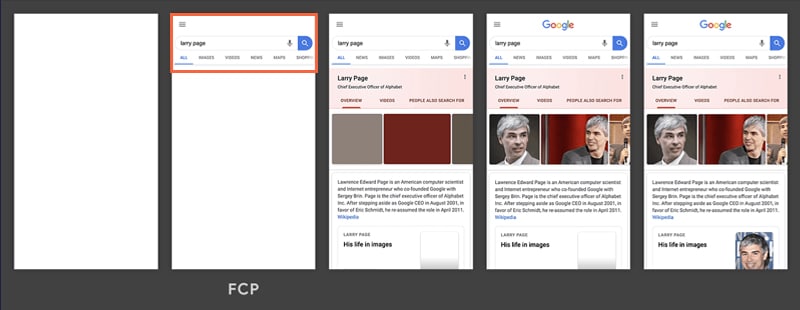
First Contentful Paint differs from First Paint, which is a point in the page load timeline where any type of render is detected on the browser. On the other hand, FCP requires some content to be rendered. This content could be text, images (including background images, logos), or non-white <canvas> elements.
First Contentful Paint also differs from the Largest Contentful Pain (LCP), one of the Core Web Vitals measuring how long it takes for the largest element to become visible in the viewport.
To keep it simple, you can think of FCP as the time it takes for the user to see any content on their browser. Thus, a fast FCP reassures the user that something is happening and keeps them glued to the site.
How to Measure First Contentful Paint (FCP)
First Contentful Paint can be measured through lab tests and real usage experience (field data). Here are a few tools you can use to measure FCP:
- Lighthouse
- WebPageTest
- Chrome DevTools
- PageSpeed Insights
- Chrome User Experience Report
- Firebase Performance Monitoring (beta)
Google measures the 75th percentile of page loads on your site, segmented across both mobile and desktop devices. This ensures that it’s an accurate representation of the user experience.
| 🚀 Want to know more about Lighthouse? Read our article on how to improve your performance score (including the FCP grade)! |
What’s a Good First Contentful Paint Score?
As per Google, First Contentful Paint should occur within 1.8 seconds or less. This provides a good user experience to your site’s visitors.
If your site’s FCP takes 3+ seconds, it’s considered slow. According to research, over 53% of mobile users leave a site if it takes 3+ seconds to load. Take this metric seriously.
How To Improve First Contentful Paint (FCP) Time in WordPress
We’ve tackled what FCP is and why it’s important. Here are 10 ways to improve First Contentful Paint on your WordPress site and fix a bad score. The goal is to reduce the First Contentful Paint time to less than 1.8 seconds:
- Reduce Server Response Time (TTFB)
- Eliminate Render-Blocking Resources
- Generate Critical Path CSS and Inline It
- Avoid Script-Based Elements Above-the-Fold
- Avoid Lazy Loading Above-the-Fold Images
- Inline essential images
- Optimize Your Site’s DOM Size
- Ensure Text Remains Visible During Webfont Load
- Use Resource Hints
- Avoid Multiple Page Redirects
Let’s see each of these actions in detail.
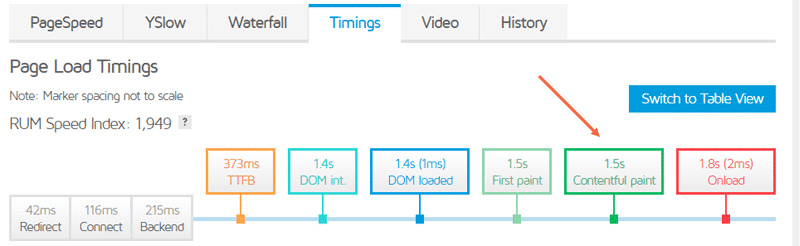
1. Reduce Server Response Time (TTFB)
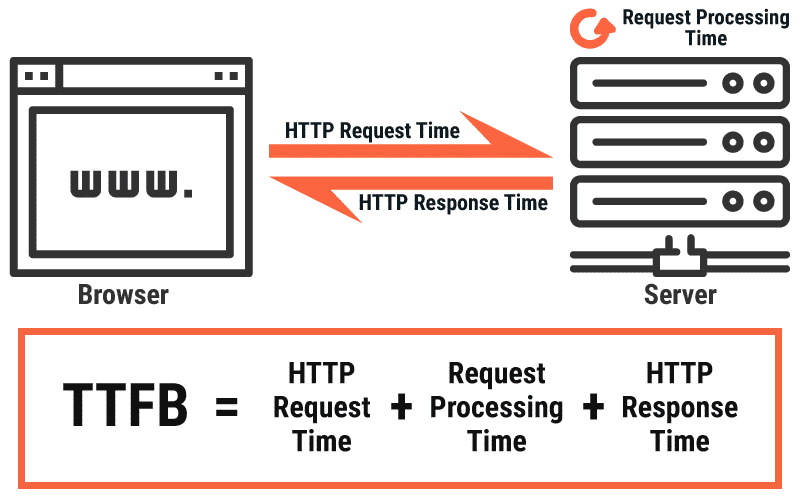
Server response time or Time to First Byte (TTFB) is the time taken by a browser to receive the first byte of webpage content.
FCP depends on more than just TTFB, but it’s the first step to get there.
FCP = TTFB + Content Load Time + Render Time
Since FCP is highly dependent on TTFB, it’s the most important factor you need to optimize to improve First Contentful Paint.
There are many ways to reduce TTFB in WordPress. As detailed in the article, the three easiest ways to reduce TTFB are:
Choose a Fast Hosting Provider
You can refer to WP Rocket’s article on web hosting to know the factors you need to consider to choose a great web hosting solution. Ideally, choose a host with servers that are located close to your users.
Use a Quality CDN
A quality CDN can help speed up delivering your site’s static resources like images, videos, and scripts. This will significantly reduce the network latency between your server and your users. For more on how to pick the best CDN for your website, check out WP Rocket’s CDN guide.
Enable Caching for Your Website
Caching helps with reducing TTFB by decreasing the server processing time. Most of the top managed WordPress hosting providers have server-level caching enabled, so check with them to see what they offer.
If you want to go further, WP Rocket integrates with WordPress on all types of hosts to speed up your site.
2. Eliminate Render-Blocking Resources
A webpage is rendered by the browser after putting together many elements such as HTML, CSS stylesheets, JavaScript scripts, and HTML imports.
An HTML document itself includes various tags, but they’re all parsed swiftly by most browsers. But that’s not the case with parsing CSS and JS.
Typically, the browser will try to download all the webpage elements first, parse them all, and then render the webpage. More often than not, the size of HTML documents is way less compared to that of CSS stylesheets and JS scripts. The number of CSS and JS resources is also usually on the higher side.
So, when the user requests for a webpage, the browser would’ve received the HTML content already, but will still be waiting for all the other resources to be loaded before rendering the page. As a result, they’re called render-blocking resources.
This behavior reduces the FCP considerably. Hence, to improve FCP, you need to eliminate these render-blocking resources. You can do this through the following ways:
Inline Critical Resources
First, identify critical scripts and styles that are necessary to render the FCP of your webpage. Here’s a simple guide by Google on how to identify critical resources.
Once you’ve identified the critical scripts, you need to remove them from the render-blocking resource and then inline them inside your HTML page with <script> and <style> tags.
By doing this, you’ll ensure that the webpage will have everything it needs to handle its core functionality when it loads.
Defer Non-Critical Resources
For non-critical resources, you need to mark the URLs with async or defer attributes.
It’s recommended that you add the defer attribute to the URLs of non-critical scripts. This directs the browser to execute the script file only after the HTML document has been completely parsed.
Here’s how you can defer a script file:
<script defer src="/path/to/file/script.js">
</script>
For non-critical stylesheets, it’s recommended that you have an async attribute added to their URL. This tells the browser to load the styles asynchronously while the rest of the page elements continue loading uninterrupted.
Since stylesheets are loaded with the <link> tag, there’s no direct way to apply the async attribute to them. But there’s a workaround and here’s how you can implement it:
<!-- Setting “media” type as ‘print’ forces the browser to load the stylesheet asynchronously.
On full page load, the media type is changed to ‘all’ so that the stylesheet gets applied. -->
 <link rel="stylesheet" href="style.css" media="print" onload="this.media='all'">
 <!-- Fallback for when JavaScript is disabled, but in this case CSS can’t be loaded asynchronously. -->
 <noscript><link rel="stylesheet" href="style.css"></noscript>
Remove Anything Unused
While identifying critical resources, you may find code that isn’t being used on the webpage. Removing any unused code – such as removing unused JavaScript – will help you optimize your webpage even more.
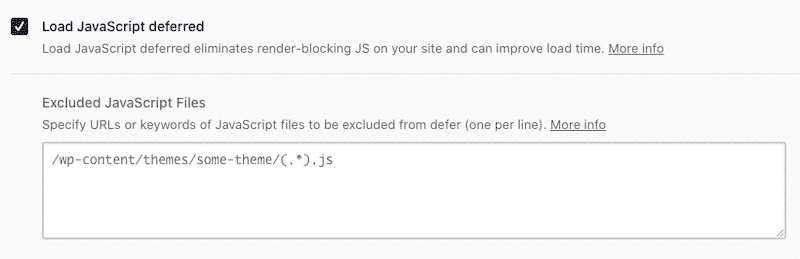
If you’re not comfortable handling code, WP Rocket is the easiest way to defer non-critical JavaScript files with just a few clicks.
You can also optimize CSS delivery with WP Rocket to remove render-blocking stylesheets. The next point covers this feature.
3. Generate Critical Path CSS and Inline It
If you’ve set CSS to load asynchronously, the browser will show unstyled content to the users before the required styles are loaded. This behavior is known as Flash of Unstyled Content (FOUC) and is an unpleasant experience for the users.
To prevent FOUC, you need to generate Critical Path CSS and inline it directly inside your HTML file.
But what exactly is Critical Path CSS?
Critical Path CSS is the bare minimum CSS necessary to display the first part of a web page (above-the-fold) to the user.
Analyzing the browser’s critical rendering path manually and then generating Critical Path CSS is a tedious process. It’s beyond the scope of this article.
However, you can use free online tools like Pegasaas to generate Critical Path CSS. It works perfectly for most use cases. Check out Google’s Analyzing Critical Rendering Path Performance for more.
Once you’ve generated the Critical Path CSS, you need to inline it inside the HTML document. The browser can now immediately render the first part of the webpage without waiting for the CSS stylesheets to be loaded asynchronously. This improves the FCP considerably.
Alternatively, you can use WP Rocket to automate this process and remove the unused CSS.
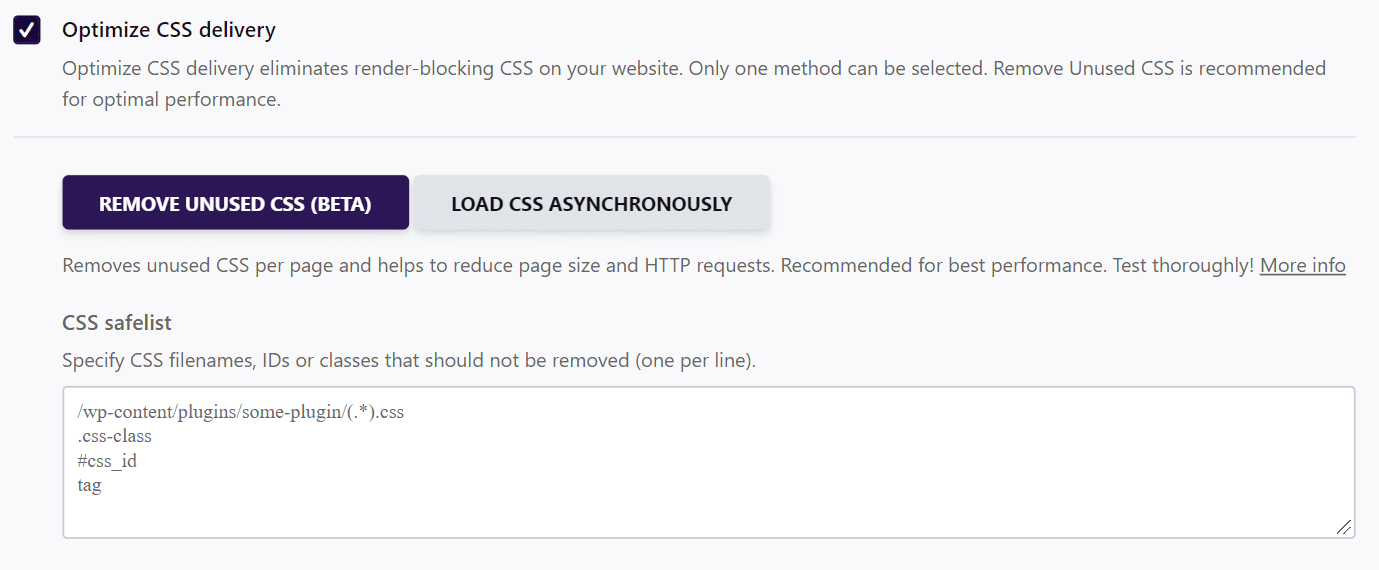
Enabling the Optimize CSS Delivery setting in WP Rocket will generate Critical Path CSS for all your WordPress page types and inline them. And if you happen to make any customizations or change your theme, it’ll automatically update the Critical Path CSS too.
For more details, you can read how WP Rocket handles Critical CSS.
4. Avoid Script-Based Elements Above-the-Fold
No matter how well you optimize JavaScript, it’s still slower compared to processing plain HTML. Anything that requires JS can have a negative impact on FCP.
While you can inline critical scripts, they still need to be loaded and parsed. When it comes to improving FCP, every millisecond counts. That’s precious load time harming your FCP score.
Many themes include fancy elements above-the-fold that use a lot of scripts. The same holds true for using Page Builders that add a lot of unnecessary styles and scripts. Hence, choose your site’s theme wisely. Using a well-coded, fast theme like GeneratePress or Astra can help reduce First Contentful Paint time considerably.
As a general rule, try to avoid using these elements above-the-fold in your website:
- Heavy animations of any kind
- Slider plugins
- Social media or sharing plugins
- Mega menu plugins
- Embeds like Google Ads
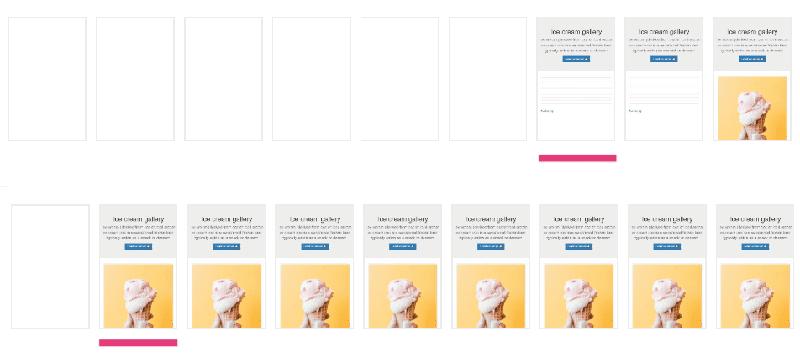
5. Avoid Lazy Loading Above-the-Fold Images
Lazy loading images is one of the easiest ways to speed up your website, especially if you have an image-heavy site.
Technically, lazy loading is a script that defers the loading of images and frames that aren’t visible in the browser’s viewport yet. When the user scrolls down, the images will load as they come into view.
Since lazy loading requires the use of JavaScript before the browser can render any images, it can delay your FCP.
Hence, you need to exclude images present above the fold from lazy loading.
Most of the popular lazy loading plugins already include this feature. Ideally, look for a lazy loading plugin that lets you exclude images not just by filenames, but also other tags such as class, id, attribute, or images from a specific domain.
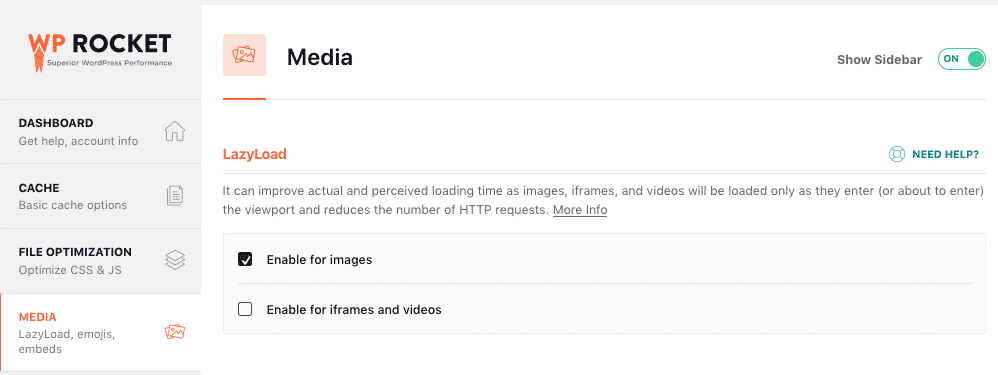
WP Rocket supports disabling lazy loading on specific images. You can disable it for an image, an image class, by an image source, and even avatars.
Note: Lazy loading of images has been added to WordPress core and will become a native feature from WordPress 5.5 onwards. It also supports filters to customize the lazy loading behavior.
6. Inline Essential Images
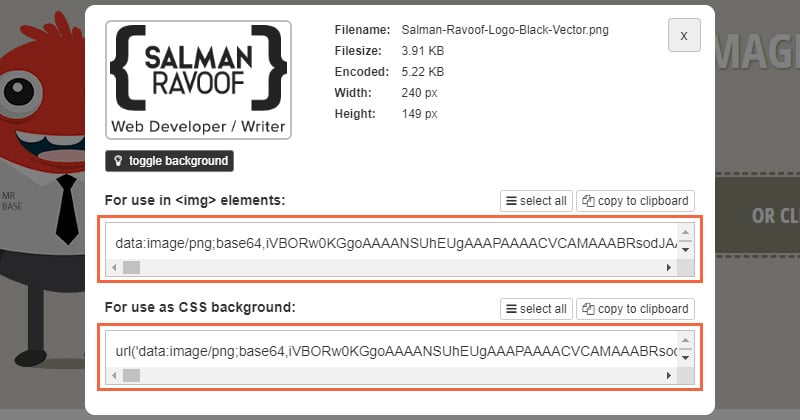
HTML and CSS provide a way for you to inline images by using Base64 or SVG formats. These are called Data URIs.
By inlining all the above-the-fold images, the browser doesn’t have to make extra HTTP requests to download them. This can help with improving the FCP.

Some of the most common above-the-fold images that you can inline are:
- Logo
- Icons (search, social media, etc.)
- Banner image
- Background
What are Base64 and SVG Images?
Base64 is an encoding algorithm that converts any type of data, including images, to text. You can embed Base64 encoded images directly into HTML or CSS files. It’s a great way to speed up load times for smaller images.
Base64 Image Encoder is an excellent free tool to convert any image format to Base64. It supports JPEG, PNG, WebP, SVG, and BMP image formats.
Adding Base64 encoded images in HTML:
<img src="data:image/jpeg;base64,/uj/…[content]..." width="100" height="50" alt="this is a base64 image">You can also use Base64 encoded images in CSS:
.custom-class {
    background: url('data:image/jpeg;base64,/9j/…[content]...');
}
Scalable Vector Graphics (SVG) is an image format for vector graphics. SVG images have smaller file sizes, scale to any size without losing quality, and look great on all devices. If your image has simple shapes, curves, and outlines (e.g., logos and icons), then it can almost certainly be saved as an SVG.
Note: Using an SVG image as a source inside an <img> tag differs from inlining an SVG image directly via <svg> tag.
Here’s how you can inline SVGs in HTML:
<body>
  <!-- Insert SVG code here, and the image will show up! -->
    <svg xmlns="http://www.w3.org/2000/svg">
        <circle cx='50' cy='25' r='20'/>
    </svg>
</body>
It’s a good idea to compress or minify (if SVG) your images before inlining them. If your images are in raster format (JPEG or PNG), use Base64. If they can be converted to vector format, then use SVG.
Anywhere you can use a URL as a source for the image, you can paste in the Base64 encoded image there.
If any images or icons are hardcoded inside your theme or plugins, you need to find them manually and replace their source URLs with inlined images. A plugin like Search & Replace can help you get this done easily.
There are several disadvantages of inlining images:
- It increases the size of the images (typically by 30%).
- It increases the page size, and thus the TTFB.
- Inlined images cannot be delivered via CDN.
In my experience, if you can keep the page size below 100 KB, inlining images is not much of a concern. Anything beyond that may affect your TTFB, and thus harm your FCP more than it improves.
Also, if you’re using something like Cloudflare to serve your website, you can configure it to cache HTML resources. Enabling this feature is recommended if and only if your site’s content is mostly static.
7. Optimize Your Site’s DOM Size
The Document Object Model (DOM) is a representation of all the objects that make up a webpage. Graphically, it’s represented as a tree with branching nodes and objects.
The DOM’s structured representation makes it easy to modify its elements with a scripting language like JavaScript.
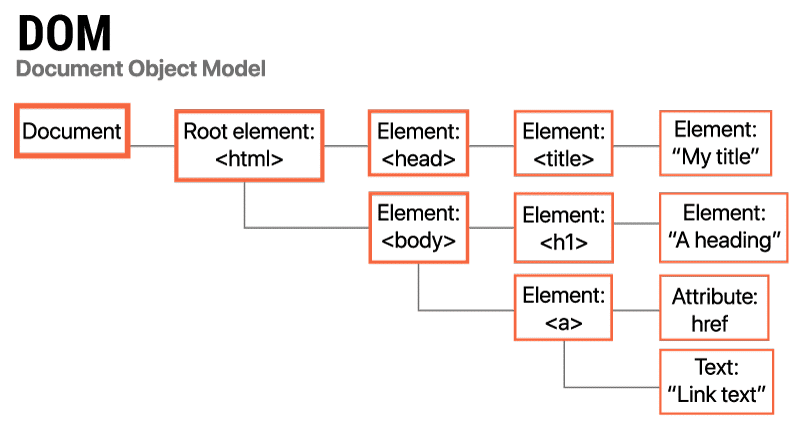
All the HTML elements in a DOM tree are called nodes. The nodes can branch out into multiple elements, all of which can further branch out, and so on. How deep they branch out is called the node depth. The node depth of the entire DOM tree is called tree depth. All the immediate branching elements of a node are called child elements.
Having a large DOM tree can negatively impact your FCP due to many reasons:
- An unoptimized DOM tree includes many nodes that aren’t visible to the user during the initial stages of page load.
- A large DOM size means more processing time is required to compute and style all the nodes, both of which can slow down rendering.
- A large DOM tree can also overwhelm the memory performance of your user’s devices.

Google flags webpages with DOM trees that have:
- More than 1,500 nodes in total
- Greater than 32 node depth
- A parent node with 60+ child nodes
How to Reduce DOM Size?
In general, you need to create DOM nodes only when needed and destroy nodes that aren’t needed. However, this tip doesn’t apply to most WordPress sites as creating the DOM is usually taken care of by themes, plugins, page builders, and the WordPress core itself.
Here are several tips to help you reduce DOM size:
- Split up large pages into smaller ones.
- Lazy load as many HTML elements as possible, and not just images.
- Paginate comments, posts, products, etc.
- Limit the number of posts shown on your homepage and archive pages.
- Don’t hide unwanted content using CSS. Instead, remove it altogether.
- Avoid using bloated page builders that insert needless <div> tags.
- Choose well-optimized themes (e.g., GeneratePress or Astra).
Don’t use plugins that add too many <div> tags (e.g., Mega menu plugins).
8. Ensure Text Remains Visible During Webfont Load
Fonts are usually large files and take a lot of time to load. You may have come across an error like this in Lighthouse:
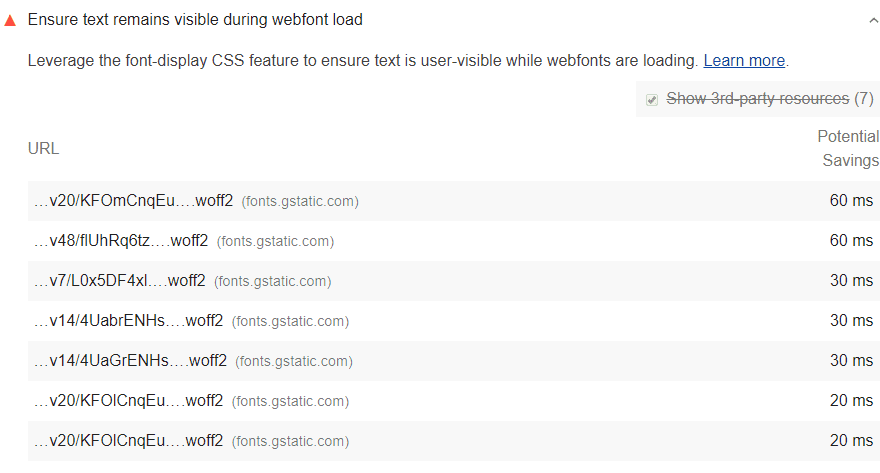
There’s a reason why Google flags this behavior. Some browsers won’t render text until all the fonts are loaded. This causes what’s known as Flash of Invisible Text (FOIT).
You can fix this by forcing the browser to temporarily show a system font while the custom fonts load. Just add font-display: swap in your @font-face style to avoid FOIT in almost all modern browsers.
Here’s an example of how you can apply this:
@font-face {
  font-family: 'Pacifico';
  font-style: normal;
  font-weight: 400;
  src: local('Pacifico Regular'), local('Pacifico-Regular'), url(https://fonts.sample.com/pacifico.woff2) format('woff2');
  font-display: swap;
}
If you’re importing fonts directly from a CDN (e.g., Google Fonts), then you can achieve the same by appending the &display=swap parameter to the end of the URL.
<link href="https://fonts.googleapis.com/css?family=Roboto:400,700&display=swap" rel="stylesheet">9. Use Resource Hints
When a user visits a website, the browser requests the HTML document from the server, parses it, submits separate requests for any other referenced resources, and after loading and parsing them all, renders the web page.
As a developer, you know which resources are the most important for your site. With this knowledge, you can set those critical resources to load ahead of time and speed up the page load. Browser Resource Hints are how you can achieve that.
Some resource hints apply to resources on the current page, while others apply to possible future pages. All resource hints use the rel attribute of the <link> tag to activate.
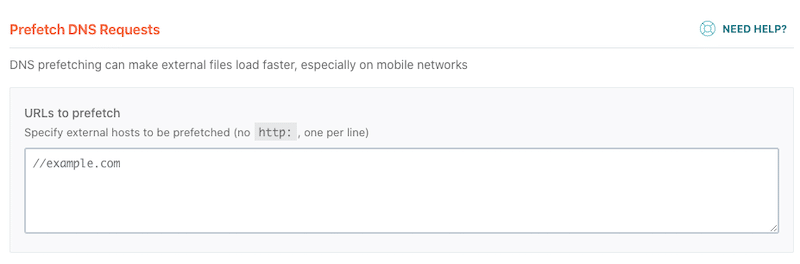
DNS Prefetching
If you’re loading any asset from an external website, adding the dns-prefetch parameter will tell the browser to resolve the DNS of the URL as quickly as possible.
Here’s how you add DNS prefetch to resources:
<link rel="dns-prefetch" href="//external-website.com">WP Rocket makes it easy to add all the external domains to the prefetched.
If you’re using a lot of code from third parties, adding the dns-prefetch parameter is very helpful to speed up page load. You can use the free Prefetch! online tool to find out which external domains you can add to the prefetch list. (Plus, read how to reduce the impact of third-party scripts on WordPress)
Preconnect
Preconnect works much like DNS prefetching, except it doesn’t stop at just resolving the DNS. It’ll also go ahead and establish the TCP handshake and TLS negotiation (if any).
It can be used like this:
<link rel="preconnect" href="https://example.com">
Bear in mind that preconnect can take up valuable processing time, especially for secure connections.
Prefetch
If you’re certain that a resource will be used in the future, then you can suggest the browser to prefetch it right away and store it in the browser. Unlike DNS prefetching, here you’re telling the browser to start loading the resource immediately.
Here’s how you can direct the browser to prefetch a resource:
<link rel="prefetch" href="scripts.js">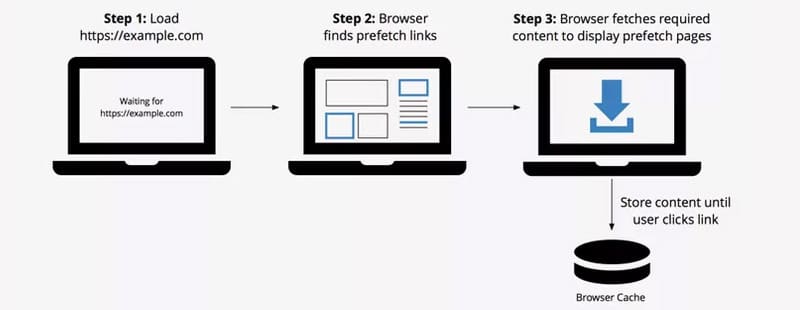
Prefetching can be ignored by the browser if the file requested is too large or the network speed is slow. For example, Firefox prefetches resources only when the browser is idle.
Prerender
This is the most powerful resource hint. Adding the prerender parameter to a resource forces the browser to load all its assets, parse them, create a DOM tree, apply styles, execute scripts, render the webpage, and keep it ready to be served. If you visit the URL mentioned in the href later, the page will be loaded instantly.
This is how you prerender a resource:
<link rel="prerender" href="https://example.com/next-page">Prerendering your main landing page is a great way to drive up conversions.
Preload
Unlike prefetching, which acts more like a suggestion to the browser, the preload resource hint directs the browser to load the assets regardless of what it thinks. The browser cannot ignore the preloading directive.
<head>
  ...
  <link rel="preload" href="styles.css" as="style">
  <link rel="preload" href="ui.js" as="script">
  ...
</head>
The earlier the browser starts to request the declared preload links, the faster your pages can load.
Resource hints won’t help much when a user visits your website for the first time. But every subsequent page they visit will render significantly faster. Since Google uses real usage data to evaluate a website’s speed ranking, resource hints will help improve your site’s FCP.
With WP Rocket, you can apply preloading and DNS prefetching to any resource on your webpages quite easily. Alternatively, you can also use a free plugin like Pre* Party Resource Hints to enable resource hints manually on your WordPress site.
10. Avoid Multiple Page Redirects
When you visit a URL that has been redirected to another URL, the server will return an HTTP 301 redirect status code response. It’ll look something like this in your browser’s console:
HTTP/1.1 301 Moved Permanently
Location: /url/to/new/location
A redirect response forces the browser to make another HTTP request to the new location. Usually, this delays the loading of the webpage by hundreds of milliseconds.
If your page has more than one redirect, it can slow down your FCP considerably.
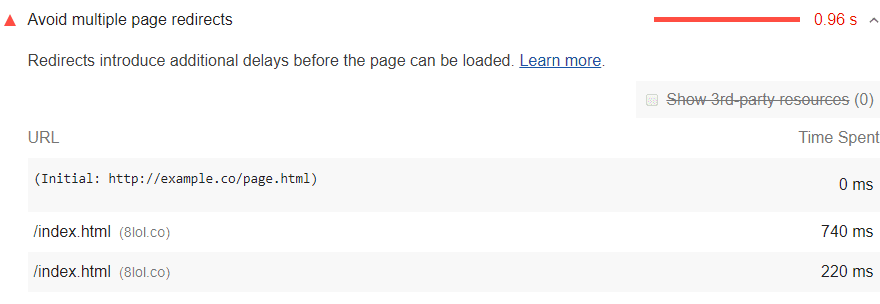
Lighthouse flags pages that have two or more redirects.
To avoid multiple redirects, point the flagged resources directly to the final destination. Furthermore, if a resource is part of your page’s Critical Rendering Path, then eliminate any redirects originating from it altogether.
Wrapping Up
Improving First Contentful Paint and reducing its time is no longer a choice but a necessity. Alongside the three Core Web Vitals metrics, a faster FCP leads to a better user experience and improves your PageSpeed score.
And better things are coming soon! Google is planning to introduce another user-centric performance metric called First Meaningful Paint (FMP). While FCP measures the render time for any content (e.g., logos, taglines, background images), FMP will be triggered only after content desired by the user is loaded (e.g., headlines, cover images, body text). FMP hasn’t been standardized yet, but you can learn more about it here.
In this post, you learned how to improve First Contentful Paint in WordPress by using various techniques. Sometimes, it can be overwhelming to understand all the technical jargon and apply it perfectly. Fortunately, a fast hosting provider and a great performance plugin like WP Rocket can help you achieve a good FCP score right out of the box.
Save yourself time and let WP Rocket do the job for you. WP Rocket will automatically apply 80% of web performance best practices. You don’t even have to touch any settings. You’ll see an instant improvement in speed and your PageSpeed score right away — no technical knowledge required, we promise!