Table of Contents
Caching is one of the most effective ways to help your website load faster. To make sure website owners use it, Google has added the Use Efficient Cache Lifetimes insight to their speed testing tools.
In this post, you’ll learn everything you need to know about how to pass this performance audit. We’ll discuss caching in detail, explain what Google’s insight targets, and how to properly set up caching on your WordPress site, by hand and via plugin.
| TL;DR ✅ Browser caching helps speed up websites by directing visitor browsers to store static assets (e.g. images, fonts, scripts) locally for quick access on repeat visits. ✅ The Use Efficient Cache Lifetimes insight flags cacheable website files with a cache lifetime shorter than 30 days. To pass it, configure your site so that browsers retain those files for at least that duration. ✅ You can enable caching manually by adding specific Cache-Control headers to your server’s configuration files. Alternatively, use WP Rocket, which enables browser caching automatically along with additional performance best practices and features. |
What is the Use Efficient Cache Lifetimes Insight?
Caching means saving important website files in a location where they are quickly accessible. There are different types of caching, some happen on the website server, some in the visitor browser. Google’s Use Efficient Cache Lifetimes insight analyzes a website’s settings for browser caching.
Browser Caching Explained
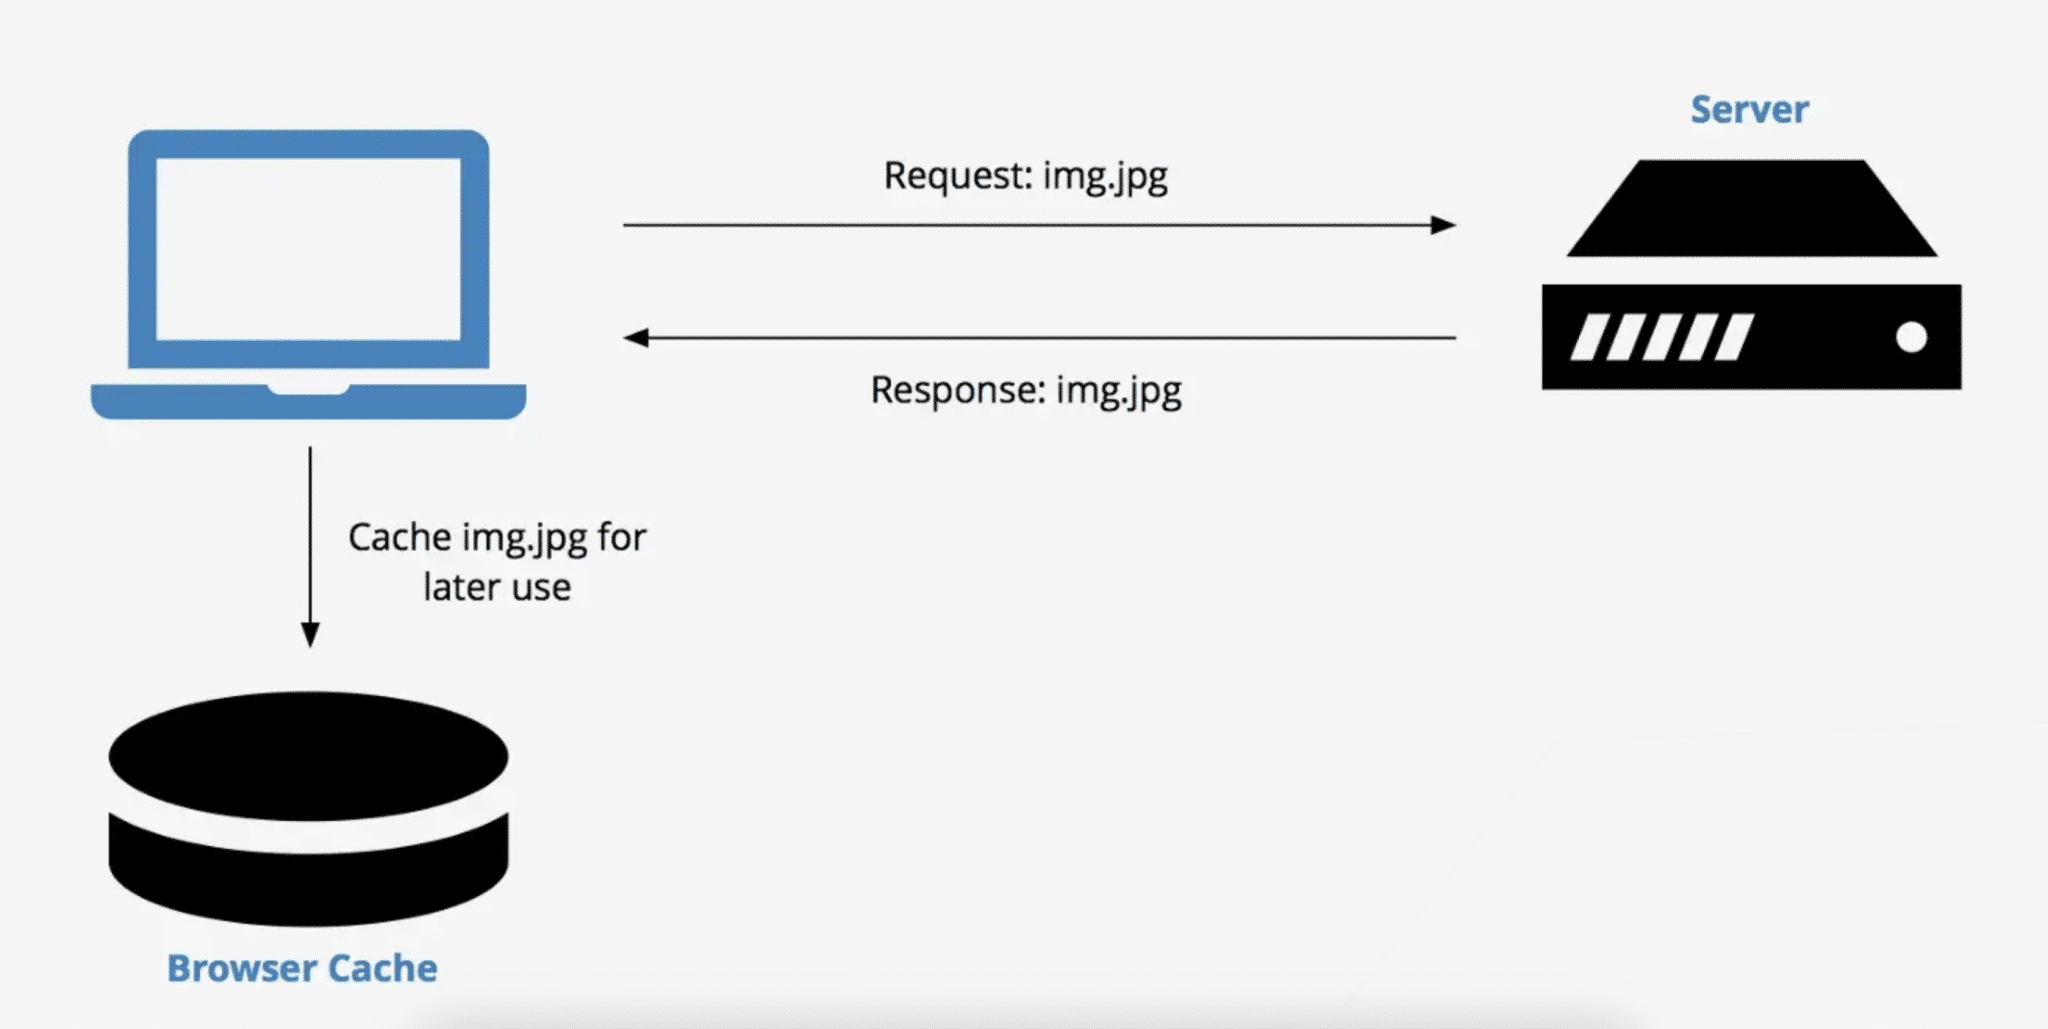
When a browser downloads a resource (meaning a file like an image or an HTML, CSS, or JavaScript document), the website can tell it how long to keep the file in the browser’s cache, meaning the user’s hard drive.
(This also works for intermediaries like proxy servers or CDNs. For simplicity’s sake, however, we’re focusing on browsers here.)
This happens using HTTP request and response headers. They allow servers and browsers to exchange important information, in this case, how long to keep static files in the cache for reuse.
In the future, when the same visitor comes back to the same website, requests first get routed through the cache. If the browser finds the requested resource there already, it can load the local file instead of downloading it again from the server.
Benefits of Browser Caching
Using local assets reduces latency and the number of files that need to be downloaded. This means fewer HTTP requests, less reliance on the network, and less bandwidth usage, so files not in the cache can load faster.
All of this means your website appears faster for visitors. This helps improve your site’s user experience and SEO. Browser caching positively impacts Core Web Vitals like First Contentful Paint (FCP), Largest Contentful Paint (LCP), and Interaction to Next Paint (INP), which are ranking factors.
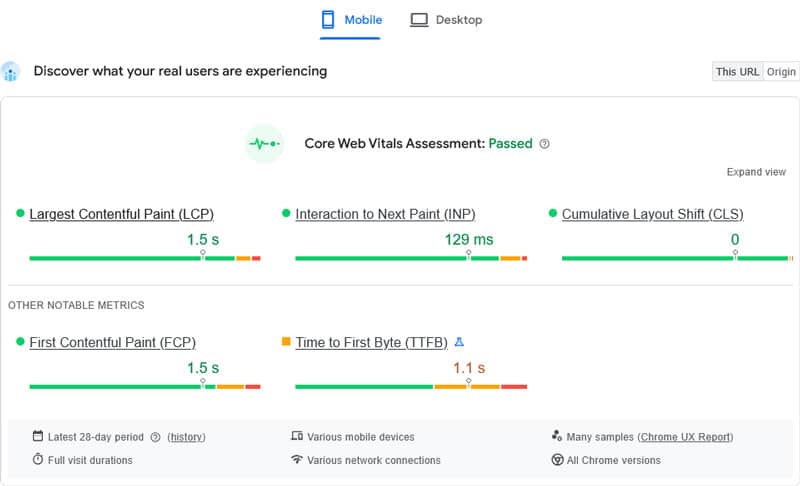
In particular, it helps improve the real-life results that appear on top of PageSpeed Insights, which come from the Chrome User Experience Report (CrUX).
What Does the Google Insight Measure?
Here’s what the documentation says how to pass the Use Efficient Cache Lifetimes insight:
“All cacheable subresource requests should have a cache lifetime of at least 30 days (2,592,000 seconds)”
What exactly does that mean?
We have already settled what resources are, they are website files. Requests happen when the browser asks the server for files it found in the HTML document of a website.
What resources does Google consider cacheable?
- Fonts, images, media files (e.g. video), scripts (JavaScript files), and style sheets (CSS files).
- Files with a 200, 203, or 206 HTTP status code.
- Resources not explicitly excluded from caching (more on that below).
Your website should instruct the browser to keep these resources in its cache for a minimum of 30 days.
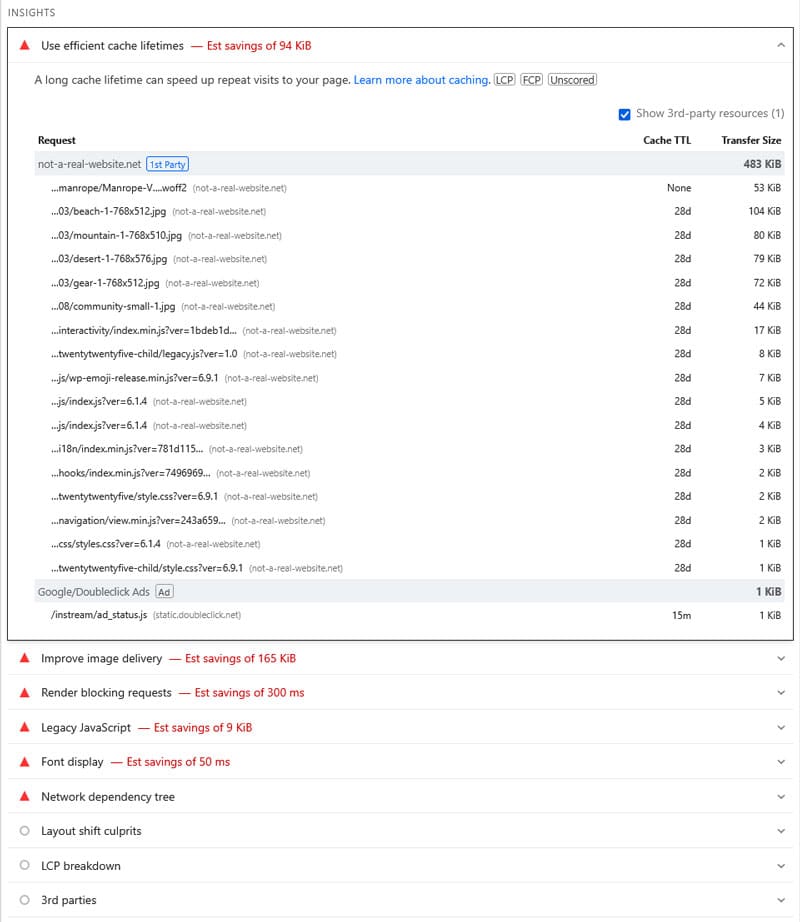
To help you comply with this guideline, the insight audit lists the URLs of all non-cached site resources (including third-party files) plus estimated data savings if you enabled browser caching for them.
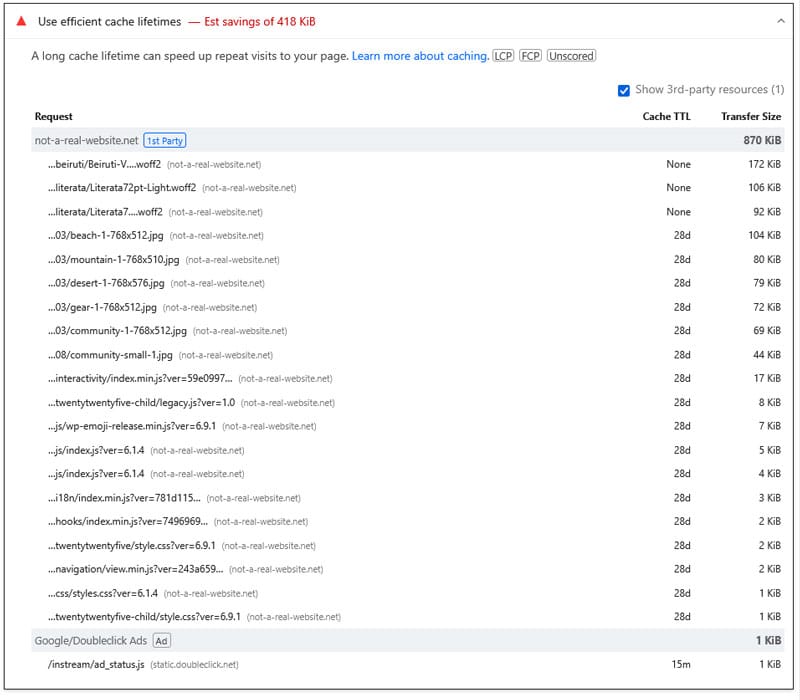
You can see each resource’s size and current caching timeline. All of this helps you easily find the files that need correcting.
| 💡An earlier version of this is insight was named “Serve static assets with an efficient cache policy.” |
How to Check Caching on Your Website
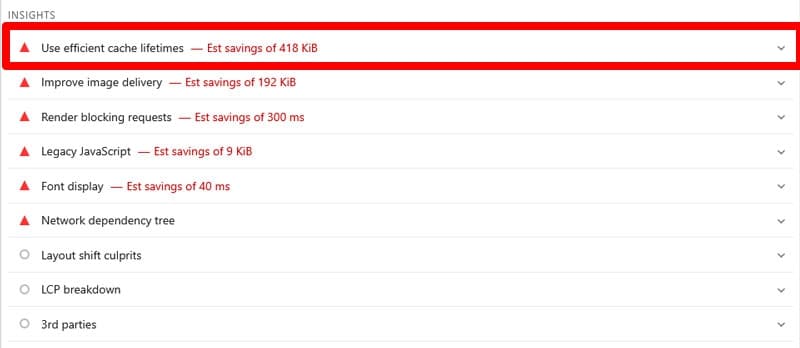
You have several ways to find out if the Use Efficient Cache Lifetimes insight is relevant for your website. The easiest is to run your website through PageSpeed Insights. If triggered, the “Use efficient cache lifetimes” message appears under the Insights section.
Another way is to use Chrome Developer Tools. Open them on your website and run a performance trace in the Performance tab (e.g. using Record and reload).
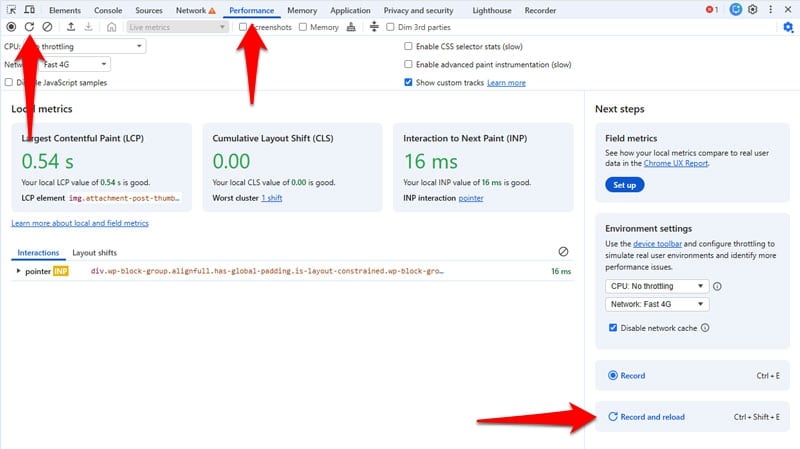
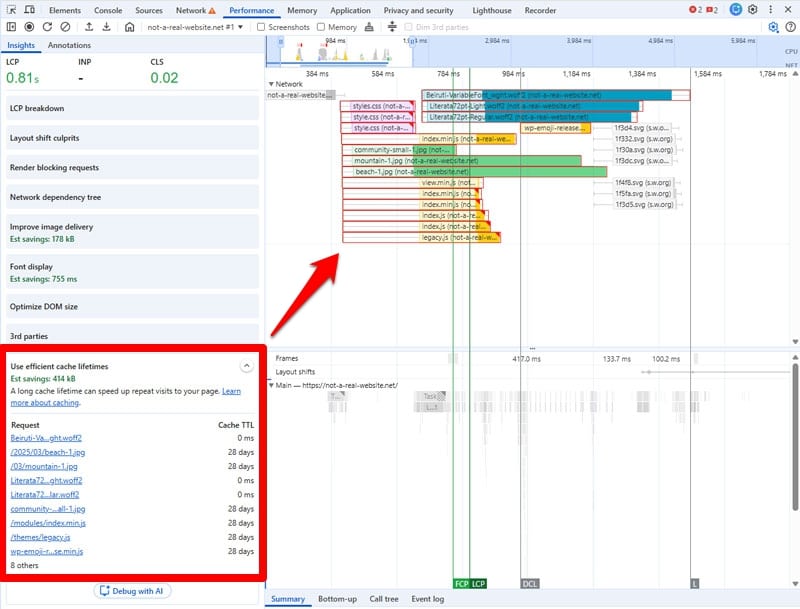
When relevant, the insight appears in the sidebar on the left. When opened, it highlights non-cached resources in the timeline on the right.
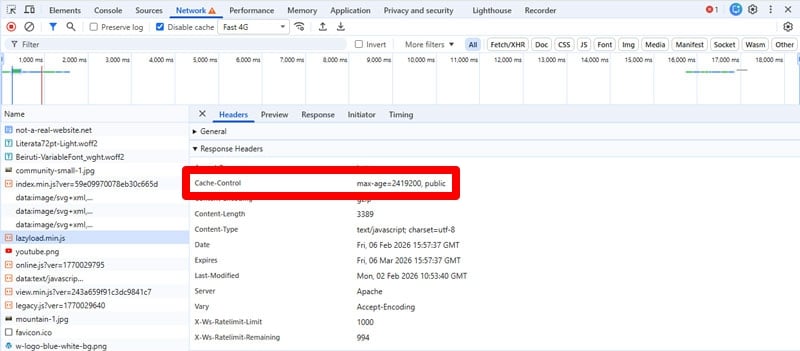
Finally, you can manually check the HTTP headers responsible for caching. This happens in the Developer Tools as well, in the Network panel. Open it, make sure Disable cache is unchecked, then reload your website. Look at the Size column to see if a request was actually served from cache.
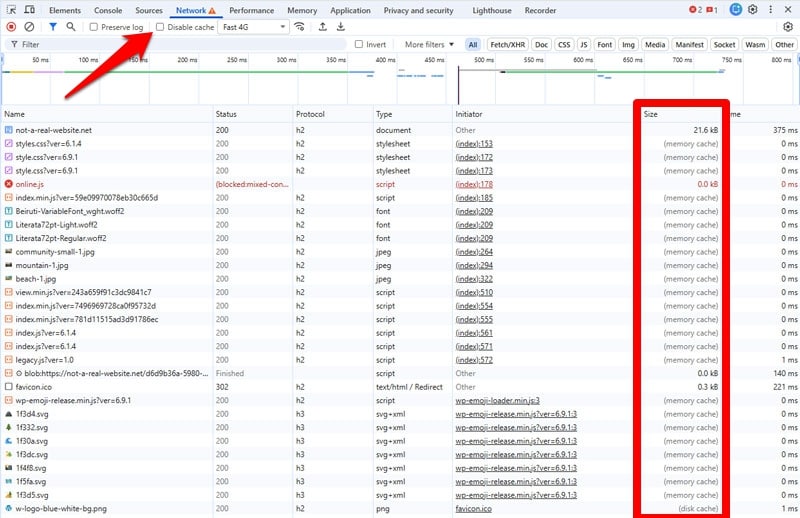
Click on individual resources to see their response and request headers.
| Method | What It Shows | How to Use It | Best For |
| PageSpeed Insights | Whether the Use Efficient Cache Lifetimes inisight is triggered | Run your site through PageSpeed Insights and check the Insights section | Quick confirmation and overview |
| Chrome Developer Tools – Performance | Highlights resources that are not cached | Developer Tools → Performance → Record and reload → Check the sidebar for the audit and timeline highlights | Visualizing how uncached resources affect loading |
| Chrome Developer Tools – Network | Shows actual caching behavior via HTTP headers | Developer Tools → Network → Reload page (Disable cache unchecked) → Inspect headers and Size column | Detailed debugging |
How to Enable Browser Caching on Your WordPress Site by Hand
To set up browser caching, you need to understand caching headers, develop a tailored caching policy, and implement it on your server. We’ll also go over how to do the same using a WordPress plugin afterwards.
Understand Cache Headers
HTTP headers are the mechanism behind browser caching. The main four that are relevant for caching are:
- Cache-Control: Defines how, and for how long, the browser should cache a resource. It’s the most authoritative header in modern web development and what browsers default to.
- Expires: An older caching header that tells the browser when a file should expire by using a specific date and time. While Cache-Control takes precedence in modern browsers, including an Expires header can make sense as a fallback.
- Etag: Important for revalidation. When the browser finds an expired cached resource, it can send a small piece of code to the server to check if the file has changed. If the server answers with the same code, the file is the same and doesn’t need to be downloaded again.
- Last-Modified: Serves the same purpose as Etag, but provides a time and date for when a resource was last modified instead of comparing code tokens.
Here’s what these headers typically look like:
Cache-Control: public, max-age=2592000, must-revalidate

Expires: Wed, 06 Mar 2026 12:00:00 GMT

Etag: "a1b2c3d4e5f6"

Last-Modified: Mon, 03 Feb 2026 09:42:18 GMT
Cache-control, the main caching header, can contain a number of different values:
- max-age: Sets the cache lifetime in seconds (e.g. 31,536,000 for a year).
- no-cache: Instructs the browser to revalidate with the server every time before using a cached version of a resource.
- no-store: Forbids the browser to store any version of the file ever.
- private: Personal browsers may cache the file, but intermediate caches, like CDNs or proxies, may not.
- public: File is permitted to be stored by any cache.
- must-revalidate: Tells the browser to cache the file for a defined timeframe but definitely confirm with the origin server afterwards. Prevents browsers from using stale files (meaning past their max-age) when the server is not available.
- immutable: Informs the browser that a file’s content will never change, so it can always use the cached version.
- stale-while-revalidate: Allows to serve stale file versions within a defined grace period during which the browser should revalidate with the server.
There are more directives but the above are most relevant. Directives often appear in combination, like so:
Cache-Control: public, max-age=31536000, immutable, stale-while-revalidate=86400Develop a Sensible Caching Policy
Your caching policy decides what assets are stored for how long. Since different types of files are more or less prone to changing, they need different cache lifetimes.
Why does this matter?
- If you make the caching time too short for files don’t change, you make visitors download them more often than necessary, potentially compromising performance.
- On the other hand, if you set the cache lifetime of frequently changing files too long, your visitors can end up with out-of-date content.
Version vs Unversioned Files
When deciding on a caching policy, it’s important to distinguish between versioned and unversioned resources. Versioned files have a fingerprint or version number in their URL, like:
<link rel="stylesheet" href="style.css?ver=5.10.2" />

<script src="script.js?ver=5.10.2"></script>
These can have extra-long cache times. Since their names change when they get updated, it automatically prompts the browser to download them again. This is also called cache busting.
In WordPress, you can implement it using wp_enqueue_style() and wp_enqueue_script(), which both have a $ver parameter that appends a version string to the file URL.
Basic Caching Rules
So, what’s a good rule of thumb for your cache policy?
- To pass the Google insight, all cacheable assets need to have a max-cache of at least 30 days.
- For rarely changing files, like fonts, as well as versioned files, you use a cache interval of a year and also add “immutable.”
- Files that change often like HTML page or unversioned assets should either not be cached or should use short cache lifetimes with revalidation.
Beyond that, use these directives to further differentiate your caching policy:
- no-store for sensitive data or content that changes very often, like account pages, checkouts, or real-time data.
- private for user-specific content that can be stored in browser cache, but not intermediaries. A good example is user profiles or other personalized content.
- public for shareable content that’s useful for anyone, like your blog posts or other public pages.
- must-revalidate for content that can never go stale, like time-sensitive information such as prices.
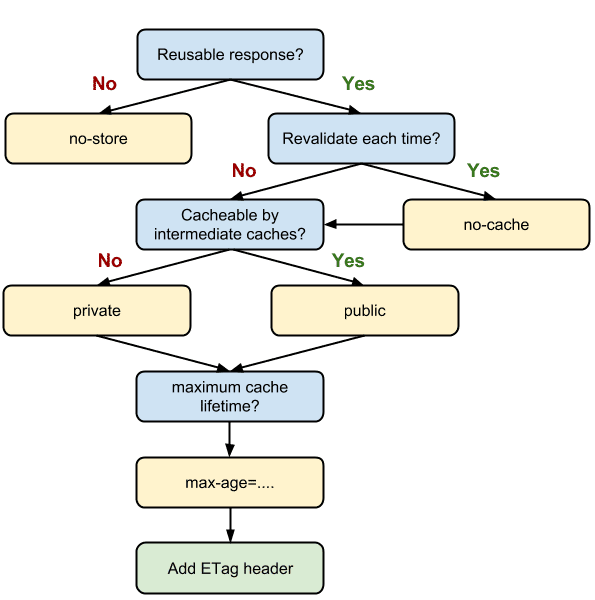
In addition to cache lifetimes, your caching policy should also include validation headers such as Etag or Last-Modified. Web.dev has a flowchart for making decisions about caching policy.
Implement HTTP Caching
The final question is, how do you put the above into practice on your WordPress website?
First, the good news: WordPress has some helpful defaults built in.
- Unless disabled by your host, the Last-Modified and Etag headers are enabled automatically, so cache validation mechanisms are already in place.
- WordPress has default HTTP headers that prevent HTML pages from being cached.
That means, all you have to do is set up rules for your cacheable static assets. This happens on the server, via server files.
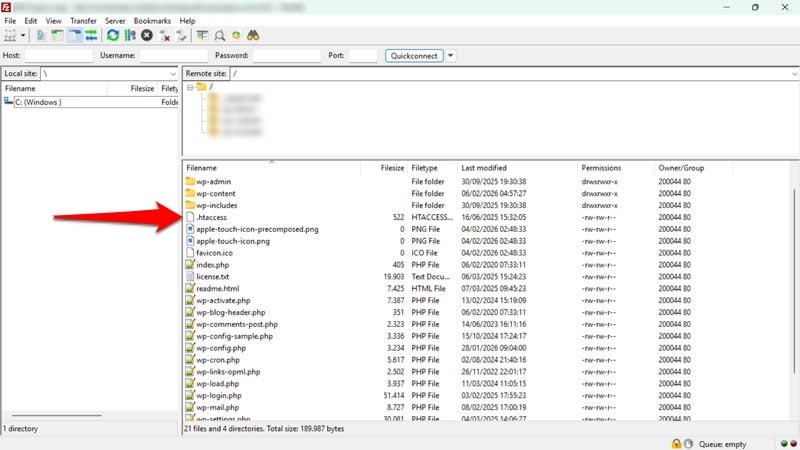
If you are on an Apache server, the file in question is .htaccess. You usually find it in the root directory of your site where you can access it via FTP (you may have to tell your FTP client to show hidden files to see it).
Here’s how to set Cache-Control in .htaccess:
<IfModule mod_headers.c>

 	# HTML, XML, JSON — always revalidate

<FilesMatch "\.(html|xml|json)$">

Header set Cache-Control "no-cache, must-revalidate"

</FilesMatch>


# Images, video, audio — 1 year

<FilesMatch "\.(gif|png|jpg|jpeg|webp|avif|mp4|webm|ogg)$">

Header set Cache-Control "public, max-age=31536000, immutable"

</FilesMatch>


# SVG — 1 year

<FilesMatch "\.svg$">

Header set Cache-Control "public, max-age=31536000, immutable"

</FilesMatch>


# Fonts — 1 year + immutable

<FilesMatch "\.(woff2?|ttf|otf|eot)$">

Header set Cache-Control "public, max-age=31536000, immutable"

</FilesMatch>


# CSS & JavaScript — 1 year (assumes versioning)

<FilesMatch "\.(css|js)$">

Header set Cache-Control "public, max-age=31536000, immutable"

</FilesMatch>

</IfModule>
The code above allows you to set cache policies for different file types. Explanations are in the comments. Adjust to your needs.
| 💡 One caveat: the code above assumes your CSS and JavaScript files are automatically versioned by your themes and plugins. If that’s not the case, you can reduce the CSS and JavaScript cache by swapping in this snippet: # CSS & JavaScript — 30 days <FilesMatch “\.(css|js)$”> Header set Cache-Control “public, max-age=2592000” </FilesMatch> |
As a fallback, you may also include the Expires header:
<IfModule mod_expires.c>

ExpiresActive On


# HTML, XML, JSON — always revalidate

ExpiresByType text/html "access plus 0 seconds"

ExpiresByType application/json "access plus 0 seconds"

ExpiresByType application/xml "access plus 0 seconds"

ExpiresByType text/xml "access plus 0 seconds"


# Images — 1 year

ExpiresByType image/gif "access plus 1 year"

ExpiresByType image/png "access plus 1 year"

ExpiresByType image/jpg "access plus 1 year"

ExpiresByType image/jpeg "access plus 1 year"

ExpiresByType image/webp "access plus 1 year"

ExpiresByType image/avif "access plus 1 year"

ExpiresByType image/svg+xml "access plus 1 year"


# Video, audio — 1 year

ExpiresByType video/mp4 "access plus 1 year"

ExpiresByType video/webm "access plus 1 year"

ExpiresByType audio/ogg "access plus 1 year"

ExpiresByType video/ogg "access plus 1 year"


# Fonts — 1 year

ExpiresByType font/woff "access plus 1 year"

ExpiresByType font/woff2 "access plus 1 year"

ExpiresByType font/ttf "access plus 1 year"

ExpiresByType font/otf "access plus 1 year"

ExpiresByType font/eot "access plus 1 year"

ExpiresByType application/font-woff "access plus 1 year"

ExpiresByType application/font-woff2 "access plus 1 year"

ExpiresByType application/x-font-ttf "access plus 1 year"

ExpiresByType application/x-font-opentype "access plus 1 year"

ExpiresByType application/vnd.ms-fontobject "access plus 1 year"


# CSS & JavaScript — 1 year

ExpiresByType text/css "access plus 1 year"

ExpiresByType application/javascript "access plus 1 year"

ExpiresByType text/javascript "access plus 1 year"

</IfModule>

This is the alternative 30-day rule for CSS and JavaScript:

# CSS & JavaScript — 30 days

ExpiresByType text/css "access plus 30 days"

ExpiresByType application/javascript "access plus 30 days"

ExpiresByType text/javascript "access plus 30 days"
If your site runs on an NGINX server, you can implement the same rules as above using this code inside nginx.conf or your site configuration file. It includes both Cache-Control and Expires headers.
# HTML, XML, JSON — always revalidate

location ~* \.(html|xml|json)$ {

add_header Cache-Control "no-cache, must-revalidate";

}

# Images, video, audio — 1 year

location ~* \.(gif|png|jpg|jpeg|webp|avif|mp4|webm|ogg)$ {

    expires 1y;

    add_header Cache-Control "public, immutable";

}

# SVG — 1 year

location ~* \.svg$ {

    expires 1y;

    add_header Cache-Control "public, immutable";

}

# Fonts — 1 year + immutable

location ~* \.(woff2?|ttf|otf|eot)$ {

    expires 1y;

    add_header Cache-Control "public, immutable";

}

# CSS & JavaScript — 1 year (assumes versioning)

location ~* \.(css|js)$ {

    expires 1y;

    add_header Cache-Control "public, immutable";

}
After you are done, verify the successful implementation via the methods discussed earlier.
| 💡 For more information, refer to the Apache and NGINX documentation. |
Enabling Page Cache on Your Website with a WordPress Plugin
If the above seems a bit complicated, you can also enable browser caching and address the Use Efficient Cache Lifetimes insight using a performance plugin like WP Rocket.
The plugin enables browser caching automatically the moment you activate it on your site. Not only that, it implements other caching methods (including a separate mobile cache), alongside additional performance best practices, such as:
- Critical image optimization: Makes images above the fold load early and excludes them from lazy loading.
- Automatic lazy rendering: Speeds up initial page render.
- GZIP compression and minification: Reduces file size for faster loading.
- Preconnect: Connect to third-party resources early to improve load times.
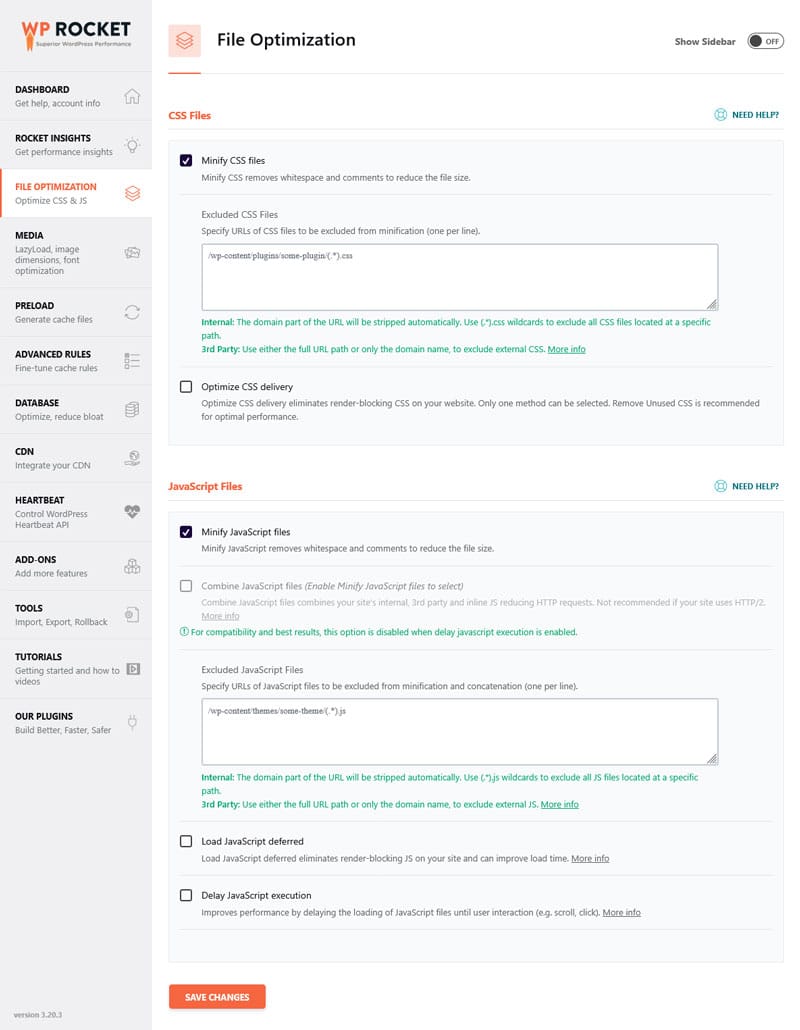
By simply activating, WP Rocket applies 80% of performance best practices to your site. You can then enable optional features to further improve site speed:
- Remove unused CSS: Eliminates CSS markup that slows down page rendering.
- Combine and defer JavaScript: Reduces download time and removes render-blocking requests.
- Lazy loading for visual elements: Prevents images, embedded videos, and other visuals below the fold from loading initially so critical elements can load faster.
- Self-hosting Google Fonts: Removes requests to external sources that could lead to delays.
The best part: enabling these options is as easy as checking a few boxes.
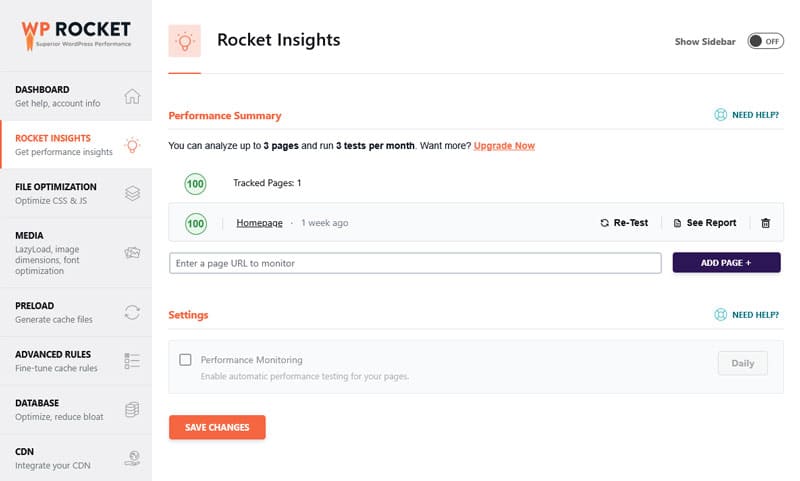
Finally, the built-in, GTmetrix-powered Rocket Insights helps you monitor your top pages’ performance and troubleshoot speed issues directly in your WordPress dashboard.
Overview: WP Rocket Features
| Feature | What It Does | Setup | Performance Impact |
| Page and Browser Caching (incl. mobile cache) | Stores pre-generated HTML and static assets to reduce server work | Automatic | Faster load times, improved TTFB |
| Critical Image Optimization | Prevents above-the-fold images from being lazy-loaded, preloads the FCP image, adds fetchpriority=”high” | Automatic | Faster FCP and perceived load speed |
| Automatic Lazy Rendering | Delays rendering of non-visible elements and content | Automatic | Improved LCP, INP, TBT (and sometimes FCP) |
| GZIP Compression | Compresses files before sending them to the browser | Automatic | Smaller file sizes, faster downloads |
| Preconnect | Automatically adds preconnect hints for external domains | Automatic | Faster third-party resource loading |
| CSS and JavaScript Minification | Removes unnecessary characters from CSS/JS files | Automatic | Faster downloads, reduced render-blocking |
| Remove Unused CSS (alternative: load CSS asynchronously) | Removes CSS not used on the page | Manual | Reduces render-blocking, faster FCP/LCP |
| Combine and Defer JavaScript | Combines files and defers execution | Manual | Fewer render-blocking scripts, faster page load |
| Delay non-critical JavaScript | Delays JS execution until user interaction | Manual | Improved INP and responsiveness |
| Lazy Loading (Images, CSS backgrounds, videos, iframes) | Defers offscreen media loading | Manual | Faster initial load, improved LCP |
| Preload Fonts | Preloads critical above-the-fold fonts | Manual | Faster text rendering, improved LCP |
Case Study: Cache Your Site with WP Rocket
To give you an impression of the difference caching and WP Rocket’s performance features can make on website speed, we set up a demo site with some dummy content. Completely unoptimized, it achieved the following score on PageSpeed Insights.
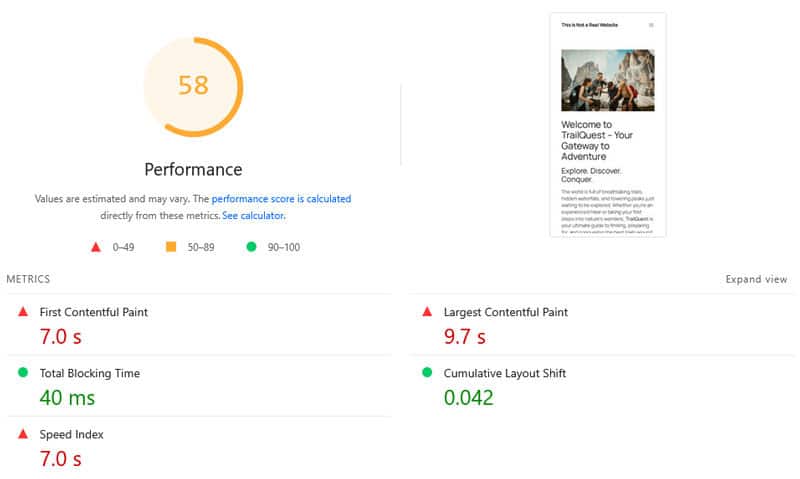
It could definitely be better. Plus, the Insights section included the Use efficient cache lifetimes warning with a long list of files.
We then installed and activated WP Rocket with all its default settings enabled by default, plus the following features:
- Remove unused CSS
- Load JavaScript deferred and delay its execution
- Lazy loading for images and video embeds
- Preload fonts
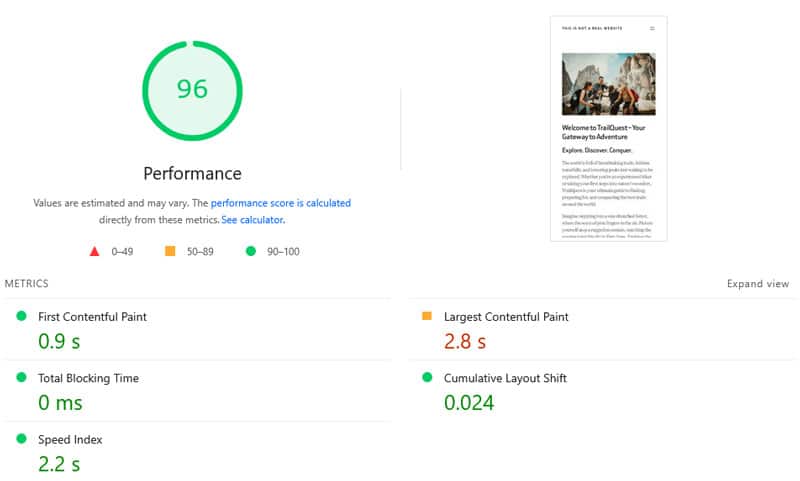
This greatly improved the test results.
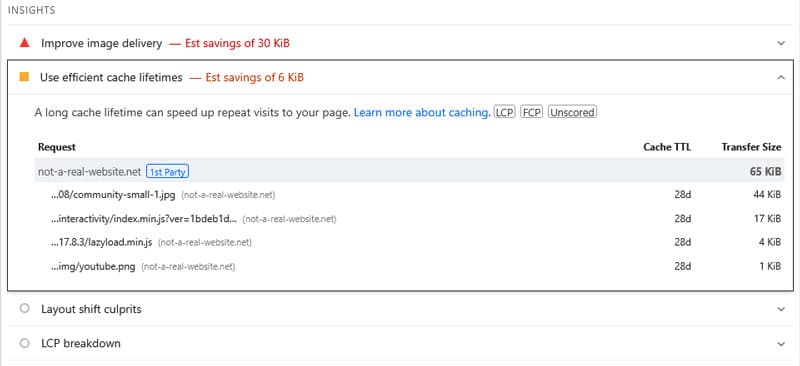
Additionally, the Use Efficient Cache Lifetimes insight showed a lot fewer problematic resources.
The best part: It took only five minutes. Here’s a comparison of the test before and after using WP Rocket:
| Value | Before | After |
| Mobile Performance score | 58 | 96 |
| First Contentful Paint | 7.0s | 0.9s |
| Largest Contentful Paint | 9.7s | 2.8s |
| Speed Index | 7.0s | 2.2s |
FAQ
To round things off, let’s answer some common questions about (browser) caching.
How does browser caching work?
When a browser downloads a file, the server sends HTTP headers that tell the browser how long to save that file locally. When the visitor returns, the browser loads the file from its own storage instead of downloading it again.
Why is it important to use browser caching on your website?
It significantly improves page speed for repeat visits by reducing latency, bandwidth usage, and the number of HTTP requests.
Is caching good for SEO?
Yes, it improves performance markers and Core Web Vitals metrics, which Google uses to determine search result rankings.
How do you enable browser caching in WordPress?
You can manually add caching rules to your .htaccess (Apache) or nginx.conf (NGINX) server files. Alternatively, use a performance plugin like WP Rocket, which enables browser caching automatically.
What is a good caching policy?
Static assets like fonts and images should have long lifetimes of at least 30 days or up to one year. Frequently changing files or sensitive data should use short lifetimes, revalidation, or be excluded from caching entirely.
How do you check if browser caching is working?
Run your site through PageSpeed Insights to see if the “Use efficient cache lifetimes” audit passes. Alternatively, use the Network tab in Chrome Developer Tools to see if the “Size” column identifies a resource as being served from cache.
Why does Google still show a caching warning after I’ve enabled it?
Google’s audit flags any cacheable resource with a lifetime of less than 30 days. Often, these warnings persist because of third-party resources (like YouTube embeds) that are hosted on external servers you cannot control.
What is “Cache Busting” and why is it necessary?
Cache busting involves adding a version number or fingerprint to a file’s URL that changes the file’s name when it’s updated. This forces the browser to download the new version rather than loading an outdated, cached version.
Implement Sound Cache Lifetimes on Your Own Website
The Use Efficient Cache Lifetimes insight is a vital performance marker in Google’s toolkit, highlighting when your site fails to cache static files for an optimal duration.
Resolving it requires setting a tailored caching policy in your server’s configuration files. To automate this process and easily implement additional performance improvements, choose WP Rocket and test it risk-free for 14 days.