Table of Contents
When speed testing your WordPress site, it’s common to see the recommendation that you should eliminate render-blocking resources on your website. This can sound very technical and intimidating at first, especially if you don’t know what this term even means.
In a nutshell, it describes website files that slow down the loading process, which can significantly impact your website’s performance. That’s bad news as it negatively affects how visitors perceive your site and also ranking factors like Google’s Core Web Vitals.
To prevent this from happening, in this post, we will give you detailed instructions on how to eliminate render-blocking resources in WordPress. You will learn what exactly they are and why it’s important to deal with them, how to find which of your files pose a problem, as well as how to take care of them.
What are Render-Blocking Resources?
First things first, what exactly do we mean when we say render-blocking resources? As mentioned above, they are website files that prevent pages on your website from loading quickly. To understand that, you need to know how the loading process works.
When a visitor accesses one of your web pages, their browser starts processing the page’s HTML code from the top. Here, it usually finds numerous calls for other files, such as CSS style sheets and JavaScript scripts. These add styling like colors and element sizes as well as interactivity to web pages.

The thing is, when the browser encounters them, it must also download and process these files. During that time, it is busy and can’t use its processing power to continue rendering the page. This pauses the loading process and, as a consequence, your page takes longer for website visitors to show up.
This is normal and simply how websites work. However, some files impede the browser’s work without contributing to the actual page being loaded.
A classic example is tracking scripts such as for Google Analytics or Facebook Pixel. They don’t add to the page’s design or behavior but, if they are loading at the wrong time, they can still slow it down. That’s what we call render-blocking resources – files that stall out the loading process without being necessary to display the web page.
As mentioned, in most cases render-blocking resources will be CSS or JavaScript files. However, other files can get in the way of a web page loading as well, such as font files or images. While they are not strictly render-blocking (because they are critical for a website’s design), you still need to optimize them so they, too, load as quickly as possible. We will talk about that below as well.
Why Eliminate Render-Blocking Resources in WordPress?
We already learned that the problem with render-blocking resources is that they make your website appear slower.
Why is this significant?
Because website speed is a major driver of user experience. That means, how much or how little visitors enjoy interacting with your website. If you have ever navigated away from another site because it took too long to load, you know exactly what we are talking about. More often than not, you would probably rather click on another result than spend your time waiting. Your visitors feel the same way.
There are also many studies to back up these findings. Even small changes in loading speed can have a significant impact on the success metrics of your website.
Google and other search engines know that web surfers prefer fast websites. They also want to provide their users with the best possible search results. As a consequence, website performance has become an important ranking factor.
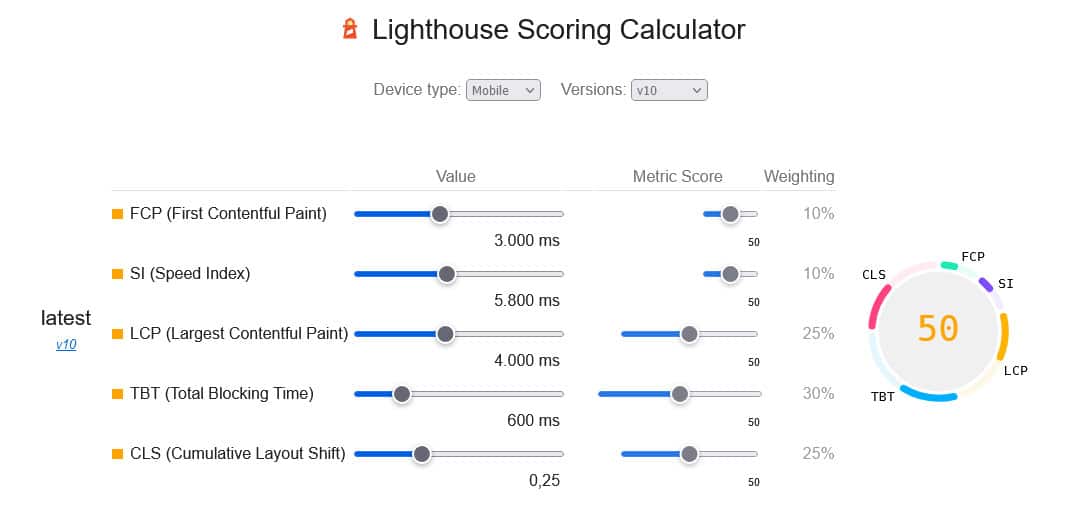
Google especially has put a lot more emphasis on user experience with the introduction of Core Web Vitals and render-blocking resources can impact several of these metrics:
The first three alone make up 65% of the Lighthouse speed scoring system.
In short, render-blocking resources directly impact both the user perception of your WordPress site as well as its ranking in search engines. So, if speed testing tools are telling you that you have a problem in this area, you better heed their advice.
How to Find Problematic Files
Before you can start fixing problems with render-blocking resources on your site, you first need to find out which files are causing them. Here’s how to do that.
Using PageSpeed Insights
The easiest way is to run your site through PageSpeed Insights. Simply enter your website URL and start the analysis.
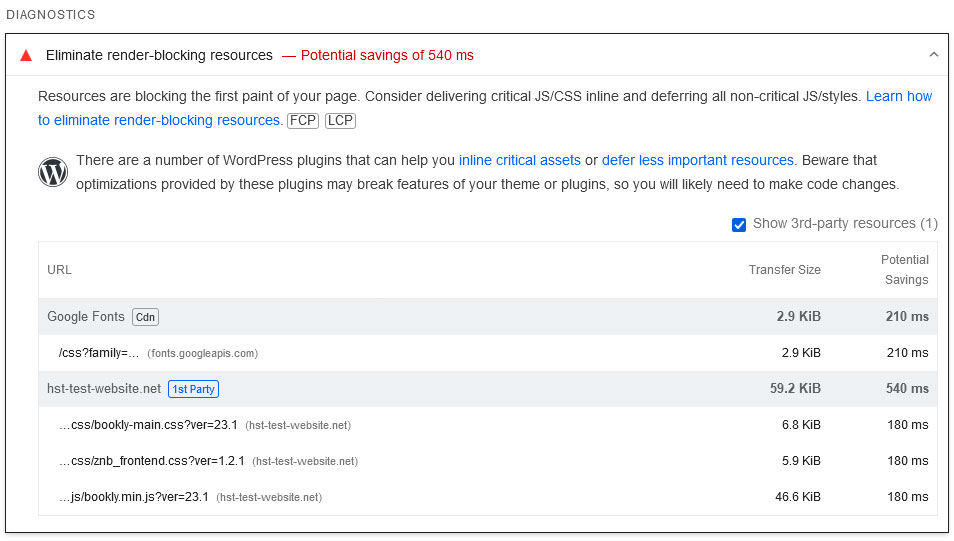
Once done, besides a whole wealth of information about the performance of your website, you will find the recommendation to eliminate render-blocking resources under Diagnostics.
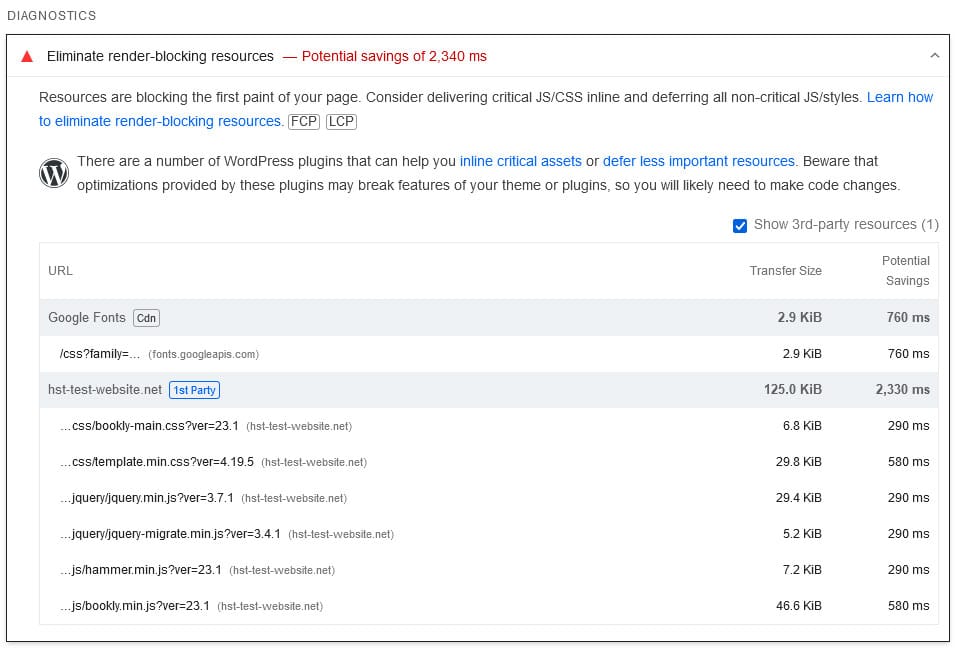
PageSpeed Insights will also list the files responsible for slowing down your page loading time. That way, you know exactly where to start.
Other Tools
Besides that, there are a number of other online tools that will help you find render-blocking resources on your WordPress site:
- Lighthouse – Integrated into Chrome developer tools, Lighthouse runs the same checks that you see in PageSpeed Insights, just directly in the browser. You also find information about render-blocking resources under Diagnostics.
- GTmetrix – This is a tool similar to PageSpeed Insights. It can give you detailed information about your site’s performance, including render-blocking resources. You can find information about that in the Structure tab of the results.
- WebPageTest – Yet another speed testing tool. Simply enter your URL and run it. If there are issues with JavaScript and CSS files impeding the loading process, you will find this information under Opportunities & Experiments in the test results.
How to Get Rid of Render-Blocking Resources in WordPress (With and Without a Plugin)
Now comes the most important part: how do you actually deal with the files impeding your site’s loading process? We will answer this question in detail in the following.
You’ll learn how to handle problematic files using both manual methods as well as our very own WP Rocket plugin, which makes the process much easier.
1. Optimize CSS Delivery
The first thing we will deal with is how to improve the way your website handles CSS files.
Avoid Using the @import Rule
A very basic step to eliminate render-blocking CSS on your WordPress site is to make sure to deliver it to the browser in the correct way. Here, it’s a good idea to avoid doing so using @import.
With @import, you can reference and import other CSS files inside style sheets. While this has very practical applications, it can also result in render-blocking request chains.
Because the browser has to download a second CSS file to process the original style sheet, it can cause a significant delay in your site’s loading. Therefore, it’s best to avoid this method.
Instead, call the style sheets separately via links in the document head. If you want the browser to prioritize one of them, you can tell it to do so via rel=”preload”.
<link rel="preload" href="important.css" as="style" />
Check for Unused Code
Most web pages come with a ton of code they are not actually using, especially CSS. You can easily see that when you open up the Coverage tab in your browser developer tools.
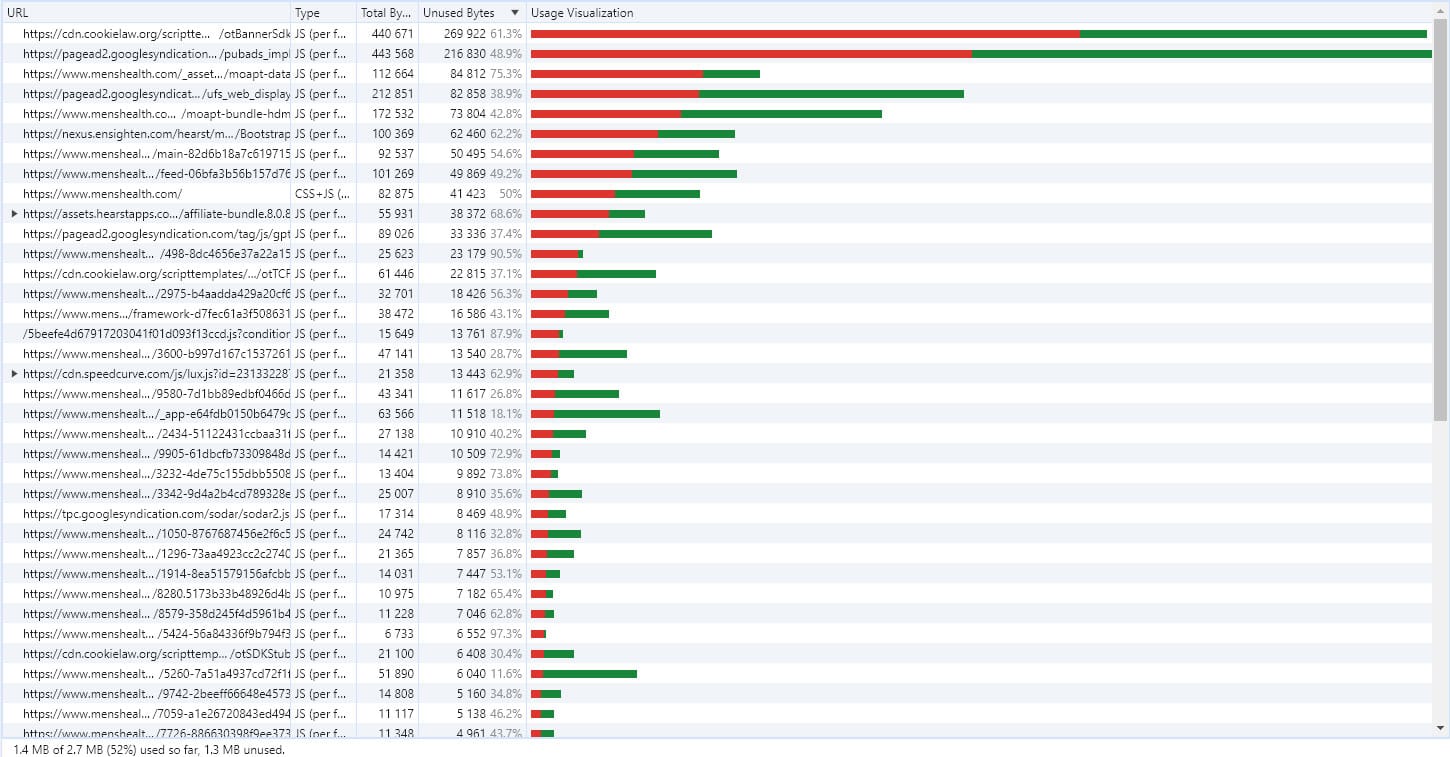
It shows you what code was loaded versus what was actually used to render the page. The difference is often staggering.
This is not incompetence. It simply stems from the fact that style sheets cover all kinds of website elements that don’t always appear on each page, from forms to widgets. That’s how you end up with that much unused markup.
At the same time, naturally, this markup takes up loading time and bandwidth without having a purpose, making your website slower in the process.
So, the first step is to eliminate code that is unnecessary. Because if it’s not being loaded, it can’t block anything. Makes sense, doesn’t it? You have two main options for that.
Inline Critical Path CSS
The first is to extract the critical path CSS (meaning the markup that is absolutely necessary for displaying your page) and including it directly in the document head instead of its own file.
So, instead of linking to a style sheet, you would have the CSS markup right in the HTML file, like so:
<!DOCTYPE HTML>
<html>
<head>
<title>Your Website Title</title>
<meta name="description" content="website description" />
<meta http-equiv="content-type" content="text/html; charset=UTF-8" />
<style>article,footer,header,main,nav{display:block}html{font-family:sans-serif;-ms-text-size-adjust:100%;-webkit-text-size-adjust:100%}</style>
<link rel="stylesheet" type="text/css" href="style/style.css" title="style" />
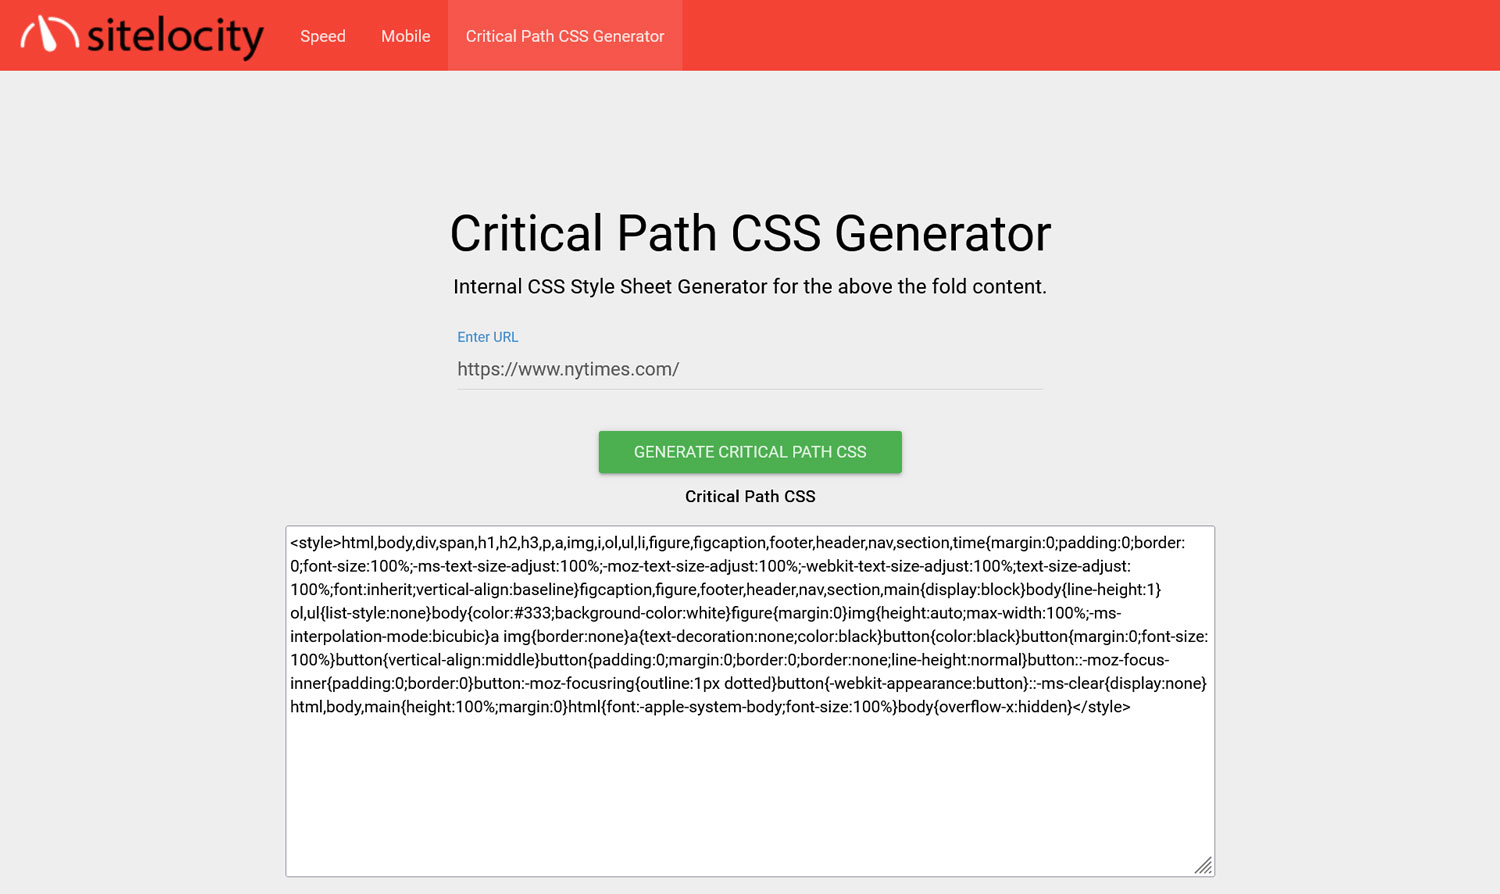
</head>To find out the critical path CSS for a web page, you can use a tool like Sitelocity or PurgeCSS.
That way, you don’t have to figure it out manually.
Split CSS Files
Another option you have to eliminate render-blocking resources on your WordPress site is to split your CSS files for different screen sizes and load them only when necessary using the media attribute. For example, you might have files such as:
- main.css
- small.css
- medium.css
- large.css
You would then have the browser load these only for certain screen resolutions like so:
<link rel="stylesheet" href="main.css" media="all">
<link rel="stylesheet" href="small.css" media="(min-width: 320px)">
<link rel="stylesheet" href="medium.css" media="(min-width: 768px)">
<link rel="stylesheet" href="large.css" media="(min-width: 1200px)">
You can extract CSS from large files with media queries using PostCSS so you don’t have to split them manually.
Alternatively, Use WP Rocket
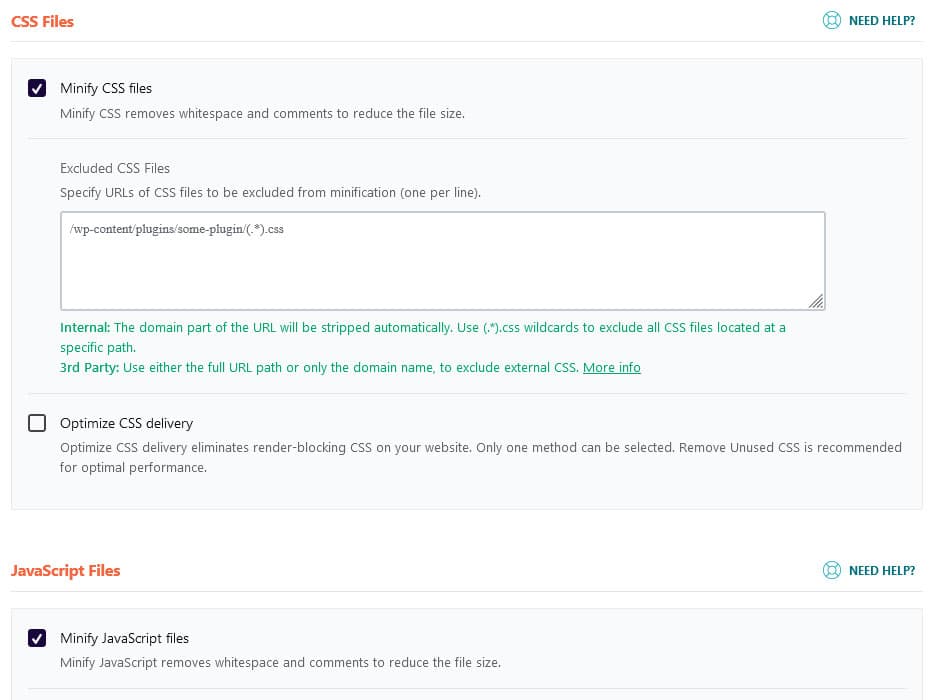
If the above sounds too complicated, you can tackle render-blocking resources automatically using WP Rocket. With the plugin active on your site, go to the File Optimization menu. Here, simply check the box that says Optimize CSS delivery, confirm your choice (there is a little warning), save, and the plugin will automatically reduce/remove unused CSS from your pages so they load faster.
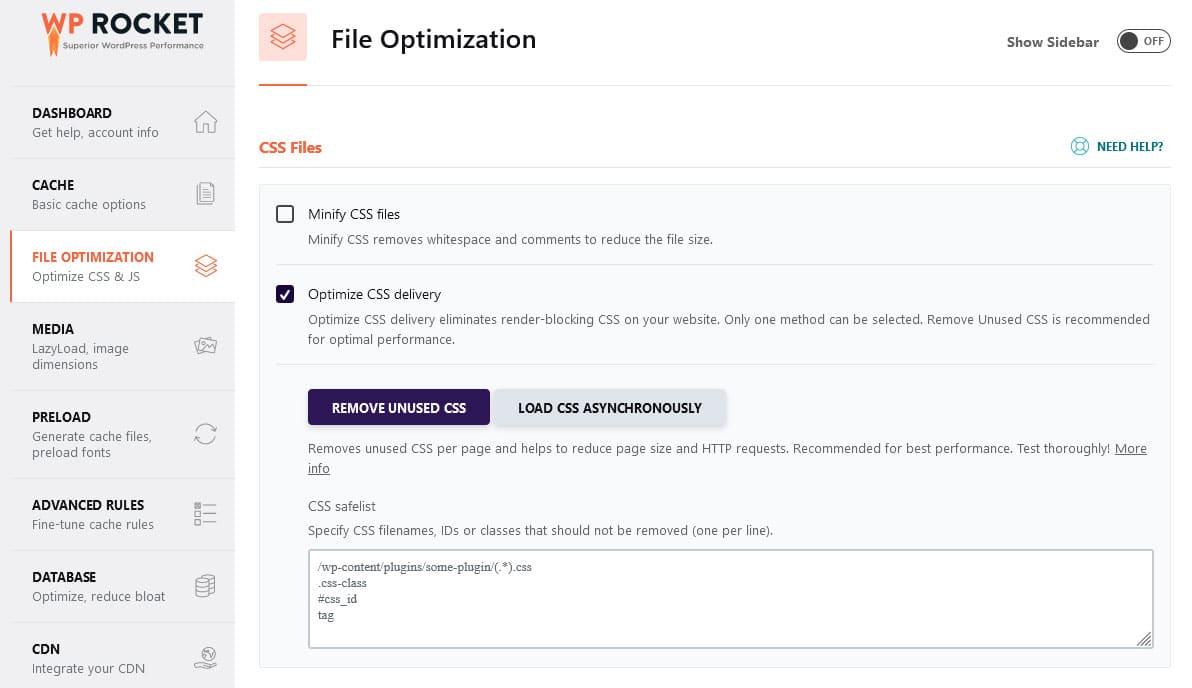
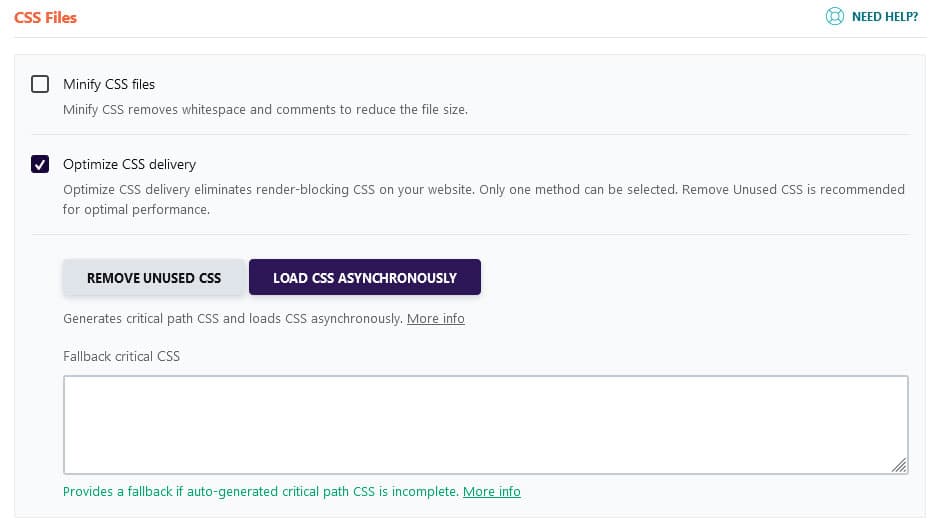
Finally, there’s also the option to load CSS asynchronously (you’ll learn what that means in the next section) instead of removing unused CSS.
Note, however, that this is only a fallback option if you encounter an issue and that removing unused CSS is the recommended method.
2. Deal With Render-Blocking JavaScript
Next up, we’ll work on problematic JavaScript files.
async and defer
The two main tools you have for preventing scripts from delaying your page’s from rendering are the async and defer attributes. You can add them to your calls in the code like so:
<script async src="important.js"></script>

<script defer src="also-important.js"></script>
Both of these attributes do very similar things. They prevent your visitor’s browser from pausing the site loading process when it encounters a JavaScript file. However, they do so in slightly different ways and, therefore, differ in how to use them:
- async – The browser will download JavaScript marked in this way in the background and only start executing it once the file has been completely downloaded. It will also execute files regardless of the order they appear in the document and instead based on when they become available.
- defer – Here, the browser also downloads files in the background, however, it will only execute them once it has finished with the rest of the page. Additionally, it will adhere to the original order of the scripts.
Here’s an illustration to make it clearer:
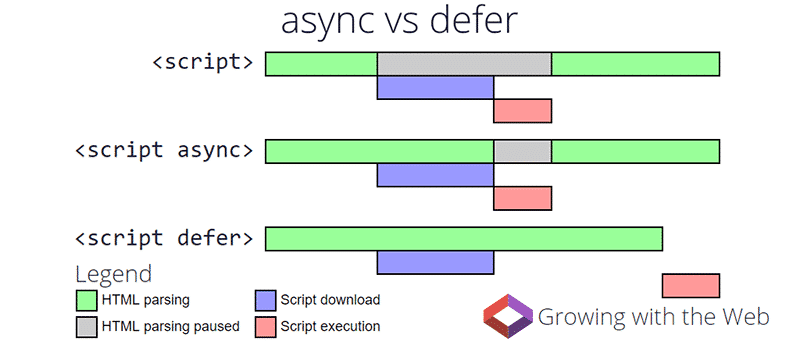
When should you use what?
Use defer for files where the order matters. That’s usually because they rely on a previous file being present when running. Otherwise, you might encounter problems. A common example is when sites use jQuery and try to execute some of its functionality before the jQuery library has been loaded.
The async attribute, on the other hand, is for files that are completely independent of the rest of the page document, such as the aforementioned tracking scripts.
It’s important to note that you can theoretically also load CSS asynchronously. However, that’s a bit more complicated than we can cover here. You can find instructions over at web.dev.
Split JavaScript Files
Another step you can take to prevent your site’s JavaScript from being render-blocking is to split your files. That’s similar to what we discussed for CSS. It reduces the time it takes for the browser to process each file, so it isn’t blocked as long from loading the page. It also keeps your site responsive to user input, which is important for the Interaction to Next Paint metric.
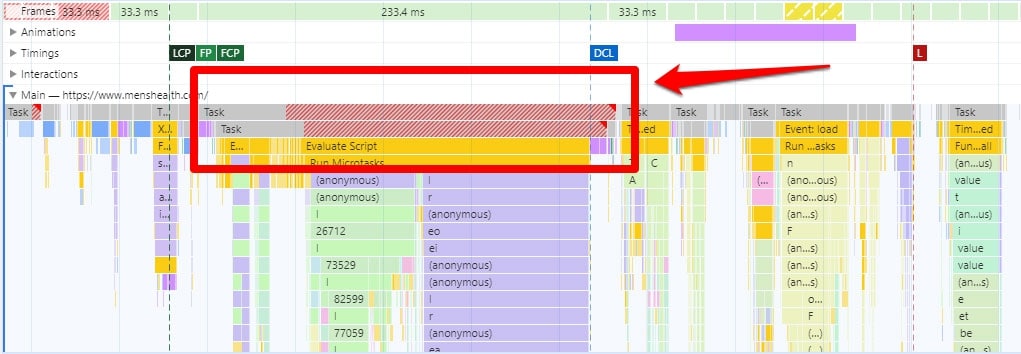
When using Chrome developer tools to analyze the performance of your website, it will warn you of particularly long JavaScript tasks with a red triangle.
If that’s a problem on your site, you can use bundlers like webpack, Browserify, and Rollup to divide your JavaScript into multiple bundles that only load when needed.
WP Rocket Options
WP Rocket also has options for optimizing JavaScript on your site. Again, under File Optimization, you can determine whether to load it deferred and delay loading until a user interaction occurs.
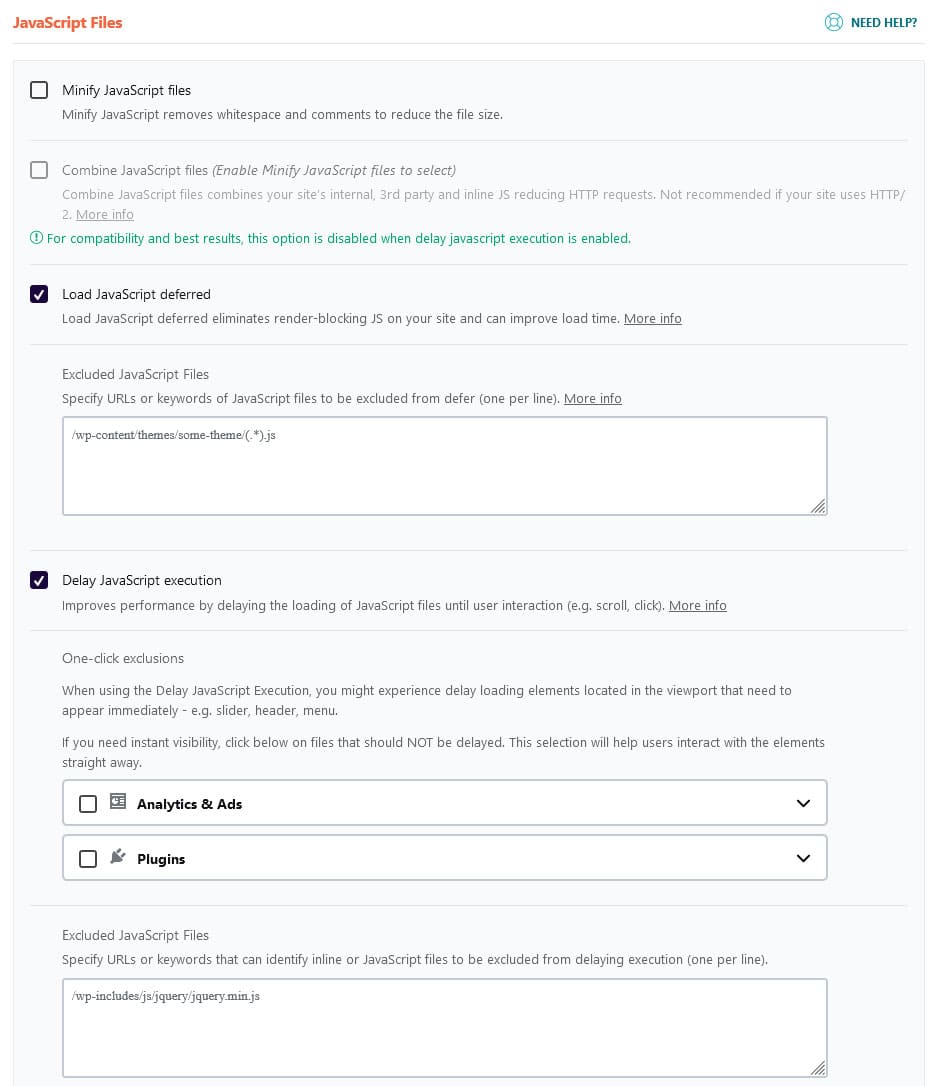
In addition, the plugin has the option to exclude scripts manually from being delayed to make sure that important JavaScript still loads.
3. Improve Font Loading
As mentioned earlier, font files can also interfere with the loading process. While they are not strictly render-blocking, they can still be disruptive. The two most important concerns here are:
- Flash of Unstyled Text (FOUT) – This happens when a visitor first sees your website text in a standard fallback font that changes the moment the font file loads.
- Flash of Invisible Text (FOIT) – In this case, no text is visible at all at first and only appears together with the loading of the web font file.
Here are ways to avoid these issues:
- Use a modern font format – Fonts come in different file formats. The smallest and, therefore, fastest to load are usually WOFF or WOFF2.
- Choose a fitting fallback font – If you define a fallback font that’s very similar to your intended typeface, the switch between fonts is not as glaring. Font Style Matcher can help you find a good combination.
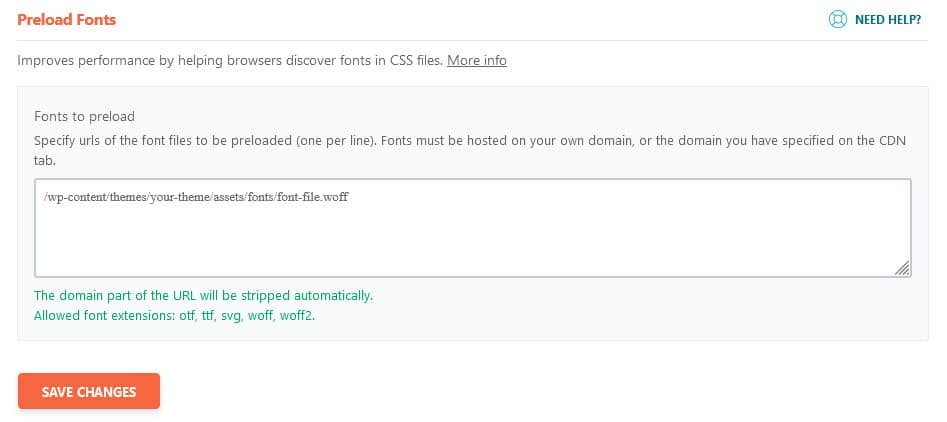
- Preload fonts – Placing your web font files high up in the page document and adding rel=preload to its call will make the browser load them more quickly.
By the way, you can easily preload font files in WP Rocket by defining their location under Preload.
4. Use Compression and Minification
These two techniques don’t directly help eliminate render-blocking resources. However, they can still improve performance problems. Here’s what each of these terms mean:
- Compression – You are probably familiar with this concept from using zip files on your computer, which also compress data. The same is possible on a web server. Smaller website files are faster to download, which means the browser can start displaying your website more quickly.
- Minification – This technique eliminates white space and comments in website files that make them more human-readable, shrinking the file size in the process.
If you want to use these techniques on your WordPress website, it usually involves manually adding code to a server file or running files through a tool like Minify JS.
Alternatively, go with a plugin solution. For example, WP Rocket automatically enables GZIP file compression on your WordPress website when it becomes active. In addition, you can activate minification for both CSS and JavaScript files by checking the boxes under File Optimization.
5. Implement Other Optimization Techniques
Besides getting rid of render-blocking resources on your WordPress site, there are other techniques you to further improve your site’s performance:
- Caching – This saves static copies of your pages as HTML files on your server. That way, it doesn’t have to dynamically create them from PHP files and the database each time someone wants to view a web page.
- Image optimization – While images are not render-blocking, they do have a big impact on page loading speed and need optimization as well. Compression, using the right size, and taking advantage of modern image formats like WebP and Avif all help slim down images and deliver them more quickly. Image optimization is especially important for mobile devices.
- Lazy loading – This is another technique that helps with image optimization. It tells browsers to only load images that actually appear on screen initially and defer those further down the page until the user scrolls toward them. This saves a lot of bandwidth.
- Database optimization – The database contains all your website content. If it’s slow due to redundant data, this has an effect on the entire site. That’s why it needs regular optimization and cleanup.
- Using a content delivery network – A CDN spreads your static server files across different servers around the world. This allows visitors to receive them from the location nearest to them, reducing loading time.
Except for image optimization, WP Rocket has functionality for all of this:
- Caching is automatically activated upon plugin installation and you can also switch it on for mobile.
- You can enable lazy loading for images, CSS background, iframes, and videos.
- WP Rocket can clean up and optimize your database, even automatically on schedule.
- The plugin supports CDNs and has dedicated add-ons for popular providers. You can even use our own RocketCDN.
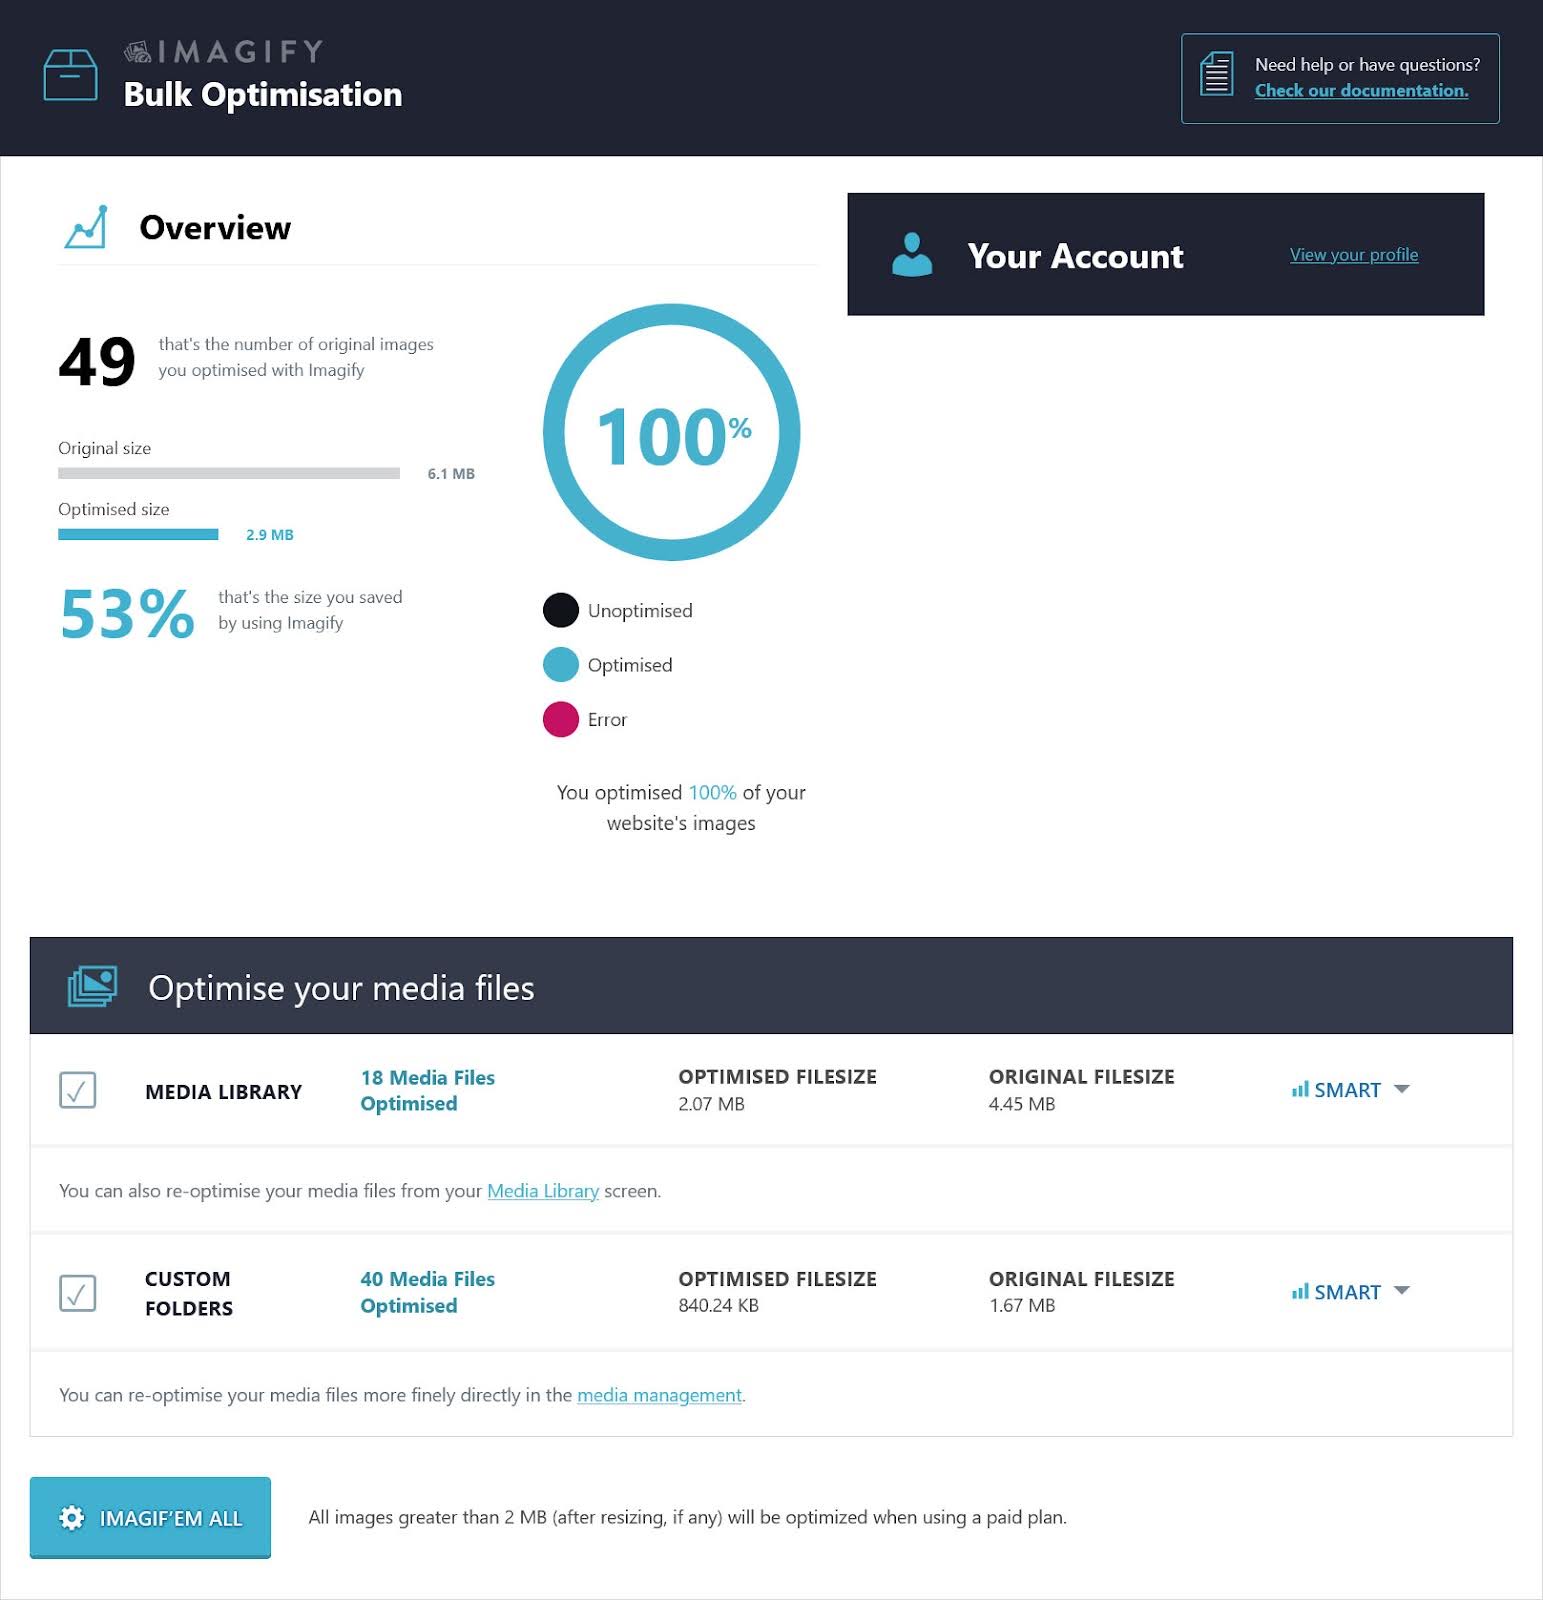
In addition, you can also check out Imagify, our other plugin. It can help you do all of the image optimization techniques mentioned above right on your WordPress website. Imagify uses Smart Compression to balance image quality and performance and can convert visuals to both WebP and Avif. It is the easiest image optimization plugin for WordPress to make images lighter.
Eliminating Render-Blocking Resources with a WordPress Plugin (Before-and-After Case Study)
Are you still in doubt that eliminating render-blocking resources could have a significant impact on your WordPress site’s performance? Then let’s put those doubts to rest by putting the advice above to the test.
Test Setup and Initial Results
For this case study, we set up a simple trial website using the Kallyas theme. We installed one of their starter sites and all the plugins that come with it.

When we first ran it through PageSpeed Insights, we got the following results:
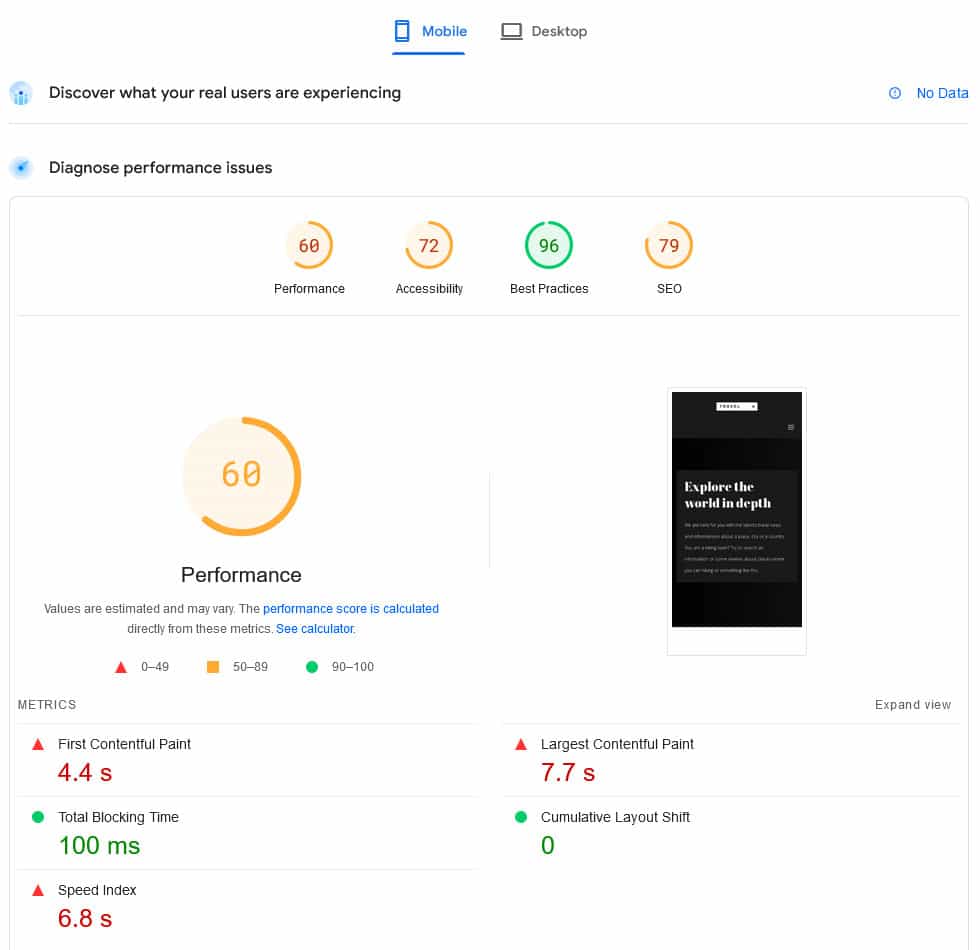
In particular:
- Performance score: 60 (mobile), 69 (desktop)
- First Contentful Paint: 4.4 s (mobile), 1.8 s (desktop)
- Largest Contentful Paint: 7.7 s (mobile), 2.2 s (desktop)
- Total Blocking Time: 100 ms (mobile) version, 120 ms (desktop)
In addition, note that we got the advice to take care of render-blocking resources in the test results.
WP Rocket Improvements and Their Effects
To improve the situation, we did exactly what we described above in the WP Rocket plugin.
- Optimized CSS delivery by removing unused CSS
- Load JavaScript deferred and delay its execution
Besides that, as mentioned, WP Rocket automatically implements a number of speed optimization techniques automatically, namely caching and compression. Note that we also enabled mobile caching manually. It is not enabled by default, and we wanted the mobile and desktop results to be comparable.
After doing the above, we retested the site again, this time with the following results.
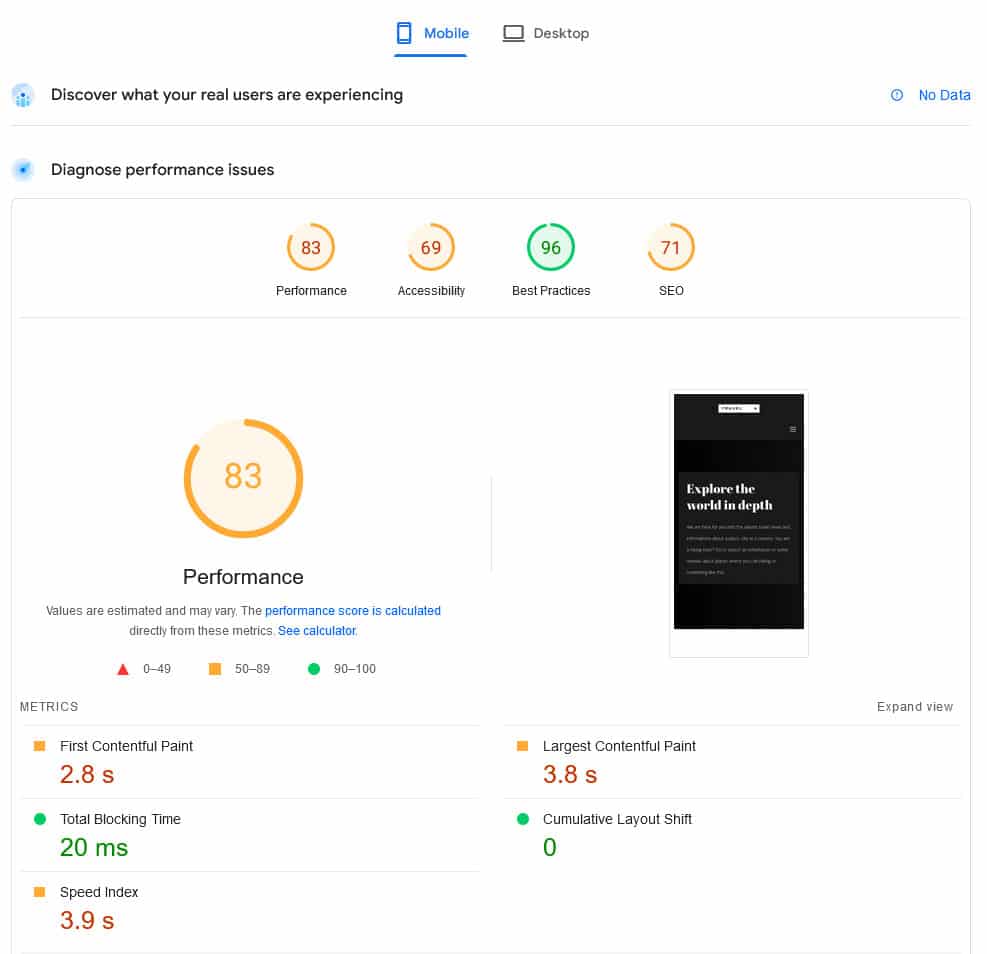
In addition, the recommendation to eliminate render-blocking resources disappeared for both mobile and desktop.

Not bad for optimization that took literally a minute to implement, was it? Plus, that’s not even all you can do. As mentioned, there are a whole lot of other optimization techniques you can implement with WP Rocket that we haven’t even touched here. So, there is still room for improvement.
For example, here is the same website with code minification, lazy loading for images, and preloading options activated.
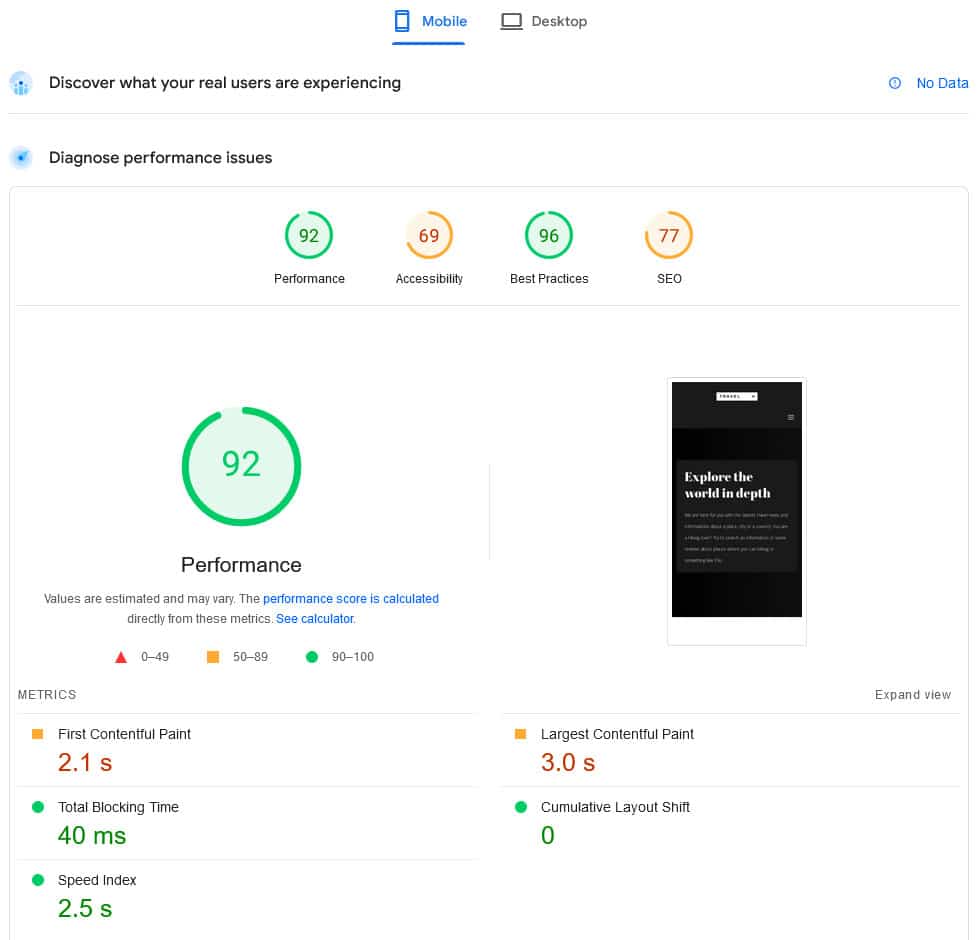
Here is a chart with before and after results for easier comparison:
| Before | After | Change | |
| Performance score (mobile) | 60 | 92 | +32 |
| Performance score (desktop) | 69 | 91 | +22 |
| First Contentful Paint (mobile) | 4.4 s | 2.1 s | -2.3 s |
| First Contentful Paint (desktop) | 1.8 s | 1.2 s | -0.6 s |
| Largest Contentful Paint (mobile) | 7.7 s | 3.0 s | -4.7 s |
| Largest Contentful Paint (desktop) | 2.2 s | 1.5 s | -0.7 s |
| Total Blocking Time (mobile) | 100 ms | 40 ms | -60 ms |
| Total Blocking Time (desktop) | 120 ms | 0 ms | -120 ms |
Start Eliminating Render-blocking Resources Today!
JavaScript and CSS files that prevent your web pages from rendering can be a main factor in making your website appear slow. They are a common factor in less-than-favorable speed tests and bad user experience.
Fortunately, there are plenty of things you can do to eliminate them and we have shown you the main ways to do so above. Most of it comes down to both reducing code and optimizing the way it is delivered to your visitors’ browser.
If you feel overwhelmed by the prospect of implementing these changes yourself, you can make your life easier by using WP Rocket. It comes with all the necessary functionality to speed up your website and make render-blocking resources on your WordPress website a thing of the past.
As you have seen in the case study above, all you need to do is simply install the plugin, activate it, and check a few boxes. However, enabling just a few options can greatly improve your site’s performance, user experience, and search ranking. Purchase WP Rocket today to take advantage of its powerful features immediately.