Table of Contents
Enabling text compression on WordPress is one of the best performance techniques to keep your website loading fast. When you run a speed test on Google PageSpeed Insights, you may see that “Enable text compression” is one of the recommendations coming from Lighthouse:
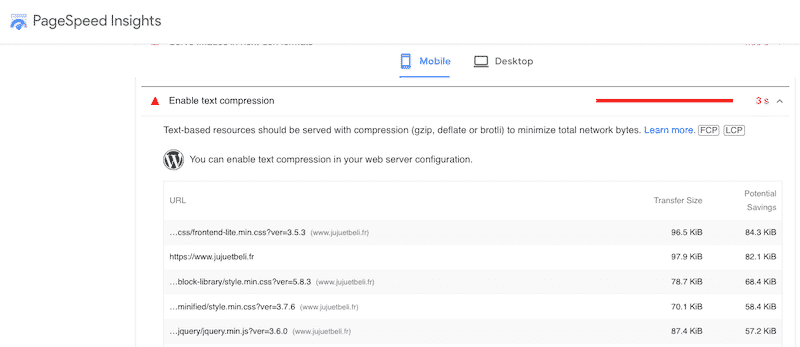
In this article, we explain how data compression works, how to activate it on your WordPress site and how to check that it’s enabled.
What’s Data Compression
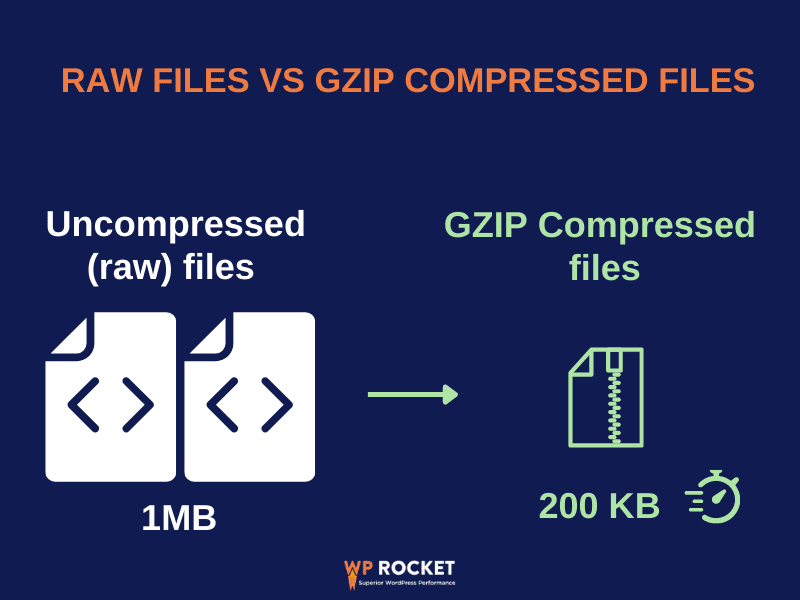
Data compression is the process of reducing file sizes thanks to the LZ77 and Huffman coding algorithms before sending them to browsers. There are several compression methods such as GZIP or Brotli that play a key role in showing billions of pages to users daily.
To give an example, that’s how a compressed HTML file looks like before and after the minification process:
Before Compression: 329 characters
<html>
<head>
    <style>
    /* my-banner for desktop only */
    .my-banner { font-size: 150% }
    .my-banner { width: 75% }
</style>
</head>
<body>
    <!-- my banner START -->
    <div>...</div>
    <!-- my banner END -->
    <script>
    my Scripts(); // just some scripts used on the web page
    </script>
</body>
</html>
With GZIP Compression: 142 characters
<html><head><style>.my-banner{font-size:160%;width:65%}</style></head><body><div>...</div><script>myScripts();</script></body></html>
Let’s go over the 2 types of compression algorithms recognized by Lighthouse, namely:
What’s GZIP Compression?
GZIP is an open-source compression algorithm that locates and removes the duplicate characters in your text files. It aims at compressing web pages on the server-side and decompressing them in the browser. The goal is to reduce the file size of your site (HTML, JS, and CSS) to get faster code.
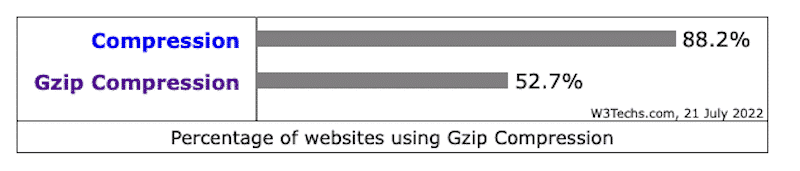
According to W3Techs.com, 88.2% of the websites on the internet use compression, and 52.7% of all websites use GZIP.
What’s Brotli Compression?
Similar to GZIP, Brotli is a compression algorithm developed by Google allowing text compression of a web page. Brotli was designed from the beginning to compress streams on the fly. Overall, Brotli is faster at compressing content on the server and decompressing it in the browser than in GZIP.
Do you want to see a more in-depth comparison between GZIP and Brotli? Check our guide!
How GZIP Compression Works
Data compression follows the same process for each web page on the internet. With the help of LZ77 and Huffman encoding, the whole technique can be broken down into 5 key steps:
- When a server receives a request for a web page, it checks the header of the request to determine if the browser supports GZIP.
- If it does, the server generates the markup for the web page and then applies GZIP.
- GZIP converts the markup into a compressed data stream, which is then transferred to the browser.
- When the browser receives the stream, it decompresses it and displays it to the user.
- What if the browser doesn’t support GZIP? The web server serves up an uncompressed data stream.
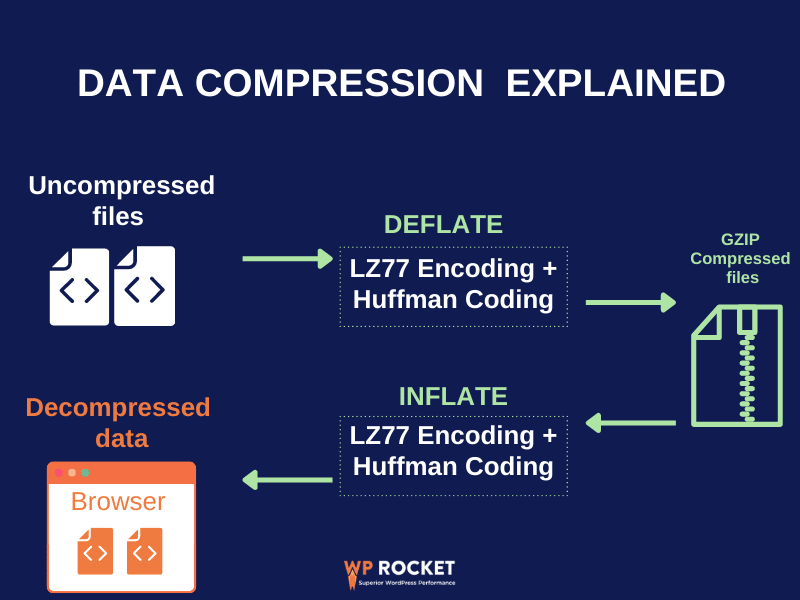
To go a little bit further in our explanation, let’s understand how the LZ77 and Huffman encoding work.
First, GZIP compression runs the LZ77 algorithm to remove redundancies in a small section of the raw data:

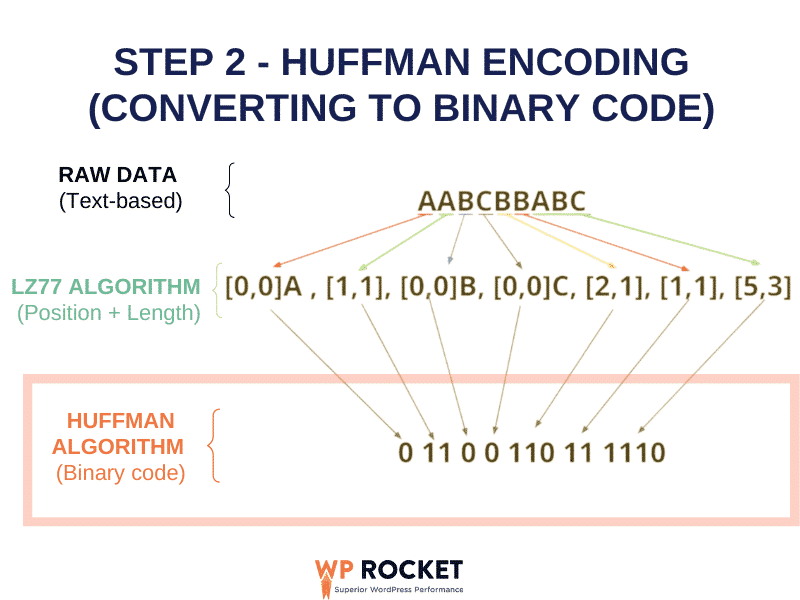
Then, the GZIP compressor uses the Huffman coding algorithm to compress it even further. The characters occurring more frequently get the least number of bits, while more rare characters get the highest number of bits:
Finally, if you want to see a real-life example Kinsta made an interesting explanation with the word “Bookkeeper”.
It has 10 characters but only 6 unique ones (2 “o”, 3 “e” etc.).
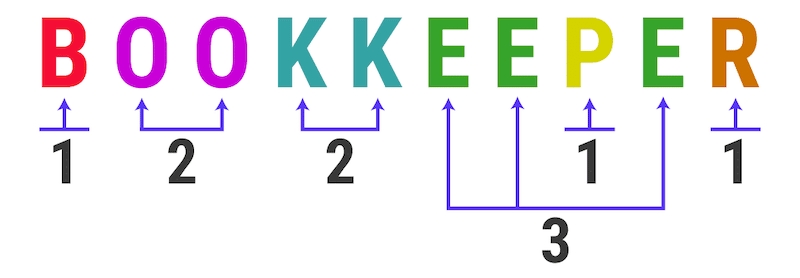
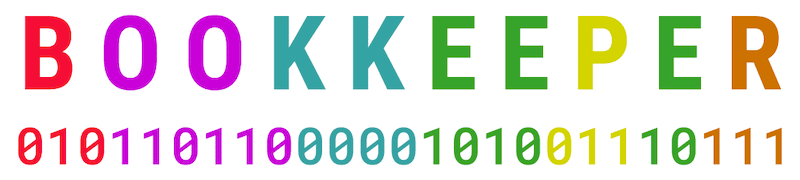
The Huffman coding algorithm losslessly compresses the whole text string by generating a binary tree with every unique letter as a leaf. It gives a binary code to each character according to its frequency:
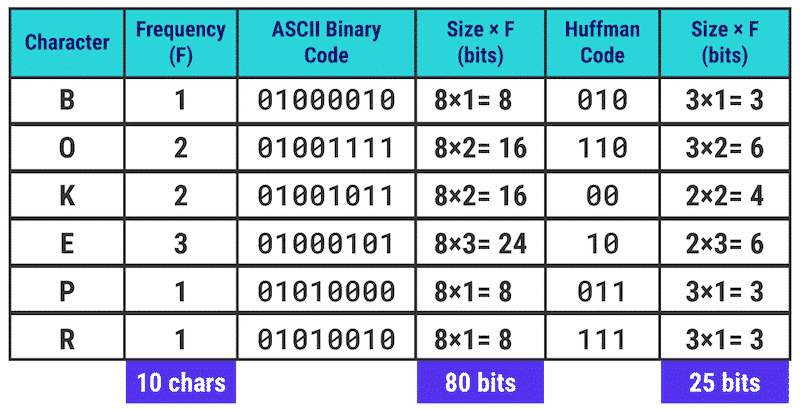
Result: GZIP saved us almost 70% of memory. It went from 80 bits to 25 bits, thanks to the Huffman conversion.
How Data Compression Impacts on Performance
Data compression has a positive effect on the performance of your WordPress site. Enabling text compression allows you to serve smaller text-based resources to your users. Smaller files mean faster files to download. As a result, visitors will be happy because they don’t have to wait to view the content on your page.
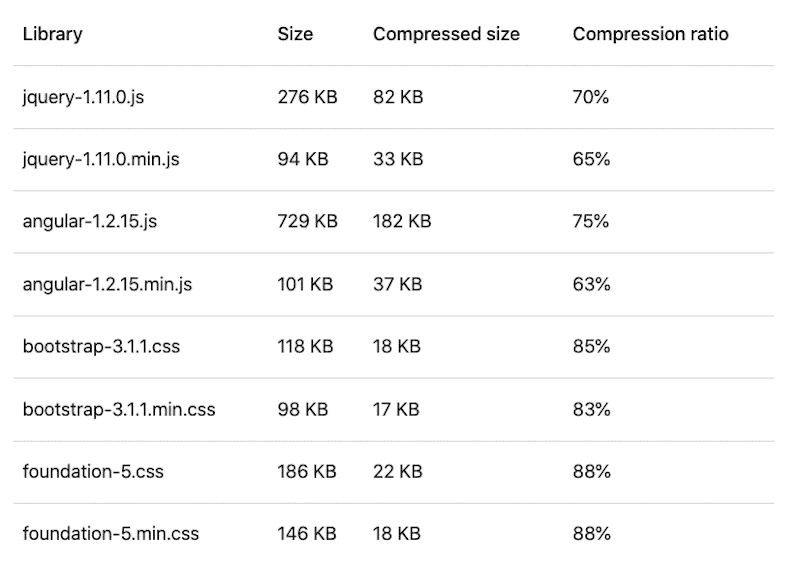
A study on Web.Dev shows how GZIP compression affects the most popular JavaScript and CSS frameworks. The results are impressive: GZIP compression can produce savings of 65-88%.
Performance Impact of GZIP compression on FID, LCP, and FCP
Data compression also impacts some of the Core Web Vitals, three key metrics developed by Google to measure performance and the overall user experience of a web page. Amongst them, we have the Largest Contentful Paint (LCP), the First Input Delay (FID), and the Cumulative Layout Shift (CLS). Another performance metric worth mentioning is the First Contentful Paint (FCP). You’ll understand why in the next paragraph.
First of all, let’s understand what those performance metrics are for.
LCP measures how long it takes for the main elements to load, FCP is about the first appearance of any content, and FID concerns browser responsiveness to a user action.
Now, you may wonder what’s the correlation between the three metrics and GZIP compression. Well, those metrics measure when the data will be available to a user. So if you compress that data, you get lighter files that are available faster for the user. In fact, GZIP compression boosts your FID, FCP, and LCP scores by serving smaller files to the browser. As a result, the metrics are more likely to be in their respective green threshold when you are using compression.
Data Compression Impact on Lighthouse Performance Scores
The GZIP compression algorithm can reduce the size of resources by up to 90%! As a result, you’ll reduce the page loading times by up to 50% and pass the specific audit on PageSpeed Insights.
How to Check if GZIP Compression is Enabled and is Working
Before enabling GZIP on your site, it’s a good idea to check if it’s already switched on. There are different ways to check if your host supports GZIP compression. We’ll go over four of them.
- Speed Tests (PSI, GTmetrix, etc…)
- Online GZIP Compression Tools
- Check The “content-encoding: gzip” Response Header in Developer Tools
- Create a phpinfo File
Let’s go over them!
1. Speed Tests on Lighthouse (PSI, GTmetrix, etc…)
To check if GZIP compression is enabled and working, you can use performance tools like PageSpeed Insights or GTmetrix. In their audit sections, if some text-based content is not compressed, the following audit will be triggered:
| Audit section on PSI | Audit section on GTmetrix |
 |  |
2. Online GZIP Compression Tool
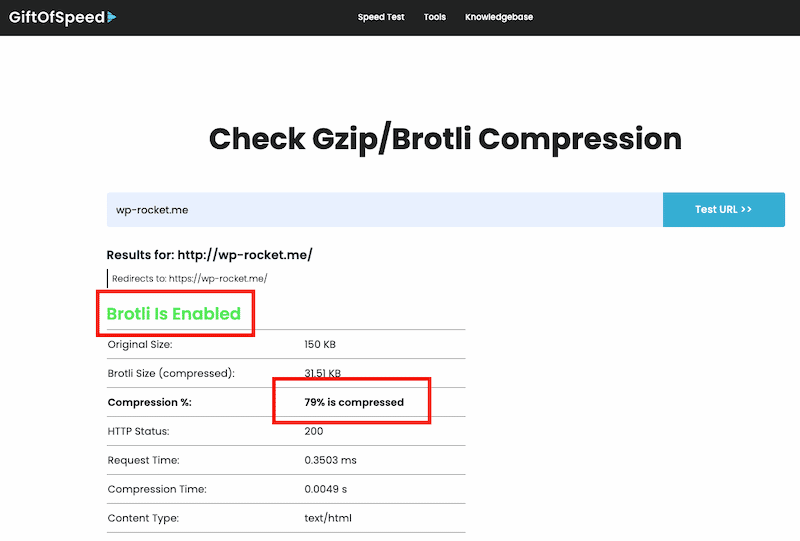
The easiest way to check if your site has GZIP enabled is to head over to Giftofspeed or HTTP compression test and scan your site. Both tools check if your web server sends the GZIP HTTP header to your visitors’ browsers.
Simply enter the URL and click on the “Test URL” button to launch the verification. In our example, Brotli is enabled, and 79% of our data is compressed.
3. Check The “content-encoding: gzip” Response Header in Developer Tools
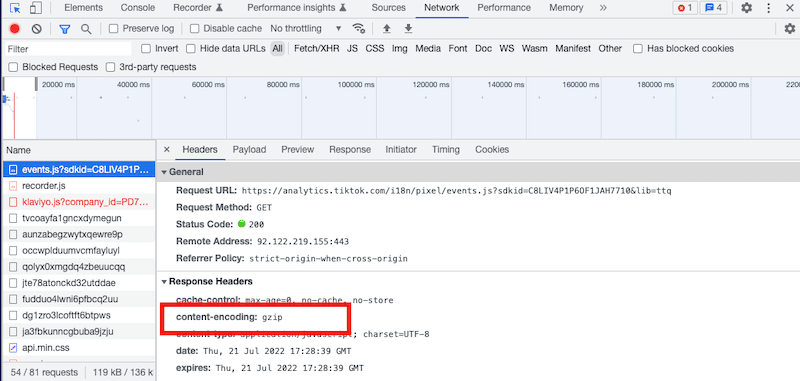
The third way to check if a website delivers GZIP compressed content is by verifying the content-encoding: gzip HTTP response header from the dev tools.
To verify, open your Dev Tools and head over to the “network” section. Go to the “Response Headers” section. If you see “GZIP” or “Brotli” in the content-encoding row, your text-based content is compressed.
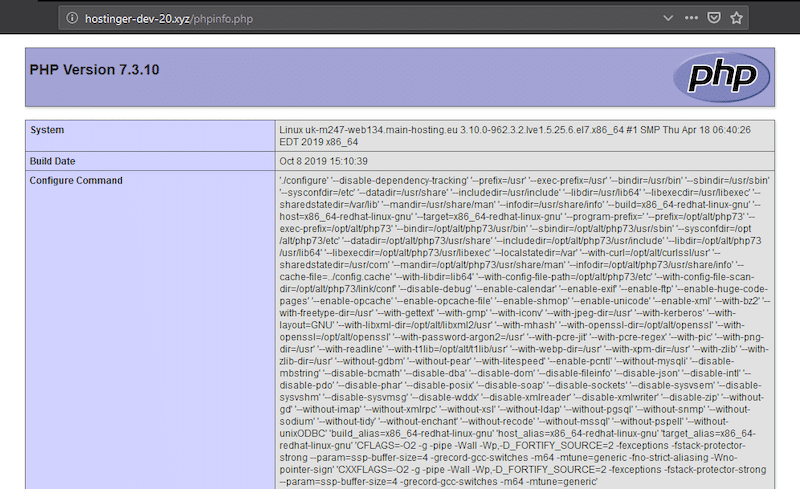
4. Create a phpinfo File
If you are comfortable with PHP settings for your site, you might want to create a phpinfo page to activate data compression.
To do this, you just need to create a new page for your site. Here’s how to do it via cPanel:
- Log in to cPanel of your site and open the file manager (from your hosting provider)
- Navigate to the directory you are working with, i.e. the root folder for your site, which should be public_html.
- Create a new file and name it phpinfo.php
- Open the file and enter the following code:
<?phpphpinfo();?> - Save your changes
- Open a new tab in your browser. If you created the file in your site’s root folder (i.e. public_html), go to yoursite.com/phpinfo.php to view your new phpinfo page
- Scroll down the page and look out for the mod_gzip or mod_deflate modules. If they’re listed and enabled, GZIP compression should be available.
How to Enable Data Compression on WordPress (Manually)
Enabling text compression on WordPress means activating the GZIP or Brotli algorithm on your text-based data to create smaller files and boost performance.
If you don’t have GZIP compression enabled yet, there are several techniques you can follow, such as asking your host, setting up a CDN, or manually doing it on the web server you’re using to host your site.
1. Ask Your Hosting Provider
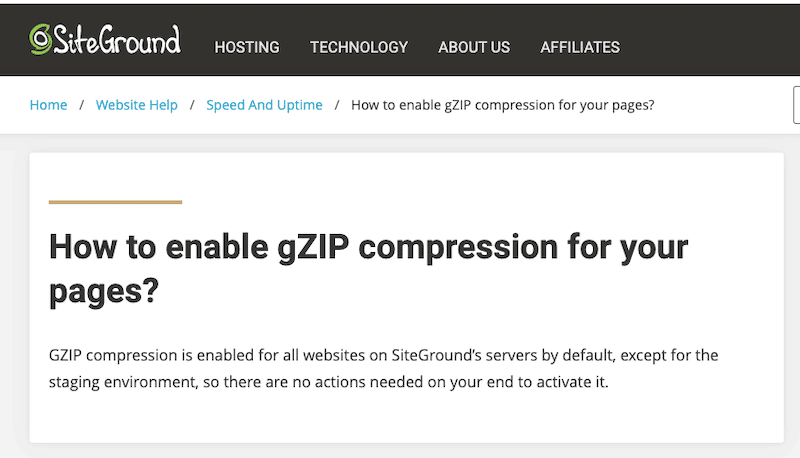
One of the most straightforward ways to enable Brotli or GZIP compression on your site is to ensure your host does this by default before choosing it. Siteground, for example, enables GZIP compression on all their websites by default:
2. Set up a CDN
By using a CDN like RocketCDN, you’ll automatically get the GZIP compression activated on all your data. RocketCDN runs on the StackPath network. Therefore GZIP compression is enabled by default on all StackPath CDN sites. The CDN compresses JS, HTML, CSS, and text files automatically.
The three following methods depend on which web server you’ve chosen to host your website.
3. Enable GZIP Compression on Apache
To enable GZIP compression on Apache servers, you need to use its “mod_filter” and “mod_deflate modules” and configure them. To guide Apache to compress the data before sending it to the browser, you can use “directives”.
There are two options to edit Apache’s server configs based on your access level:
Situation A: you can access the main server configuration file (usually called httpd.conf). Great! You can use it to configure Apache.
Situation B: you can’t access the httpd.conf. In that case, you need to configure Apache using the .htaccess file.
In most cases, you’ll have only access to the .htaccess file, so our tutorial will be for situation B (activating GZIP through .htaccess file). Make sure you add the code above after any other directives already in your .htaccess file.
<IfModule mod_deflate.c>
  # Compress HTML, CSS, JavaScript, Text, XML and fonts
  AddOutputFilterByType DEFLATE application/javascript
  AddOutputFilterByType DEFLATE application/rss+xml
  AddOutputFilterByType DEFLATE application/vnd.ms-fontobject
  AddOutputFilterByType DEFLATE application/x-font
  AddOutputFilterByType DEFLATE application/x-font-opentype
  AddOutputFilterByType DEFLATE application/x-font-otf
  AddOutputFilterByType DEFLATE application/x-font-truetype
  AddOutputFilterByType DEFLATE application/x-font-ttf
  AddOutputFilterByType DEFLATE application/x-javascript
  AddOutputFilterByType DEFLATE application/xhtml+xml
  AddOutputFilterByType DEFLATE application/xml
  AddOutputFilterByType DEFLATE font/opentype
  AddOutputFilterByType DEFLATE font/otf
  AddOutputFilterByType DEFLATE font/ttf
  AddOutputFilterByType DEFLATE image/svg+xml
  AddOutputFilterByType DEFLATE image/x-icon
  AddOutputFilterByType DEFLATE text/css
  AddOutputFilterByType DEFLATE text/html
  AddOutputFilterByType DEFLATE text/javascript
  AddOutputFilterByType DEFLATE text/plain
  AddOutputFilterByType DEFLATE text/xml

  # Remove browser bugs (only needed for ancient browsers)
  BrowserMatch ^Mozilla/4 gzip-only-text/html
  BrowserMatch ^Mozilla/4\.0[678] no-gzip
  BrowserMatch \bMSIE !no-gzip !gzip-only-text/html
  Header append Vary User-Agent </IfModule>
4. Enable Brotli Compression on Apache (brotli_module)
Follow our steps below to enable Brotli compression on Apache:
Step 1 – Install Brotli package on your system
For Ubuntu and Debian systems, it’s available in the default repositories. Open the terminal and type the following code:
$sudo apt install brotli -y Step 2 – Enable the brotli module
The Apache server contains the Brotli module default. You can enable the brotli module in Apache with the following command:
sudo a2enmod brotli
Step 3 – Configure Apache virtual host to enable compression
Simply add the below code in the virtual host configuration file:
<IfModule mod_brotli.c>
    AddOutputFilterByType BROTLI_COMPRESS text/html text/plain text/xml text/css text/javascript application/javascript
</IfModule>
Important: save the configuration file, close it and reload the Apache service to apply changes.
Save the configuration file and close it. Then reload the Apache service to apply changes:
sudo systemctl restart apache2
That’s it! Brotli compression should now be enabled in the Apache server.
5. Enable GZIP Compression on NGINX
If your site is hosted on an NGINX server, enabling GZIP compression is fairly easy.
- Open up your nginx.conf file. Typically, you can find this file in your server’s /etc/nginx/nginx.conf location.
- Add the following directive:
gzip on;
- Reload Nginx after saving your nginx.conf file with the following terminal command: sudo service nginx reload
For more on how to configure compression and decompression on NGINX, check out this handy guide on the NGINX site. You can also head to the official Nginx documentation for a list of all the ngx_http_gzip_module directives.
6. Enable Brotli Compression on NGINX (ngx_brotli)
To enable Brotli Compression on NGINX you’ll need two modules:
- ngx_brotli filter module – for compressing responses on-the-fly
- ngx_brotli static module – for serving pre-compressed files
Step 1: Install the nginx-plus-module-brotli module
For Amazon Linux 2 LTS, CentOS, Oracle Linux, and RHEL:
$ yum install nginx-plus-module-brotliFor Debian and Ubuntu:
$ apt-get install nginx-plus-module-brotliFor SLES 15:
$ zypper install nginx-plus-module-brotliStep 2: Configure
Now you can configure Brotli modules in the NGINX Plus configuration file nginx.conf.
- Enable dynamic loading of Brotli modules with the load_module directives specified in the top-level (“main”) context:
load_module modules/ngx_http_brotli_filter_module.so; # for compressing responses on-the-fly
load_module modules/ngx_http_brotli_static_module.so; # for serving pre-compressed files

http {
    #...
}
2. Enable Brotli compression and perform additional configuration as required by the ngx_brotli module. Brotli compression can be configured on the http, server or location levels:
http {
    server {
        brotli on;
        #...
    }
}
3. Test the configuration and reload NGINX Plus to enable the module:
$ nginx -t && nginx -s reloadAnd that’s it! You can find more detailed steps in NGINX official documentation.
7. Enable GZIP or Brotli Compression on IIS Web Server
Note that the IIS Web Server created by Microsoft is not fully compatible with WordPress, so it’s quite rare to find any WordPress site using this technology. However, if you are using this setup, please refer to the official Microsoft documentation.
How to Enable Data Compression on WordPress (With a Plugin)
If you are not too comfortable opening your config files and running some commands, or if you simply want to save time, then you may use a WordPress plugin to enable data compression on your WordPress site.
Most cache and performance WordPress plugins come with the GZIP compression feature. They activate it out of the box or include an option directly in the cache settings panel.
Let’s take the example of WP Rocket which also appears to be one of the best caching plugins for WordPress.
If you host your WordPress site on an Apache or Litespeed server, WP Rocket automatically lets you add GZIP compression rules. It enables GZIP compression by adding mod_deflate module to the .htaccess file right after activating the plugin!
Lighthouse also recommends using a plugin like WP Rocket to enable text compression:
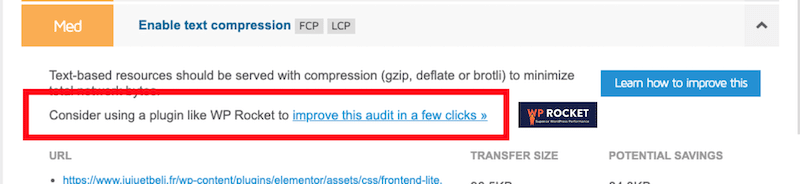
WP Rocket does not only apply GZIP compression. It also helps you improve your Core Web Vitals and overall web performance. It comes with powerful features such as lazy-loading, removing unused CSS, minifying CSS and JS, delaying the non-critical JS, and much more!
Let’s run a simple performance audit on PageSpeed Insights before and after activating WP Rocket on my WordPress site.
| Overall performance and Core Web Vitals (no WP Rocket) | ✅ Overall performance and Core Web Vitals (with WP Rocket) 🚀 |
 |  |
| Audit section in red (no WP Rocket) | ✅ Passed audit section in green (with WP Rocket) 🚀 |
 |  |
| Lighthouse warning “Enable Text Compression” (no WP Rocket) | ✅ Fixed Lighthouse warning “Enable Text Compression”(with WP Rocket)🚀 |
Wrapping Up
You should now understand why data compression is essential for web speed and the user experience.
| 📝 Data compression in a nutshell: Smaller compressed files → Less work for the servers → Less content to parse and download for the browser → Faster loading time |
Data compression can be tricky to perform manually, but with a plugin like WP Rocket, the text-based optimization technique becomes very easy! Using WP Rocket and all its optimization features, you’ll enhance the Core Web Vitals grade and the performance score of your WordPress site.
Haven’t tried WP Rocket yet? Save yourself time and let WP Rocket do the data compression job for you. You don’t even have to touch any settings!