
How to Easily Clear WordPress Cache: 4 Methods
Table of Contents
If you’ve ever made changes to your WordPress website, but they just didn’t show up, it’s probably a good idea that you learn how to clear your site’s cache.
Adame Dahmani, Product Manager at WP Rocket, explains:
Caching speeds up your site by serving static pages, but it can also hold onto outdated content. WordPress sites use multiple cache layers: browser (which can’t be cleared remotely), plus plugin, server, and CDN. A solid caching strategy, along with a well-propagated clearing mechanism, is key to keeping content relevant for visitors.
Since we already have a detailed article on how to clear browser cache, in this guide, we’ll walk you through how to clear cache everywhere related directly to your WordPress site.
Clearing Site Cache in WordPress: Main Takeaways
Strapped for time and in a hurry? Here’s the TL;DR:
- Caching means storing website files in a temporary location for easier access. It improves website speed but can cause issues when it holds on to outdated content.
- WordPress sites can be cached at multiple levels, such as the user browser, server, and CDN.
- Hosting and CDN providers offer built-in tools to clear cached resources quickly and easily. You just have to know where they are located.
- You can manually empty the cache of your WordPress site via FTP or SSH if you can’t access the dashboard.
- One of the easiest ways to manage caching in WordPress is to use a performance plugin like WP Rocket. All plugins that offer caching usually have their own options to purge cached files from the website back end.
- If your website displays issues like broken layouts or outdated content after site changes, caching could be the problem.
- Verify that issues have been resolved after emptying your caches.
How to Empty Server Cache at Your Hosting Provider
Many WordPress hosting providers, especially those offering managed hosting, include server caching as part of their service. They also usually have built-in tools to clear the cache on demand. The process varies between hosting companies, but it’s usually just a few clicks.
Below are instructions for how to clear cache of your WordPress site on some of the most popular hosting providers. If yours is not among them, you should be able to find instructions in the help section or documentation of your provider. If that still doesn’t yield anything, get in touch with support.
SiteGround
To clear the server cache on SiteGround, log in to your hosting dashboard. Go to Websites and choose Site Tools for the website you want to manage.
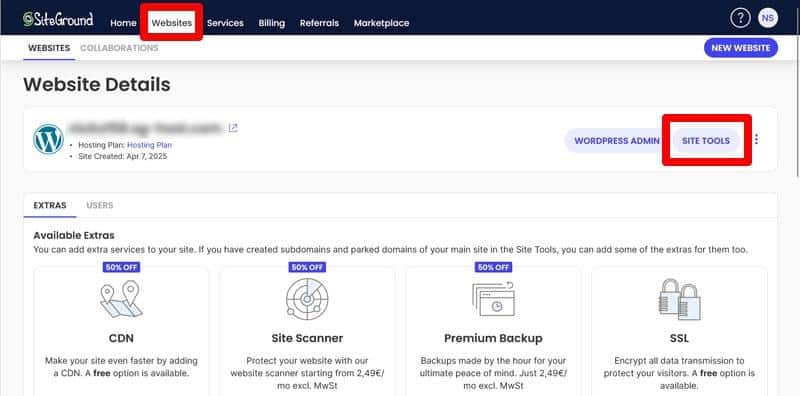
In the following screen, choose Speed > Caching, then use the Flush Cache button under the Dynamic Cache or Memcached tabs (it’s a little broom icon).
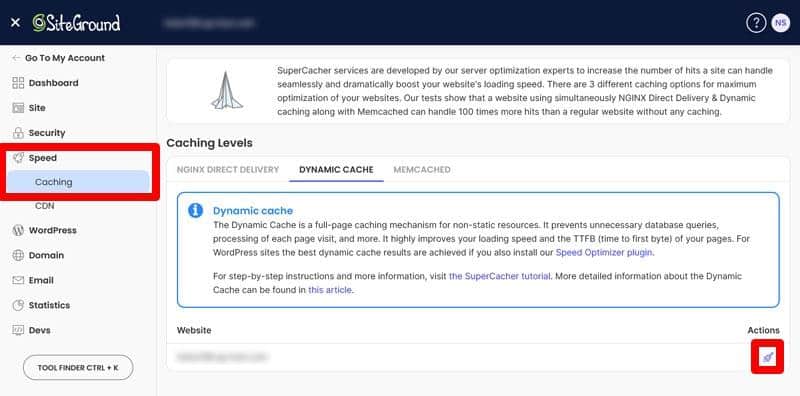
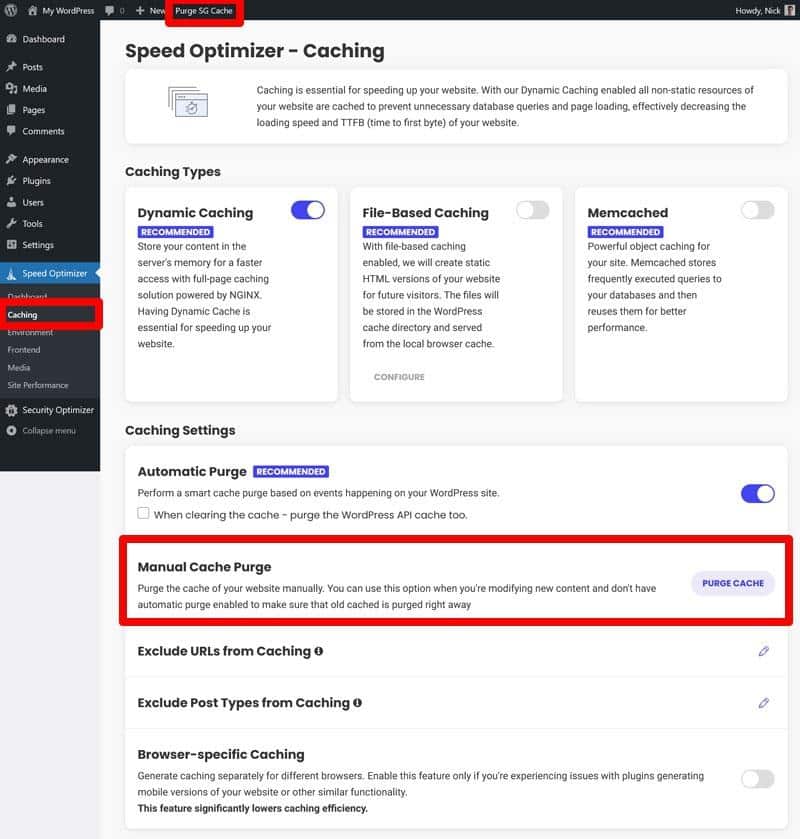
If you’re using Siteground’s Speed Optimizer plugin, you can also clear cache directly from your WordPress admin bar or under Speed Optimizer > Caching and then Purge Cache.
Bluehost
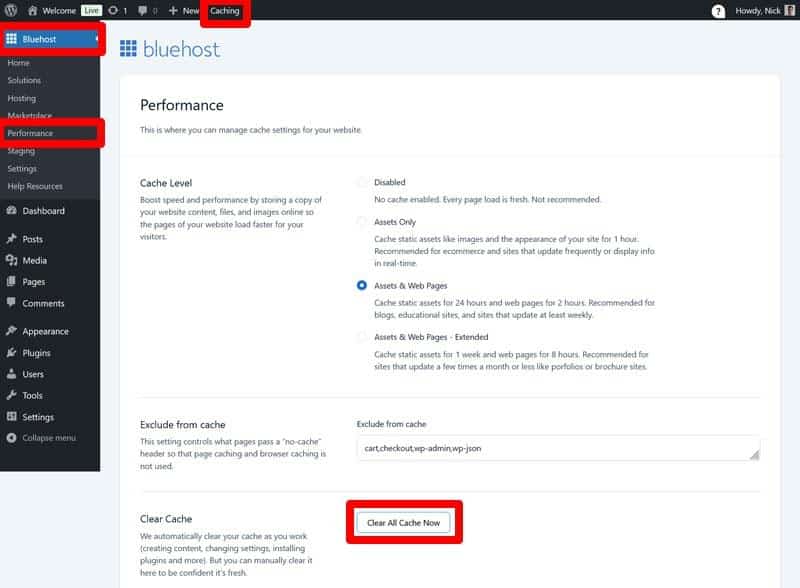
On Bluehost, start by logging in to your hosting dashboard. Go to the Websites section, and choose your site. Under the Speed tab, you’ll find options to clear the entire cache or for specific URLs.
If you’re logged into your WordPress dashboard, you’ll also find options for this under Bluehost > Performance.
Kinsta
To clear the cache with Kinsta, access the MyKinsta dashboard and click on WordPress Sites.
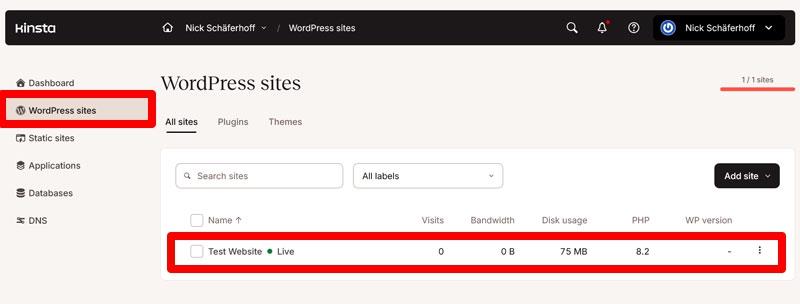
Click the name of the WordPress site you want to clear cache for, then go to the Caching tab, and use the available options to delete the different types of caching Kinsta offers.
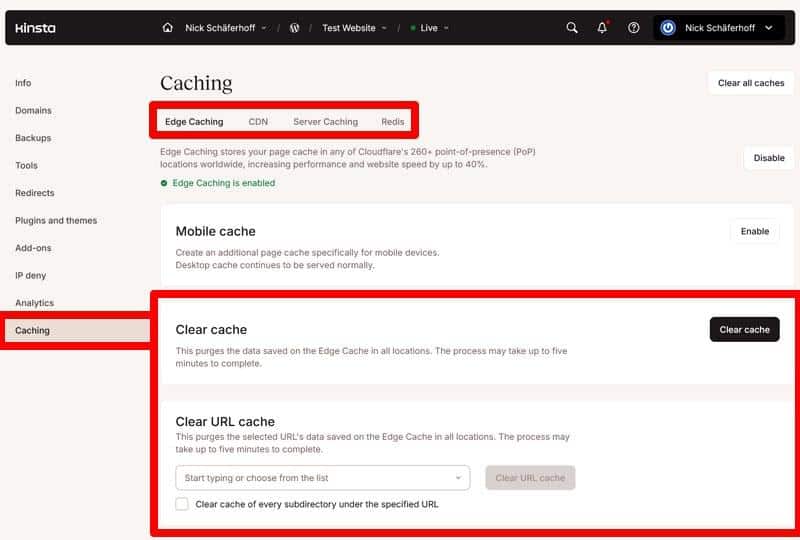
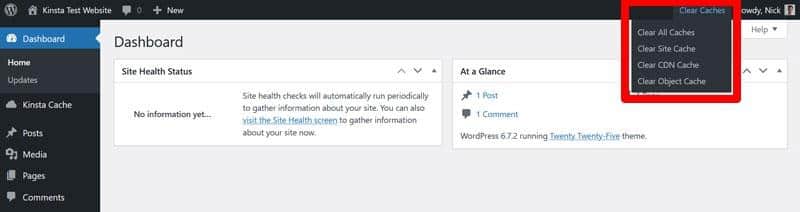
You can also do this from the WordPress dashboard in the admin bar
WP Engine
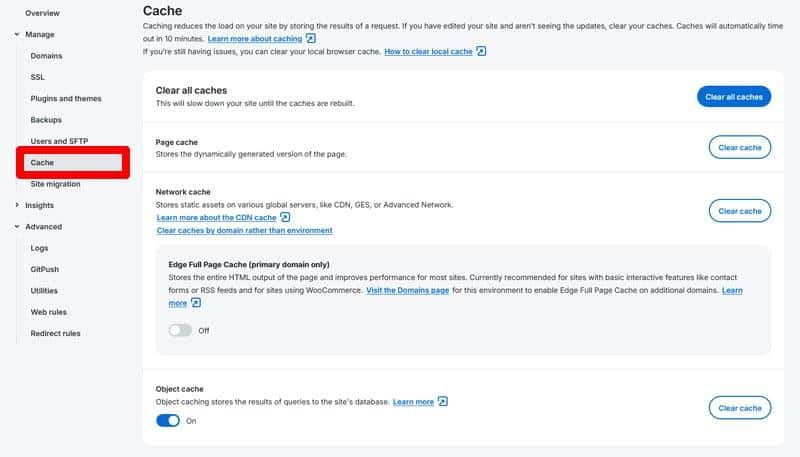
WP Engine makes it easy to clear cache from your WordPress dashboard. Click on the WP Engine menu in the admin sidebar, then select Caching. From there, click the Clear all caches button.
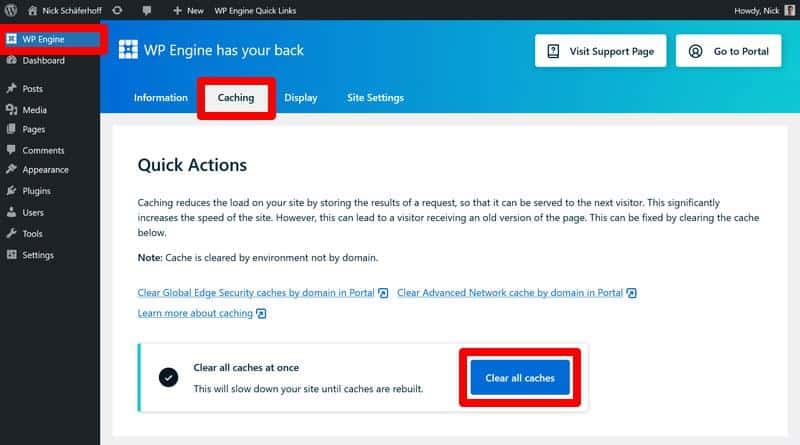
This will clear both server-side and object cache. You also find options to purge site cache in the WP Engine User Portal as well as more detailed configurations.
Hostinger
Finally, to clear cache on Hostinger, log in to the hPanel, and go to Hosting. Click on Manage next to the domain of the website you want to manage. Then, access Advanced > Cache Manager. If your server cache is enabled, you can empty it using the Purge All button.
Adame Dhmani explains:
WP Rocket has built-in support to propagate cache purges across all major hosting platforms and servers that use additional cache layers. This gives our shared users a worry-free experience managing cache, no matter where it’s stored.
How to Purge the Cache of Your CDN
If configured to handle page cache, Content delivery networks (CDNs) store cached copies of your site on servers around the world. This helps speed up loading times because visitors can receive the data from the source nearest to them.
Adame Dahmani points out:
When handling page cache, CDNs need clear instructions on cache lifetime and content freshness. Even if you’ve cleared the cache on your website and server, the CDN may still serve an outdated version until it’s manually purged or receives a remote request to do so.
However, CDNs can continue serving outdated versions of your content even after you’ve made updates. To make sure changes appear globally, you may need to manually purge your CDN cache. Here’s how to do that for some of the most popular CDN services.
Cloudflare
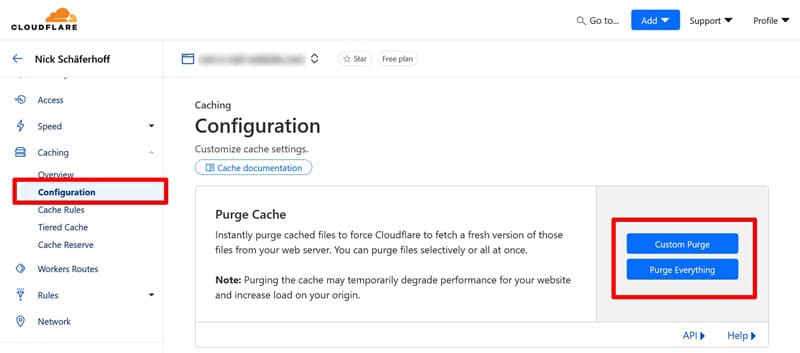
To clear your CDN cache with Cloudflare, log in to your dashboard and select the account and domain you want to manage. Go to the Caching tab and click on Configuration. You can choose Purge Everything to remove all cached files or use Custom Purge to target specific URLs.
KeyCDN
In your KeyCDN dashboard, go to the Zones section and select the zone associated with your WordPress site. Click on Manage, then scroll down to the Purge options. You can choose Purge Zone to clear all cached content or use Purge URL to target specific pages.
RocketCDN
RocketCDN, which integrates with WP Rocket, makes cache clearing simple. Log into your WordPress dashboard and go to Settings > WP Rocket. Under the CDN tab, you’ll find the option to Clear Cache.

Delete WordPress Cache Manually (2 Ways)
Clearing your WordPress cache manually is sometimes necessary if you can’t access the WordPress dashboard. This method is more technical but gives you direct access to cached files.
Be aware that the availability of this depends on your setup. WordPress does not have caching built in, so you can only manually clear your site’s cache if you have enabled it, either through your hosting provider or a plugin.
This method also only works for file-based caching, not other methods.
Via FTP
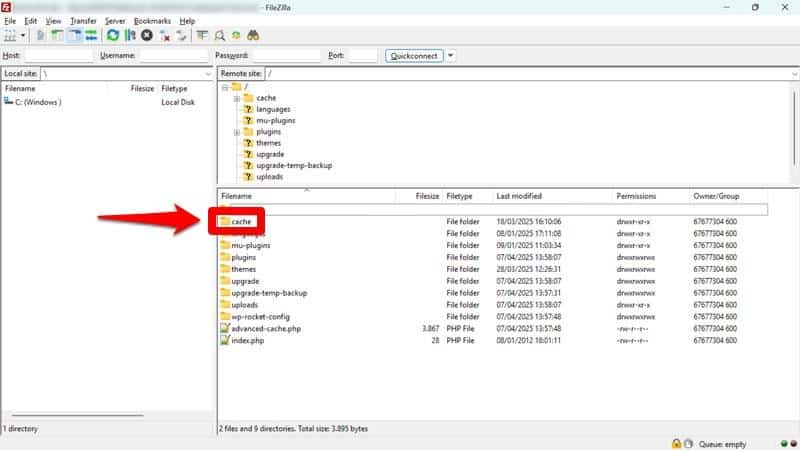
Connect to your site using an FTP client such as FileZilla. You should get the credentials for that (URL, port, username, password) from your hosting provider.
Navigate to the /wp-content/ directory in your WordPress installation. Look for a folder named /cache/ or similar.
Open the folder and delete the contents. Do not delete the folder itself.
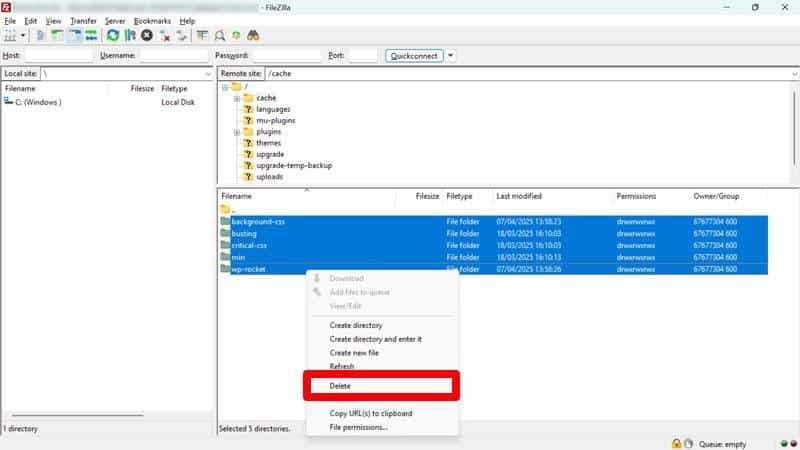
After clearing, WordPress will regenerate fresh cache data automatically during future page loads. For WP Rocket, you can find additional details in the documentation.
Via SSH
SSH stands for Secure Shell Protocol. You can use it to perform tasks on your server with a command line tool. Connect to your server via SSH using an application like Terminal (macOS/Linux) or PuTTY (Windows).

Again, your hosting provider should give you the credentials you need.
Navigate your WordPress installation directory using the cd command and, again, look inside the /wp-content/ folder for the caching directories.
Use a command like rm -rf wp-content/cache/* to delete all files inside the cache directory. Be cautious not to delete the entire folder structure, just the files inside.
If your server uses a persistent object cache, you can use wp cache flush with WP-CLI to clear it.
To use WP-CLI, make sure it’s installed and then run the wp cache flush command from the root of your WordPress site. This command clears the object cache and forces WordPress to rebuild it dynamically.
How to Clear Cache with a WordPress Plugin
Using a plugin is one of the easiest ways to manage and clear the cache on a WordPress site. Most popular plugins that offer caching include a one-click option to purge cached content directly from your WordPress dashboard. Here’s how to do it with a few of the most widely used plugins.
WP Rocket
WP Rocket makes it easy to clear your WordPress cache with a single click. Just like for the RocketCDN cache, from your WordPress dashboard, just go to Settings > WP Rocket and click the Clear Cache button.
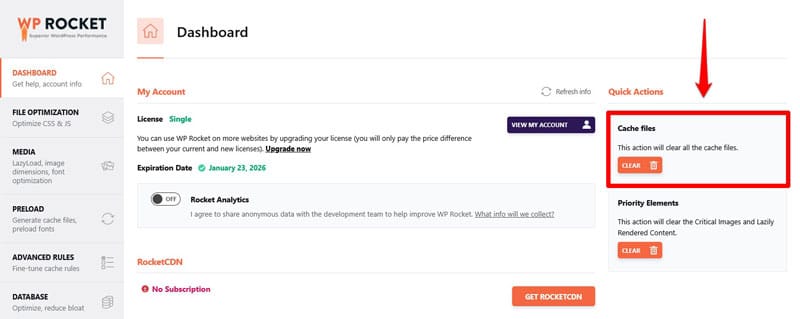
You can also purge the cache from the WordPress admin bar at the top of the screen.
You can also purge the cache from the WordPress admin bar at the top of the screen.
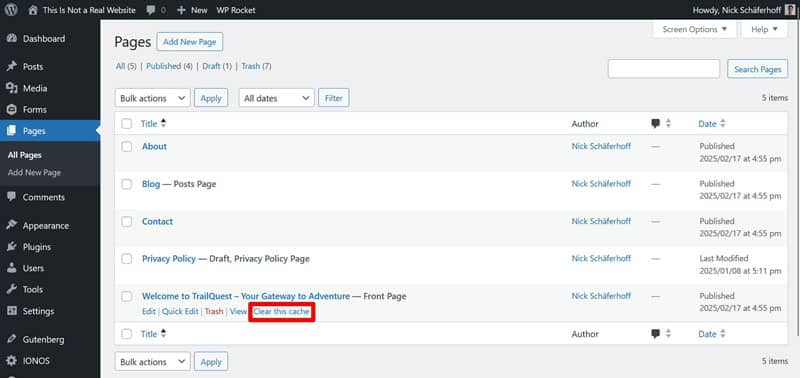
In addition, you have the ability to clear the cache of individual pages either inside the WordPress editor or from the Pages or Posts menu by hovering over the entries there.
WP Rocket automatically enables browser and server caching on your site (with a separate cache for mobile devices) when you enable it. It also offers many options to customize your caching settings. Among others, you can determine the caching lifespan and define pages, cookies, and user agents for which you don’t want to use caching.
Adame Dahmani adds:
“WP Rocket automatically clears cache using both global and selective triggers. Global purging happens in cases like theme changes, where a full refresh is needed. Selective purging ripples clearing cache to related content. For example, updating a post title or featured image will also refresh its category pages where these items are being used. This automated logic helps prevent stale or irrelevant content from being served to visitors.
Besides that, WP Rocket automatically clears its cache selectively at certain events. For example, when you publish new or update existing content, change themes, create new categories, or perform any other action that should have an impact on your site visitors’ experience. More info in the documentation.
Besides caching, WP Rocket has many more features that make your WordPress website faster, such as:
- Lazy loading for images and videos
- Deferring render-blocking resources
- Preloading cache, links, external files, and fonts
- Database optimization
The plugin also makes it easy to connect your site to a CDN, including WP Rocket’s own RocketCDN.
Finally, WP Rocket automatically implements many additional performance improvements in the background. They include GZIP compression, minifying CSS and JavaScript files, and optimizing images above the fold to improve Largest Contentful Paint.
| 🚀 As a matter of fact, the plugin applies 80% of performance best practices to your site as soon as it’s activated. That means your website gets faster immediately without requiring you to do anything by hand. |
LiteSpeed Cache
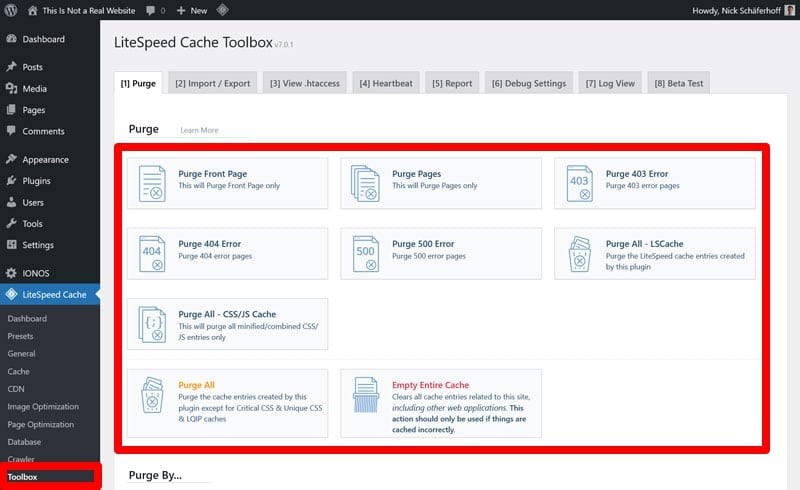
If you use the LiteSpeed Cache plugin for your WordPress website, go to LiteSpeed Cache > Toolbox in your dashboard. Here, click the Purge All button to clear everything, or choose a more specific purge option like Purge Front Page or Purge Pages.
W3 Total Cache
W3 Total Cache has a drop-down menu to clear all or individual caches at the top of every page in the Performance menu.
It also has similar options under Performance in the WordPress admin bar.

WP Super Cache
Users of WP Super Cache can access the Delete Cache button in the WordPress admin bar. Alternatively, head to Settings > WP Super Cache and click the Delete Cache button under the Easy tab.

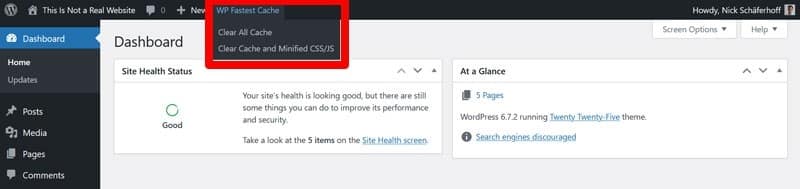
WP Fastest Cache
Head to the WP Fastest Cache menu in your WordPress dashboard and then the Clear Cache tab. Use the buttons to clear all caches or additionally delete minified CSS/JS files.
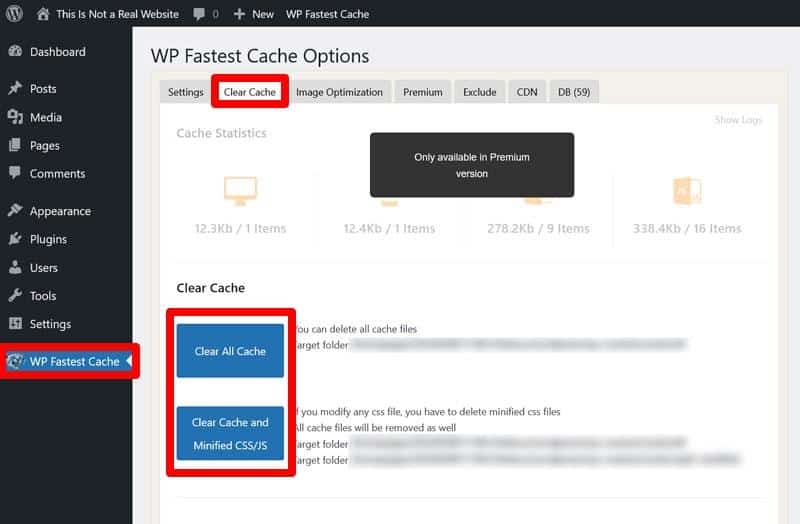
The same options exist in the WordPress admin bar.
What Does Clearing Your Cache Mean and Why Is It Important?
So far, we have only talked about how to clear the cache on your WordPress site. We haven’t touched on what it means and why you should do it.
To do so, you first need to understand what caching is. It means storing your WordPress site’s pages, styles, scripts, and other files in a temporary location so they can be accessed more quickly, and the server doesn’t have to rebuild every page from scratch for each visitor.
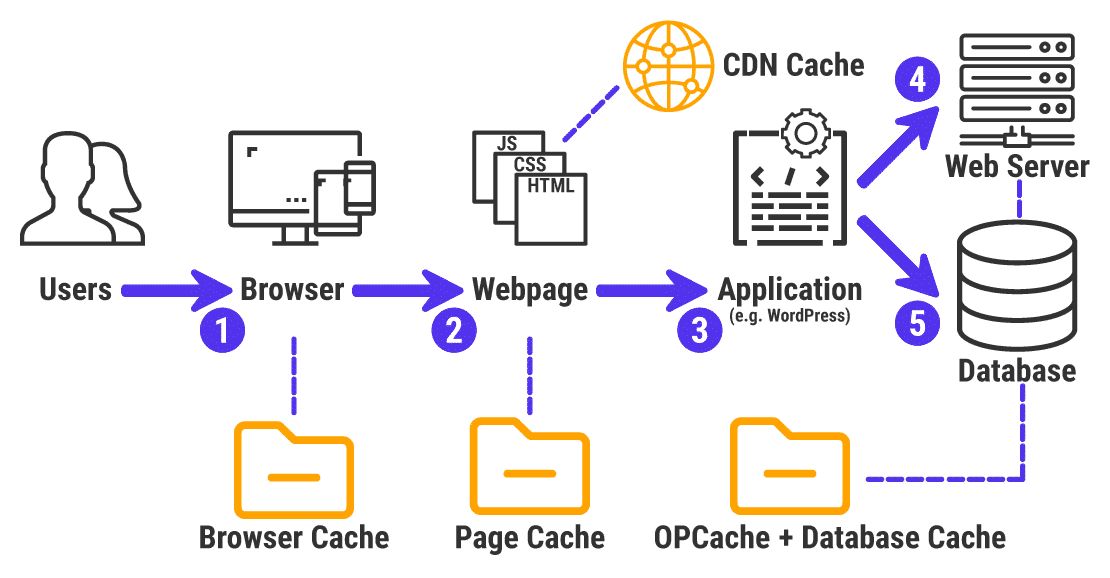
It’s a great technique to speed up your website because it allows your visitors’ browsers to access and load the files needed to display your site faster. As we have seen, caching can also happen at different levels — in the browser, on the server, or through a CDN. You can find more details in our article on how to cache a website.
Clearing your cache simply means deleting those files to be updated with newer versions. This makes sense because the cache can sometimes contain outdated variations of your content or cached files can become corrupted.
When either of those happens, modifications to your WordPress theme, plugins, or content might not show up immediately for both you and your visitors. Clearing your cache makes the most recent version of your site available, including any updates you’ve made. It also helps solve WordPress-specific issues like broken shortcodes, outdated widgets, or missing style changes from the Customizer.
| 💡 Ideally, your caching solution rebuilds its cache automatically at certain events, such as site updates, as WP Rocket does. But, if that isn’t working properly, it’s really helpful to know how to clear the various caches of your WordPress site manually to make your changes appear. |
How to Know If the Cache of Your WordPress Site Needs to Be Flushed
Another question is, when do you need to empty your cache? Signs that your WordPress site has problems with an outdated cache are:
- Updates to posts, images, or menus appear in the WordPress dashboard but not on the live site.
- You make changes in the Customizer, with a page builder, or by editing theme files but don’t see them reflected on the front end of your site.
- Forms won’t submit or you see styling errors or broken layouts after installing or updating plugins.
- One browser shows the correct version of your site, while another still displays the old one.
- Issues persist even after you do a hard refresh in your browser (Cmd/Ctrl + Shift + R or Cmd/Ctrl + F5).
When in doubt — especially after making visible changes — it’s a good idea to clear your cache just to be safe.
How to Verify Cache Has Been Cleared
After purging your cached files, it’s a good idea to double-check that your changes are being served to visitors. Here are ways to do that:
- Check for confirmation messages from your caching plugin, hosting, or CDN’s dashboard that the cache has been emptied.
- Open your site in an incognito or private browsing window to bypass your browser cache.
- Use a different browser or device to view your site.
If everything looks updated and consistent across devices, you’ve been successful.
Don’t Let Caching Stand in the Way of Site Updates
If you’ve ever felt like your WordPress site is playing tricks on you by continuing to show old content after refreshing it, you’re not alone. Luckily, most of the time, you can solve the issue by simply clearing your website cache.
At this point, you should have a pretty good idea how to do so on different levels of the loading process. Want an even easier way? Take advantage of automatic and one-click cache purging as well as many more performance optimizations with WP Rocket!