
How to Cache Dynamic Content in WordPress
Table of Contents
Caching is crucial for WordPress. It’s one of the primary ways to make WordPress sites load as fast as possible. Caching is what WP Rocket excels at. However, it’s not that easy to cache highly dynamic WordPress sites, especially those that display personalized pages to every user. But it’s possible to cache dynamic content with the right techniques and technology.
In this article you’ll learn what’s dynamic content, how dynamic content caching works, its various benefits, and the multiple ways you can implement it across different server configurations.
Let’s get started!
Static Content vs Dynamic Content
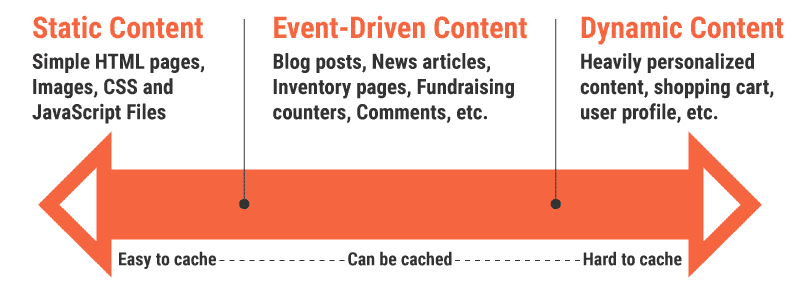
Static content remains the same on webpages for all users. The website owner can update it, but after that the new content will still be static for all users. Static content includes files such as HTML, CSS, JavaScript, images, and videos.
An example of static content is this very blog post you’re reading. Since static content doesn’t often change (or not at all), caching and delivering it is super easy.

Dynamic content isn’t the same on webpages for all users. It’s customized to every user based on several factors such as location, device, time of day, user profile settings, etc. Dynamic webpages can also change on-the-fly based on user input. This makes websites more interactive, engaging, and personalized for every user.
An example of dynamic content is your social media feed or shopping cart. Since it’s unique for every user, caching and delivering it is not that simple.

Most modern websites are dynamic to some extent. They use server-side scripts to generate all the assets required for rendering a webpage. The browser compiles these assets to show unique, personalized content to every user.
Dynamic Content vs Event-Driven Content
There’s also content that falls between static and dynamic content. It’s referred to as “Event-Driven Content” by some industry professionals.
A few examples of event-driven content include:
- Stock prices change rapidly while the markets are open and then remain static after the markets close.
- Comments on an old news article (it doesn’t attract much attention) versus a new trending story (it attracts tons of comments).
- If a news website is serving personalized content to users based on their locations, for many users from the same location, the content is static, but it’s dynamic if the users are from unique areas.
Since you cannot predict with certainty whether a particular content is event-driven or dynamic, most event-driven content is classified as dynamic content.
To keep things simple, I will treat event-driven content as dynamic content in this article. Once you’ve understood how dynamic content caching works, you can explore this topic further.
| 💡 We wrote an in-depth article on Cache-Control HTTP Headers. Check it out! |
How Does Dynamic Content Caching Work in WordPress?
Most WordPress sites are simple blogs or small business sites. The content on these sites is usually static.
As WordPress is a CMS that uses PHP scripts and database queries to generate all the site pages dynamically, each incoming request generates a new response from the server. Such responses aren’t necessary for most websites as it leads to a server crunch when the traffic shoots upwards.
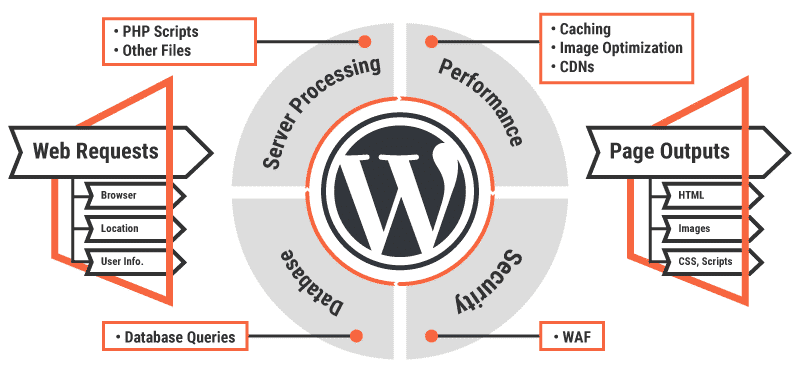
A cache can store these page outputs the first time they’re generated, so that it can serve subsequent requests from the cache instead of from the server. This speeds up page load significantly.
While this works perfectly for static content, since dynamic content is unique for each user, you cannot cache it using regular caching techniques.
In the good ol’ days, caching dynamic content was next to impossible. Even today, most CDNs only cache static content by default.
But newer technologies have made it possible to serve dynamic content from a cache easily, significantly reducing the TTFB of such pages while still keeping the user experience great.
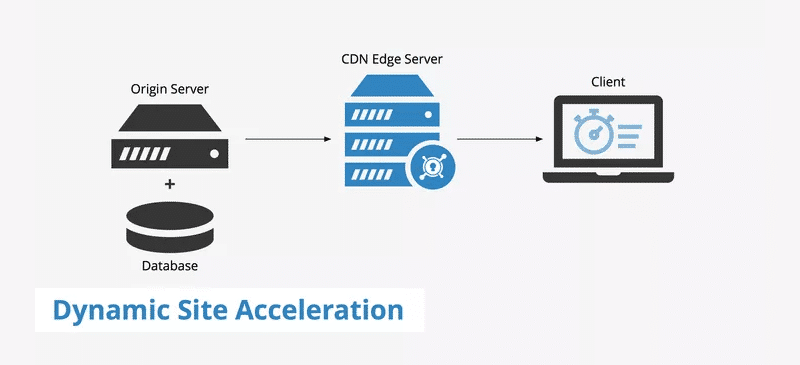
CDNs are one of the best ways to cache static content and deliver it swiftly to the end-user, but they can also serve dynamic content. One way CDNs “cache” dynamic content is by running scripts in a server closest to the user, rather than in the distant origin server.
Thus, CDNs generate and deliver all the dynamic content from their edge servers. This speeds up the load time of dynamic web pages.
CDNs can also use a markup language called Edge Side Includes (ESI) to cache dynamic content. You can insert ESI element tags into the page HTML to show which elements are dynamic. This helps the edge-side processors (a CDN or an origin server) to cache only the static parts of a dynamic webpage.

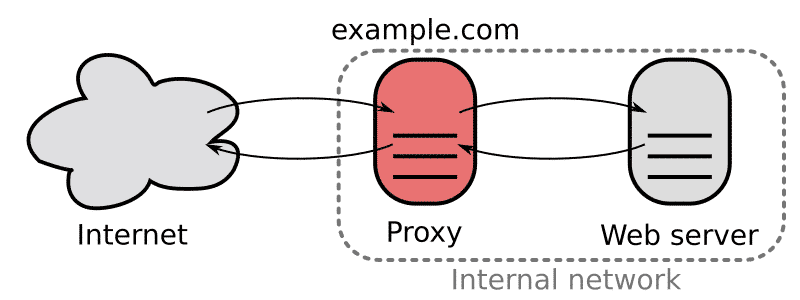
HTTP reverse proxies like Varnish, NGINX, and IIS are another way to cache dynamic content. Some of them like NGINX and IIS also act as a primary web server.
Typically, a reverse proxy is a server (physical or virtual) placed between the client and the web server. Its primary purpose is to filter all the requests before they reach the site.
Varnish not only handles all inbound requests before they land on the server, it also caches all the server responses. By default, the Varnish cache refreshes every two minutes, but you can set it to whatever time you want. This is how Varnish helps with caching dynamic content.

Varnish stores its cache in server memory, making retrieving and delivering responses to clients much faster. For a detailed explanation, read WP Rocket’s article on HTTP reverse proxies. You can also watch this educational video to get a better understanding of how Varnish works.
Let’s move on to see how you can cache dynamic content through different means.
Caching Dynamic Content on a CDN
The exact method to cache dynamic content using a CDN varies from one platform to another, but they’re all based on a set of technologies called Dynamic Site Acceleration (DSA).
For instance, if you’re using Cloudflare CDN, you can use Cloudflare Workers to set up serverless JavaScript functions that run on CDN PoPs placed all around the world.

You can use these custom serverless functions to modify your site’s HTTP requests and responses, generate new responses, and make parallel requests. Cloudflare Workers can help your site perform a variety of tasks based on multiple parameters such as user input, device type, location, time of day, third party APIs, etc.
Thus, you can generate dynamic content from the CDN itself and then serve it to clients. You can also combine serverless functions with ESI tags to make this process even more efficient.
To implement edge caching on your site easily, you can use the free Cloudflare Page Cache plugin. Going into further details is beyond this article’s purpose, but you can check out the official Cloudflare Workers docs to get started.
Likewise, KeyCDN provides two options to cache dynamic content. The first method is to use KeyCDN’s API to instantly purge the CDN cache based on user actions so that your users will always see the latest dynamic content.

The second option suggested by KeyCDN involves modifying Cache-Control headers to direct a client how and when to cache responses, and for how long. You can view an example in KeyCDN API docs to get a better understanding of how it’s deployed.
Fastly CDN’s API also provides features like instant cache purging, real-time logging and availability, and mechanisms such as Origin Shield. You can check out a few examples of how Fastly users have cached dynamic content using CDN: “How to cache with tracking cookies” and “API caching.”
Most of the top CDNs offer multiple ways to cache dynamic content. If you’re using or planning to use any of the CDNs mentioned above, the resources I’ve linked above will come in handy. If it’s any other CDN, then I suggest you to explore their docs or get in touch with their support team.
Further Reading: Refer to WP Rocket’s docs to learn more about how you can integrate various popular CDNs with WP Rocket.
Caching Dynamic Content Using NGINX
There are many plugins and techniques to cache dynamic content generated by WordPress sites running on an NGINX server. The most recommended solution is to use FastCGI, which is an improved variation of the Common Gateway Interface (CGI) protocol.

FastCGI improves site performance by not opening a separate process for each incoming request. Any server that processes requests to generate dynamic content, like NGINX running WordPress, can benefit greatly from it.
As covered in WP Rocket’s NGINX FastCGI Caching for WordPress tutorial, getting started with it is super easy. The NGINX web server provides a native FastCGI module to help you set it up in minutes.
FastCGI eliminates the need to set up extra caching solutions like WordPress plugins and reverse proxies (e.g. Varnish) for most sites.
NGINX’s ngx_http_fastcgi_module module allows the main web server to pass incoming requests to the FastCGI server. As with all NGINX modules, FastCGI is controlled by various directives you specify in its configuration file.
Typically, the virtual host file to configure NGINX is found in the /etc/nginx/sites-available/domain.com directory, where domain.com is the name of your domain name (e.g. salmanravoof.com, wp-rocket.me).
sudo nano /etc/nginx/sites-available/domain.comThis will open the configuration file in the Nano text editor within your Linux terminal. Next, add the following NGINX directives before the server{} block inside your config file.
fastcgi_cache_path /var/run/nginx-fastcgi-cache levels=1:2 keys_zone=WPROCKET:100m inactive=60m;
fastcgi_cache_key "$scheme$request_method$host$request_uri";
fastcgi_cache_use_stale error timeout invalid_header http_500;
fastcgi_ignore_headers Cache-Control Expires Set-Cookie;
Here’s a line-by-line breakdown of the directives used above:
- fastcgi_cache_path: This specifies the cache’s location, size, subdirectory levels, key_zone name, and the inactive duration. The cache’s location can be anywhere on the server. Since it’s faster to serve files from the RAM, I’ve used the /var/run folder as Ubuntu mounts this directory as tmpfs (a fast volatile memory).
- fastcgi_cache_key: This directs the FastCGI module on how to encrypt the cache files by generating unique key names.
- fastcgi_cache_use_stale: This instructs NGINX to continue serving old (stale) page cache even if PHP crashes (and by extension WordPress). This is one of the many strengths of NGINX web servers.
- fastcgi_ignore_headers: This directive tells the FastCGI server not to process specific response header fields.
The above directives along with the default NGINX ones will enable caching for your entire site. But the current configuration isn’t ideal for serving a dynamic content site yet.
Now, you need to direct NGINX not to cache certain pages. To do that, just add the following conditional directives before the first location{} block within your server{} block.
set $skip_cache 0;
    # POST requests and URLs with query strings won't be cached
    if ($request_method = POST) {
        set $skip_cache 1;
    }
    if ($query_string != "") {
        set $skip_cache 1;
    }
    # URIs containing the following segments won't be cached
    if ($request_uri ~*  "/wp-admin/|/xmlrpc.php|wp-.*.php|/feed/|index.php|sitemap(_index)?.xml") {
        set $skip_cache 1;
    }
    # Don't serve cache for logged-in users or recent commentators
    if ($http_cookie ~* "comment_author|wordpress_[a-f0-9]+|wp-postpass|wordpress_no_cache|wordpress_logged_in") {
        set $skip_cache 1;
    }
The above directives will instruct NGINX to skip serving cached content for POST requests, URL requests with query strings attached to them, admin screens, pages for logged-in users, and a few other pages.
Next, add the following directives within the PHP location{} block.
fastcgi_cache_bypass $skip_cache;
fastcgi_no_cache $skip_cache;
fastcgi_cache WPROCKET;
fastcgi_cache_valid 60m;
add_header X-FastCGI-Cache $upstream_cache_status;
The fastcgi_cache_bypass directive defines when the server’s cache will be skipped, while the fastcgi_no_cache directive specifies the conditions when no server response will be saved to the cache.
The value under fastcgi_cache directive should match the keys_zone value you set before. In my case it’s WPROCKET.
You can also specify how long the FastCGI cache is valid for. The default value is set to 60 minutes. It’s a decent duration for most sites. You can change it to whatever duration you want though.
If you modify the value of fastcgi_cache_valid and set it to some other duration, then it’s an excellent idea to update the value of the inactive parameter too. You defined it earlier inside the fastcgi_cache_path directive.
The inactive parameter specifies the max time the server allows any cached data to persist in its memory without being called. If it’s not accessed within the specified timeframe, the server will remove the cache.
The last line adds the X-FastCGI-Cache header to your server’s HTTP responses. You can use it to validate whether requests to your website are being served from FastCGI cache or not.
Once you’re happy with the configuration, save the file, exit the editor, and then restart NGINX.
sudo service nginx restart The last step to configure NGINX to work with your WordPress site is to install the free Nginx Cache plugin by Till Krüss. After activating the plugin, go to Tools > Nginx panel in your WordPress dashboard and set the Cache Zone Path. It should be the same as the one you defined in your NGINX hosts file earlier.

You can also enable automatic purging of NGINX cache in the same settings panel. Every time you modify any content on your site, it’ll automatically purge the NGINX cache.
The Nginx Cache plugin also lets you purge the cache manually through its settings page and the admin bar. Nginx Helper is another great plugin that you can install to automate many other NGINX features.
Now that you’ve learned how to cache pages selectively on your WordPress site, you can apply the same logic to specify custom FastCGI cache rules for dynamic WordPress sites built with WooCommerce, BuddyPress, or Easy Digital Downloads.
For example, if you have an ecommerce site that runs on WooCommerce, you shouldn’t cache user account, shopping cart, or checkout pages as they’re unique for each user. To address this issue, you can set up additional cache exclusions by extending the conditional directives you used earlier.
if ($request_uri ~* "/(cart|checkout|my-account)/*$") {
    set $skip_cache 1;
}
You need to paste the above conditional directive in the same location where you entered them earlier.
This code snippet instructs NGINX not to cache WooCommerce’s default pages such as Cart, Checkout, and My Account pages. You can also use regex expressions to append even more pages to the cache exclusion list.
You should note that cache still doesn’t work for logged-in users as they’re shown highly personalized pages. To cache pages accessed by logged-in users, you can selectively cache all the static elements of a dynamic webpage by using an advanced technique called fragment caching. While it’s fairly complex, it’s worth checking out.
Most WordPress plugins that create highly dynamic pages should have extensive documentation on how to exclude their dynamic pages from caching. WP Rocket plays well with NGINX servers after a few simple tweaks. Refer to the NGINX Configuration for WP Rocket for more information.
Caching Dynamic Content Using Varnish
Varnish is one of the most popular HTTP accelerators and reverse proxies in use today. It’s focused exclusively on HTTP and designed to speed up content-heavy dynamic websites.
Varnish Cache uses a domain-specific configuration language called Varnish Configuration Language (VCL). If you’re familiar with C programming language, you’ll find VCL to be similar. It’s a highly flexible language that gives you the independence to test and implement Varnish the way you want.
For instance, if you want Varnish Cache to ignore AJAX requests, here’s how you implement it:
if (req.http.X-Requested-With == "XMLHttpRequest") {
    return(pass);
}
Similarly, if you want to instruct Varnish Cache to skip caching WordPress admin screens and edit pages, you need to add the following VCL code snippet to your config file.
if (req.url ~ "(wp-admin|post\.php|edit\.php|wp-login)") {
    return(pass);
}
if (req.url ~ "/wp-cron.php" || req.url ~ "preview=true") {
    return (pass);
}
Let’s get started with Varnishing your WordPress site!
If your web server runs on Ubuntu, here’s a quick guide to install and configure Varnish. Alternately, you can also go through this step-by-step tutorial to enable Varnish Cache on your WordPress site.
Once you’ve set up your server to use Varnish to cache content, you can then direct WordPress to take care of the rest. WordPress sites with mostly static content won’t need much tweaking. There are a lot of helper plugins to aid you with optimizing your Varnish Cache configuration even more. Here are some of my favorites:
Every time you modify a post or page on your website, Proxy Cache Purge will automatically send a PURGE request on behalf of the URL. For example, when you edit, publish, or delete a post, Proxy Cache Purge will purge its old cache automatically. The same applies for commenting on a post or changing your site’s theme.
You can modify your Varnish Cache’s configuration to skip certain pages from being cached.
WPBase Cache is a specialist plugin that optimizes WordPress deployment on a server stack comprising varnish + nginx + php-fpm + php-apc. It uses three types of cache to supercharge your website: full page cache, db cache, and opcode cache.
This plugin also integrates code from nginx-compatibility and db-cache-reloaded-fix helper plugins. They’re fixes for nginx and database cache respectively.
WPBase Cache also supports configuring Varnish Cache with the provided default.vcl file. You can learn more about WPBase Cache’s features and benefits on its website.
WP Rocket’s Varnish add-on allows you to purge both Varnish and WP Rocket’s cache at the same time. Apart from enabling interoperability without causing any conflicts, the add-on will also ensure that the content served to your users is always up-to-date.
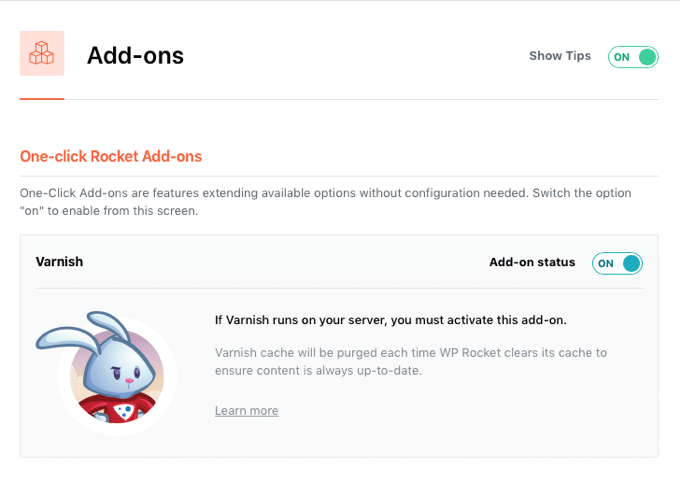
With the Varnish add-on installed, you can relax knowing that both Varnish and WP Rocket are compatible with each other and can work together. For more information, refer to WP Rocket’s documentation on Varnish add-on.
We’ve finished setting up Varnish Cache to cache and serve static content. But what about caching dynamic content? The solution is to use Varnish Modules (VMODs) to extend the features of Varnish Cache.
Varnish 6.0’s new XBody and Edgestash VMODs allow you to cache and accelerate dynamic content with ease.

The XBody VMOD picks up all the dynamic content from the webpage and parses it into JSON data-interchange format and a Mustache web template.
Later, the Edgestash VMOD picks up both the JSON data and the Mustache template, and then recombines them back into a new response. You can check out Varnish Software’s docs on personalized caching to learn more about how it’s done.
Caching Dynamic Content Using WP Rocket
Advanced caching plugins like WP Rocket can intelligently sense which assets are static or dynamic and cache only the static content. It also updates the cache automatically whenever any static content is updated.
WP Rocket also disables caching by default for dynamic pages such as cart, checkout, user profiles, etc. It also allows you to disable caching manually for pages.
If you have pages with a lot of static content and a few dynamic elements, then you can still cache those pages by serving the dynamic elements via JavaScript / AJAX. Since JS runs on the client-side (or browser), the dynamic elements will get updated on the cached page served to the user.
You can read this step-by-step AJAX tutorial to learn how you can dynamically update content on your WordPress website.
You can also use WP Rocket to cache pages with dynamic content. WooCommerce also provides an effortless way to ajaxify your cart viewer by adding a simple code snippet.
Wrapping Up
Caching isn’t just for static or event-driven sites anymore. You’ve seen many options above to cache highly dynamic WordPress sites. While it requires some configuration and tweaks initially, the final result is worth the effort. Dynamic content caching helps you to improve your site’s Time to First Byte (TTFB), reduce your hosting costs, achieve better SEO, and increase your conversion rates.
By expanding your cache to include dynamic content too, you can have a dramatic effect on your site’s performance. It’ll also ensure that your users receive the latest up-to-date information swiftly.
And if you want to go further, WP Rocket works out-of-the-box with most of the server-level caching solutions discussed in this article. It’s time to supercharge your website with WP Rocket now!