Table of Contents
Last update on
Interested in WordPress localization but not sure where or how to get started?
When you publish your website, anyone can access it from anywhere in the world. That’s the beauty of the Internet!
But if you want to create the best experience possible for visitors in the different locations where you’re active, you need to optimize your site for them. That’s where WordPress localization comes in.
By learning how to localize WordPress, you can create optimized experiences for visitors browsing from different locations and in different languages.
In this guide, you’ll learn what WordPress localization is in more detail, along with some of its benefits for both you and your readers.
Then, you’ll learn step-by-step how to localize WordPress in the most efficient way possible using a WordPress localization plugin and you’ll get some other general tips.
What Is WordPress Localization?
WordPress localization is the process of fully adapting your WordPress site to both the language and culture of its target markets (also called “locales”).
So – what does that mean in practice? Here are some of the most common aspects of localizing a website:
- Translating your site’s content into users’ local languages.
- Adjusting your images, videos, and other visuals to the local market.
- Changing currencies to visitors’ local currencies.
- Changing other units of measure into the local units (e.g. pounds versus kilograms).
- Adjusting dates, times, and other location-specific formats.
- Accounting for cultural differences and sensitivities to avoid causing offense or confusion.
- Complying with local laws and privacy regulations.
- Optimizing website performance so that visitors experience fast load times in all relevant locales.
Basically, website localization covers everything needed to create a great experience for visitors in different locations.
WordPress Localization vs WordPress Translation
Because WordPress translation is such a big part of localization, a lot of people will use translation and localization interchangeably.
However, this isn’t entirely accurate because translation is just one element of fully localizing a website.
It’s certainly important to translate your site’s content to provide a localized experience, but you also need to go beyond just basic translation if you want to fully localize WordPress for your visitors.
The Benefits of WordPress Localization
There are a lot of benefits to WordPress localization, including benefits to your users and benefits to you.
In terms of user experience, localization lets you optimize your website for users in that locale. For example, a user will be able to browse in their preferred language, see prices in their local currency, interact with relevant visuals, and so on.
Beyond that, localization also helps you be more culturally sensitive and avoid accidentally confusing or offending your visitors, which is another important part of creating a good experience for them.
If those benefits aren’t enough, localization can also help you grow your site and improve your marketing opportunities.
By localizing your content, you can expand your potential audience by moving into new markets, which helps you grow your global brand presence and boost your market share.
There are also more direct growth benefits, such as being able to rank for multilingual queries in Google Search, being shared more broadly on social media in multiple languages, and so on.
Basically, you have a bigger pool of potential people that you can reach across all channels.
How to Get Started With a WordPress Localization Plugin
Now that you know more about localization and its benefits, let’s go over an easy way to start localizing your site using the TranslatePress WordPress localization plugin.
Then, once you have a solid baseline, we’ll cover some other tips to localize WordPress in the next section.
1. Install TranslatePress and Choose Languages
To get started, install and activate the free TranslatePress plugin from WordPress.org.
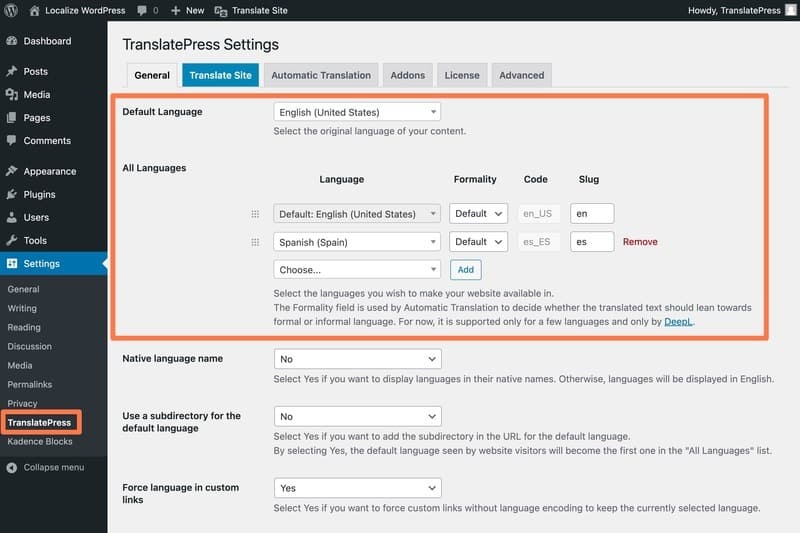
Then, head to Settings → TranslatePress to choose the languages/locales that you want to offer on your site:
- Default Language – the language that your site’s content currently exists in.
- All Languages – one or more new languages/locales into which you want to translate your site’s content.
For example, if your site’s content currently exists in English and you want to create a new version for Spanish speakers in Spain, you would configure it like so:
2. Translate Your Content
Translation is not all of localization, but it is one of the most essential elements. So before you go any further, you’ll want to translate your content into the languages you selected in the previous step.
However, it’s important to note that you don’t have to “translate” your content word for word.
For example, you could change the meaning or references of some text to better adapt to the local culture instead of trying to preserve the exact same meaning. You also might change other details, such as using kilograms instead of pounds (more on this later).
TranslatePress supports two different translation approaches:
- Manual translation – manually translate your content using a visual, point-and-click interface. You can do the work yourself or hire a translator. This lets you ensure 100% accuracy, but it can be time-consuming if you have a lot of content.
- Automatic machine translation – use Google Translate or DeepL to automatically generate your site’s translations. This lets you save a lot of time and effort. However, while machine translation services have gotten quite good (especially for popular language pairs), they’re still not 100% perfect.
You can also mix and match both approaches, which can offer the best of both worlds. That is, you can use machine translation to generate your site’s baseline translations but then still manually refine those automatic translations using the visual interface.
When you do your manual edits, you could also adjust meaning and references as needed to better localize your content.
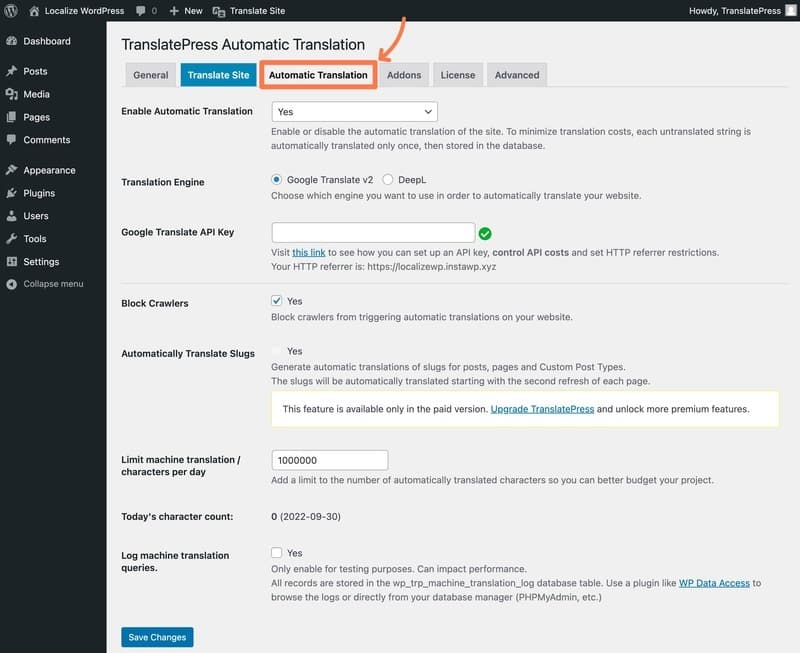
Set Up Automatic Translation (Optional)
If you want to use automatic translation, you can set that up from the Automatic Translation tab of the TranslatePress settings area.
You’ll need to generate an API key from your chosen translation service and then add that API key to the TranslatePress settings.
The plugin also gives you a feature to control your usage, which can help with billing. While TranslatePress doesn’t charge any extra to use machine translation, you might need to pay Google Translate or DeepL depending on your usage (both services offer limited free tiers, though).
Open the Translation Editor
Next, you can open the visual translation editor:
- If you use automatic translation, all of your content’s translations will be pre-filled from the translation service, but you can still edit them if needed.
- If you skip automatic translation, your content’s translations will be blank and you’ll need to add them from scratch.
Here’s how to open the translation editor:
- Open the page that you want to translate on the frontend of your site.
- Click the new Translate Page option on the WordPress toolbar.
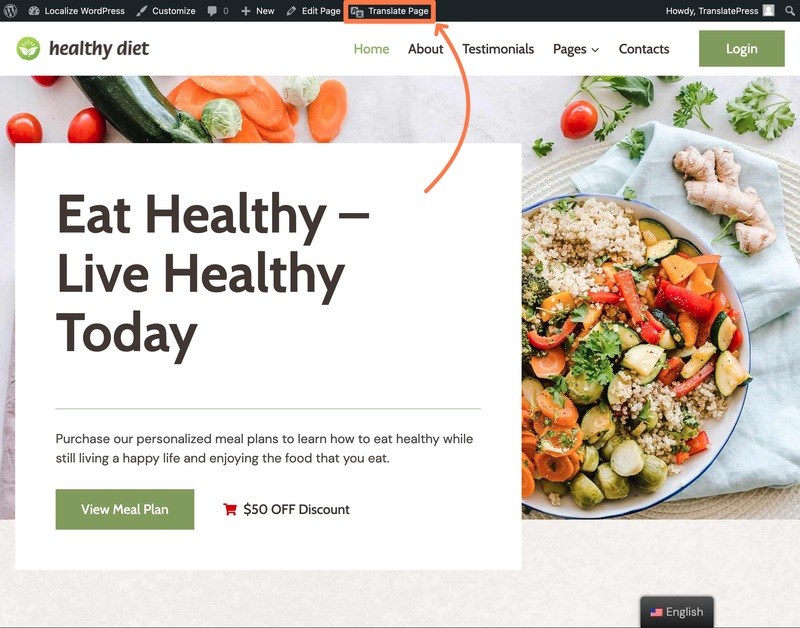
Once you’re in the translation editor, it works a lot like the native WordPress Theme Customizer – you’ll see a live preview of your site on the right and a sidebar on the left.
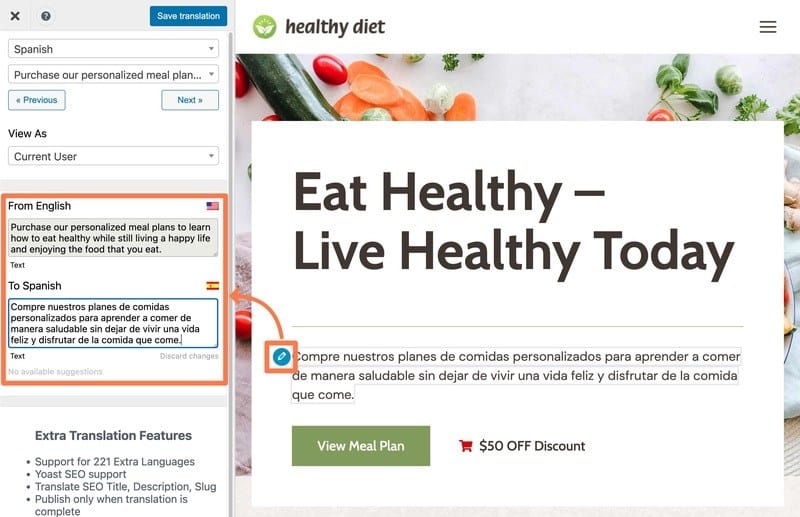
Here’s how to translate content:
- Hover over the content that you want to translate on the live preview of your site.
- Click the pencil icon to open that content’s translation in the sidebar.
- Use the sidebar to add/edit the translation.
- Save your changes by clicking the Save Changes button or using the Ctrl + S keyboard shortcut.
- Repeat to translate additional content.
You can use this point-and-click approach to translate all of your site’s content, whether it comes from the native WordPress editor, your theme, or other plugins you might be using (such as page builders like Elementor or Divi).
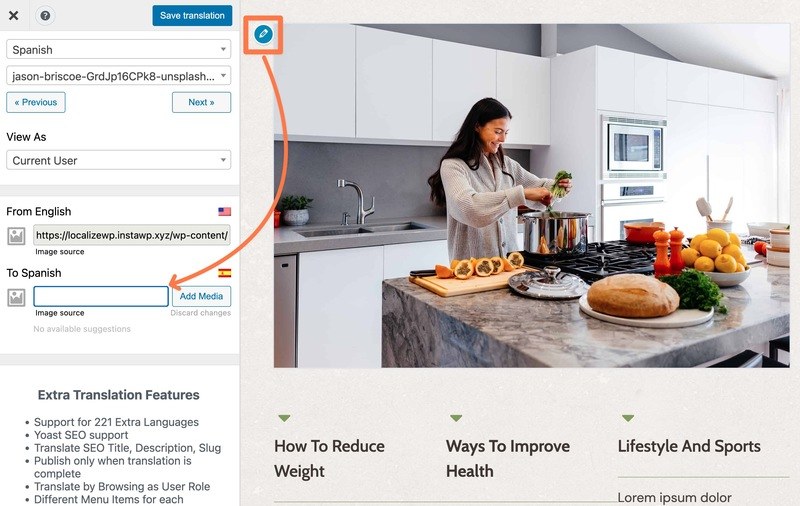
3. Localize Your Images and Videos
As we discussed earlier, translating your content is only part of localizing WordPress. You’ll also need to consider other aspects of your site, including localizing your images.
That is, you might have certain images that you want to adjust based on the user’s language/locale.
To help with this, TranslatePress lets you “translate” your images much like the rest of your content.
In the translation editor, hover over the image you want to localize and click the pencil icon. Then, you can use the sidebar to choose a different image based on the user’s language. If applicable, you’ll also be able to translate the image alt text and title.
4. Add a Language/Locale Switcher
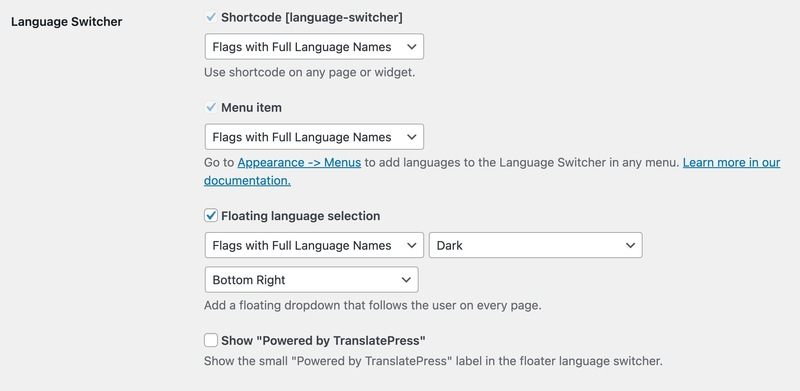
Finally, you’ll want to add a frontend option to let your site’s visitors choose their preferred languages and/or locales.
By default, TranslatePress adds a floating language switcher to the bottom-right corner of your site. However, you’re free to move this floating switcher to a different position or to use a different placement, such as adding it to your navigation menu or manually placing it with a shortcode.
You can find the language switcher settings by going to Settings → TranslatePress and scrolling down to the Language Switcher section.
8 More Tips to Localize WordPress Effectively
While TranslatePress can help you with WordPress translation and some other localization details (such as images), you’ll also want to consider some other WordPress localization tactics.
Let’s go through some other tips to fully localize WordPress.
1. Optimize Website Performance for Different Geographic Areas
If you want to target audiences in different areas, it’s important that your WordPress site loads quickly for all visitors, even if they’re browsing from different continents.
In addition to general WordPress speed optimization, one of the best ways to achieve fast global load times is to use a content delivery network (CDN).
A CDN works by caching your site’s content to a global network of servers, which lets visitors download the content from the server location that’s nearest to them. Because physical distance still affects load times, this means that users will be able to benefit from faster load times no matter where they’re browsing from.
For the easiest way to optimize your site and set up a CDN, you can use the WP Rocket plugin and the RocketCDN service.
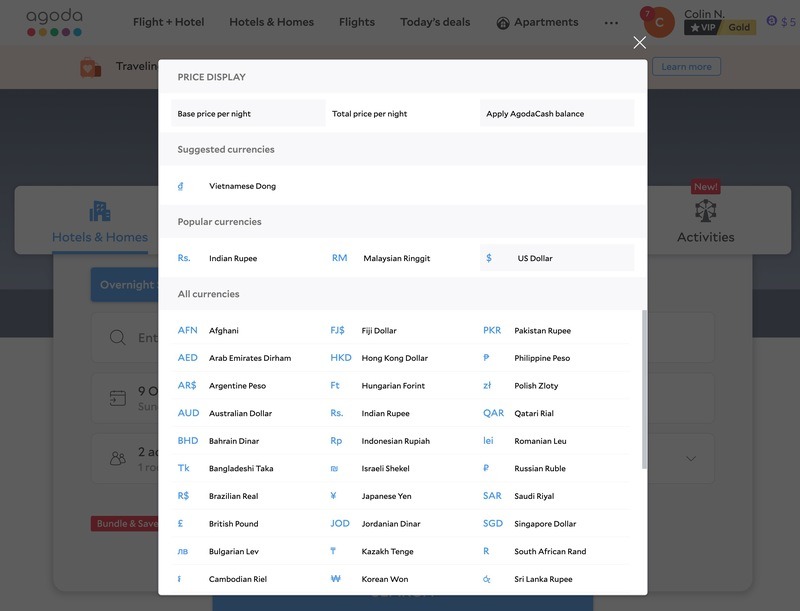
2. Add a Currency Switcher (if Applicable)
If you sell physical products, digital products, and/or services, another important aspect of localization is providing prices in your visitors’ local currencies.
You’ll see this on pretty much any site that sells products in multiple markets – here’s an example from Agoda, a travel booking site:
There are two ways that you can do this:
- Show converted prices in the visitor’s local currency but still charge them in the original currency. For example, let’s say you normally accept payments in USD. You could show converted prices in Euros as a courtesy to your EU customers, but still process the actual payments in USD. This is the simplest option because you still only need to deal with one currency.
- Show converted prices AND process payments in that currency. While this approach is nice for visitors because it lets them avoid any potential currency conversion fees from their credit card provider, it adds complexity for you because you’ll now need to deal with multiple currencies. However, payment providers like Stripe typically make it easy to handle multiple currencies and can also handle automatic conversions for you (though at a fee).
To let customers choose their preferred currencies, you can add a frontend currency switcher to your site using a currency switcher plugin. WOOCS is one of the most popular options, though there are plenty of other quality currency switcher plugins.
If you’re using WP Rocket to optimize your site’s performance, make sure to choose a WP Rocket-compatible currency switcher plugin – check out some options here.
3. Adjust Units of Measurement
Beyond currencies, you’ll also want to adjust other common units of measure. Here are some examples:
- Pounds vs kilograms
- Kilometers vs miles
- Centimeters vs inches
- Etc.
Basically, if one version of your site targets visitors in the USA, you’re probably going to need to adjust units of measurement if you want to localize for most other countries in the world!
4. Adjust Date and Time Formats
Different locations might use different formats for date and time, which can cause confusion if you don’t take the time to localize these formats.
For example, is 2/12/2022 “February 12th 2022” or “December 2nd 2022”? Without proper localization, your visitors might end up confused.
For dates that come from WordPress (e.g. a post’s publish date), TranslatePress will automatically adjust the date format using WordPress’ built-in wp_date() localization function.
However, if you include a date manually (e.g. writing it in the editor), you’ll need to remember to localize the date format when translating that content.
5. Adapt Content to Cultural Norms
This one is pretty broad, but it’s important to remember that users in different locations might have different cultural norms.
As such, content that might work fine for visitors in one language/locale could be confusing or even offensive to visitors browsing their local versions of your site.
If needed, you can change the content/meaning of the text when you’re “translating” it in TranslatePress.
6. Change Your Font If Needed
Different languages might use different characters, either because the language uses its own unique characters or it adds variations to the Latin alphabet.
Not all fonts will support these different characters, which could lead to subpar or even broken experiences for visitors browsing in certain languages.
To address this, it’s important to make sure that the fonts you’ve chosen for your site offer full support for all of the languages and locales that you want to offer.
To check font support, you can use tools such as Alphabet’s CharSet Checker or the Underware font validator.
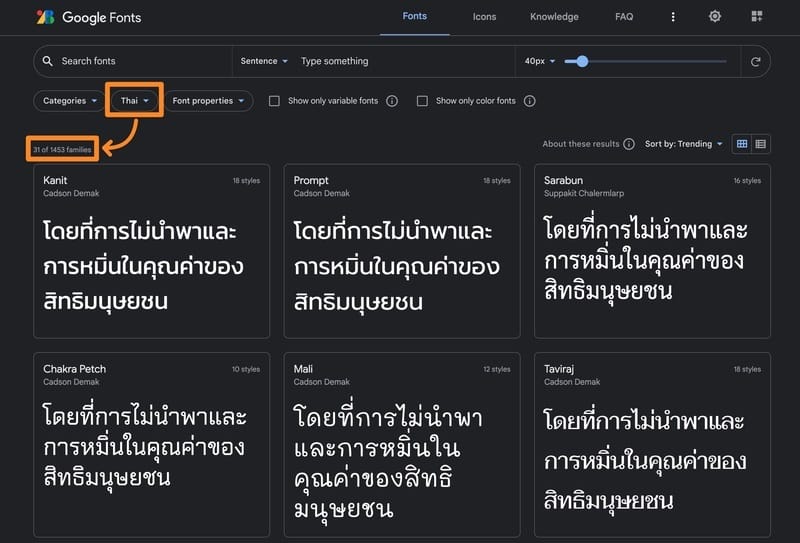
If you’re using Google Fonts, the Google Fonts website also has a feature that lets you choose fonts that support different languages/character sets (and preview those languages).
7. Check Your Icon/Emoji Usage
Icons and emojis are a great way to add some spice to your content. However, they can cause localization issues because the formatting might be different in various countries or different locales might just interpret them differently.
For example, you might have an arrow emoji that points to the right and works fine for left-to-right text. But if you also offer your site in a language with right-to-left text, that emoji might suddenly not make any sense (or lead to confusion).
To address this, think about whether any of your icons or emojis could be interpreted differently in different locales. If you think they might be, you can either remove them or change them based on a user’s location.
8. Use Different Testimonials
If your website features customer testimonials, you might want to think about localizing the testimonials to each visitor’s location to make them more effective.
For example, you could show testimonials from USA customers to visitors from the USA and testimonials from Spanish customers to visitors from Spain.
To achieve this, you should be able to just “translate” your content with TranslatePress. But rather than translating the content word-for-word, you’d be adding a different testimonial based on the user’s language.
Wrapping Up
If you want to reach visitors in multiple locales, learning how to localize WordPress is important so that you can create the best experience possible for all of your visitors.
Not only will it create a better user experience, but it will also expand your potential market share, grow your global brand presence, and help you reach more people in search engines and social media.
Translating your site’s content is one of the most important parts of WordPress localization. However, it’s important to remember that localization goes beyond just translation and you’ll also want to consider other aspects such as visuals, currencies, units of measurement, formats, cultural sensitivities, website performance, and so on.
Follow the tutorial above to localize your WordPress website in the easiest way possible and you can start benefiting in no time.