
Cache Miss vs Cache Hit: What’s the Difference?
Table of Contents
If you cache your WordPress install, you can effectively speed up your site. But, without the proper setup, the cache won’t work optimally, and it could lead to miss penalties.
These are delays in serving up your website’s content, slowing down your page load times.
This is where knowing the difference between a cache miss and a cache hit can help you understand how your caching system should be organized for maximum performance.
Today, I’ll share more detail on cache misses, cache hits, the difference between them as well as miss penalties, and how to reduce them to speed up your WordPress website’s page load times with caching.
| TL; DR A cache hit happens when a requested page is already stored in the cache and can be served instantly. A cache miss occurs when the cache doesn’t have the requested data, forcing the server to generate the page from scratch before storing it for future requests. Cache hits lead to faster load times and lower server load, while frequent cache misses slow down performance and increase server processing. |
Key Takeaways
- Cache hits are good for performance because the page is served instantly from stored cache instead of being generated dynamically.
- Cache misses happen when content isn’t cached yet, so the server must build the page before storing it.
- A high cache hit ratio (typically 95–99%) indicates that your caching strategy is effective.
- Cache misses are normal for the first request, after cache expiration, or when content is excluded from caching.
- Reducing cache misses improves page load speed, server efficiency, and user experience.
- WordPress optimization plugins like WP Rocket automatically create static versions of pages so future visitors get cache hits instead of misses.
What is Caching?
Before diving into the details of what a cache hit and a cache miss are, it’s imperative to know a bit about caching and how it works.
In terms of your WordPress website, caching refers to saving your site’s content to what’s called a cache.
When you set up a cache to work with your site, it memorizes your content when it loads and creates a static version of it. That way, the next time your site loads, it can quickly retrieve that content from memory and effectively load your site faster.
You can check out Caching for WordPress, Explained in Plain English, for details.
Caching and Memory
Similar to a computer’s memory, a cache is a compact, fast-performing memory. It stores data in a hierarchy of levels, starting at level one and progressing sequentially. They are labeled as L1, L2, L3, and so on.
A cache is further partitioned into blocks, which can also be called lines. When a page of your site first loads, data is transferred and written into the cache. On each subsequent page load, the cache is read, so content is transferred and loaded on the page.
A cache also gets written to if the site requests it, such as when there has been an update to the page and new content needs to be saved to the cache, replacing the older content that was saved.
Whether the cache is read or written, it’s done one block at a time.
Each block also has a tag that includes the location where the data was stored in the cache.
When data is requested from the cache, a search occurs through the tags to find the specific content that’s needed in level one (L1) of the memory. If the correct data isn’t found, more searches are conducted in L2.
If the data isn’t found there, searches are continued in L3, then L4, and so on until it has been found. Then, it’s read and loaded onto the page. If the data isn’t found in the cache at all, then it’s written into it for quick retrieval the next time the page is loaded.
The faster the data is found in the cache, the faster it can load on the corresponding page. If searches are conducted past L1, the slower the loading times. Also, for each level that’s accessed for the data, the more time it takes to retrieve it, which means the slower the page loads.
So, that means data transferred from L2 is slower than data retrieved from L1, but data from L4 creates much slower loading times than if it was read from L1, or L2.
A cache hit and a cache miss has to do with this process and if the data was read from the cache.
What is a Cache Hit?
A cache hit describes the situation where your site’s content is successfully served from the cache.
The tags are searched in the memory rapidly, and when the data is found and read, it’s considered as a cache hit.
A cache hit is when content is successfully served from the cache instead of the server.
Cold, Warm, and Hot Caches
A cache hit can also be described as cold, warm, or hot. In each of these, the speed at which the data is read is described.
A hot cache is an instance where data was read from the memory at the fastest possible rate. This happens when the data is retrieved from L1.
A cold cache is the slowest possible rate for data to be read, though, it’s still successful so it’s still considered a cache hit. The data is just found lower in the memory hierarchy such as in L3, or lower.
A warm cache is used to describe data that’s found in L2 or L3. It’s not as fast as a hot cache, but it’s still faster than a cold cache. Generally, calling a cache warm is used to express that it’s slower and closer to a cold cache than a hot one.
What is a Cache Miss?
A cache miss refers to the instance when the memory is searched, and the data isn’t found. When this happens, the content is transferred and written into the cache.
The Difference Between a Cache Miss and Cache Hit
Now that both cache hit and cache miss have been defined, it may be clearer to see the main difference between the two: With a cache hit, data has been found in the cache, but the opposite is true for a cache miss.
If you want to learn more, check out our article on What are Hit and Miss Ratios? Learn how to calculate them!
Cache Hit vs Cache Miss Comparison
| Feature | Cache Hit | Cache Miss |
|---|---|---|
| Definition | Requested data found in cache | Data not found in cache |
| Response time | Very fast | Slower |
| Server workload | Minimal | Higher |
| User experience | Faster page load | Possible delay |
| Typical cause | Page already cached | First visit or expired cache |
Miss Penalties and Reducing Them
As mentioned earlier, when the cache is searched for the relevant content, it passes through L1, then L2, L3, and so forth.
For each level that’s searched, the more time it takes, which means the slower the web page loads.
This delay is known as a miss penalty. When your site experiences miss penalties, it kind of defeats the purpose of having a cache since their primary purpose is to speed up your page load times.
So, these delays are definitely best be avoided as much as possible. While you won’t be able to escape miss penalties altogether, you can reduce them.
Cutting down on the delays in getting your pages to load is certainly recommended for optimal performance.
How to Reduce Miss Penalties
As previously explained, a cache miss occurs when data is requested from the cache, and it’s not found. Then, the data is copied into the cache for later use.
The more cache misses you have piled up, the more data that has to be written into the memory. That means that if you’re able to reduce the amount of times that your content has to be saved to the cache, you’re able to reduce the amount of cache misses your site experiences.
You can do this by setting an expiry date to the lifespan of the cache.
A cache lifespan is the amount of time that data is stored in the cache before it’s purged, and your site is cached again.
If you set a low expiry, the cache is cleared more often leading to an increase in cache misses. If you set the expiry to a higher time, the cache is purged less often resulting in fewer cache misses.
It may be important to note that not every site can confidently set higher expiry times. If site content is updated frequently, then lower expiry times are necessary to continuously display updated content to end users.
Generally speaking, you should set the expiry time to reflect when your site is typically updated.
For example, if you rarely update your site, you can safely set a higher expiry time of 14 days or longer.
On the other hand, if you update your site a couple times a week, you should set your cache’s lifespan to expire in seven days at the absolute most. A daily or twice daily cache expiry would be more suitable.
If your site is constantly being updated such as with comments being posted every few minutes, then your expiry time should be set much lower such as one hour, or less.
At the same time, if you’re unsure of when your cache lifespan should expire, setting it to 10 hours is a good starting point. If you find your cache isn’t running optimally, you can adjust it as needed from there.
A Cache 22
It’s crucial to mention that it may not always be practical to set your cache’s lifespan to more than 10 hours. Otherwise, your site could break.
If you use plugins and themes that require the use of nonces, your expiry should be set to no more than 12 hours, though, 10 hours or less is ideal.
Nonces are used to validate a request to verify it’s coming from the intended souce. It helps prevent hackers from being able to disguise themselves as the user to execute actions as if they were the user such as in a Cross-Site Request Forgery (CSRF) attack.
Depending on when the nonces expire, the page could be cached long after the nonces are gone, breaking your site, and leaving it vulnerable.
While setting cache lifespan expiries higher can reduce miss penalties, it shouldn’t be done if you have plugins or themes that rely on nonces.
It’s a real catch 22.
Fortunately, there are other ways to reduce miss penalties such as optimizing your site in other ways including minifying your HTML, CSS, and JavaScript files, enabling CDN caching, enabling LazyLoad for images, and more.
For details, check out Nonces and Cache Lifespan.
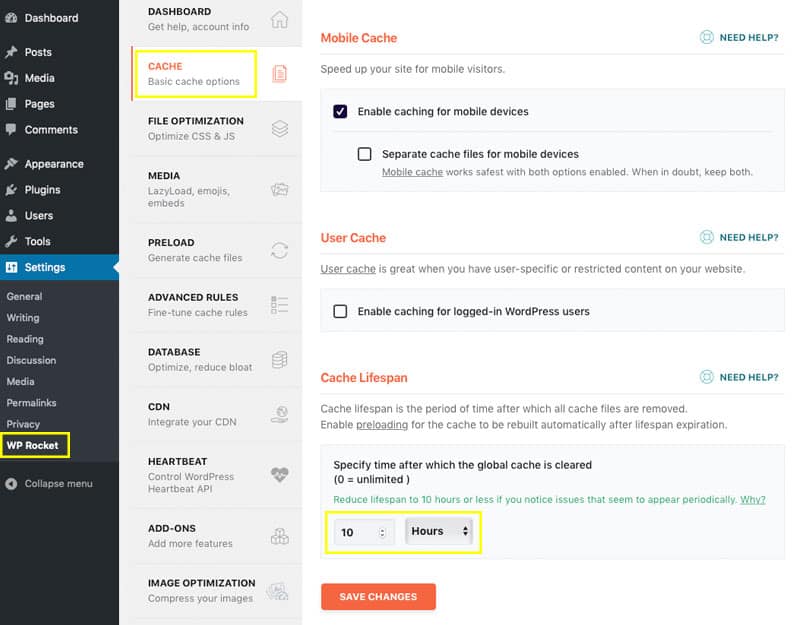
Reducing Miss Penalties with WP Rocket
You can set the expiry of your cache lifespan to reduce cache misses with WP Rocket.
Once installed, go to Settings > WP Rocket. Then, click on the Cache tab in the menu that appears on the page.
In the last section, Cache Lifespan, you can set the expiry time by typing a number into the first field. Then, select either minutes, hours, or days in the adjacent drop down box.
FAQs on Cache Miss vs. Cache Hit
What is a cache hit?
A cache hit occurs when a requested page or resource is already stored in the cache and can be served immediately without generating it again from the server.
What is a cache miss?
A cache miss happens when the requested content is not stored in the cache. The server must generate the page dynamically before storing it in the cache for future requests.
Is a cache miss bad?
Not always. Cache misses are expected when:
- a page is visited for the first time
- the cache has expired
- dynamic pages are excluded from caching
However, frequent cache misses can slow down your site.
What is a good cache hit ratio?
Most websites aim for a 95–99% cache hit ratio, meaning the majority of requests are served from cache rather than generated dynamically.
Why do cache misses happen?
Common causes include:
- expired cache
- newly published or updated content
- logged-in users or personalized pages
- dynamic content like carts or checkout pages
How do I check if a page is cached?
You can check by:
- viewing response headers (e.g.,
X-Cache: HITorMISS) - inspecting the page source
- using developer tools or caching plugin indicators.
Can too much caching cause problems?
Yes. Aggressive caching may serve outdated content or interfere with dynamic features like login sessions, carts, or forms.
Does a CDN affect cache hits and misses?
Yes. CDNs also cache content at edge servers, which can increase cache hits and reduce the distance data travels.
Wrapping Up
Understanding what a cache miss and cache hit are as well as the difference between them will go a long way in helping you know how to optimize your site’s cache.
Try WP Rocket now, so you can diminish cache misses to enhance your site’s performance, and reduce page load times