
7 Tips for Using a Cache Plugin on Your WooCommerce Site
Table of Contents
Do you need to implement caching on your WooCommerce site? Read our tips before diving into it, we will show you how you can enable caching easily and give an extra speed boost to your e-shop.
Why Caching is Essential for WooCommerce
Caching improves the speed and performance of your WordPress site built with WooCommerce. It helps your e-shop to load more quickly by reducing the amount of data transfer between the browser and the server. Caching saves a static version of your site so it can be displayed faster on each subsequent visit.
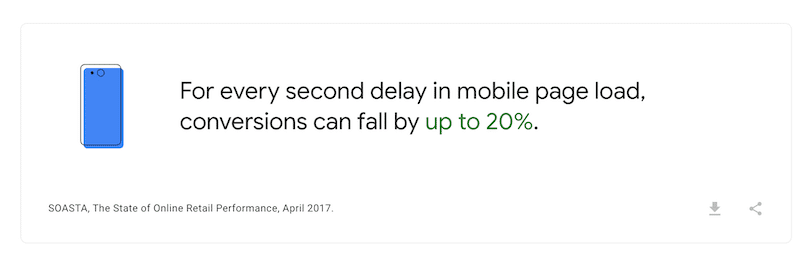
According to Google, site speed is a top priority for online shoppers: every second delay in mobile page load can make conversions fall by up to 20%.
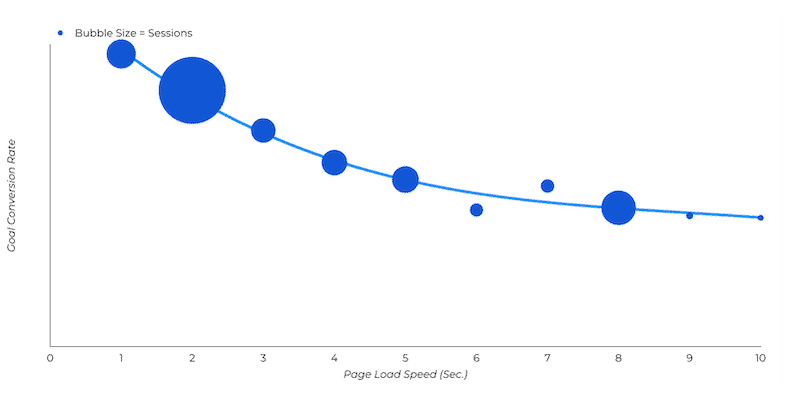
Another research conducted by Portent a few years ago says that the highest e-commerce conversion rates occur on pages with load times between 0-2 seconds.
E-commerce sites are often the slowest on the web because they contain many images, videos, products, payment gateway, API connections, etc. Implementing caching ensures that the pages load faster, resulting in a better user experience.
The last reason you should improve your page speed with caching is to boost your SEO rankings. The quicker your page loads, the higher it’ll rank in Google search results, meaning more visitors (and sales) will come your way!
Now that we’ve discussed the importance of caching let’s see how to implement it on your WooCommerce site.
How to Enable Cache on WooCommerce
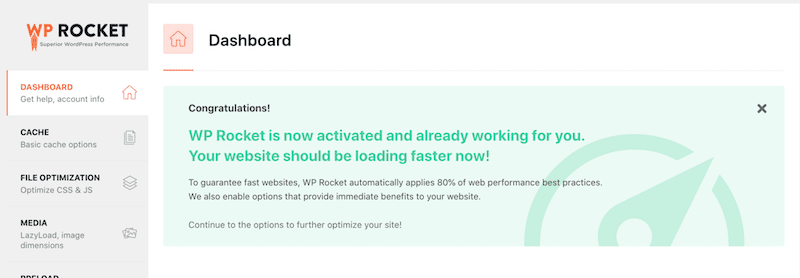
WooCommerce does not cache content out of the box, but you can install a WordPress cache plugin that will do the job for you! For example, you have WP Rocket, one of WordPress’s best caching plugins, enabling caching automatically upon its activation. Of course, more options are available in our guide listing the best caching plugins for WordPress.
Step 1: Exclude the dynamic pages
When you implement caching on your WooCommerce site, the content is saved and served in the same way to visitors every time. As a result, there are pages you should not cache, such as:
- The Cart page – or the users may end up with products they never added.
- The Checkout page – this is the crucial page where users add their credit card information, so you don’t want any problems in that part of the purchasing process.
- My account – this involves a login and a password with probably private data that should be cached.
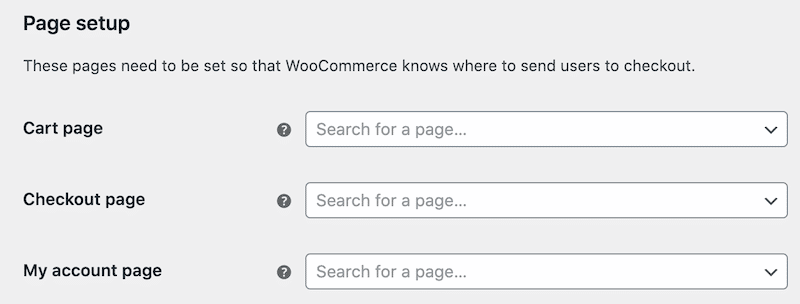
- Other pages to consider excluding – the custom “thank you” and confirmation pages.
- Any other widgets, custom post types, or custom pages that handle adding to cart, account, or checkout options.
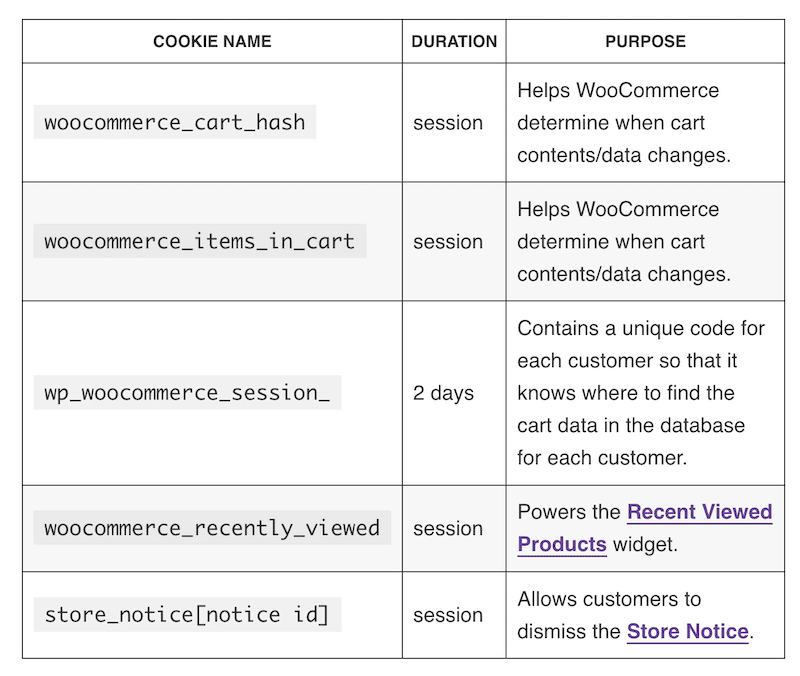
Step 2: Exclude WooCommerce Cookies and Sessions From Caching
WooCommerce cookies such as “items recently viewed” are useful for the user experience, and some others help the whole purchasing process to be seamless. That is why the following cookies should be excluded from your caching strategy:
- The “woocommerce_cart_hash” and the “woocommerce_items_in_cart” – ensure that the cart reflects the correct items. Otherwise, you may still see some products in the cart after removing them.
- The “wp_woocommerce_session” — helps WooCommerce to find the shopping cart data in the database for each visitor/customer.
- The woocommerce_recently_viewed — pops up to help the customer find a previously seen product.
WooCommerce explains the different types of cookies, their purpose, and their ideal duration very well. You can read more about WooCommerce cookies directly on their website.
Most caching plugins have a tab to exclude any scripts of your choice. Simply scroll to the exclusion fields and add the cookies mentioned above.
How to Clear Cache on WooCommerce
No matter which cache plugin you choose for your site, you will always be able to clear the cache on WooCommerce directly from your WordPress dashboard. They all have the feature from their options panel.
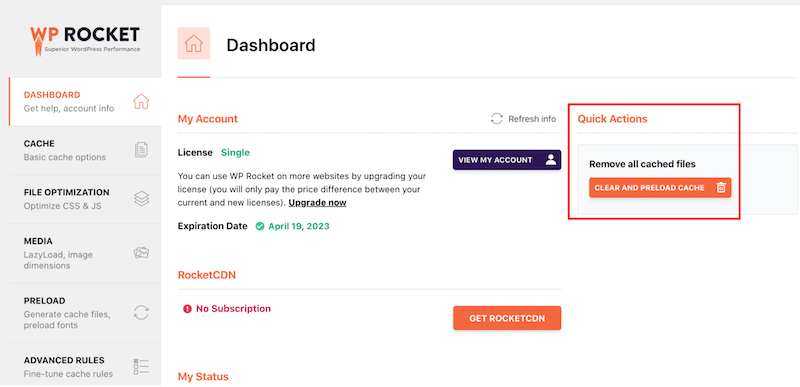
For example, with WP Rocket, you can navigate to WP Rocket Dashboard > Quick Actions > Clear and Preload cache.
Another way to clear the cache of your WooCommerce site is to use the top bar in your WordPress admin directly. For instance: WP Rocket > Clear and preload cache.

| 💡It’s a good idea to clear the cache on your WooCommerce site because it prevents you from showing outdated content and products to users. |
7 Tips to Make the Most Out of Caching
Caching may seem daunting at first, but it can be much easier with the right tools and guidance. Here are 7 tips to make the most out of caching on your WooCommerce.
1. Enable Page and Browser Caching
As seen in the first section, page caching stores a page’s HTML on the initial page load to serve the same static content for the next visits. As a result, every visitor will notice a significant increase in the site’s speed.
WP Rocket is one of the best WordPress caching plugins that will automatically enable page caching to WooCommerce. WP Rocket does the heavy lifting for you, and no actions are required from you to activate the cache.
2. Enable Object Caching
To unload the server and the database, you can implement object caching on WooCommerce using Redis or Memcached. Those tools are very popular and store the loaded query results. Therefore, the next time they’re needed, they can be loaded from the cache instead of the server. That reduces the round-trip time between the server and the data meaning better performance for your WooCommerce site.
3. Include Opcode Caching
According to php.net, OPcache improves performance by storing PHP in shared memory, removing the need for PHP to load and parse scripts on every request. If you optimize your PHP, you also optimize your page speed overall, as WordPress and WooCommerce are built on this code.
4. Setup Varnish Cache
Varnish cache is an HTTP reverse proxy that makes page load time 300–1000 times faster. It’s a piece of software you put in front of your server to reduce the loading times of your website by caching the server’s output. The only inconvenience is that to install it, you need to be familiar with the configuration files and command lines of your terminal.
5. Reduce or Cache API calls
Your WooCommerce site may need to call third-party apps like Facebook, YouTube, or Paypal, which could impact its loading speed. To reduce those API calls, you can use the WP Rocket helper API plugin or the WordPress Transients API.
6. Optimize CSS and JS files
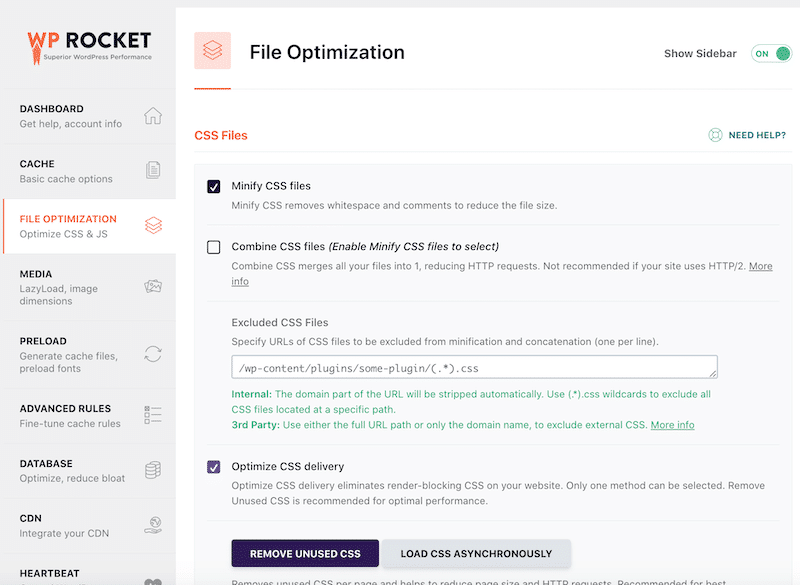
Another performance optimization along with caching it to minify, defer and reduce unused CSS and JS files. While you can conduct these code improvements manually, you can also use the File Optimization tab from a caching plugin like WP Rocket.
From your WordPress dashboard, go to Settings > WP Rocket > File Optimization You’ll find all the options needed to optimize your code:
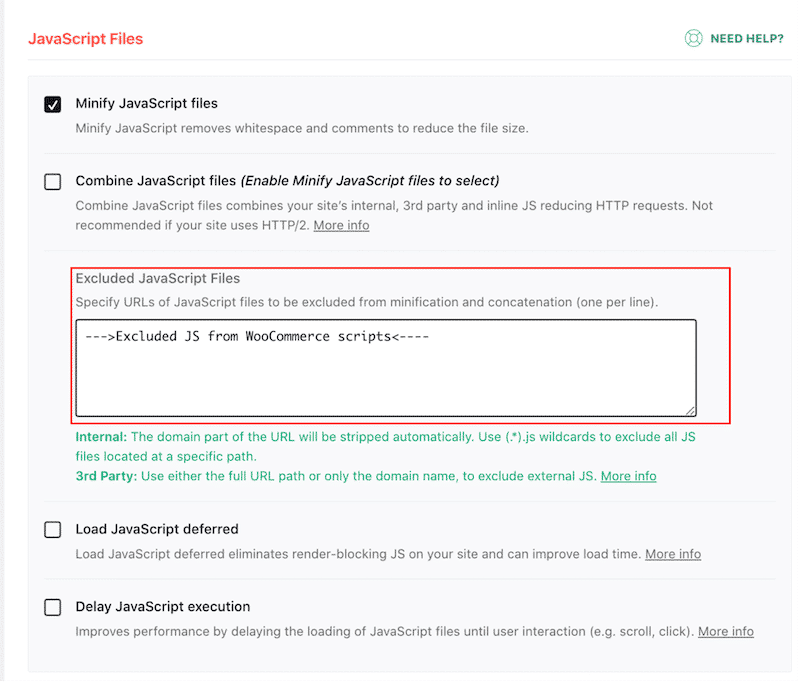
| ⚠️ Important: WooCommerce does not recommend minifying JS, so we suggest you exclude WooCommerce scripts from the minification process. |
Thankfully, most caching plugins allow you to easily exclude WooCommerce scripts when you select the minify JS option. For instance, here’s the option that WP Rocket offers:
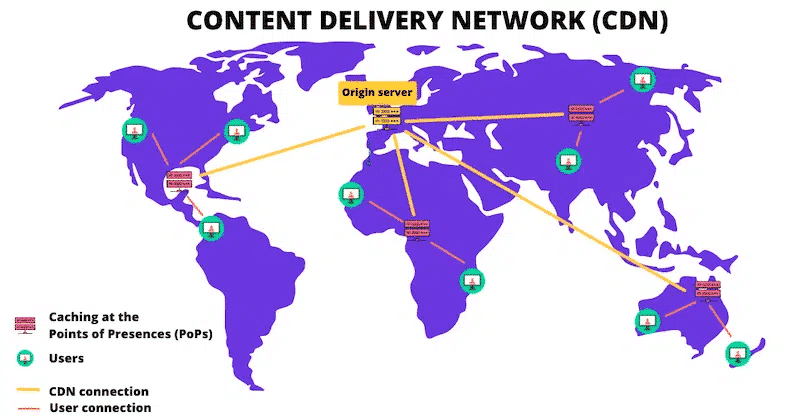
7. Use a CDN
CDNs also use caching to distribute content faster to users located around the world. They use edge servers to cache the data, store it temporarily and display it to the closest international visitors. That results in a faster site because the content does not need to come from the origin server. There are many CDNs available in the market, but if you want one fully integrated with WordPress that does the configuration for you, try RocketCDN.
How to Enable Cache on WooCommerce with WP Rocket
After its installation, WP Rocket automatically enables cache, excludes the dynamic pages from the process, and allows you to do your own page/cookie exclusions.
Let’s go over each feature:
- Enabling caching with WP Rocket
WP Rocket does the heavy lifting for you and applies caching on your WooCommerce site as soon as it’s installed. More than 80% of web performance good practices automatically upon its activation!
- Excluding scripts and pages of your choice with WP Rocket
To exclude cookies from the cache with WP Rocket, go to Settings → WP Rocket → Advanced Rules and enter the values of the cookies in the “Never Cache Cookies” field:
- woocommerce_cart_hash
- woocommerce_items_in_cart
- wp_woocommerce_session
- woocommerce_recently_viewed
- (…)
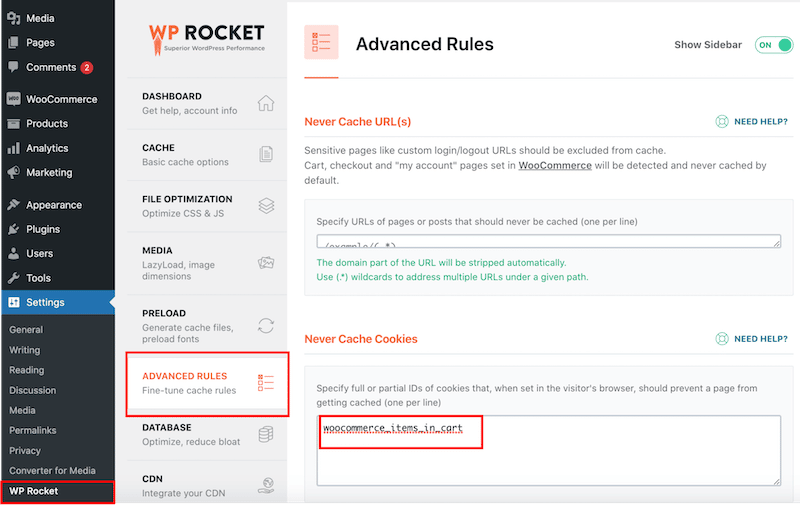
| 🚀 Good to know: WP Rocket automatically excludes the “Cart”, “Checkout”, and “My Account” pages from the cache. |
Performance test with and without WP Rocket
Additionally, the plugin helps improve your Lighthouse performance score and boost your Core Web Vitals, partly thanks to its advanced JS and CSS optimization features.
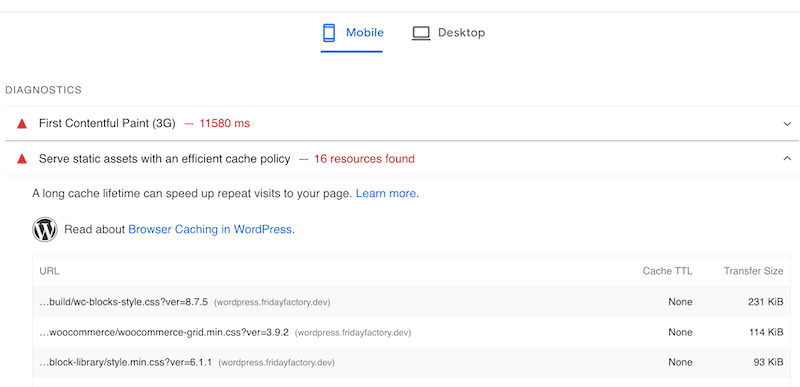
PageSpeed Insights recommends implementing caching to boost the speed of your WordPress site. As you can read in the screenshot below, a long cache lifetime can speed up repeat visits to your page:
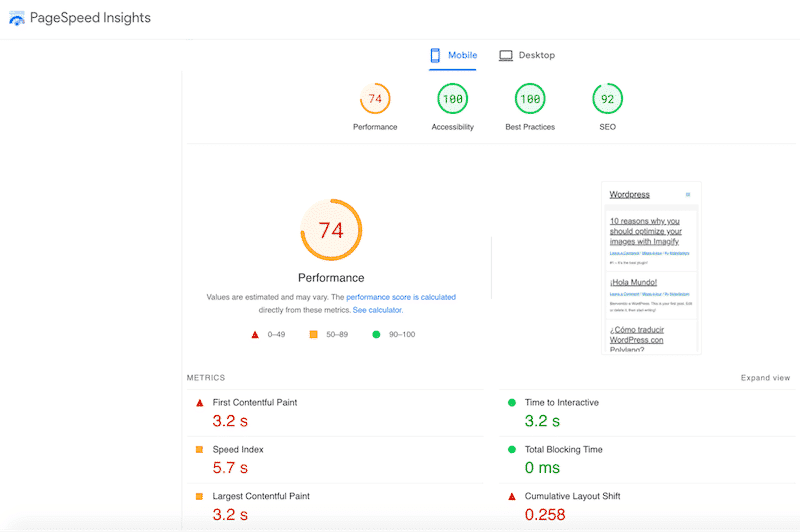
I ran a performance test using PageSpeed Insights, sharing my results with and without caching (using WP Rocket).
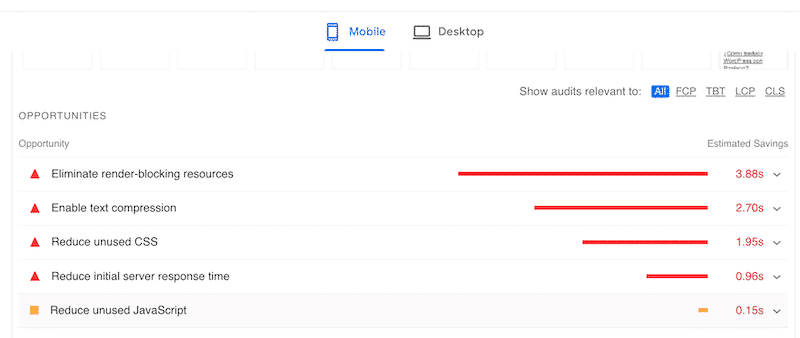
Performance without caching (No WP Rocket)
My performance score on mobile is 74/100. One of my Core Web Vital, the Cumulative Layout Shift (CLS), is in red, while the Largest Contentful Paint (LCP) is in orange.
Lighthouse also recommends implementing caching:
I followed the PSI’s suggestion and activated WP Rocket. Then I opened the file optimization tab, applied a few options on my JS and CSS files, and here’s what happened.
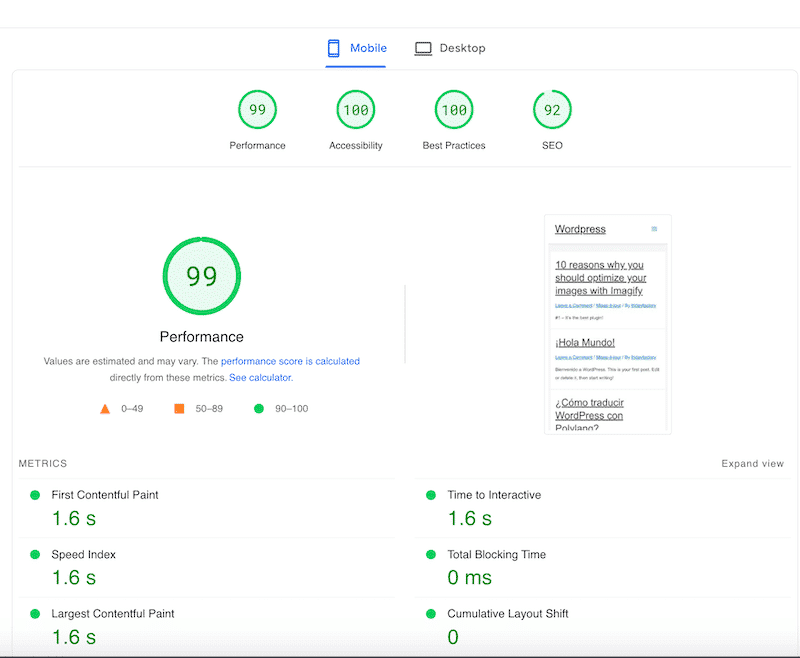
Performance with caching (WP Rocket):
My performance score went to 99/100, and my Core Web Vitals are in the green:
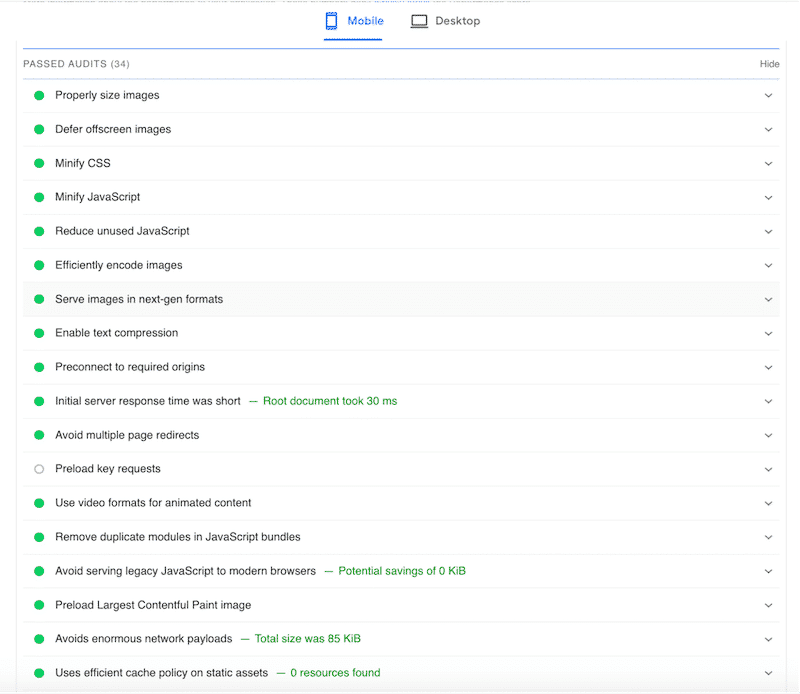
All the previous performance issues related to caching and files optimization are now in the “passed audits” section:
Wrapping Up
Our tips will certainly help you in your caching journey and give an extra speed boost to your WooCommerce site! WP Rocket helped us pass the PageSpeed Insight audit on caching and code optimization. So if you need to quickly implement caching on your WooCommerce site, then why not give WP Rocket a shot? Run your own before/after an audit on PageSpeed Insights to compare your performance results!