Server Cache vs. Browser Cache vs. Site (Page) Cache: What’s the Difference?
Table of Contents
In case you might be questioning yourself:
“I want to cache my WordPress site. What type of caching should I use for it?”
The answer involves many options, depending on the nature of your website and what you want to achieve from it.
There are several types of caching, each of which is different from the others and useful in different circumstances. So it’s essential to comprehend the kinds of data they store and the levels of control they provide you.
In this article, we’ll discuss different types of web cache in detail, how they work, and their differences.
Then we’ll look at various types of content that can be cached and how you can cache your WordPress site in the most efficient way possible!
What Are The Caching Types?
There are two types of caching options you can go with:
- Server-side Caching
- Client-side Caching
Although both of them cache your website differently but has one similar goal:
Making your website load blazing fast without loading the entire site files again.
Let’s take a closer look at both of them.
What’s Server-Side Caching?
Server-side caching temporarily stores web files and data on the server for later use, effectively reducing the server’s load and latency.
Here’s how it works:
1. When the user visits a website and requests the web page, the website retrieves data from the server, generates that webpage, and displays it to the user.
2. After the response has been sent back to the user, the server creates a copy of the webpage and stores it as a cache.
The result?
The next time a user revisits the website, instead of going through the whole process again, it displays the already saved (or cached) copy of the webpage – thus making the website load faster!

What’s Client-Side Caching?
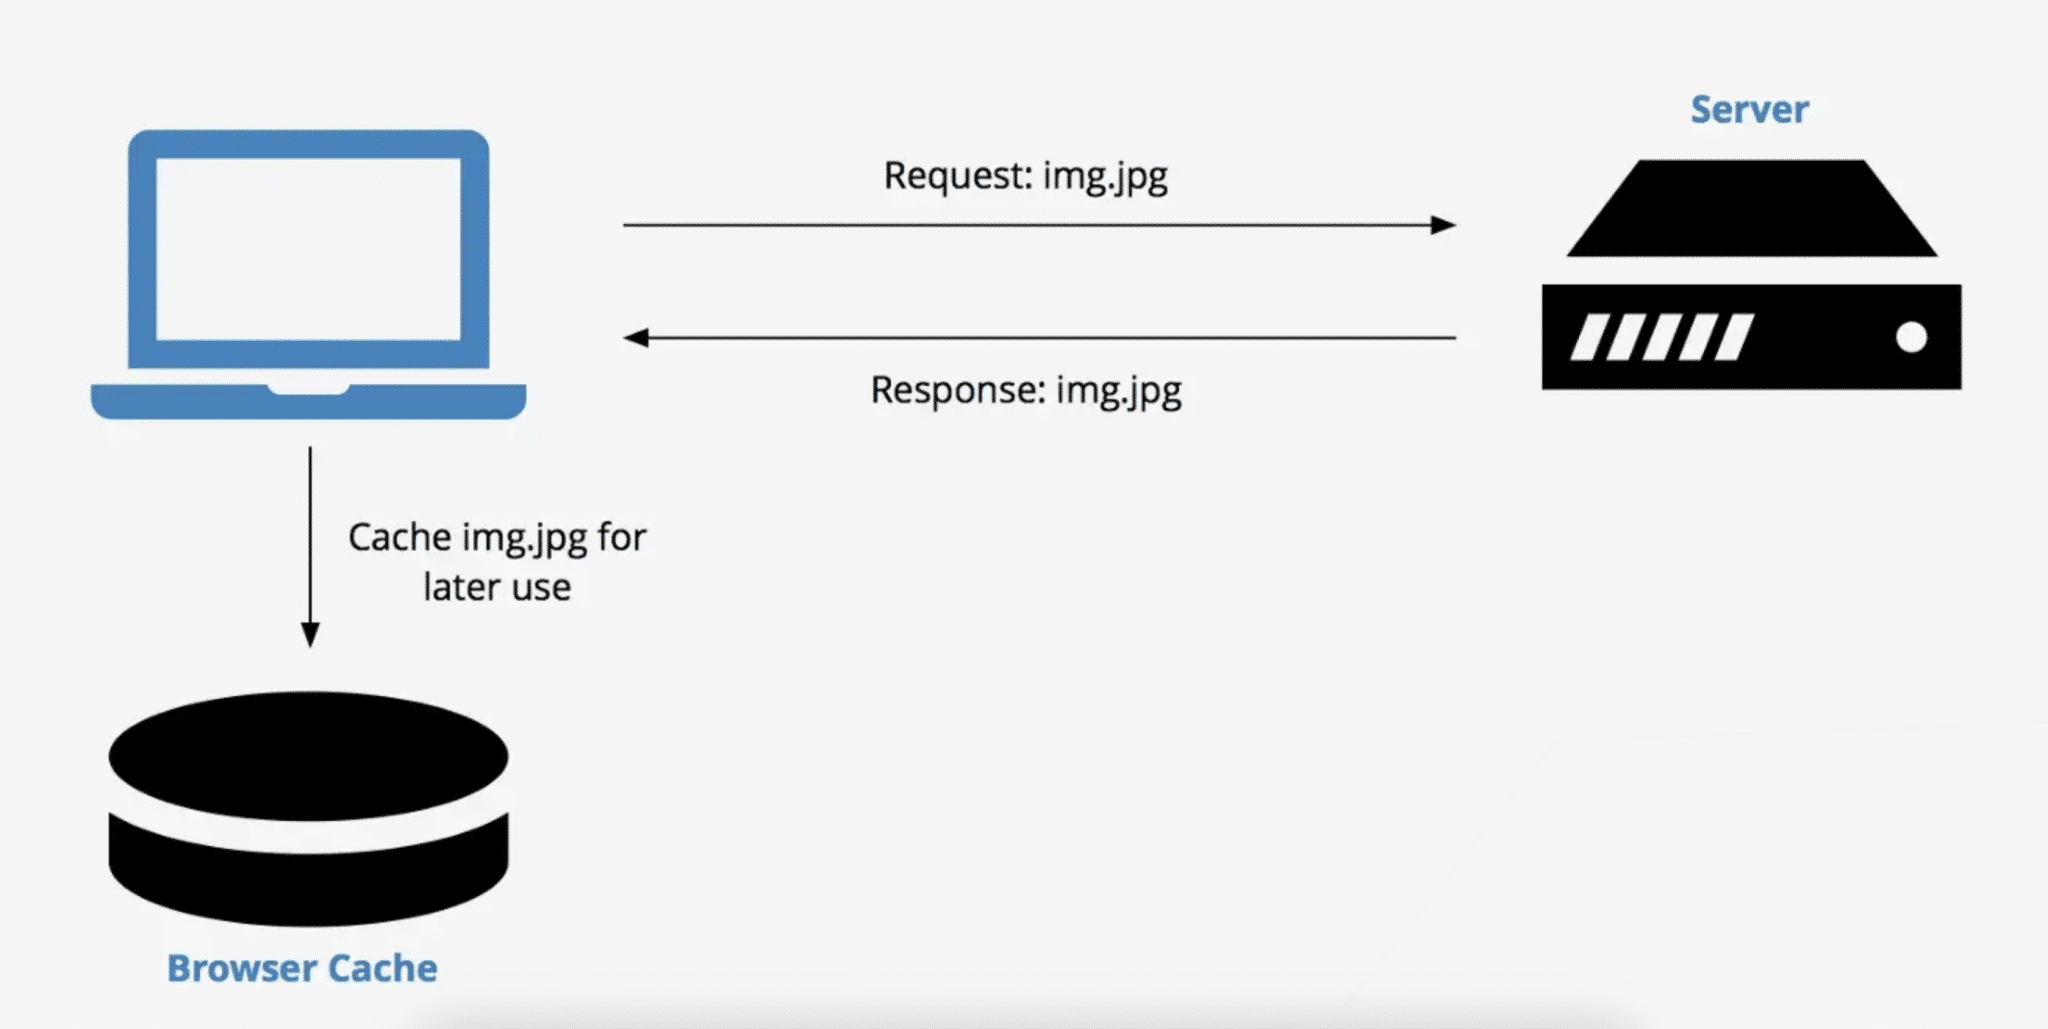
Client-side caching, often called browser caching, temporarily stores the copy of a webpage in the browser’s memory (a folder created by the browser).
So, the next time a user revisits a website with client-side caching enabled, it won’t make a call to the server for the data. Instead, it will fetch it from the browser cache folder located on the user’s device.

Server-Side Caching vs. Client-Side Caching
The type of caching you choose significantly improves the overall user experience and usability of your WordPress site. So it’s always better to understand which type goes well with your website beforehand.
Let us help you figure that out with an example:
Suppose you run an online retail site.
Because of the nature of the business, the type of content on your website is dynamic (i.e., users see recommended products, emails about abandoned carts, or ads for similar/relevant products).
Due to this, users access your website smoothly whenever there’s a new update.
If your website takes longer to load, it will urge the users to move on to another site even before the content fully loads. Hence, resulting in increased bounce rates and, most importantly, a negative first impression on a visitor landing on your website.
Now, consider the above example:
- If you use server-side caching:
When the user requests a web page, the website retrieves data from the server. But before that, it checks if a copy of that web page is cached. If it’s cached, it serves the cached copy of the webpage.
There are three main scenarios:
- If your website’s content is static, it does require any accommodation.
- If the content is dynamic within a time frame (short-lived content), it requires cache renewal after a certain amount of time or “ajaxifying” the dynamic content.
- On the other hand, if your website’s content is dynamic with a short time frame and is user-specific (logged-in experience, for example), it requires bypassing the cache.
By default, and if the webpage is cached, it will be served from the cache as long as there is no instruction to bypass it (i.e., adding items to the cart in some specific cases).
But there’s one problem.
It displays the cached version as if the content on the website is static!
Due to this reason:
Server-side caching is the best choice for websites with static content and short-lived cache, as it significantly reduces the number of operations on the server – without having it reconstruct the entire content per user request. On the other hand, a highly dynamic server cache is still possible using advanced technologies like Edge Side Includes (ESI) or Ajax (Asynchronous JavaScript and XML).
- Let’s try it out with client-side caching:
When you use client-side caching, the website’s copy is stored in the browser’s cache. So when the user requests a web page, it displays the cached version stored in the browser instead of requesting it from the server.
For this example, since your website has dynamic features, your preferred method will be using JavaScript (JS). It operates on the browser’s side, so you can rely on it by running the scripts within the browser to handle the dynamic needs of your website in real time.
Due to this reason:
For dynamic websites, client-side caching solves both latency and server cache problems by reducing the server load.
Now, if we categorize it further, some of the types of web cache include:
- Page Cache (or Site Cache)
- Server Cache
- Proxy Cache
- Browser Cache
However, there’s also a different type of caching unrelated to the other four types mentioned above, known as Object Cache.
Object Cache is a process that stores database query results so that they can be accessed easily the next time a user requests it. The cached object will be served instantly from the cache without needing to query the database repeatedly.
If you want to learn more about Object Cache, check out What is Object Caching and How to Use It With WordPress.
What is Page Cache (or Site Cache)?
Page cache, also known as HTTP or site cache, temporarily stores the content on your website the first time you visit it.
So the next time you visit that website, it fetches the stored data from the page cache to display static web content faster than it would with a new request.
In addition to that:
All the data is stored in the server’s hard disk or memory (RAM), and you, as a website owner, can determine how much time a file stays in the page (site) cache.
If elements of your website are static, you can set a file’s expiry date for longer. However, dynamic elements of a website have much shorter expiry dates. These brief expiry dates tell the website when to refresh the files stored in your device’s page cache.
What is Browser Cache?
Browser cache stores cached versions of the specific web pages a user browses. It is built into your web browser – enabling the website to load faster in order to provide you with a better user experience.
Browser caches work by temporarily saving copies of a website’s files, such as:
- HTML pages
- Multimedia content and images
- CSS stylesheets
- JavaScript scripts
When the user revisits your website, their browser will fetch the cached files and use them to assemble your website’s content to create a smooth browsing experience. Cached content loads faster because your browser doesn’t have to load everything from scratch to display them.
Usually, a browser stores its cache for a limited time or until it is full. After that, it automatically clears out the cache and displays the updated website’s content on the next visit.
The silver lining is:
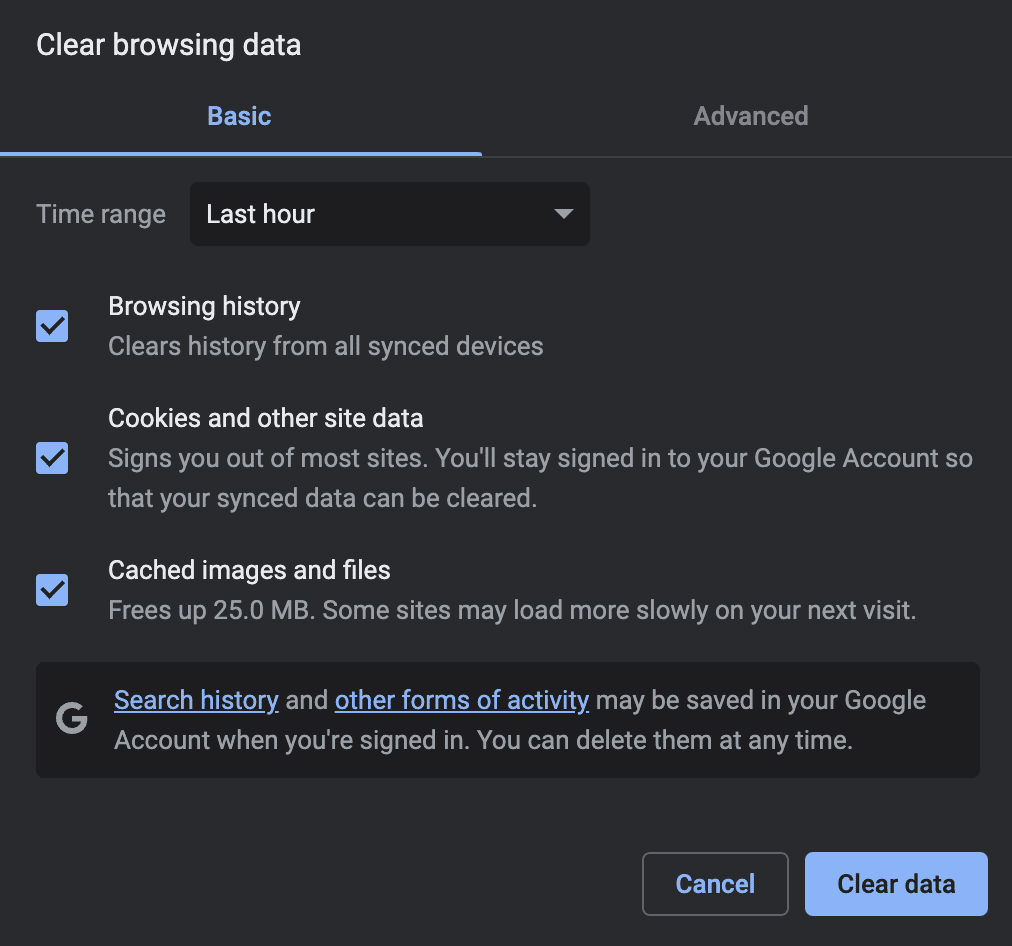
You can also delete your browser cache by manually clearing your browsing data if it takes up too much space – and that’s one of the key features of this type of cache!
In Google Chrome, you can do this by clicking:
Settings > Privacy and security > Clear browsing data

When you visit a website after clearing browser data, it will load everything from scratch.
What is Server Cache?
Server cache is also the type of web caching over which the end users don’t have any control and is fully administered by the server.
(Note: There are mainly four types of web servers – Apache, IIS, Nginx, and LiteSpeed.)
This type of cache is mainly used to reduce server loads.
When a user visits a website and requests a web page from the server, the server scans the cache and displays the stored content immediately. This helps decrease the processing time and return web pages faster, which is especially beneficial for websites with high traffic.
Server cache can be considered an umbrella term for many types of caches. The most common are:
- Object cache – stores database queries in a server-side cache for quick retrieval and prompter page loading without querying the database repeatedly.
- Opcode cache – store precompiled PHP code for speedier execution.
What is Proxy Cache?
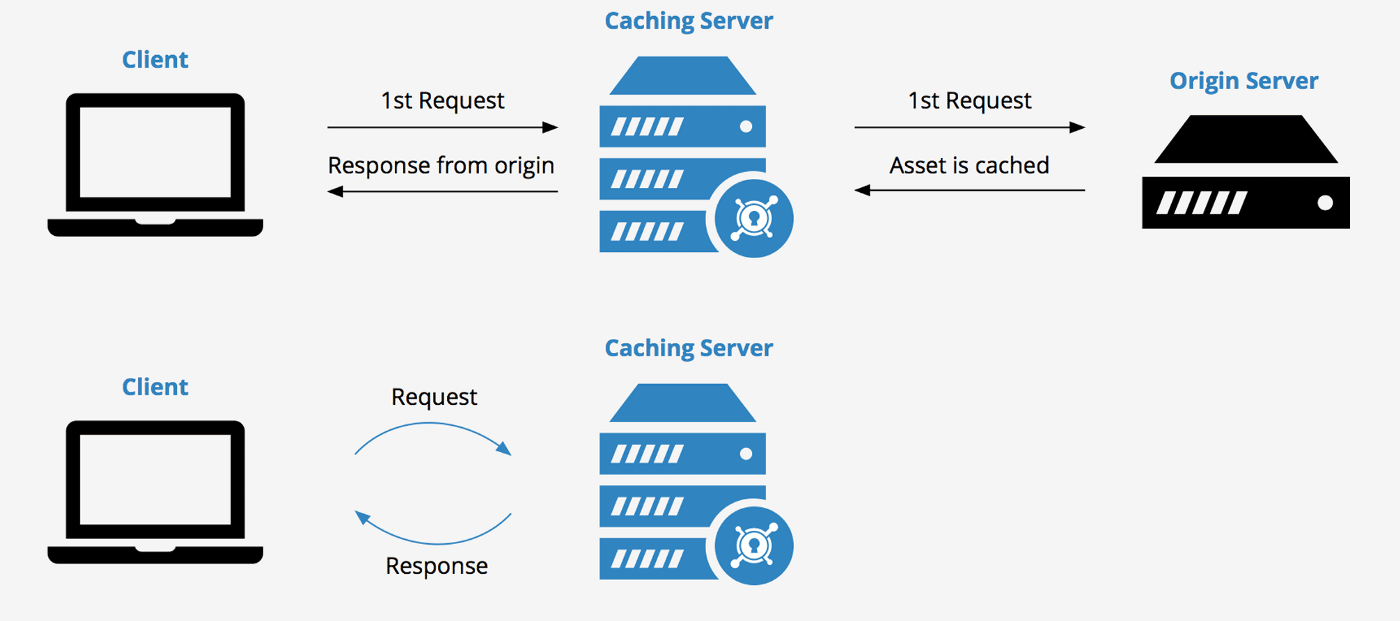
Proxy cache stores content on the proxy server, allowing web services to share those resources with more users. The proxy server coordinates with the origin server to cache website data such as files, images, and web pages.
When a user opens a web page, the proxy checks whether it has a recent copy of that web page and its assets.
If a copy exists, it immediately displays that web page or resource to the user. On the other hand, if the web page is old or missing, it fetches a new copy from the source, caches it to the proxy, and delivers it to the user.
Once a proxy updates a web page, it resets the webpage’s expiration date to prevent it from being labeled as outdated. The webpage will be delivered until a specific time passes, after which the proxy server will re-check the source.
Besides that, the proxy cache also has a type known as:
Content Delivery Network (CDN) cache – a cluster of servers located at different geographic locations. The server closest to the end user will return cached content to load content faster.
Page Cache vs. Browser Cache vs. Server Cache vs. Proxy Cache
Now that we know about each type of cache – let’s understand the differences between them:
Page Cache (or Site Cache):
- Saves content like web pages, images, text, etc.
- Serves content much quicker after the first visit.
- Ideal for websites with static content.
Browser Cache:
- Stores limited data types like HTML pages, CSS stylesheets, JavaScript scripts, Images, and other multimedia files.
- Files are heavier and take time to load – thus, stored in the computer.
- Controlled by the user’s browser.
- Serves web pages directly without processing from the server.
Server Cache:
- Saves content, code, queries, and similar data on a server.
- Type of server-side caching.
- Controlled by the server.
- Administered by website owners without any input from end-users.
- Best for high-traffic websites that need to reduce server strain.
Proxy Cache:
- Allows web services to share resources with multiple users
- Saves bandwidth and decreases the loading time
- It might help in more complex scenarios, such as handling dynamic or frequently-updated resources (but only when using geotargeted content where the country/region-specific content is stored separately).
What Content Can Be Cached?
There are various types of content that website owners frequently cache. However, some can be cached, but many site owners do not cache them as it seems “risky”. And lastly, there are some which should not be cached at all.
Let’s look into all of them.
Files that can be cached but rarely cached include:
- Pages with dynamic content
- Ajax/REST requests if their cache is purged
- Other code that needs to change less frequently
Files that are frequently cached and should be cached include:
Pages with static content or types of content that remain the same for all users and don’t often change, such as
- Static images
- Logos and assets
- CSS stylesheets
- Downloadable files or other content
Files that should not be cached include:
- Dynamic content, or in simpler terms, personalized data using conditions to be displayed
- Any sensitive data (such as credit card information)
Caching with WP Rocket
WP Rocket is the most beginner-friendly and easiest plugin to quickly improve your WordPress website’s speed and performance!
Here’s how it works:
It caches your web pages by creating static HTML files and making them readily available for future visits. In addition, it applies browser caching, requesting the browser to save the frequently used but rarely updated files in its local cache memory.
One of the things which makes it the best caching plugin for WordPress is that when you install WP Rocket on your WordPress site and activate it, it automatically applies 80% of web performance best practices right away!
Furthermore:
WP Rocket can be set to bypass or store dynamic cache depending on query strings and cookies.
Also, it has a system to help refresh the cache in any timeframe requests to help serve a fresh version of the website.
Page caching, browser caching, and GZIP compression are some of the default features that WP Rocket enables for you. But if you don’t settle for the standard settings, WP Rocket also includes advanced features such as:
- Minify CSS and JavaScript files – removes whitespaces and comments to reduce the file size.
- Remove Unused CSS – eliminates render-blocking CSS on your site for faster load time. You can either load CSS asynchronously or remove unused CSS files (the preferred method).
- Load JavaScript deferred – eliminates render-blocking JavaScript to improve load time.
- Delay JavaScript execution – improves performance by delaying loading JavaScript files until the user interacts with the website, i.e., via scroll or click.
- Optimize Google Fonts – combines, preloads, and loads the Google Font file asynchronously (i.e., without render blocking).
With all these features, you can get a blazing-fast website in the blink of an eye, which eventually results in:
Great first impressions, better SEO ranking, & more conversions! 🚀
Most importantly, it helps improve the PageSpeed Performance Score and metrics, including the Core Web Vitals grades.
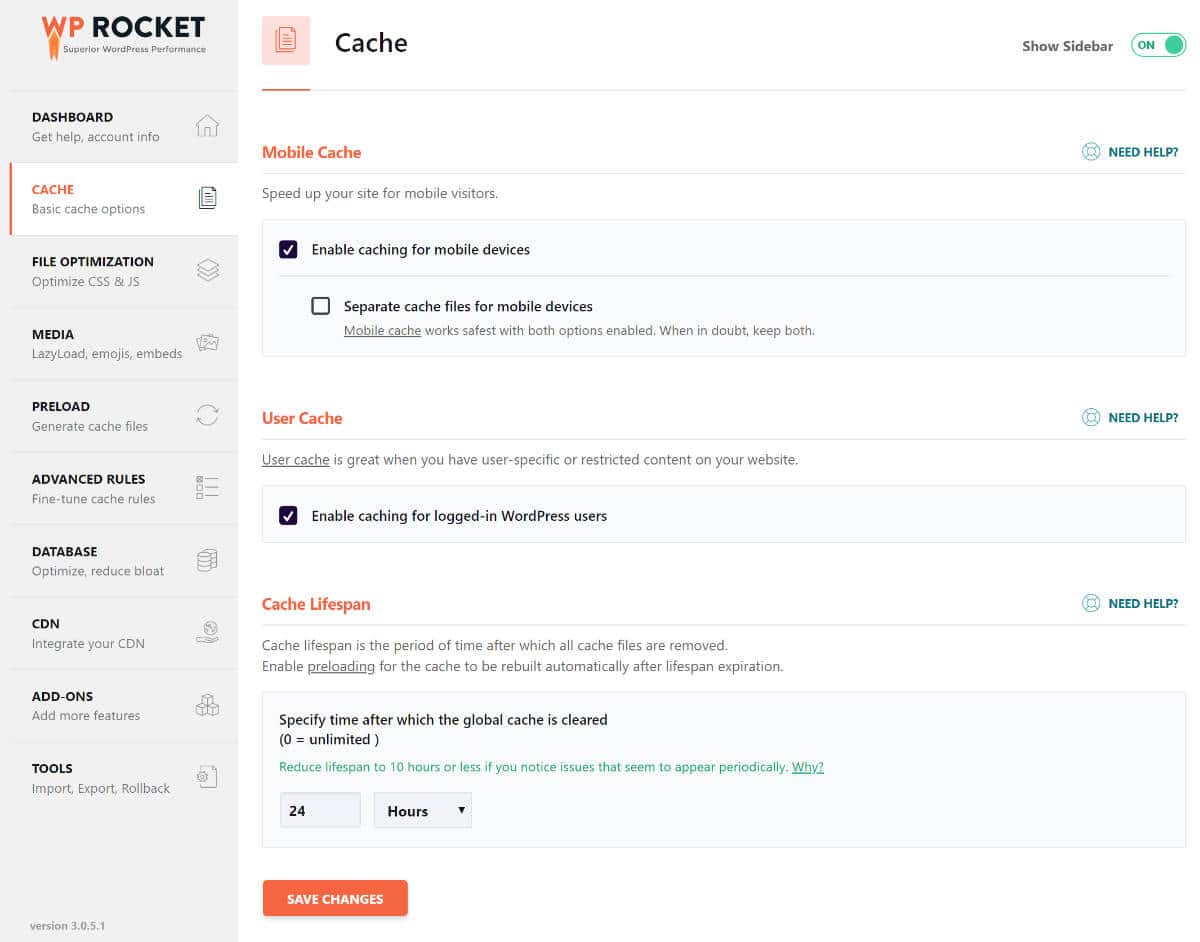
P.S: To set up caching in WP Rocket, go to:
Settings > WP Rocket page > and click on the ‘Cache’ tab.

WP Rocket already enables page caching by default, but you can tweak additional cache settings from this page.
Wrapping up
The boost in the performance of your website after implementing caching is simply irresistible. If done right, it can unlock a whole new level of user experience, search engine rankings, and revenue by optimizing your WordPress site for performance.
However, with so many caching options available, it seems scary to understand which one suits your website well.
But now, as you’re well aware of all the types of caching out there and how they work – it’s time to get cached up! (no pun intended)
