
How to Improve Speed Index (SI) on WordPress
Table of Contents
Do you know how many seconds it takes for your website to load onto your visitor’s screen? The answer points toward the Speed Index (SI), a performance metric impacted by anything that deals with above-the-fold.
The Speed Index (SI) contributes to your overall performance score on the Lighthouse report. Maintaining a good Speed Index leads to a great user experience: it means that the content located in the viewport is delivered quickly.
To improve your performance score, there are six metrics to optimize, and the Speed Index holds up 10% of this global grade computed by Lighthouse.
What is a good Speed Index? How to measure it? Which tools are the most reliable? It can be overwhelming to run a performance audit for your website!
Follow our step-by-step guide to control your Speed Index KPI and conduct an effective performance optimization process. We will explain the Speed Index metric in detail, the free tools you can use to measure your performance, and some technical tips to apply to get a good Speed Index grade (under 3,4 s).
What’s Speed Index in Lighthouse?
Speed Index is a Lighthouse performance metric that shows how quickly the content of a page is loaded and visible for the user.
The Speed Index indicates the loading time of the visible part above the fold of a web page (in the viewport). It measures the entire loading process of what users see before scrolling.
In fact, Lighthouse takes a video of the loading process and calculates the difference between all the frames. Then, Lighthouse uses the Speedline Node.JS module to compute the final SI score. (You can find more information on this module on Github).
The Speed Index is the result of a calculation: it’s the average rendering speed of a web page and its visual progress, also called visual completion.
It’s a meaningful lab metric for measuring loading time that directly affects how users perceive a website’s performance.
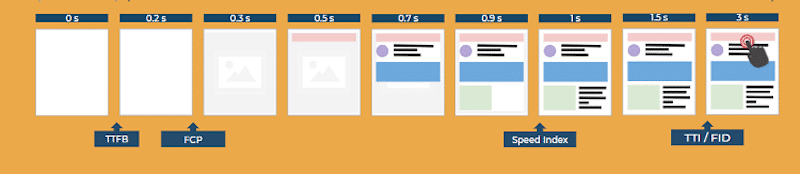
Let’s illustrate this visual completion with two scenarios: page A is optimized, while page B is not:
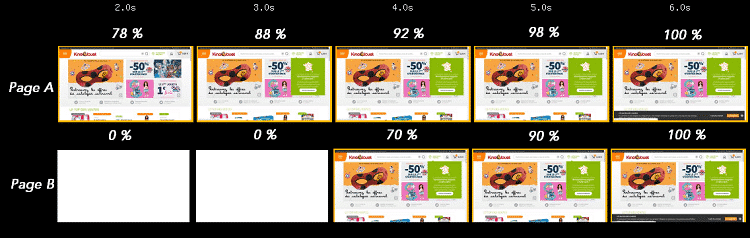
| 📖 A low Speed Index score means that your page renders the visible content pretty fast, giving your visitors the perception of a faster loading page. 📖 SI metric is user-centric: it tracks visual progression. |
What’s the Impact of Speed Index on Performance?
Speed Index is a load performance metric that shows how quickly elements of a page become visible in the viewport. How fast does your website seem to your visitors? That’s exactly the question you’re trying to answer when measuring your web performance!
Speed Index is represented on the image below, almost at the end of the visual completion process:
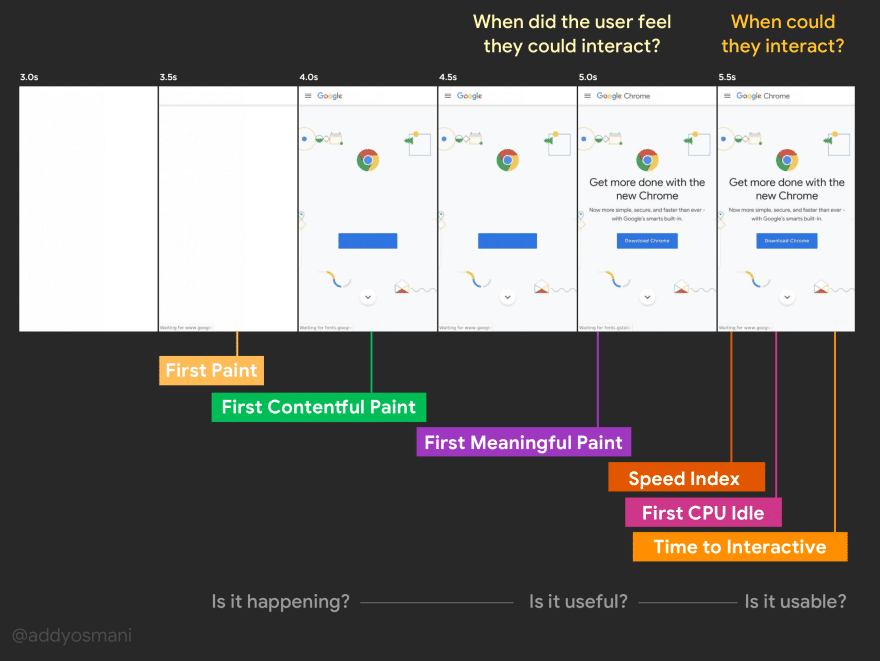
Now, let’s see how the Speed Index compares to the 5 other KPIs measured by Lighthouse.
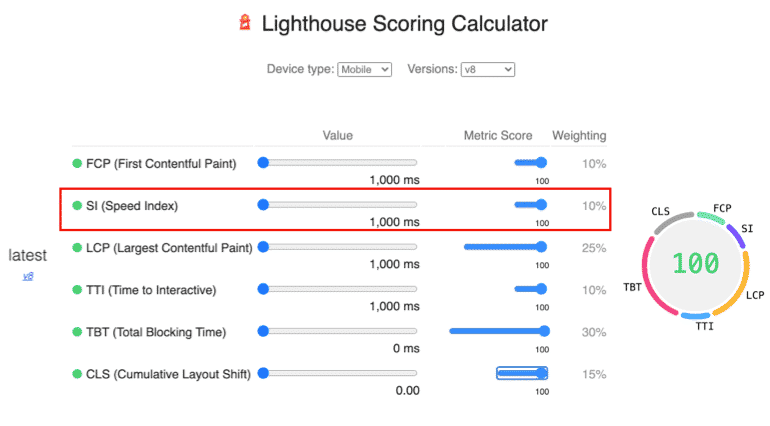
Speed Index Weight on the Lighthouse Score
In the Lighthouse v8 Performance score, SI’s weight has been reduced from 15% to 10%.
How is the Speed Index Calculated by Lighthouse?
Web.Dev explains that your Speed Index score is a “comparison of your page’s speed index and the speed indices of real websites”.
The V8 Lighthouse version computes six metrics to generate your final performance score. It includes the Core Web Vitals, the Total Time to Interactive, the Total Blocking Time, and finally, the Speed Index:
| KPI | Weight | What’s a good score? (green zone) |
| First Contentful Paint | 10% | 0-2 s |
| Speed Index | 10% | 0-3,4 s |
| Largest Contentful Paint | 25% | 0-2,5 s |
| Time to Interactive | 10% | 0-3,8 s |
| Total Blocking Time | 30% | < 200 ms |
| Cumulative Layout Shift | 15% | 0 – 0,1 |
Speed Index is an important lab metric because it defines whether your page is perceived as fast or slow.
| 📖 Speed Index Formula: Interval time * (1 – visual completeness / 100) |
Before we give you some technical recommendations to improve your Speed Index if needed, we should determine what is a good SI score according to Lighthouse.
And that leads us into the next section: the Speed Index threshold.
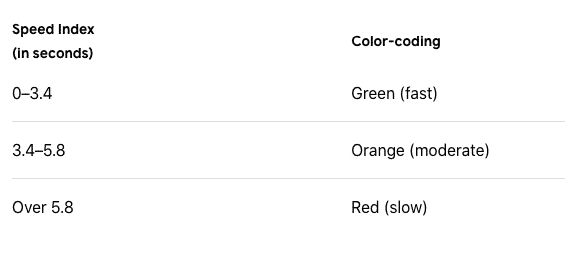
What’s a Good Speed Index Score?
A good Speed Index score should be under 3,4 seconds.
Speed Index vs First Contentful Paint
If you are familiar with the recent Core Web Vitals update, the Speed Index metric may look similar to the First Contentful Paint (FCP) KPI. Let me explain the main difference and why both metrics are important.
First Contentful Paint is also a visual metric that measures the time until the browser first renders any content. Speed Index describes the rate at which the full content appears above the fold.
So whatever speeds up your FCP will improve your Speed Index metric (and it’s better for a user to see something instead of the scary white screen.)
Speed Index vs Cumulative Layout Shift
Whatever stabilizes the content above the fold, and improves interactivity will also help maintain a good Speed Index. To measure the visual stability, Google uses the Cumulative Layout Shift (CLS) from the Page Experience signals. CLS measures the sudden changes on a page that are unwanted by a user such as pop-ups or intrusive ads that ruin the user experience:

Therefore, a good CLS score means good visual stability and can affect your SI positively.
Maintaining a good SI is great for performance but also for marketing. Let’s see how.
Four Marketing Benefits to Keep a Great Speed Index
1. Lower your bounce rate
Well, imagine that you are trying to access a website, but instead of seeing any content right away, you are staring at a blank screen. What do you do? You leave.
This scenario (that we all want to avoid) is called “a bounce”. Someone visits your website and leaves immediately without interacting further with your site.
| 📖 Maintaining a good FCP and SI score will significantly reduce your bounce rate because the user will perceive your website as a fast one. |
2. Increase your “time to spend on page” KPI
If you lower your Speed Index, then the users visiting your site will be willing to stay more on your site and visit more pages.
3. Increase conversion rates
When a user spends time on your site thanks to a good speed, you have another benefit: they are more likely to buy. You are answering their needs: find the answer or the product they want as quickly as possible.
4. Boost your SEO
If your visitors enjoy the experience of being on your website, Google will like it too and will reward you with a better position in the search engine results.
How to Measure Speed Index
Lighthouse is an open-source tool that helps developers to measure Speed Index and other performance metrics. The automated tool creates in-depth reports about speed, performance, accessibility, UX, and SEO.
| 🚀 Do you need help to measure your SI and to perform your website’s audit? Follow our complete guide that explains how to improve your Lighthouse performance score on WordPress. |
Which Tools to Measure Speed Index?
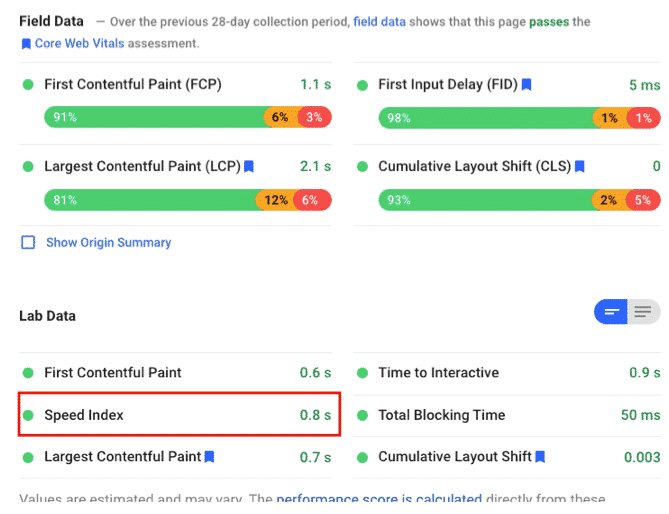
To measure Speed Index and your overall performance score, you can use Google PageSpeed Insights and GTmetrix, two popular tools powered by the Lighthouse technology.
- Using Google PageSpeed Insight (PSI) to measure the SI metric:
- Using GTmetrix to get the SI grade:
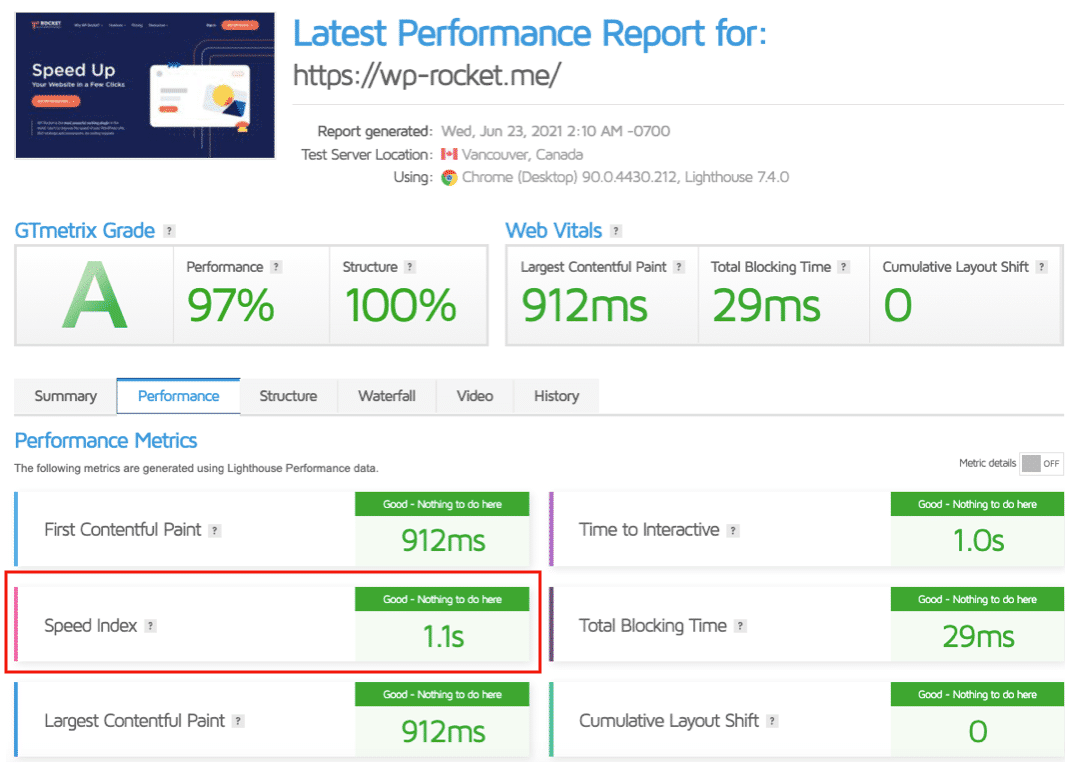
The tools are both providing a different SI score, but they are both in the green zone:
- SI score (PSI): 0,8 s
- SI score (GT Metrix): 1.1 s
| 🚀 Running a performance audit is not always easy. Check our complete guide about testing WordPress site performance and speed. It will help you identify the tools you need and what are the acceptable thresholds for each metric. |
What Affects Speed Index?
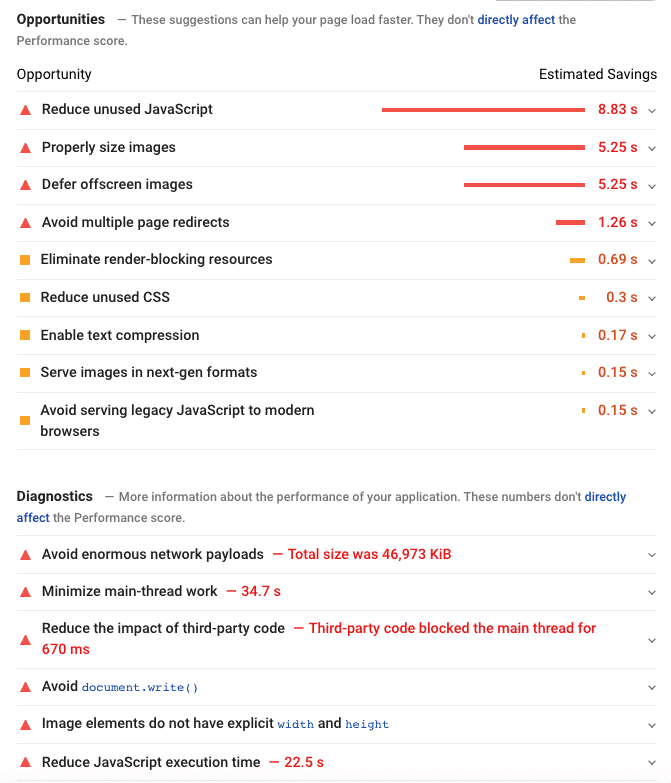
The causes of a high SI score can be identified in the diagnostics section of Google PageSpeed Insights. Usually, we have four main issues contributing to a bad SI score, namely:
- JavaScript code and unused JS
- JavaScript Execution time
- Main thread work
- Third-party code
Thanks to the “opportunities” and “diagnostics” sections generated by Lighthouse, you can find how to improve your SI and your performance grade.
The report determines how much impact each error has on your performance. Addressing them will drastically reduce your Speed Index grade and increase the overall user experience of your WordPress site.
Our goal is straightforward: we want the visitor to see the above-the-fold content as soon as possible.
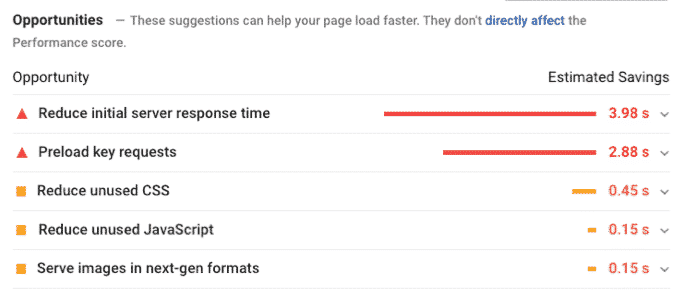
To improve the Speed Index, we’ve listed the main recommendations coming from PSI:
- Eliminate render-blocking resources
- Minimize main-thread work (minimize the browser tasks)
- Reduce JavaScript execution time
- Ensure text remains visible during webfont load (use custom fonts properly)
- Remove unused JS
- Reduce the impact of third party code
- Avoid chaining critical requests
- Preload key requests
- Keep request counts low and transfer sizes small
- Reduce TTFB and server response times
- Make sure you use the images in the files to be uploaded are in the correct format
Now let’s see how to implement each of them.
How to Improve Speed Index: 8 Performance Tips
There are eight performance techniques to follow in order to improve the Speed Index and the overall speed of your WordPress site, namely:
- Defer JS
- Delay JS and Remove Unused JS
- Minify JS and Minify CSS
- Optimize CSS Delivery and Remove Unused CSS
- Optimize Images + Lazy Load
- Use Data Compression
- Use a CDN
- Preload and Optimize Fonts
Let’s dig into each of them.
1. Defer JS
The JS files will be loaded after the browser has displayed the most relevant content. This process allows the browser to load the full content without waiting for the scripts to load.
By deferring the JS files, you also prioritize the type of content you want to show first. In our case, we should focus on anything above the fold: all the non-essential JS under the fold should be deferred.
🚨 Issues reported by Lighthouse: “Eliminate render-blocking resources”, “Remove unused JavaScript” and “Avoid chaining critical requests”.
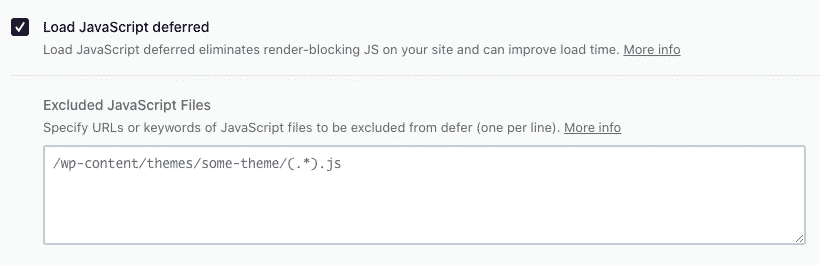
✅ Deferring JavaScript using popular plugins:
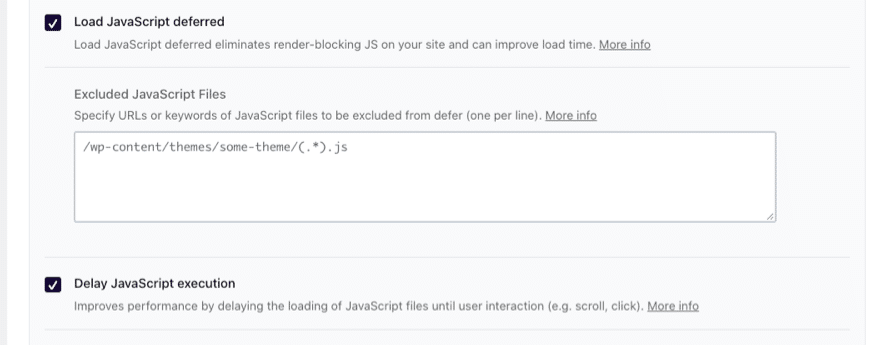
- WP Rocket has an option to defer the JS WordPress files as shown below:
- Asset CleanUp – this free plugin scans and detects the content to be loaded on the page in priority. Simply select the CSS or JS code that should not be rendered first. The plugin author recommends using Asset CleanUp with a cache plugin like WP Rocket to get the best performance results.
- Speed Booster Pack – defers JS files after the whole HTML is rendered.
- Async JS – gives you control of which scripts you want to add a ‘defer’ attribute.
✅ Deferring JavaScript using the manual way
- The Defer Attribute: Use the boolean attributes “defer” for the script tag in HTML, and it will defer the JS you want to target. With the defer attribute in place, the script file is downloaded in parallel while the HTML document is still parsing. The good thing is that the script is not executed until the HTML parsing is complete.
<script src=”library.js” defer></script>
2. Delay JS and Remove Unused JS
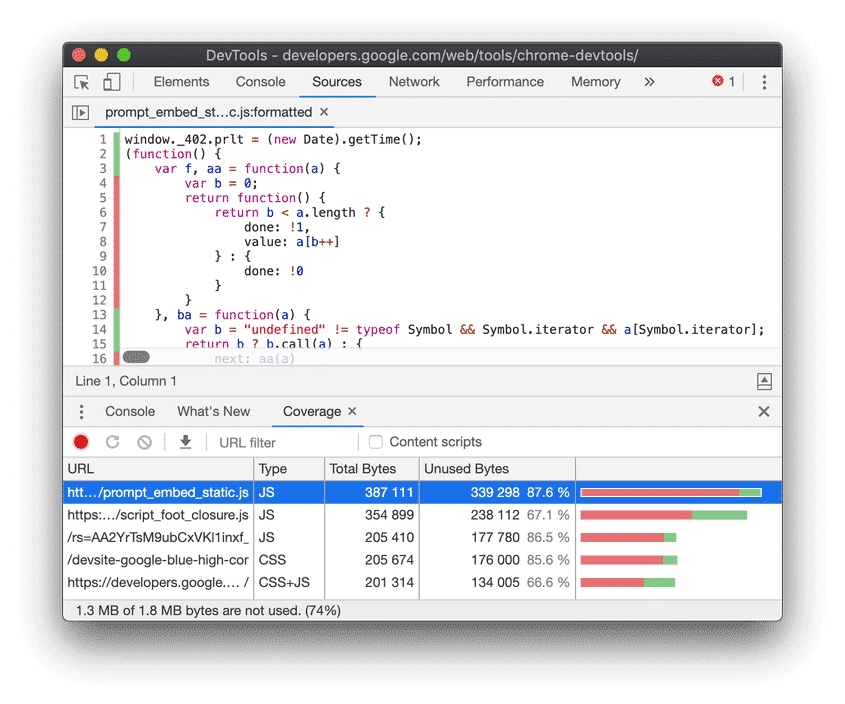
Delaying JS execution and removing unused JS allows you to improve performance and your SI score. The Coverage tab in Chrome DevTools can help you find unused JavaScript code:
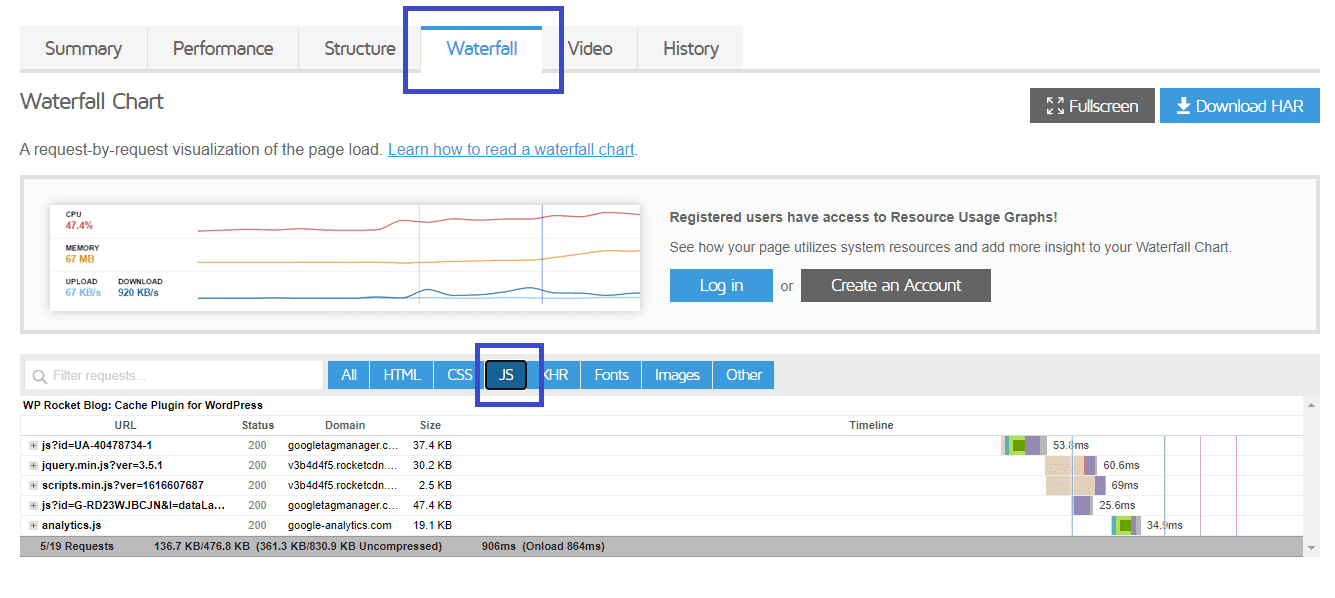
Another way to perform the audit and identify the JS to be optimized is to use PSI or GTmetrix:
🚨 Issues reported by Lighthouse: “Reduce unused JS” and “Avoid chaining critical requests”.
✅ Manual solutions:
- Create a delay in JS execution with the setTimeout()method function. This will call a function after the time you’ll specify in ms. You can use those code snippets to delay the JS functions of your choice.
Note: Lighthouse flags any file with more than 20kb of unused JS code, therefore delaying manually each JS file may be a bit off-putting.
✅ Use a WordPress plugin to delay JS:
- Flying Scripts: a plugin to delay JS and give more resources to critical JS files. It helps to prioritize the JS content that needs to be loaded in priority.
- WP Meteor: a plugin to postpone JS scripts and greatly improve the perceived speed by visitors.
- Gonzales – allows to conditionally disable CSS and JS.
- Perfmatters – helps speed up your site by disabling scripts that might not be used.
- Plugin Organizer – changes the order that your plugins are loaded.
- Asset CleanUp – lets you select the CSS/JS that are not necessary to load.
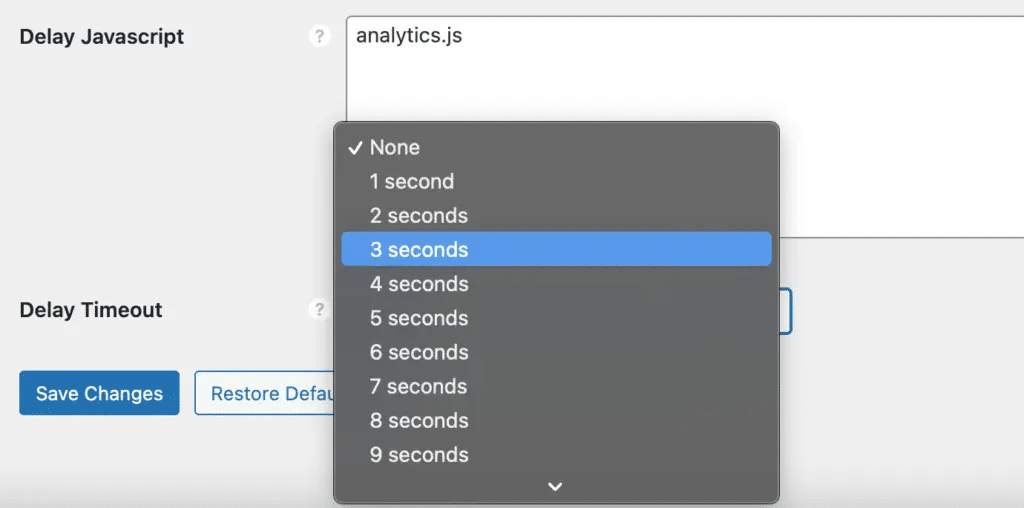
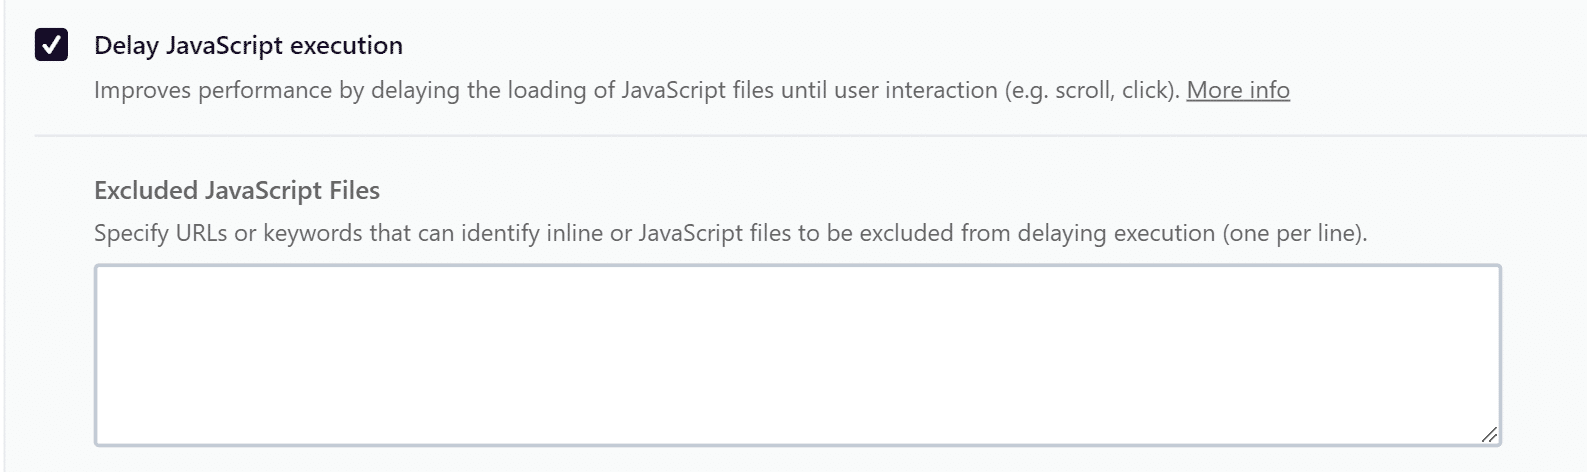
- WP Rocket cache plugin – the best seamless solution. With the WP Rocket plugin, the Delay JS feature is used to reduce unused JS. You can easily delay the JS files with one single click:
3. Minify JS and CSS
Minification is the process of removing all unnecessary characters from JavaScript code without altering its functionality. In plain English, minifying your code means removing any useless punctuations and clutter such as new lines, comments, spaces, semi-colons, etc.
Reducing the bloat will free up time for the main thread. Again, it’s about making space and time for the above-the-fold content.
🚨 Issues identified by Lighthouse: “Reduce JavaScript Execution Time”, “Minimize main thread work”, “Minify JS”, and “Minify CSS”.
Here are some options for you.
✅ Minifying your code manually:
Important: we recommend you do a backup of your site or the file you want to compress. The best is to do such manipulation in a dev environment. If you are not tech-friendly, then we encourage you to use a plugin instead.
- Use a text editor like Sublime Text or Visual Studio Code.
- Open the file containing your code and remove the comments, white space, new lines, and indentations.
- Shorten ID, class, or variable names as much as possible and optimize your conditional statements.
- Save the file again.
✅ Minifying your code using an online tool:
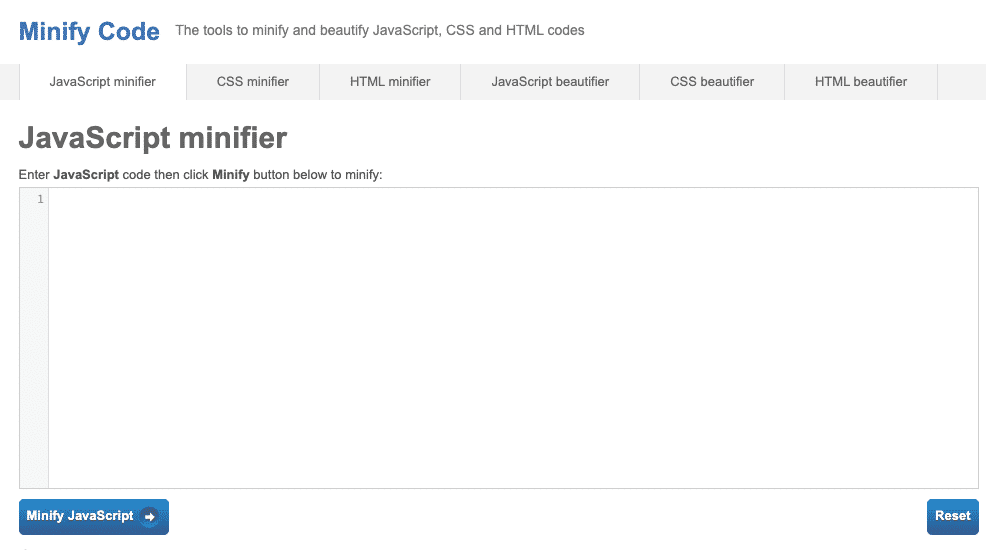
- Go to minifycode.com and open the tab of your choice: JS, CSS, HTML, etc.
- Paste the code from your file into the main field and click the Minify JS button.
✅ The Best JS and CSS minification tools:
- Closure Compiler by Google, a solid option to consider that parses, and analyzes JavaScript, rewrites code when needed, and minifies JS after that.
- UglifyJs minifies, parses, and optimizes your JavaScript.
- Autoptimize is a very popular option to optimize CSS and JS.
- YUI Compressor Tool by Yahoo is both a CSS and JavaScript minification tool.
- WP Super Minify combines, minifies, and caches inline JavaScript and CSS files
- CSS Nano (CSS preprocessor)
- CSSO (CSS preprocessor)
- UNCSS (CSS preprocessor)
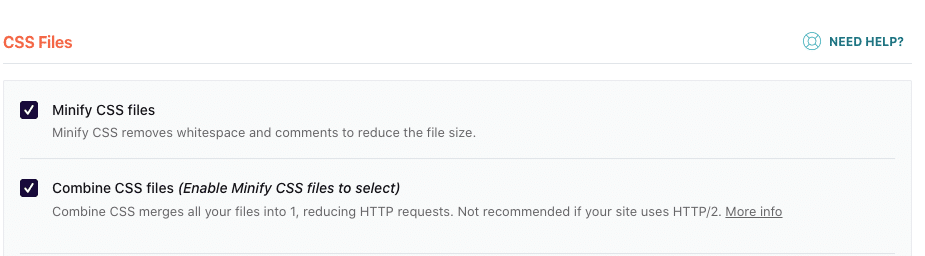
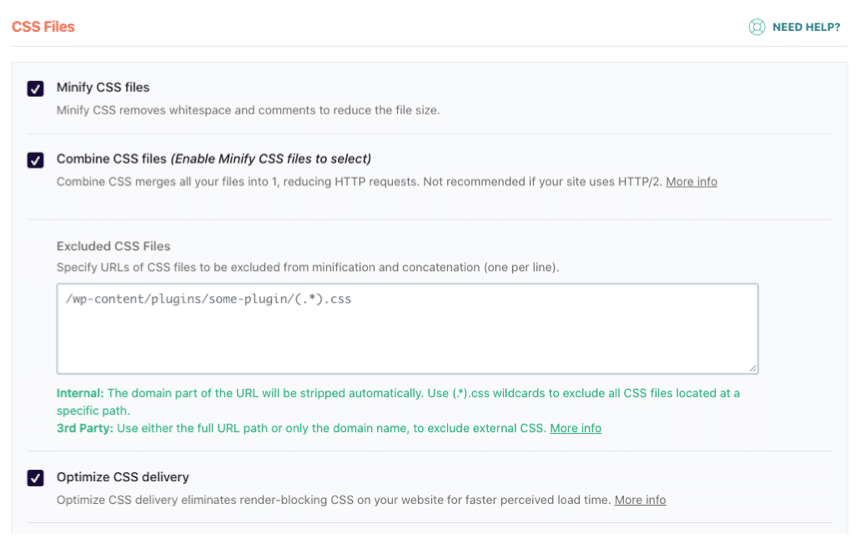
- WP Rocket allows you to minify both your JS and CSS files in a couple of clicks as shown below:

4. Optimize CSS Delivery and Reduce Unused CSS
WordPress is a huge ecosystem, and most theme authors offer lots of layout options and design effects, resulting in using a lot of CSS. The thing is, we all need CSS because it’s the code that styles our web content. On the one hand, we don’t want an ugly website from the 2000s, but at the same time, we need to ensure good performance. It’s all about finding the perfect balance and optimizing how the CSS is rendered/delivered on your page.
CSS files do impact your site loading time — and you should address the issue to improve performance and your SI score. Let’s see the different tactics to optimize CSS delivery.
🚨 Issues identified by Lighthouse:
“Minimize main thread work”, “Reduce unused CSS”, “Eliminate render-blocking CSS”.
✅ Manual solutions:
- Combine, compress and inline your CSS scripts: it means that pages don’t load with separate CSS files. Instead, all the necessary styling information for a page is included with the page (and no useless stylesheet will be loaded.)
- Prioritize the CSS rules: above-the-fold content should be loaded first.
- Remove/Reduce unused CSS manually by going through your code.
✅ WordPress plugins you can use to optimize CSS delivery:
- Autoptimize – simply activate the “optimize CSS code” checkbox in the WordPress dashboard.
- Speed Up – Optimize CSS delivery – well, it’s in the name!
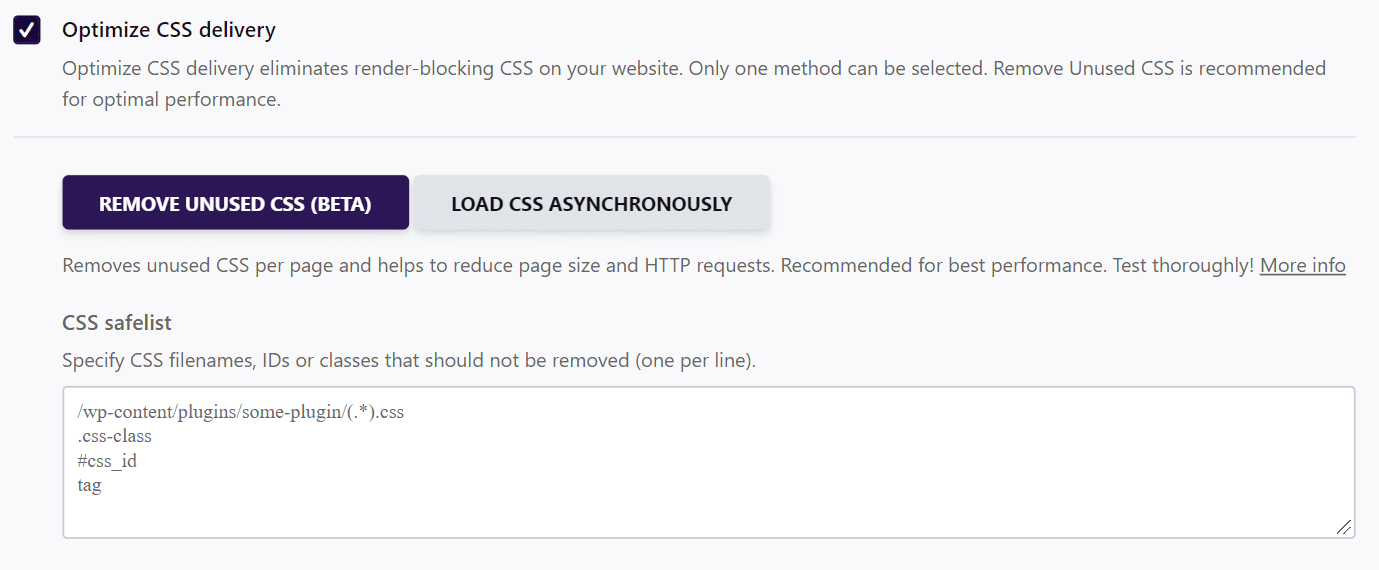
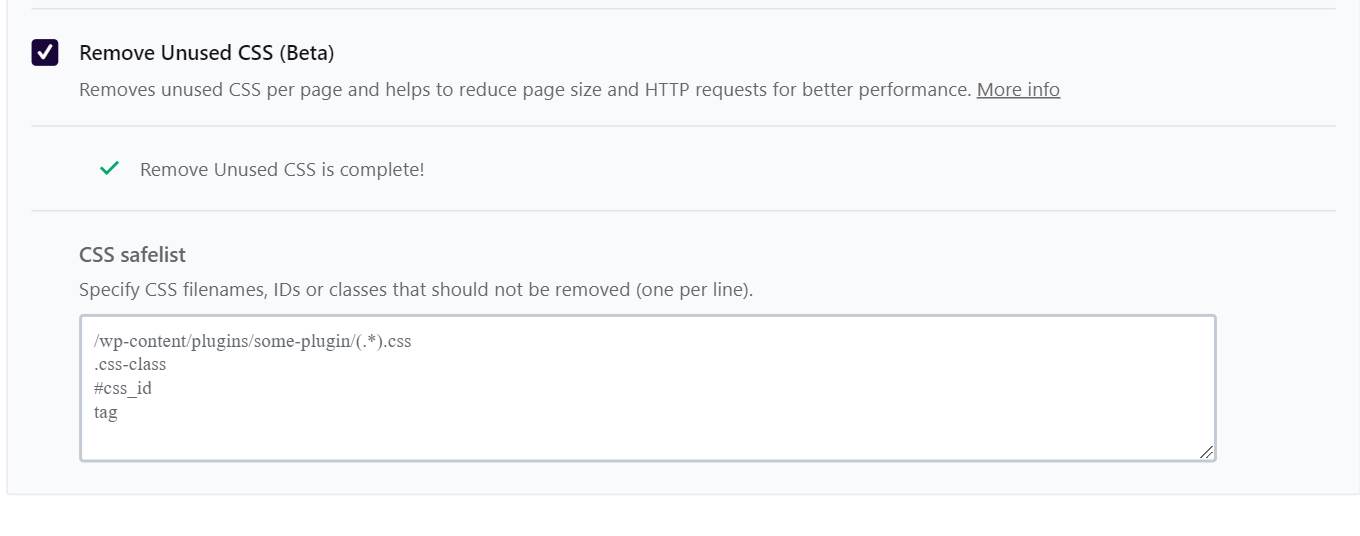
- The WP Rocket cache plugin – helps you optimize your CSS delivery by removing Unused CSS directly from the File Optimization tab.
5. Optimize Images and Use Lazy Load Feature
You need to optimize your website’s images because they are one of the biggest drains on load time. Thankfully, there are a few tools helping you to resize and compress them without a perceptible loss in quality.
Another way to optimize your images is to implement a lazy load on them. It’s a set of techniques that defer the loading of images on a page later when those images need to be visible to the user.
🚨 Issues identified by Lighthouse:
- Properly size images – resize large images to correct dimensions.
- Efficiently encode images – means that you should compress them.
- Serve images in next-gen formats – convert JPEGs/PNGs to WebP.
- Defer offscreen images – lazy load images and background images.
✅ Resizing images manually with applications and online tools:
- GIMP – free for Windows & Mac.
- Preview for Mac – it’s free and already installed.
- Photoshop – can be overwhelming, but it’s the most complete design software.
- BeFunky – a web-based graphic design software.
- Picmonkey.com – edit and produce visual content, including logos.
- Pixlr.com – the free and easy-to-use photo editor.
- Fotor.com – an all-in-one visual creation platform.
- Photopea – open a PSD (photoshop) file for free directly from your browser.
✅ Compressing images with online tools before uploading them to your WordPress site:
- GIMP (Scale image option)
- Photoshop (Save for web option)
- JPEG Optimizer (basic compression option)
- Tiny PNG (smart lossy compression option)
- JPEG.io (advanced JPEG optimization option)
✅ Optimizing images with a WordPress plugin (existing images and new ones):
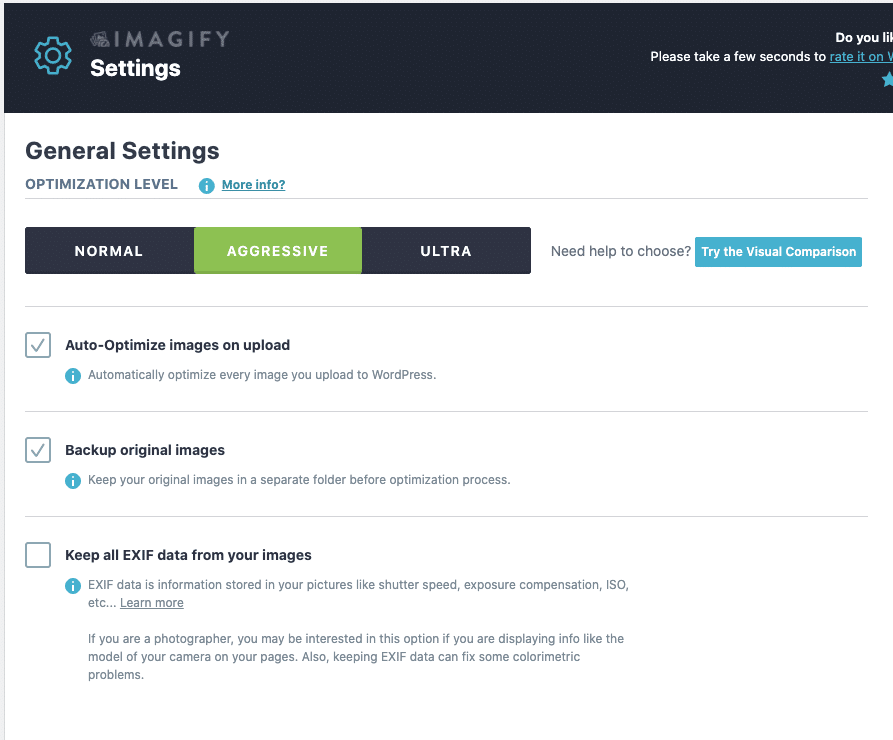
- Imagify – the most advanced tool to optimize images in one click: get lighter images without losing quality, convert WebP and compress them in bulk (Bulk Optimize feature). Imagify can optimize all image formats: jpg, png, pdf, and gif. Imagify is free for around 200 images, then you’ll need to upgrade to the premium version.
- Imsanity – puts an upload size limit to your WordPress library and automatically resizes huge pictures. It also compresses JPG images in the process of resizing them using the standard WordPress compression. However, they still recommend using a more compression-oriented plugin like EWWW Image Optimizer or Imagify.
- EWWW Image Optimizer -automatizes everything, and images are automatically compressed, scaled to fit the page, and converted to the next-gen format.
✅ Applying lazy load on images using a WordPress plugin:
- Lazy Load by WP Rocket – a free plugin helper developed by us that applies lazy load script on images. You can also replace the Youtube iframes with a preview thumbnail to speed up your website.
| Important: WP Rocket cache plugin comes with the LazyLoad feature, so if you are already a WP Rocket user, you don’t need the Lazy Load by WP Rocket plugin. |
- WP Rocket – our cache plugin also comes with a lazy load feature for photos and videos, as you can see in the Media tab below:
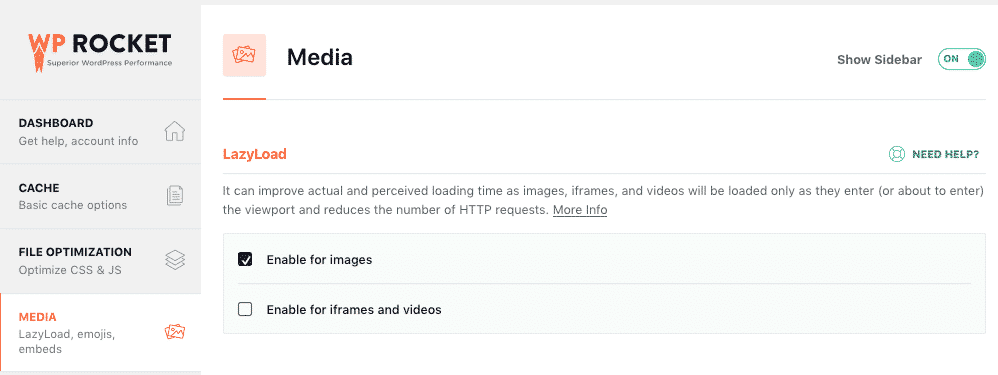
- Other lazy load plugins: have a look at the article we wrote about the best plugins you can use to implement the lazy load feature.
6. Data Compression
Compression is the process of reducing the file sizes of your website to improve your performance score. It’s simple: as you send lighter files to your browser, the rendering time will be quicker.
HTML syntax is repetitive and uses tags like <p>, <span>, <img>, <div>, consequently, it can be useful to use a method called “GZIP compression” to compress and decompress the code.
✅ Enabling GZIP compression using a WordPress plugin:
- GZIP Compression Plugin gives you the power to enable and disable Gzip compression on your WordPress site.
- WP Rocket enables the GZIP feature in the .htaccess file using the mod_deflate module right upon activation of the plugin. One more time, you can opt for our all-in-one solution instead of installing several plugins.
7. Use a CDN (Content Delivery Network)
A CDN allows you to distribute the files from several servers located in different places around the world. Thanks to this system, the loading time of your site is improved, especially for international visitors. We recommend reading our article to learn more about how a CDN works.
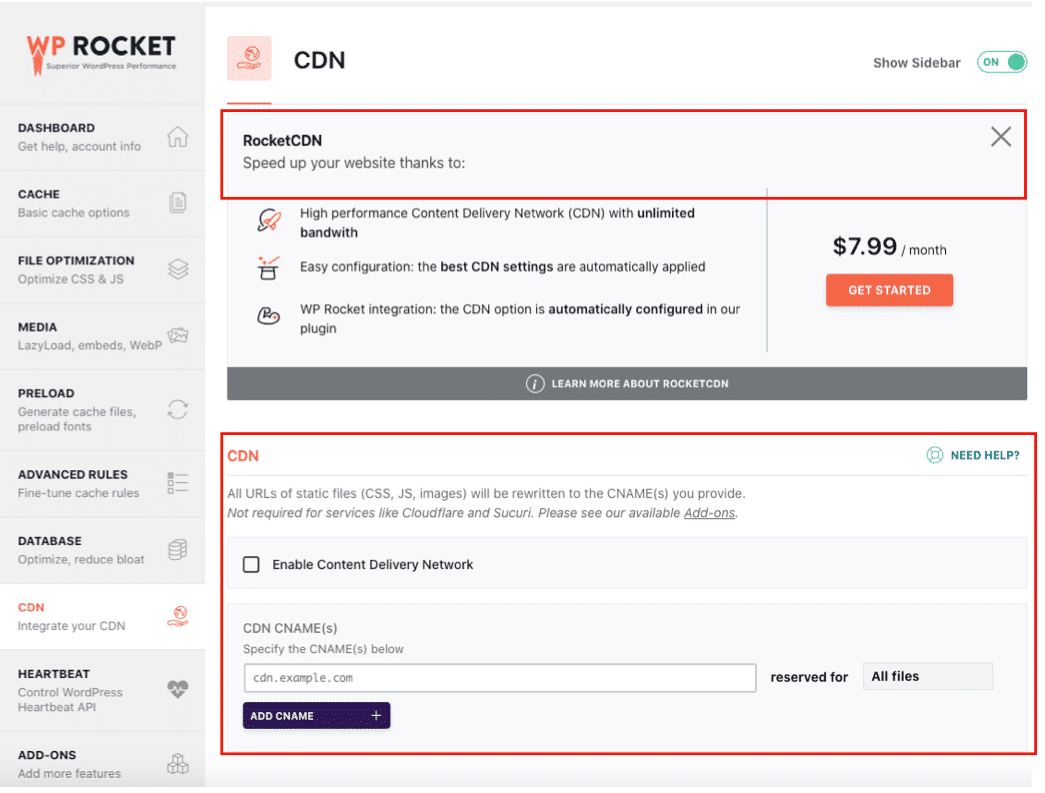
✅ Using a WordPress plugin to activate your CDN:
- WP Rocket has two options:
1. Subscribe for $7,99/month to RocketCDN. The CDN is automatically configured with the rest of the WP Rocket features, which is very convenient.
2. Integrate your own CDN directly in the WordPress dashboard.
8. Preload and Optimize Fonts
Fonts preloading means that you “ask” a visitor’s browser to load the important fonts early on and delay all the secondary ones. Speed Index relies on what happens above the fold, consequently, preloading the fonts ensures that the visible content is displayed properly for the visitors.
Custom web fonts can also cause sudden layout shifts and Google does not really like this. In fact, your visitors may face two main issues:
- FOUT (the style is not applied so the font is unattractive)
- FOIT (invisible text and high waiting time to see the font on the screen)
To maintain a good user experience and avoid such cases we recommend preloading your web fonts.
🚨 Issue identified by Lighthouse: “Preload key requests”, and “Ensure text remains visible during webfont load”.
✅ Using a manual solution to preload fonts:
You can use the rel=”preload” tag and attributes to ask your browser to preload the font.
Real life example:
<link rel=”preload” as=”font” href=”/fonts/custom-font.woff” type=”font/woff2″ crossorigin=”anonymous”>Where to put the rel=”preload” tag?
Between the head tags on your HTML for each CSS script and font files loaded on the site.
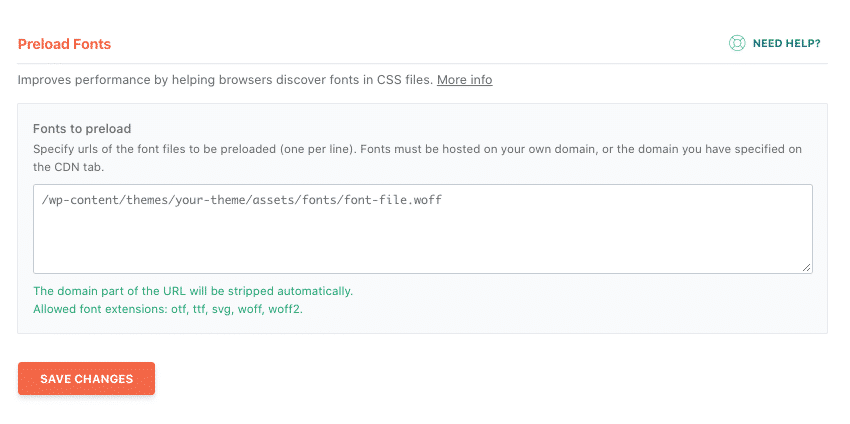
✅ Using a WordPress plugin to preload fonts:
- Use WP Rocket to preload fonts. Go to the “Preload tab”, scroll to the “Preload Fonts” and simply specify the URLs of the font files you want to preload:
How to Increase Speed Index with WP Rocket: Before & After Results
You can reduce your Speed Index grade by using WP Rocket, https://wp-rocket.me/blog/best-caching-plugins-wordpress/#wp-rocketthe best caching plugin for WordPress.
Indeed, anything going toward JS/CSS files optimization and font preloading will most likely improve SI. Good news: each feature of WP Rocket has been designed for web performance!
Don’t just take our word for it. Let us show you how a website performs before and after using WP Rocket.
Analyzing the Impact of WP Rocket on SI Score
We’ve conducted a performance audit for a French caterer named “Le point Gourmand…” using the Google PageSpeed Insights tool. Let’s have a look at our findings.

Lighthouse’s score before WP Rocket: 51/100
- In orange: TTI was 7,0 s, TBT was 480 ms
- In red: Speed Index was 6,0 s and LCP 7,1 s
Lighthouse’s score upon activation of WP Rocket: 95/100
- In Green: TTI, FCP, TBT, CLS, and… Speed Index!
My website was not in very good shape before activating WP Rocket and many issues were identified by PSI:
Enabling the WP Rocket Performance Features
Upon activating WP Rocket, I enabled a few options and followed the list of optimization techniques recommended in the previous section.
Below are all the WP Rocket options that have used to be in the green zone:
- Optimization of my JS files (Load JS deferred, delay JS execution, and remove unused JS)
- Minifying, combining CSS files, and optimizing the CSS delivery:
- Removing/Reducing Unused CSS:
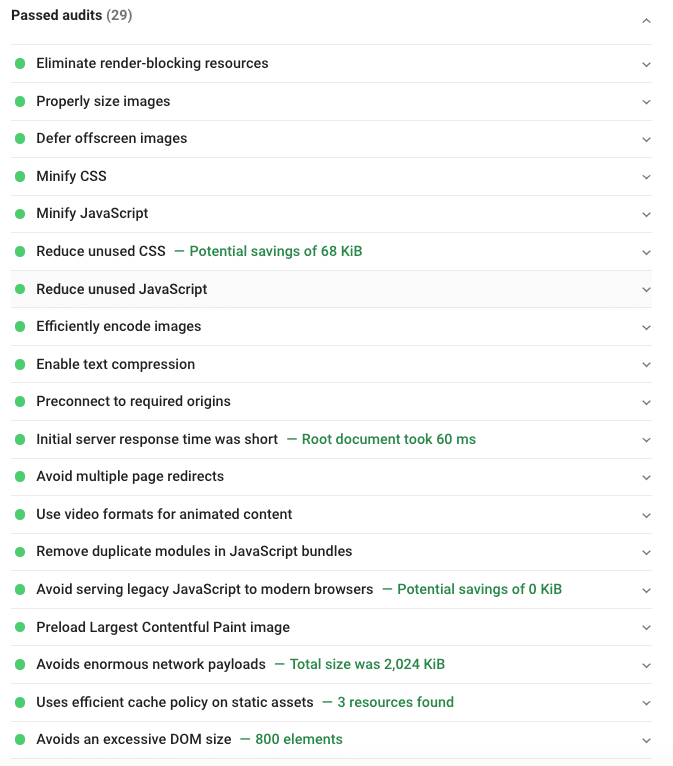
| Before using WP Rocket Two opportunities were identified: “Reduce unused CSS” and “Reduce JS issues”. | After optimizing my files with WP Rocket 🚀 “Reduce unused CSS” and “Reduce JS issues” are now in the passed audit section. |
 |  |
- Image compression. I have used the “aggressive” Imagify setting for the second audit:
- Preloading fonts:

| 💡 Conclusion upon activation of WP Rocket: My “passed audits” list is much better and many issues like “Minify JS”, “Minimize main-thread work,” “Remove unused JS” or “Eliminate render-blocking resources” are gone. My SI score is in the green zone. |
Wrapping Up
Optimizing the Speed Index metric can help your visitors perceive a noticeable improvement in how fast your content appears above the fold.
Speed Index indicates the visual completeness of the page, but it does not indicate if the content is critical or non-critical for the user. Therefore, it’s not a replacement for the other Lighthouse metrics.
The most convenient way to reduce your SI score is by installing WP Rocket, which applies 80% of web performance best practices upon activation.
Another benefit is that each Lighthouse’s KPI can be optimized thanks to the wide range of features offered by WP Rocket. You don’t need to supercharge your WordPress site with several performance plugins, WP Rocket is enough to get you closer to the green zone of Google PageSpeed Insights.
You can always count on our 100% money-back guarantee within 14 days of purchase if you feel like WP Rocket was not useful.
🚀 Boost your speed and the user-perceived performance right now!