
Table of Contents
Last update on
Loading website...
If you’re interested in optimizing WordPress performance, you’ve probably come across the free Autoptimize plugin. It’s quite popular – active on over one million sites – and it’s also racked up over one thousand five-star reviews at WordPress.org.
That might have you wondering – can you and/or should you use Autoptimize if you’re already using WP Rocket?
In this post, we’ll answer that question and also share some tips for how to properly configure Autoptimize.
Can You Use Autoptimize With WP Rocket?
Short Answer: Yes, you can use WP Rocket and Autoptimize at the same time. In fact, WP Rocket has built-in compatibility for Autoptimize to ensure smooth sailing.
However, WP Rocket and Autoptimize have different feature sets (though they overlap in some areas), so Autoptimize is not a standalone replacement for WP Rocket. Most notably, Autoptimize does not include page caching.
Long Answer: Read the rest of this section.
High-Level Differences Between Autoptimize vs WP Rocket
WP Rocket and Autoptimize both help you speed up your WordPress website. However, they have different feature sets and approaches:
- WP Rocket is a full caching and performance plugin. It implements page caching plus a number of performance best practices across a broad range of areas.
- Autoptimize is mainly focused on optimizing one specific part of performance: your site’s code – its HTML, CSS, JavaScript, etc. For example, minification, file concatenation, deferring render-blocking code, etc. Autoptimize does also include a few other optimization features, but the core of its features is code optimization.
For clarity, it might help to define a few terms before continuing on with the differences:
- Minification – removing unnecessary content from code to make it smaller without changing functionality. For example, removing white spaces or comments.
- File Aggregation/Concatenation – combining multiple CSS/JavaScript files into one to reduce HTTP requests.
- Deferring code – waiting to load less important code until after more important content has loaded. For example, prioritizing loading the visible above-the-fold part of your site over a tracking script in the background.
However, Autoptimize does not provide other important optimization tactics such as:
For that reason, Autoptimize is not a replacement for WP Rocket.
Additionally, WP Rocket does include some features for code optimization. For example, WP Rocket can help you minify your CSS and JavaScript, and includes some concatenation features, so there is some overlap between features in WP Rocket and Autoptimize.
However, because Autoptimize is mainly focused on one thing (code optimization), it goes a little bit deeper into this area than WP Rocket does. So if you want even more granular control over code optimization, that would be a big reason why you might want to pair Autoptimize with WP Rocket.
To sum it up:
- WP Rocket is designed so that it’s the only WordPress performance plugin that most people need.
- Autoptimize is primarily focused on one part of performance optimization, which lets it go into a little more detail. You still need to pair it with a caching plugin like WP Rocket (at a bare minimum).
Specific Differences Between Autoptimize vs WP Rocket
In the previous section, we said that Autoptimize goes deeper in some areas than WP Rocket. Let’s compare the settings so that you can see the differences…
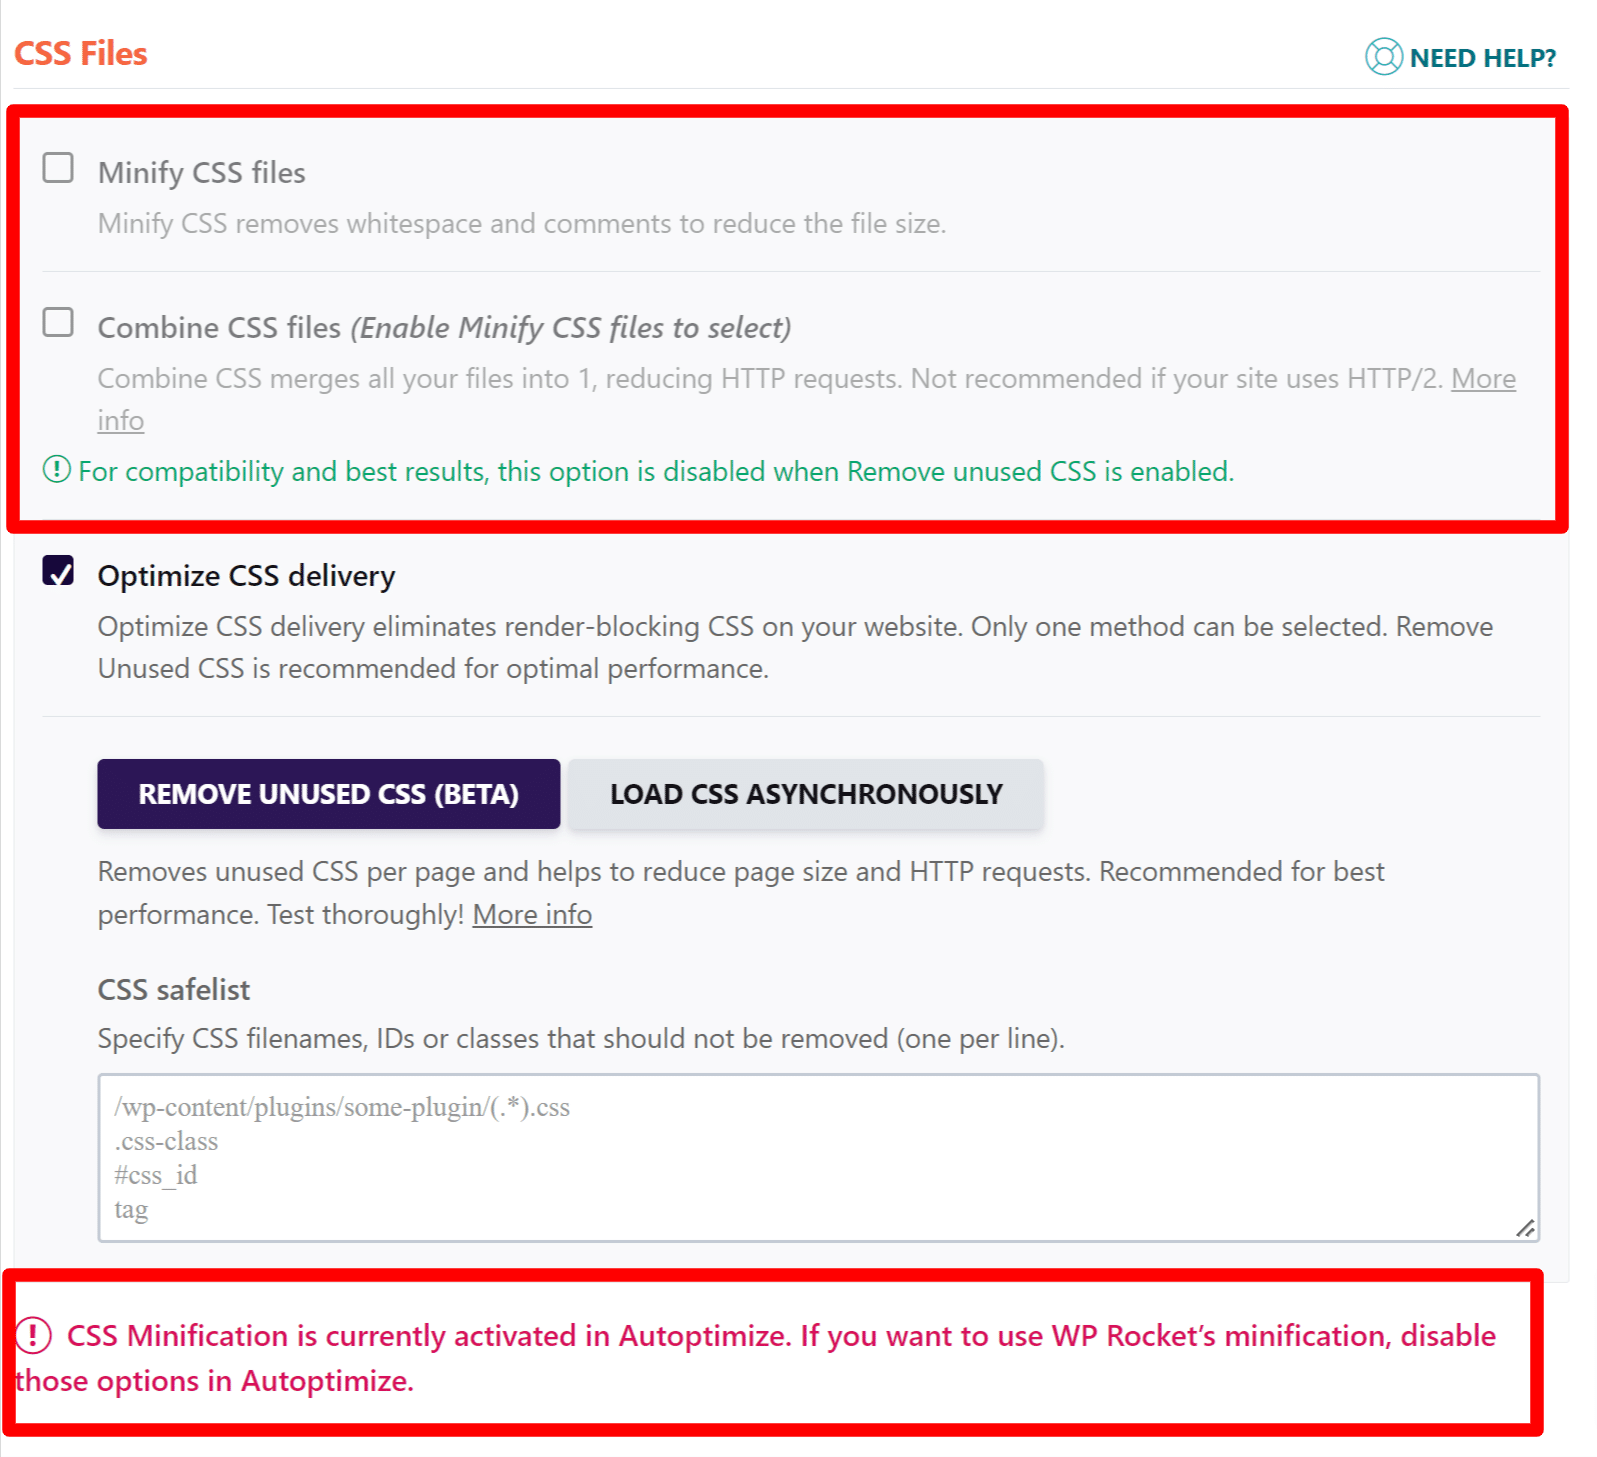
Here are the file optimization settings in WP Rocket (located in the File Optimization tab). At the top, you can:
- Minify CSS
- Optimize Google Fonts
- Optimize CSS deliver (Remove Unused CSS)
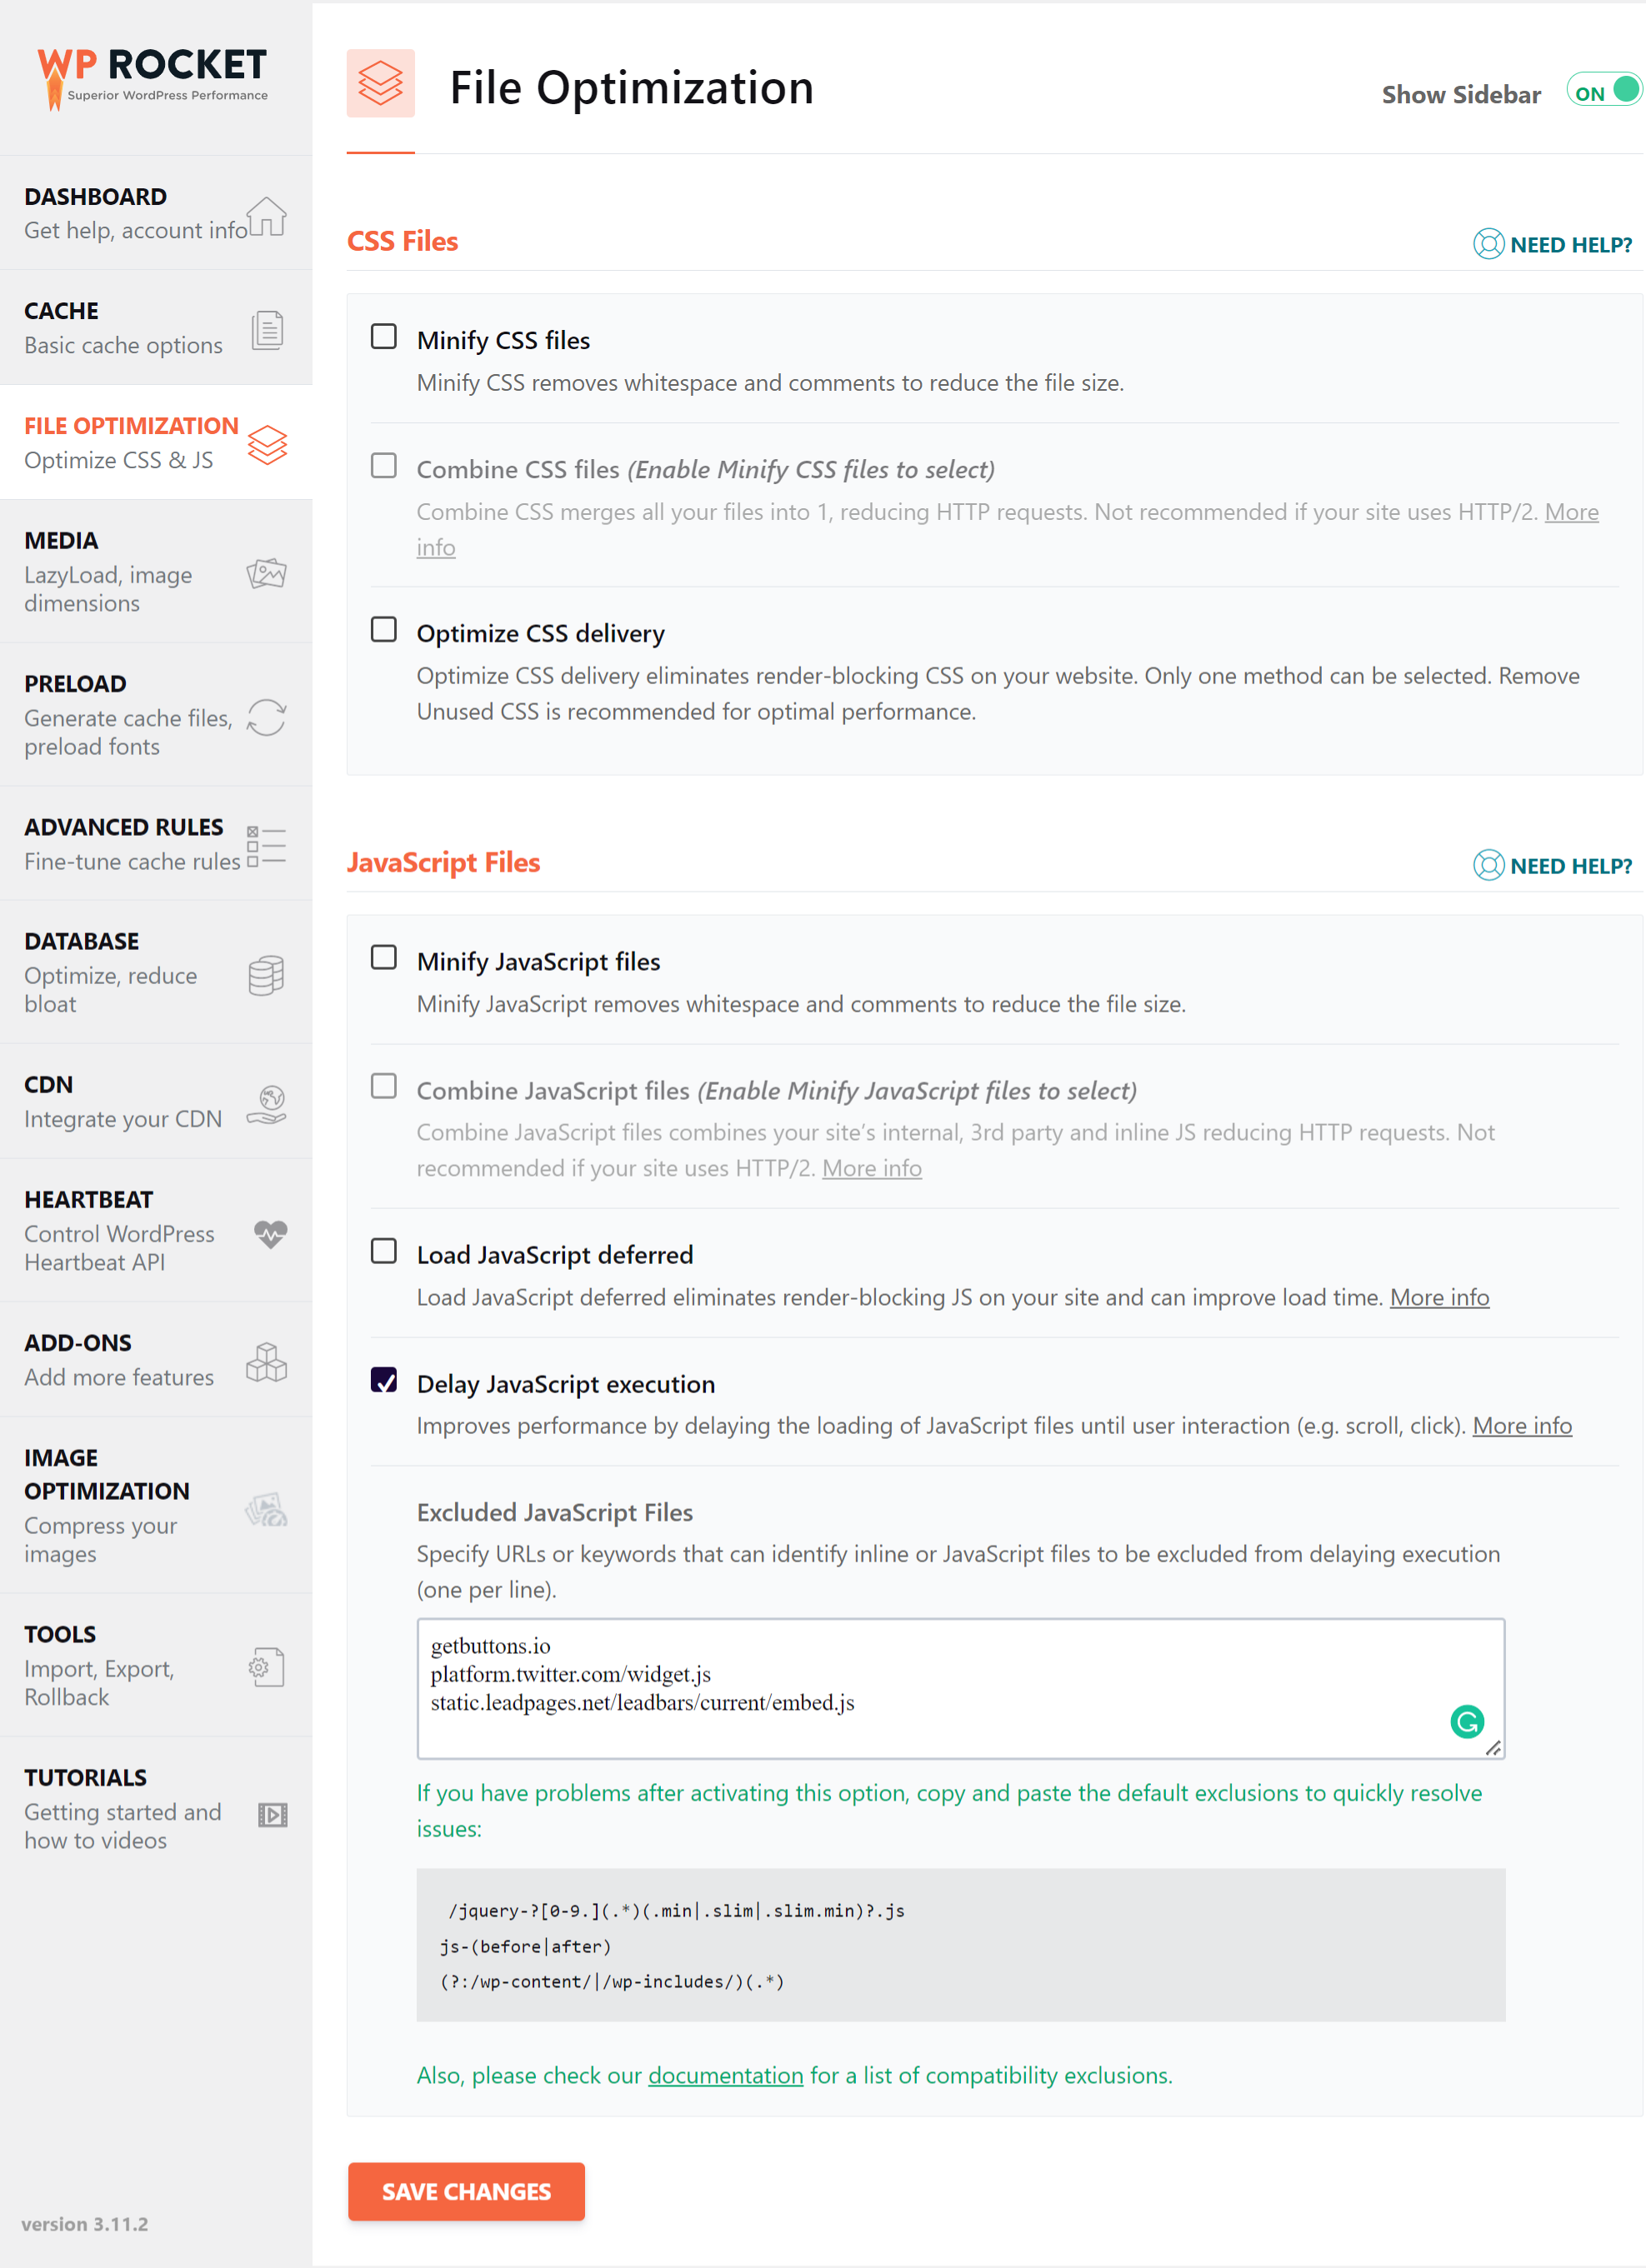
You also get similar options for JavaScript. You can:
- Minify JavaScript
- Load JavaScript deferred
- Delay JavaScript execution

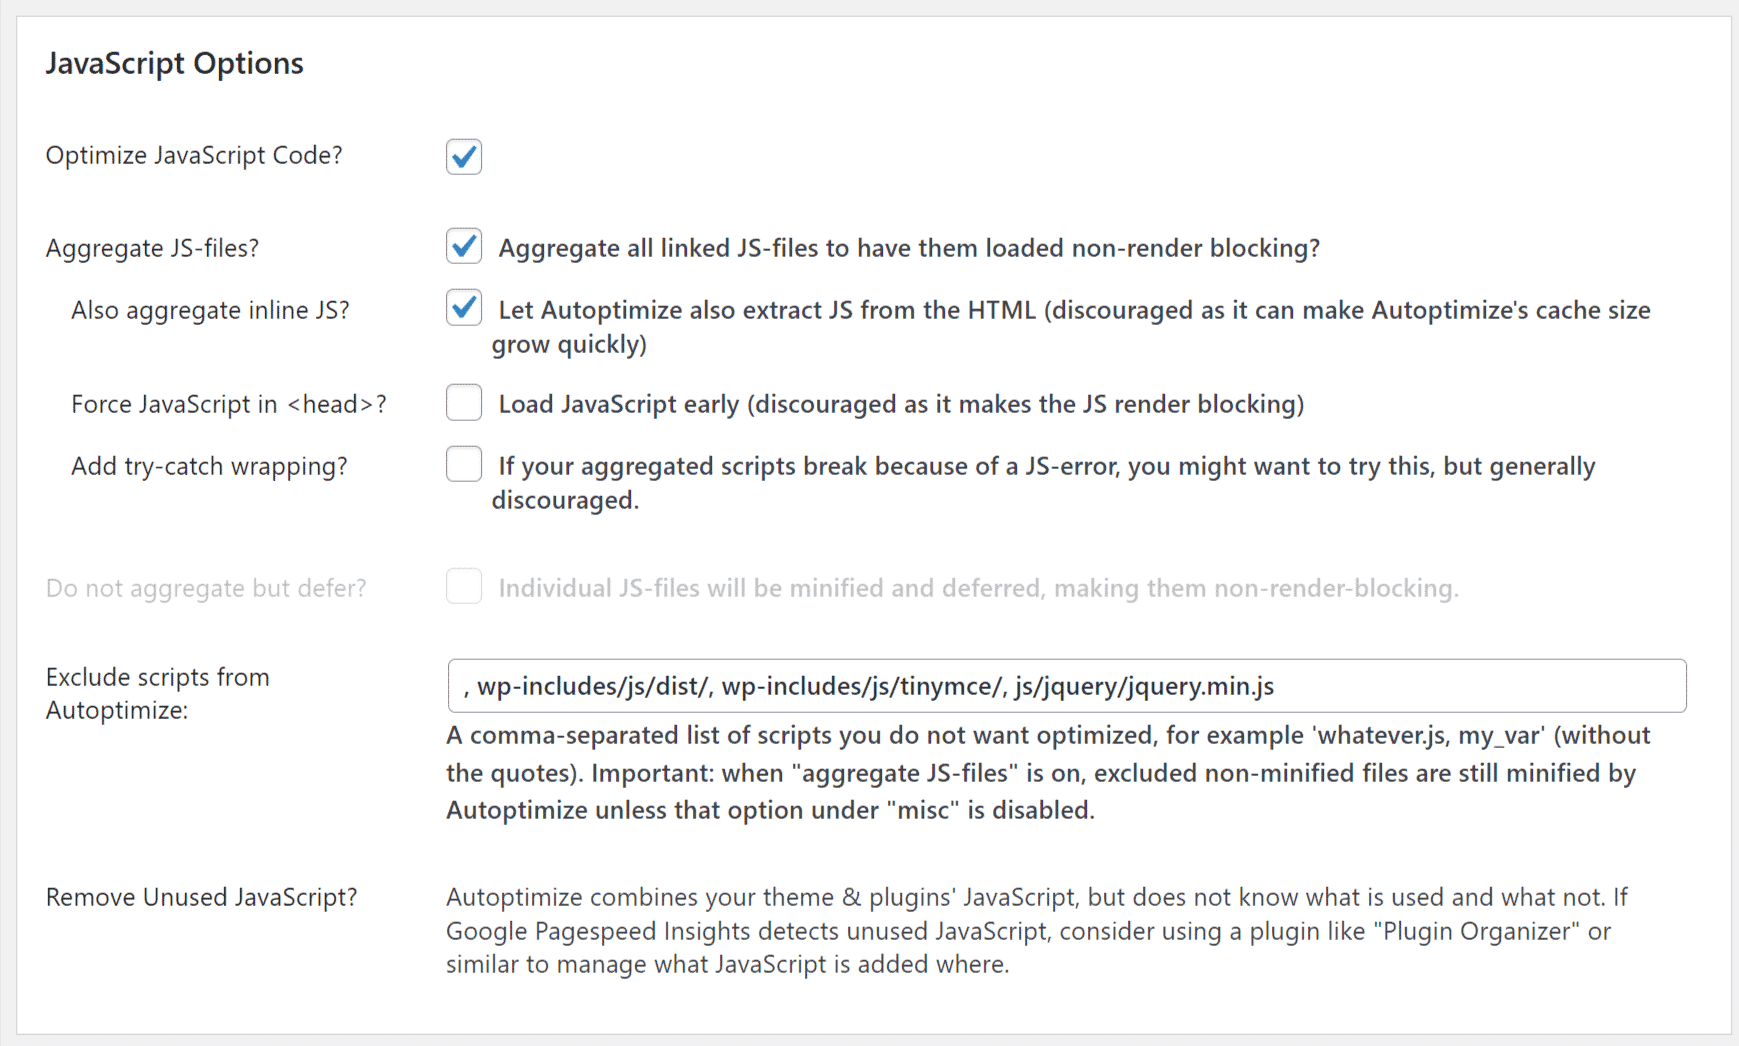
And here are the settings in Autoptimize.
JavaScript Options:
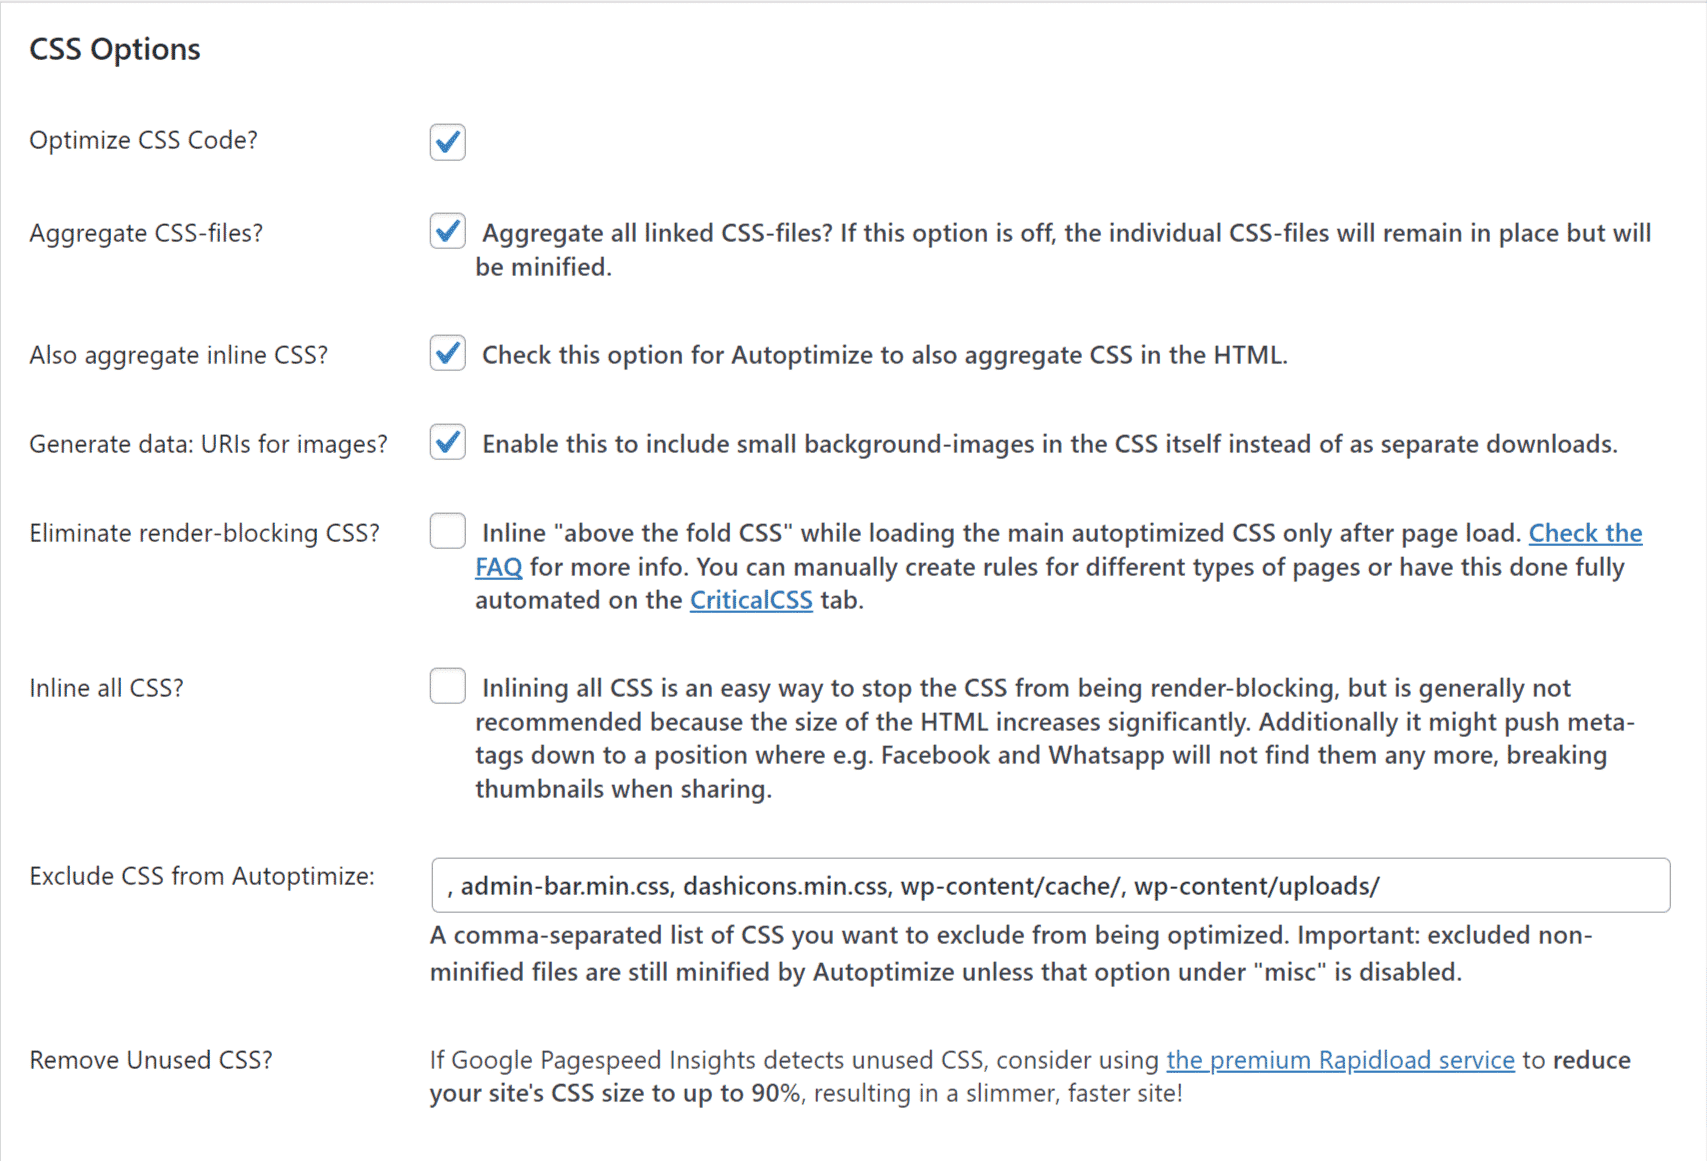
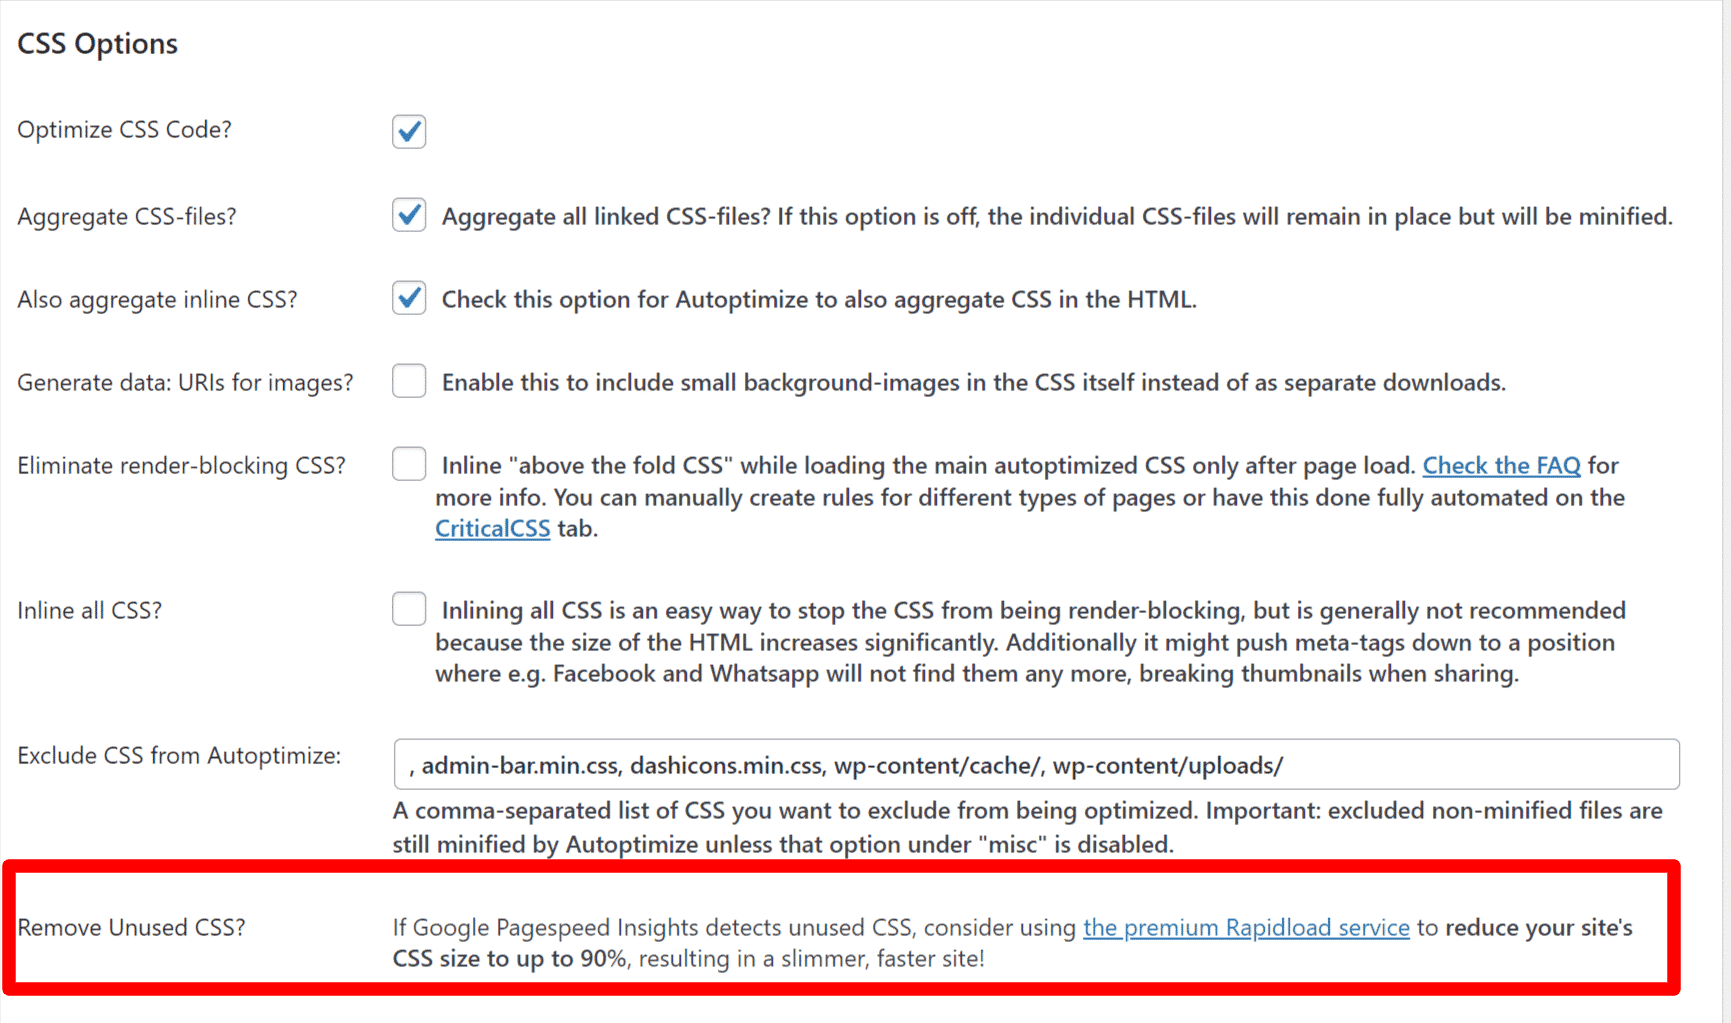
CSS Options
While there’s a lot of overlap, you also get a few other more advanced options that go beyond WP Rocket. For example, you can also exclude your excluded files from being minified, adjust how to save aggregated files, etc. With JavaScript, you can experiment with different configurations to solve certain issues, etc.
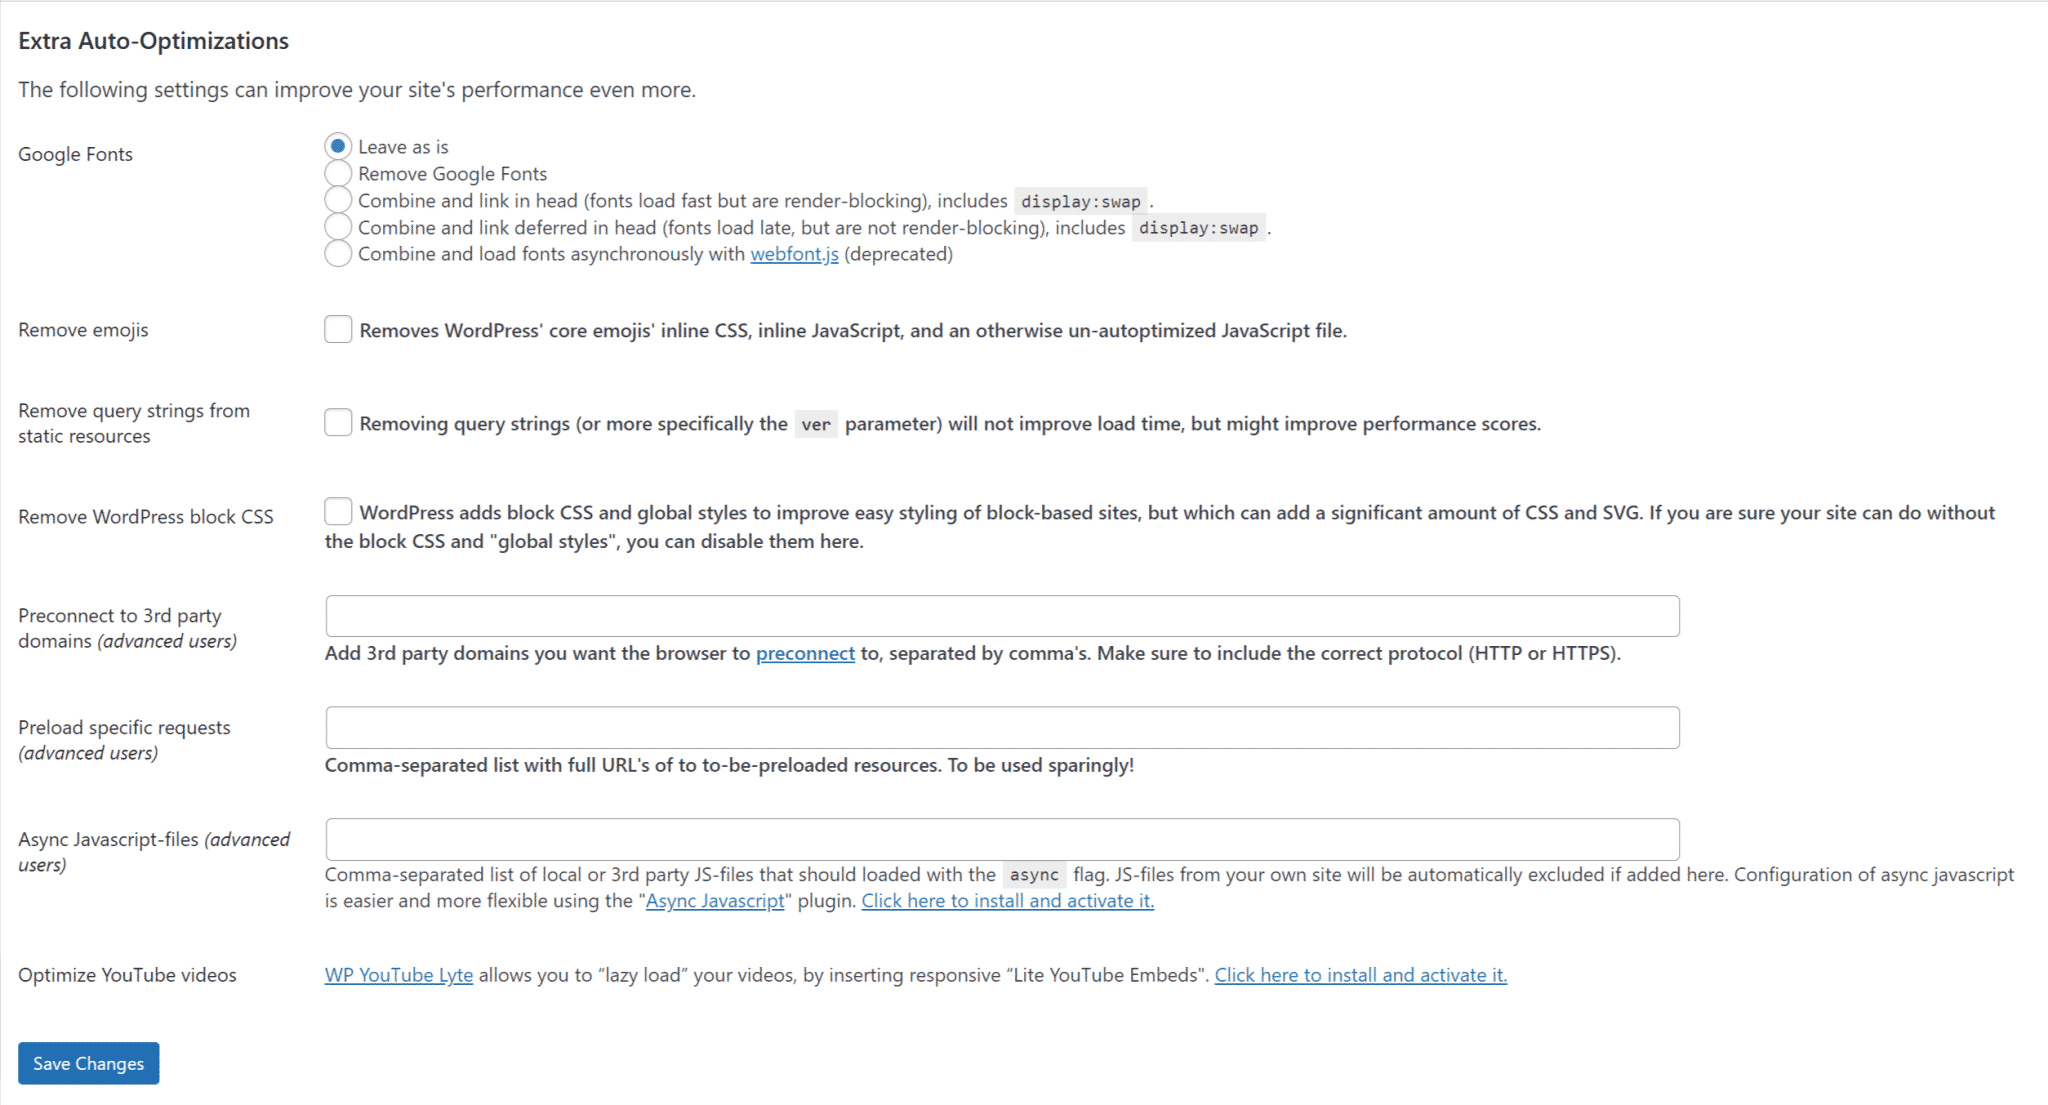
If you go to the Extra tab, you’ll see some more advanced options. For example, Autoptimize gives you five different options for optimizing Google Fonts:
From these comparisons, you can see that, at a high-level, WP Rocket is doing similar things to Autoptimize. However, Autoptimize goes a little more in-depth in some areas and gives you more control over how your file optimization works.
The Google Fonts optimization is a good example of this difference:
- With WP Rocket, WP Rocket will automatically enable and apply optimizing Google Fonts with what we think are the optimal settings for most users.
- With Autoptimize, you can choose exactly how that optimization works. For example, you could load them render-blocking, defer them, remove them altogether, etc.
I See the Autoptimize Cache, Isn’t That Doing the Same Thing As WP Rocket?
In the screenshots above, you can see the phrase “Autoptimize cache” in the Autoptimize settings. This might be one reason why some users think WP Rocket and Autoptimize are doing the same things.
The Autoptimize cache is not referring to page caching, which is what WP Rocket does.
The “Autoptimize cache” only refers to the optimized files that Autoptimize automatically generates (and caches). For example, if you have Autoptimize combine two separate CSS stylesheets into a single stylesheet, Autoptimize will cache that combined stylesheet so that it doesn’t need to manually create the combined stylesheet on every page load. The same is true of aggregated JavaScript.
Should You Use Autoptimize With WP Rocket?
You now know that you can use Autoptimize with WP Rocket and that, while there’s a lot of overlap, there are still some differences between the plugins. However, perhaps a more important question is should you use Autoptimize with WP Rocket?
Here, it really depends on how in-depth you want to go with tweaking your WordPress performance optimization. If you’re just a casual user looking for a simple solution to speed up WordPress, you’re totally fine to stick with just WP Rocket to keep things simple.
However, if you do want more control over code optimization, pairing Autoptimize with WP Rocket can be a great decision. Again, both plugins work well together and Autoptimize will give you slightly more control in some areas.
Summary:
- For casual users, you’re totally fine to just use WP Rocket and skip Autoptimize. WP Rocket already covers most (but not all) of what Autoptimize does.
- For advanced users/tweakers who want more fine-tuned control, you might prefer the extra options in Autoptimize, in which case you can pair it with WP Rocket.
How to Set Up Autoptimize With WP Rocket
Now, let’s get into how to set up Autoptimize with WP Rocket (if you want to go that route).
For this section, we’ll assume that you’ve already installed and configured WP Rocket. If you haven’t, you can get WP Rocket now and then go through our Getting Started guide.
As we mentioned earlier, WP Rocket has built-in compatibility with Autoptimize. So as you configure Autoptimize, WP Rocket will automatically disable any WP Rocket features that might interfere with Autoptimize.
You’ll see a message below the section in question and WP Rocket will disable/prevent you from activating any features that overlap:
Basically, you don’t really need to worry about accidentally hitting any compatibility issues – we’ve got you covered.
To configure Autoptimize, you go to Settings → Autoptimize. However, before we take you through the settings, we need to cover a quick note:
Whenever you’re editing/combining your site’s CSS or JavaScript, there’s always the potential to cause small issues (this is true for WP Rocket as well). For example, your site might look a little wonky after enabling a feature. If that’s the case, your best bets are to:
- Try to find the specific file that’s causing problems and exclude it (if you have the technical knowledge to find the file).
- Disable that specific feature if you aren’t sure how to find the problematic file.
Typically, you’re most likely to hit these issues when combining CSS or JavaScript.
JavaScript Options – JS, CSS & HTML Tab
In the JavaScript Options, the safest choice is to check just the first two boxes:
- Optimize JavaScript Code
- Aggregate JS-files
You can also experiment with the Also aggregate inline JS option. However, pay attention to the warning as it might cause issues for some sites:
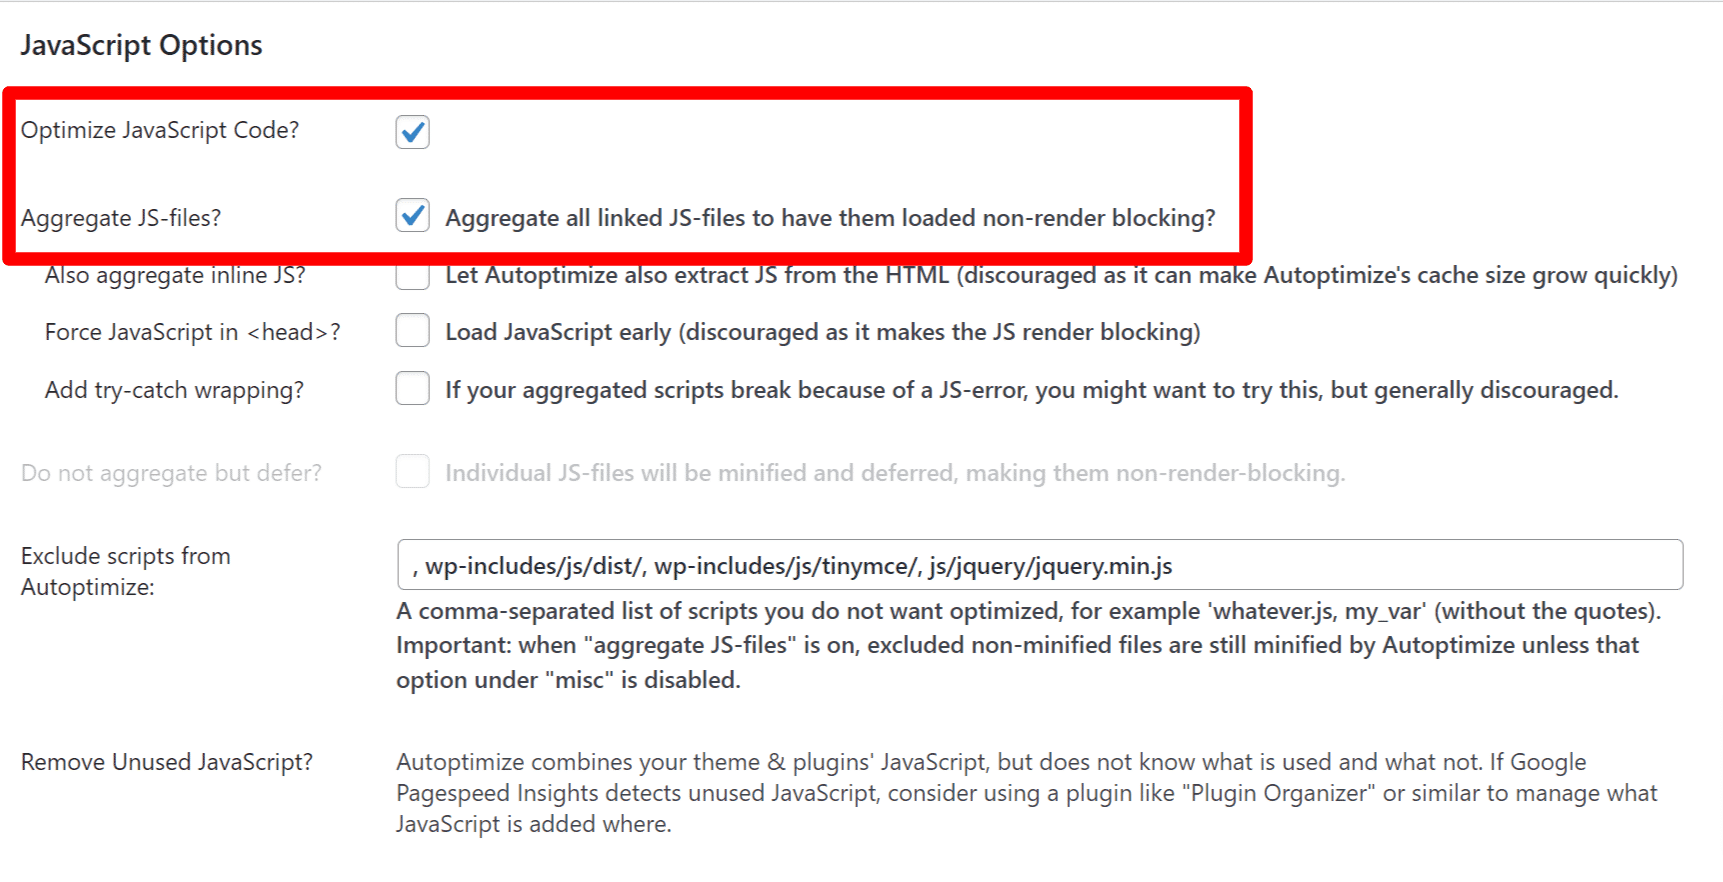
If you experience errors, you can play around with the options to force JavaScript in <head> or add try-catch wrapping – just pay attention to the warnings.
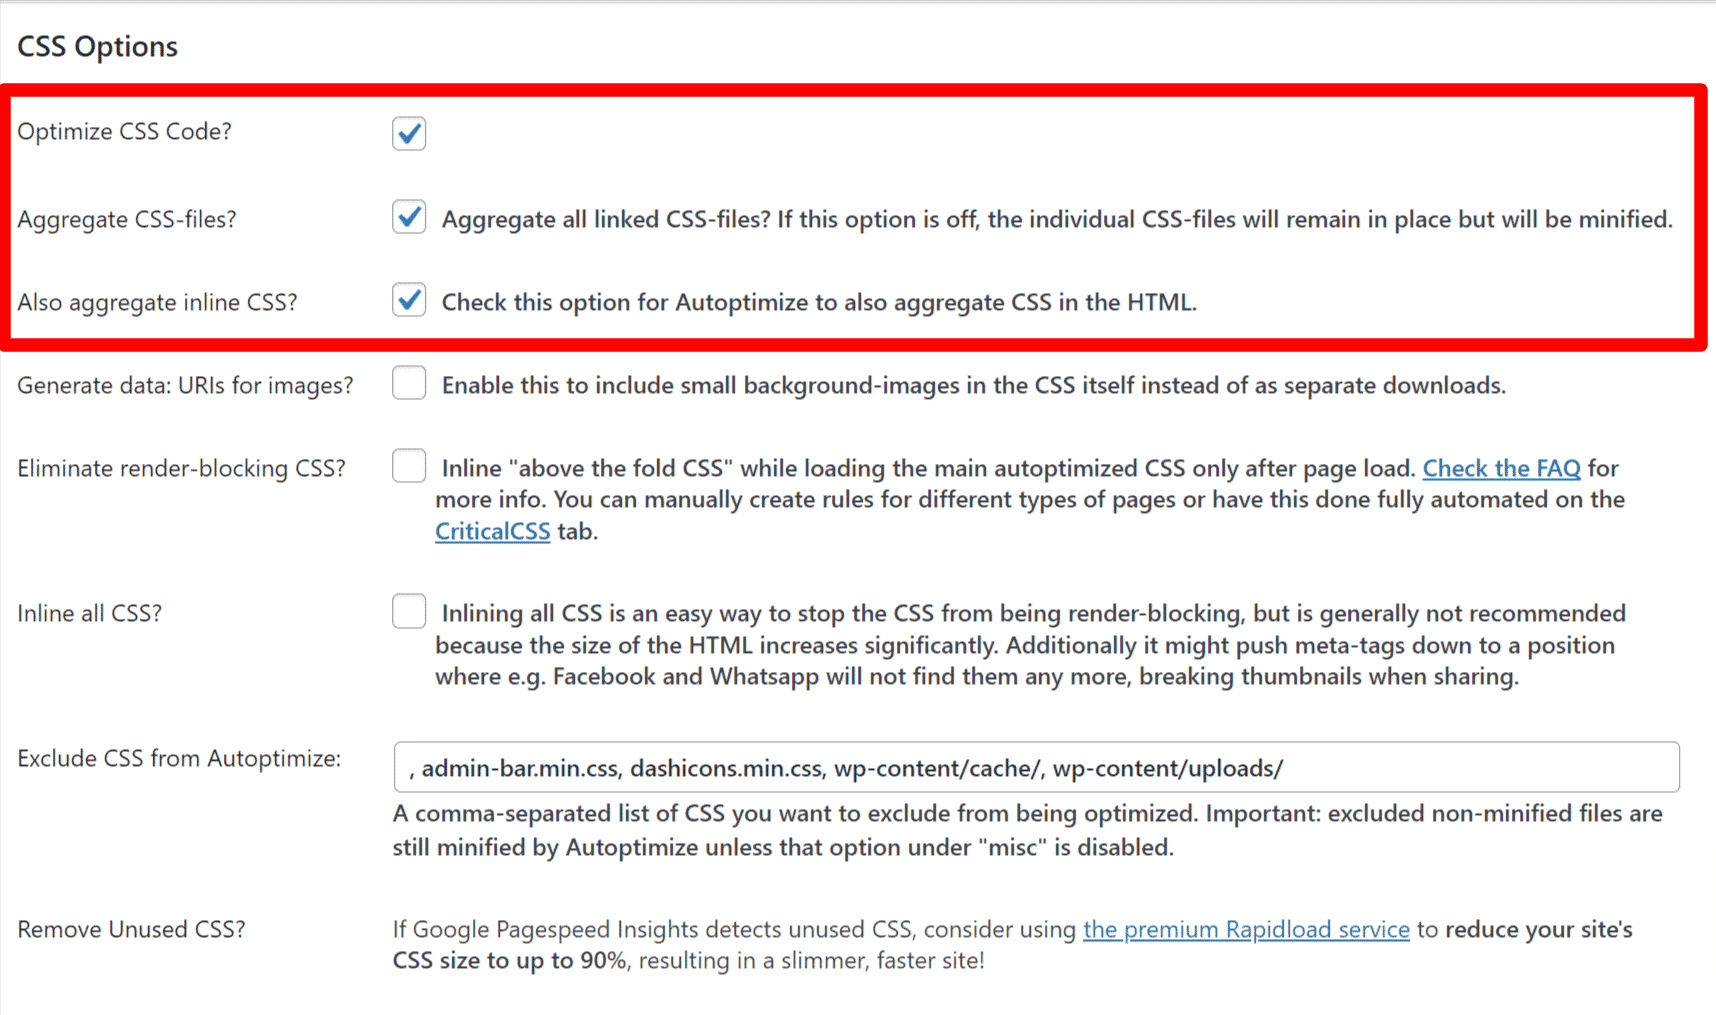
CSS Options – JS, CSS & HTML Tab
In the CSS options, a good starting point is to check the first three boxes:
- Optimize CSS Code
- Aggregate CSS-files
- Also, aggregate inline CSS
More on the option to inline and defer CSS when we talk about the Critical CSS tab.
Other Settings – JS, CSS & HTML Tab
Under HTML Options, check the box to Optimize HTML Code.
If you’re using the content delivery network (CDN) feature in WP Rocket, you should also enter your CDN Base URL in the CDN Options setting. If you’re not using a CDN, you can ignore this setting.
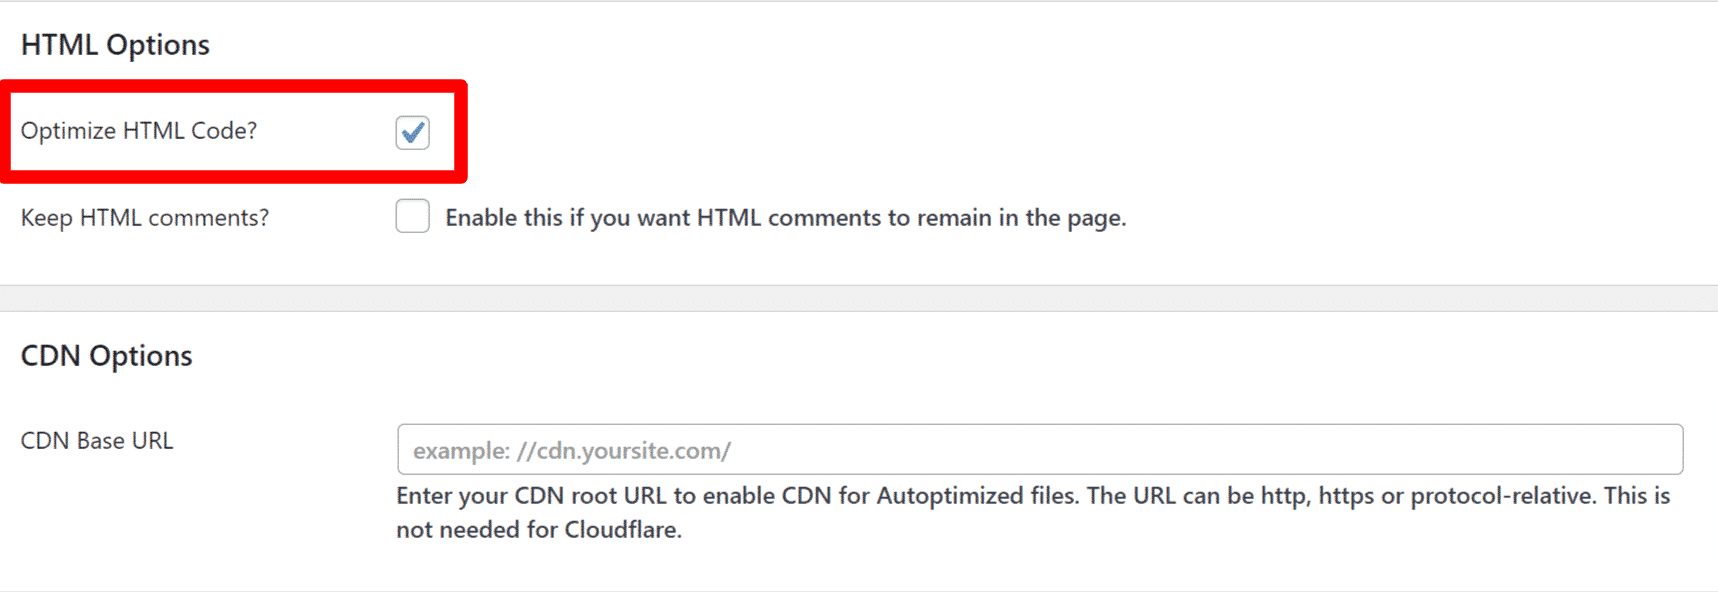
At the bottom, you can also peruse the Misc Options. When in doubt, just leave these as the defaults.
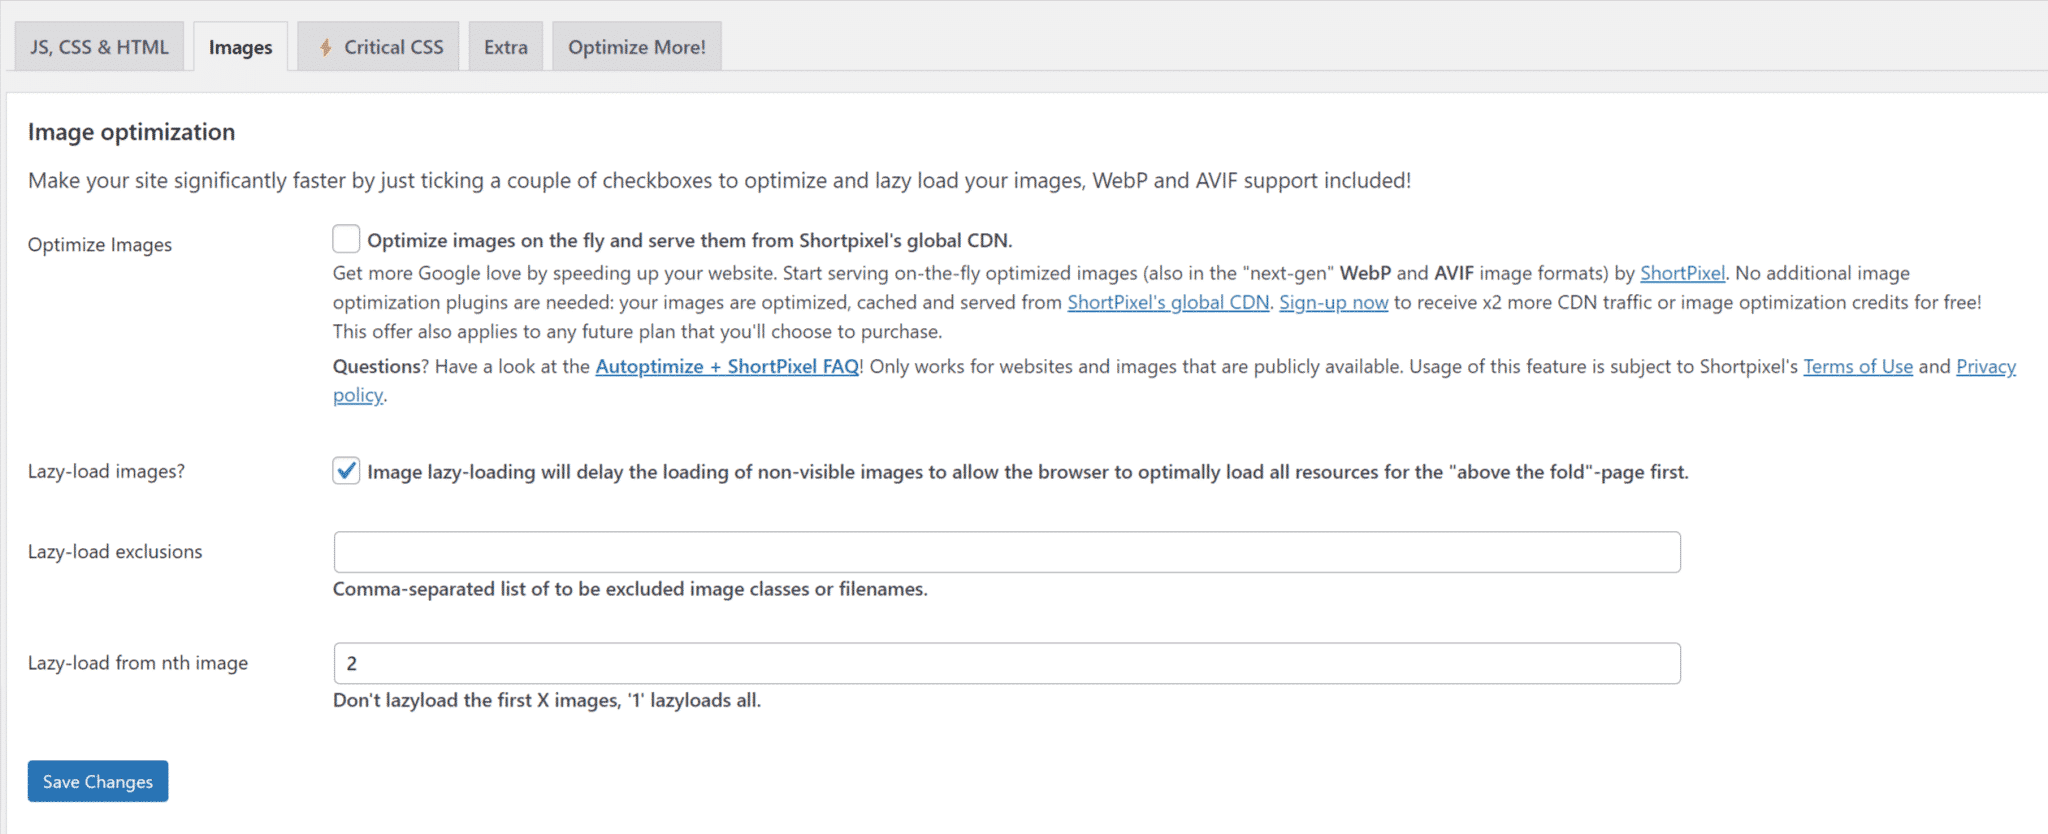
Images Tab
Autoptimize doesn’t include its own image optimization feature. However, it does integrate with the ShortPixel Adaptive Images plugin.
Alternatively, you can use our own plugin, Imagify, to optimize your images.
Autoptimize can also help with lazy loading images and serving WebP images (Short Pixel). However, WP Rocket already handles these features for you in the Media tab, so we recommend leaving them disabled in Autoptimize. Plus, it gets a little complicated with Autoptimize and setting up lazy loading
If you are using WP Rocket, we can still help with lazy loading your images and video, and add any missing image dimensions easily:
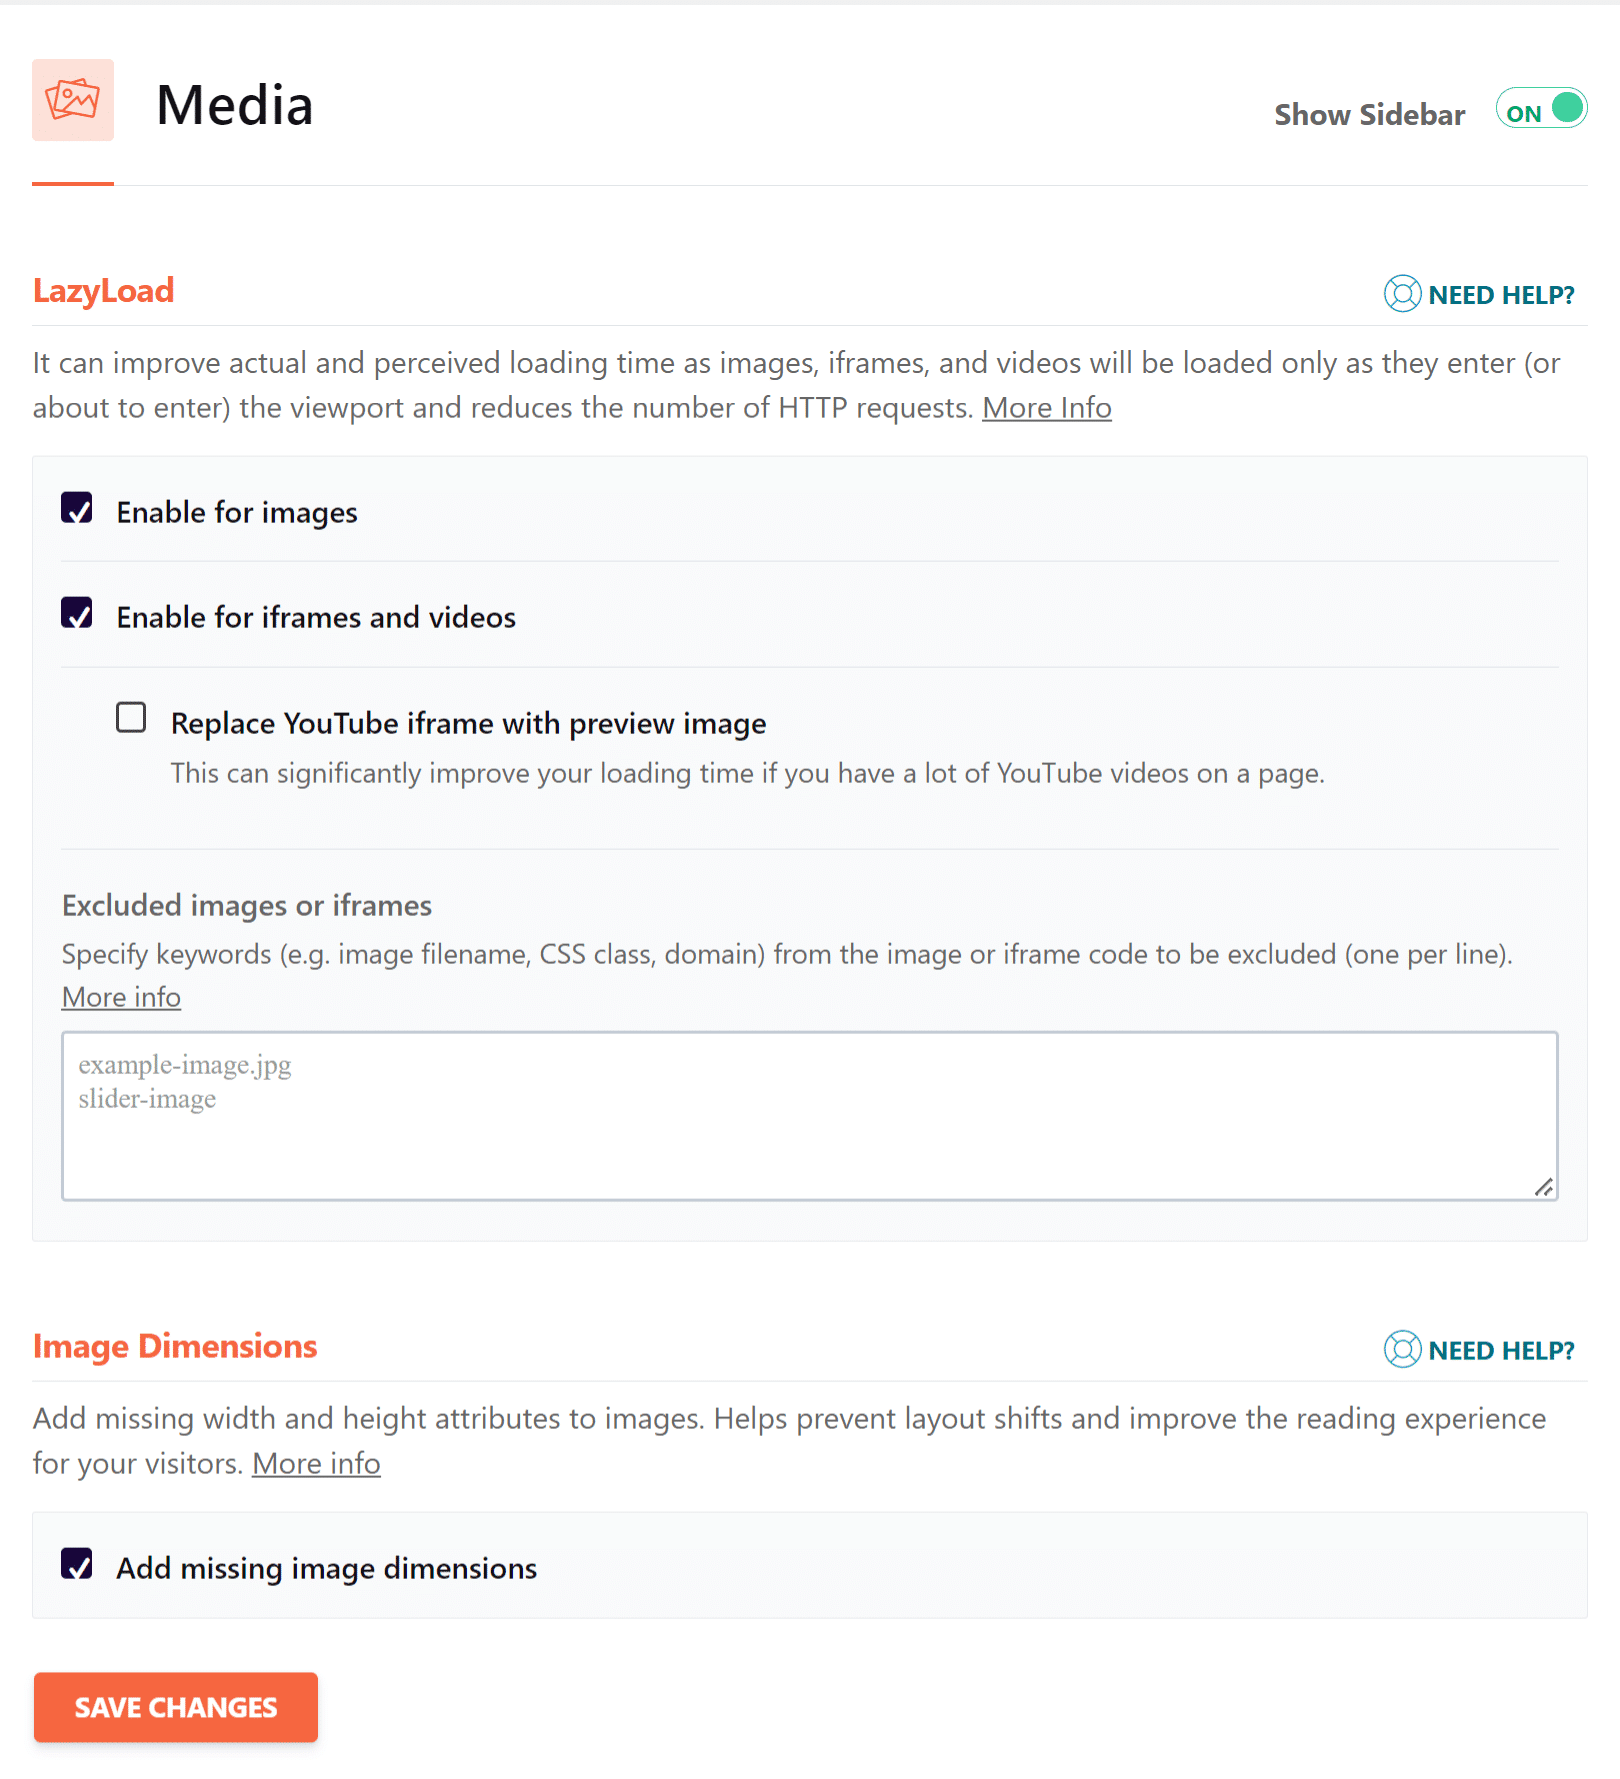
Autoptimize does not provide YouTube video lazy loading optimization and you will need to install another plugin:

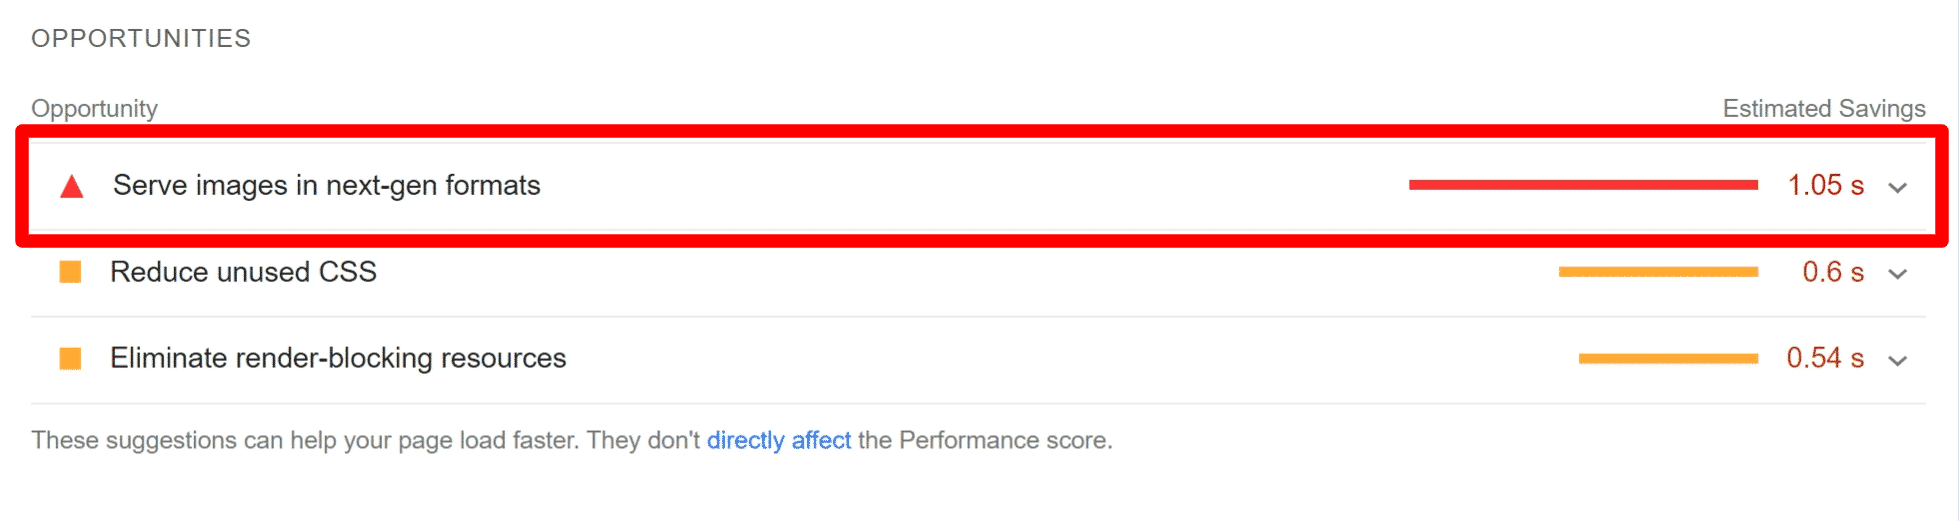
We strongly recommend using an image optimization tool to help serve images in next-gen format:
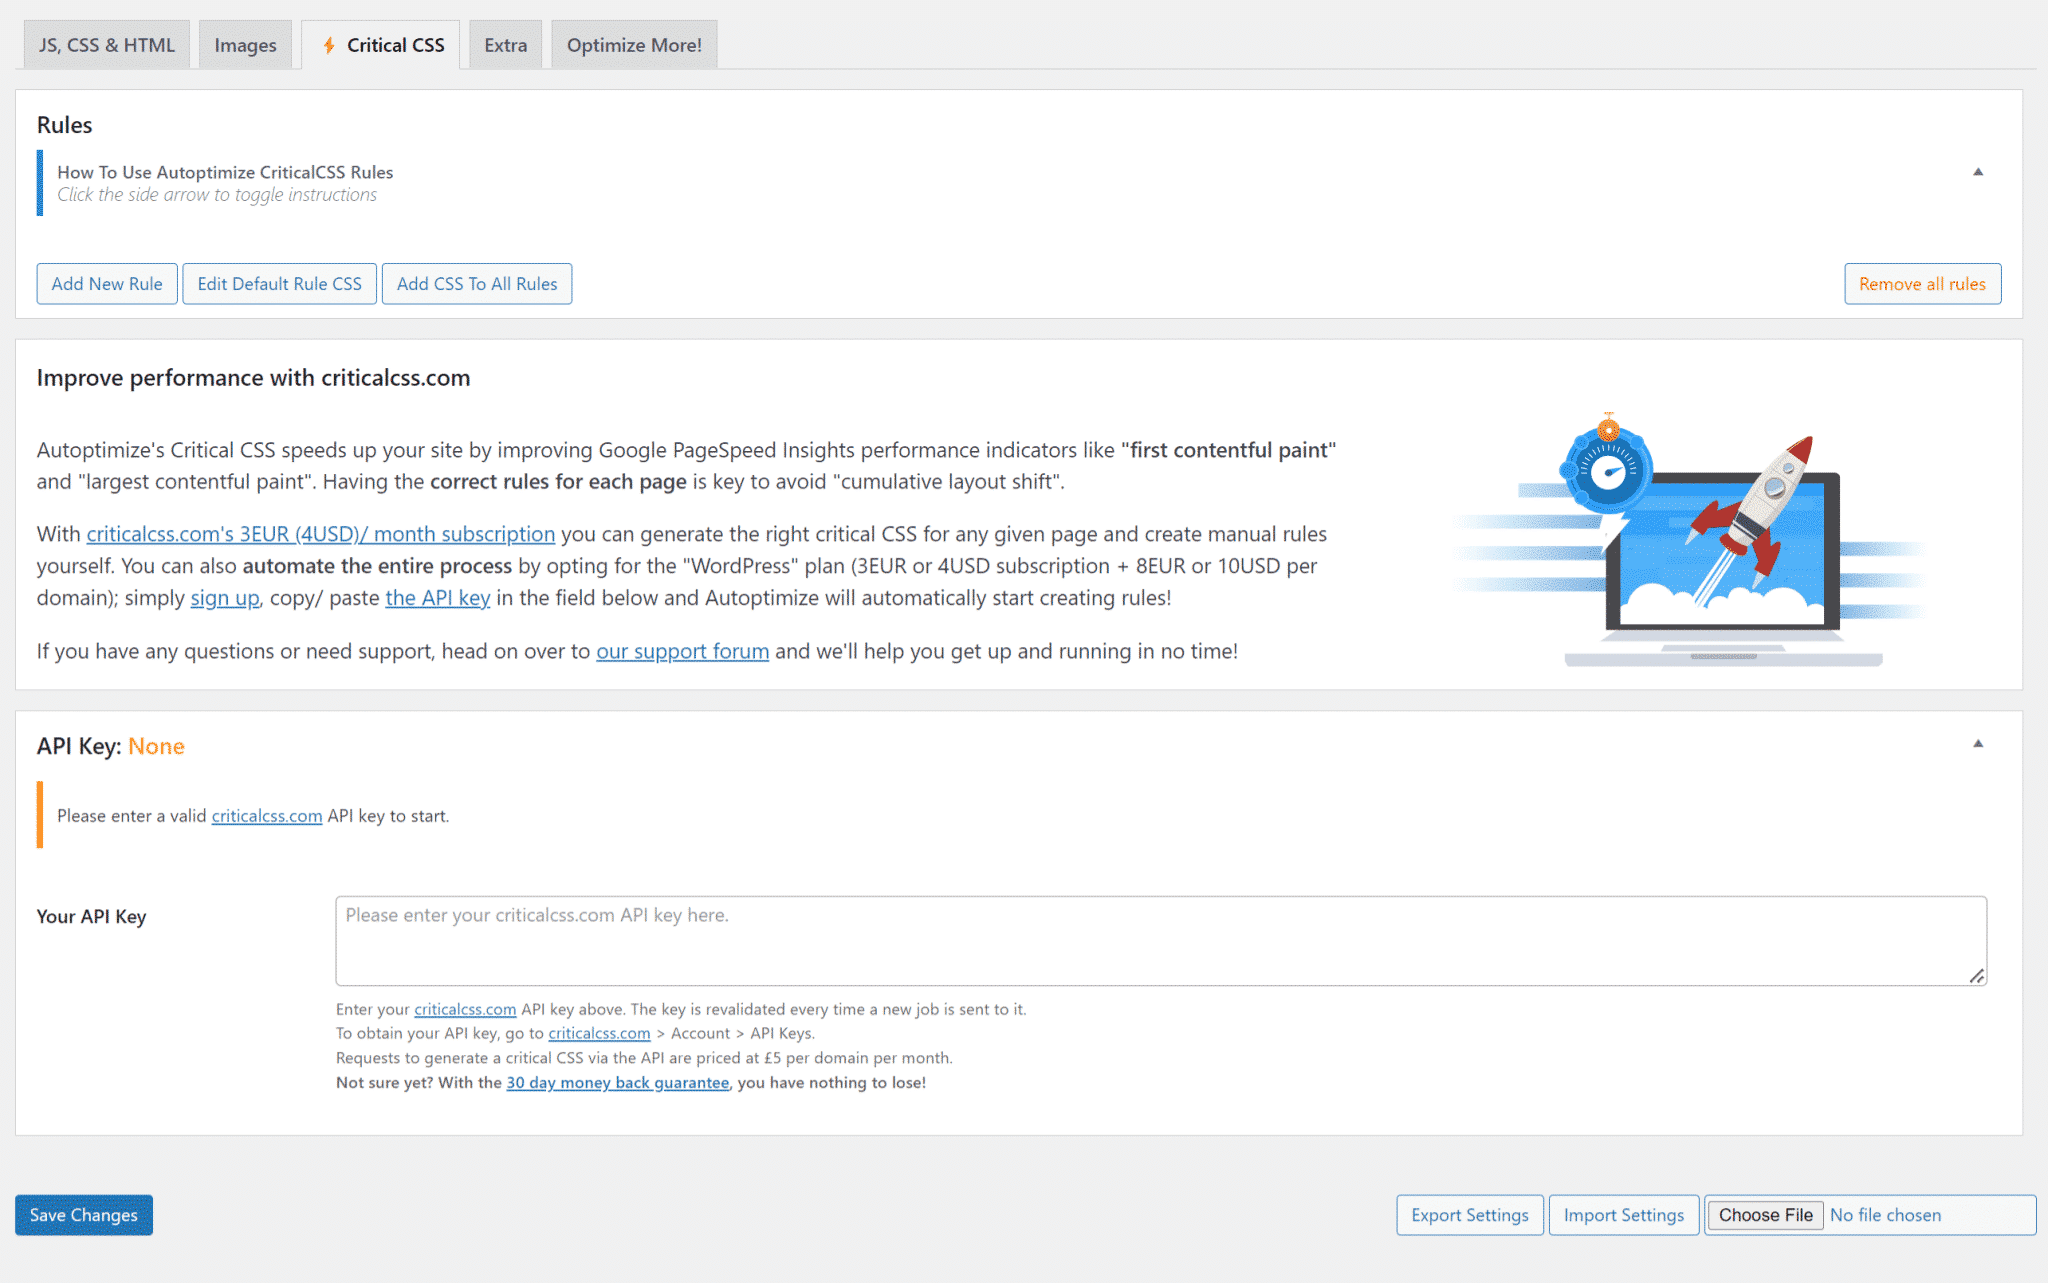
Critical CSS Tab
This one is kind of an advanced feature, so it’s a little outside the scope of this post.
I’ll give you the very short version here, but you can check out our full guide to critical CSS if you want to learn more.
Your site’s critical CSS (lower case “c” in critical) refers to the CSS needed to render the “above-the-fold” part of your website that first appears when it loads. You can take only the CSS for this code and “inline” it. Then, you can wait to load the rest of the CSS. This speeds up your site’s perceived load times.
If you’re not a CSS expert, understanding what is critical CSS and what isn’t can be difficult. WP Rocket can try to detect this CSS for you, but some sites can have certain configurations that might cause critical CSS issues.
That brings us to Critical CSS (capital “C“), which is a paid service that helps you automatically and accurately detect critical CSS (lower case “c”) on a page-by-page basis. If you’re willing to pay for the Critical CSS service, Autoptimize lets you integrate with that service in this tab.
Note – In all of our experiments, utilizing the Used CSS option alone yielded better results than using it in conjunction with Critical Path CSS. The reason for this is that producing Critical path CSS can also result in Cumulative Layout Shift, therefore disabling this option would lower Cumulative Layout Shift and hence enhance the PageSpeed Insights grade.
Autoptimize does not provide Remove Unused CSS feature, or at least outsources this service to another party:
While WP Rocket does include this feature:
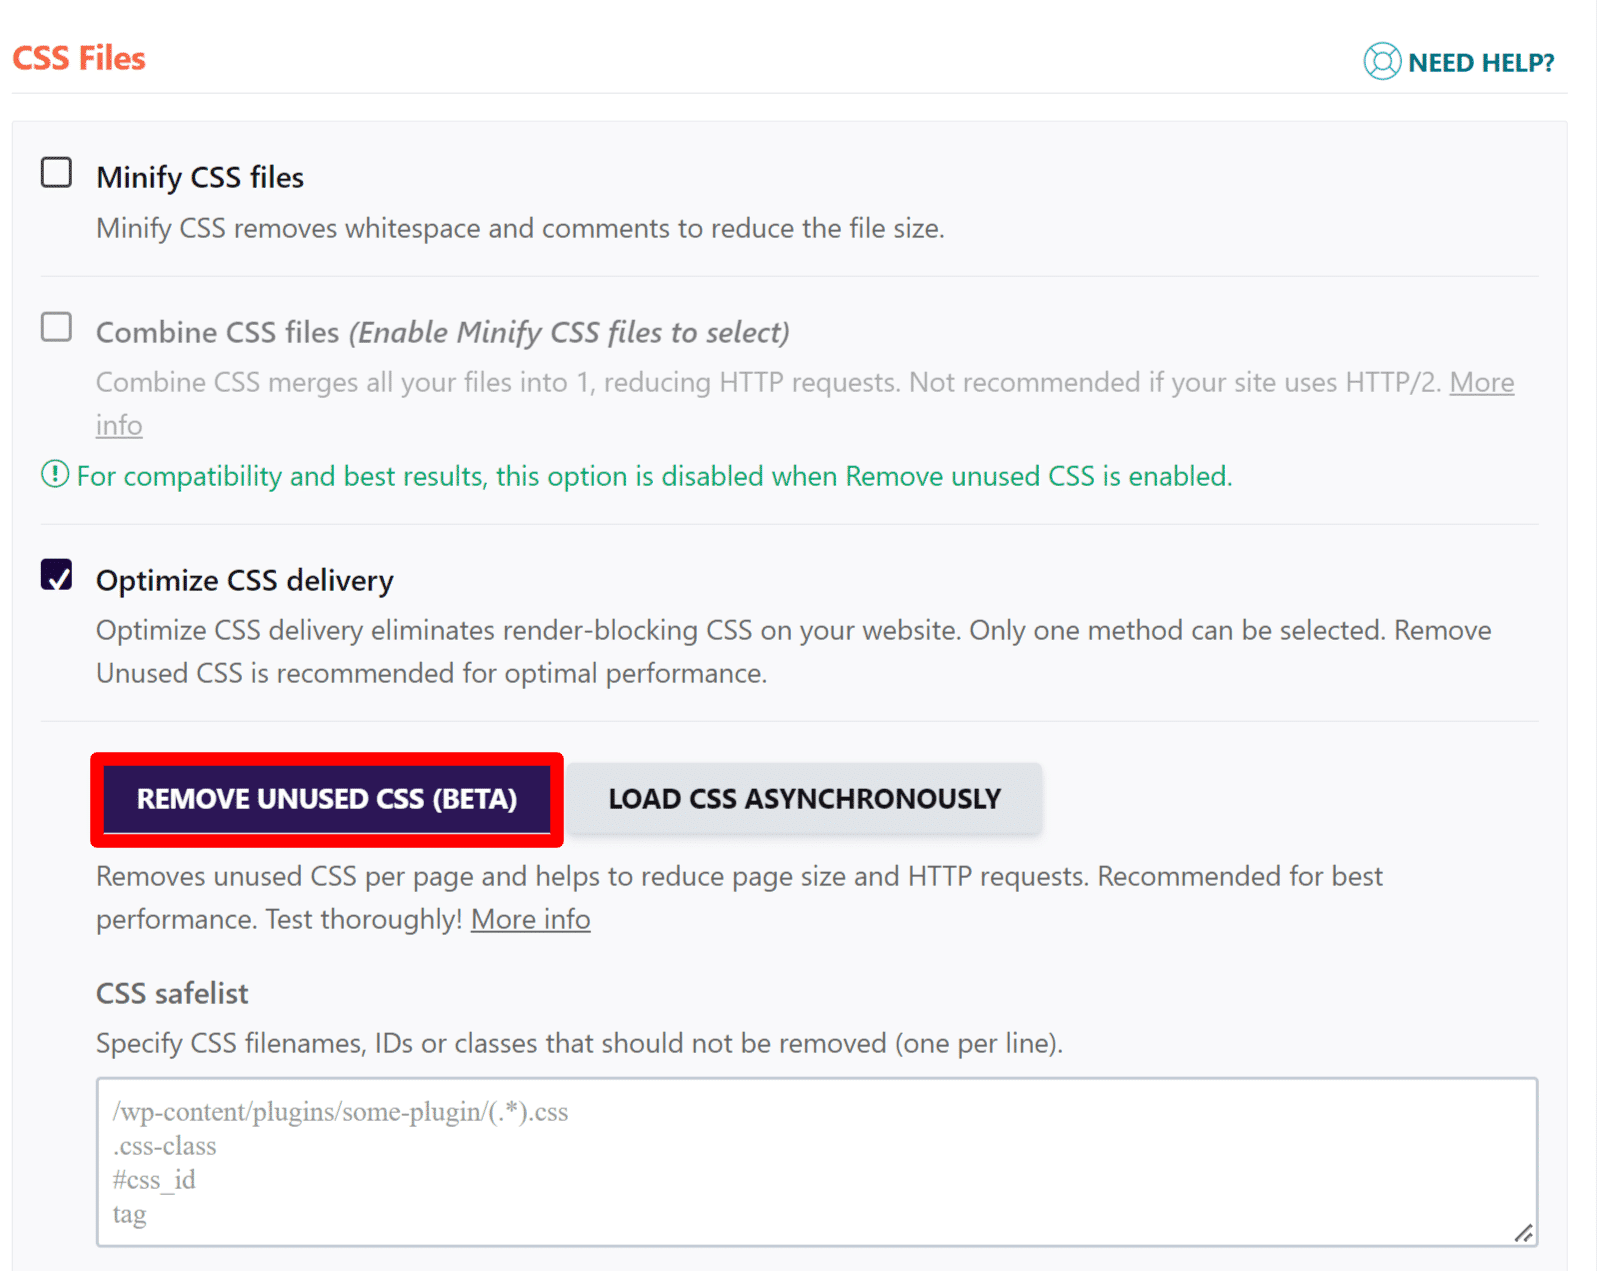
Just how important is this feature?
We conducted a number of experiments using some of the most popular page builders. We activated the new Remove Unused CSS option and monitored the results. As you can see, the CSS savings are significant, and they will have an effect on overall performance:
| Page Builder used with WooCommerce | CSS Before (KB) | CSS After (KB) | CSS Savings % |
| Elementor | 924 | 113 | -88% |
| Beaver Builder | 733 | 87 | -88% |
| Gutenberg | 554 | 64 | -88% |
| Visual Composer | 820 | 115 | -86% |
| Divi | 1,262 | 303 | -76% |
CSS saving isn’t merely for the purpose of saving CSS. We can see how such enhancements might improve performance.
Extra
The Extra tab lets you configure a few additional advanced settings. However, most of these either:
- Directly overlap with WP Rocket in the case of disabling emojis or removing query strings.
- Require advanced knowledge to use. E.g. choosing specific requests to preload or JavaScript files to async.
Unless you’re an advanced user, you can probably ignore everything here and stick with the settings in WP Rocket.

Get Paid Help From Autoptimize
If you struggle with setting up some of these features, Autoptimize offers a paid service to configure the plugin for €249.
Conclusion
To conclude, you can use Autoptimize and WP Rocket at the same time. Additionally, WP Rocket has a built-in integration so that it will automatically disable any overlapping features.
However, the plugins serve different functions so you cannot use Autoptimize as a complete replacement for WP Rocket. Instead, you can use it as a companion plugin to get a little bit more control over how you optimize your site’s code.
If you want to keep things simple, it’s also totally fine to stick with WP Rocket alone because WP Rocket already includes most of the big features in Autoptimize. WP Rocket will automatically apply 80% of web performance best practices and help you save tons of time. You’ll see an instant improvement to the naked eye in performance and PageSpeed Insights score right away.
Do you still have any questions about how to set up Autoptimize with WP Rocket? Let us know in the comments section and we’ll try to help!