
Table of Contents
Last update on
Are you looking for the best image optimization plugin for your WordPress site? Good thinking: images are often the main culprit for slow page loading speed.
Did you know that about two-thirds of a web page’s data comes from media like images and videos?
In fact, on average, 67% of the total page data comes from media.
Optimizing images is vital if you want to keep your site running fast, but optimization techniques can be tricky:
How do you ensure you reduce file sizes enough without sacrificing image quality?
Compressing too much could lead to pixelated, blurry images, negatively impacting user experience. The key is finding the right balance between file size reduction while maintaining sharp and vibrant images.
Fortunately, there are plugins designed to help you do just that!
We’ll explore 5 powerful all-in-one optimization plugins that offer advanced compression levels to enhance your website’s speed and performance. Additionally, we’ll highlight 2 bonus plugins that – while they don’t compress images directly – provide valuable features to support your overall image compression strategy.
Bonus: At the end, a bonus section will help you understand the impact of image optimization plugins on your website’s performance. You’ll also learn how to run your tests to easily compare your site’s performance before and after using these plugins.
How We Tested the Image Optimization Plugins
For each plugin, you’ll see what we particularly liked, what could be improved, the pricing, and some performance data when applicable.
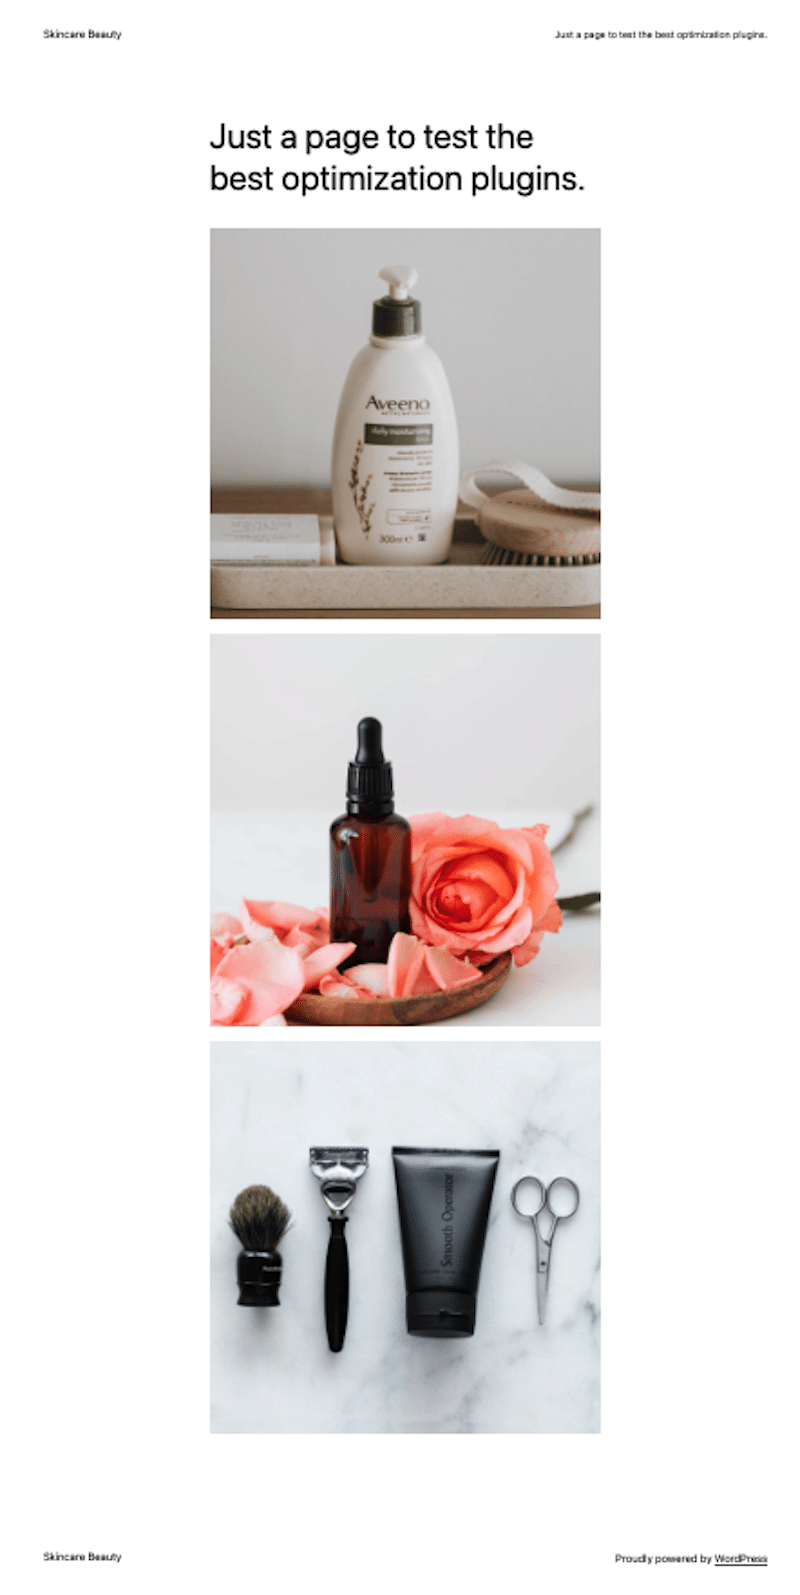
Regarding the performance test, we created a website featuring three unoptimized JPEG images:
Then, we optimized all the images with each plugin and shared the results in each section using 4 KPIs:
- File size – % of KB saved after optimization.
- Page speed – It tells you how quickly your site loads.
- Total page weight – It gives you the overall size of all the files on your webpage (HTML, JavaScript, images, videos, etc.).
- Number of HTTP requests – The number of requests your browser makes to load elements like images, scripts, and styles.
The tests were run from France with servers in Paris, and the theme used was one of the default WordPress ones.
1. Imagify
Imagify is one of the easiest image optimization plugins, designed to save you time and effort. It automatically compresses images to their maximum without compromising quality. With over 900,000 installs, it’s a popular and reliable choice to make your WordPress site faster.
✅ What we liked:
- Thanks to the Smart compression mode, images are automatically compressed to the max without affecting quality.
- The WebP and AVIF conversion helps you meet Google’s performance recommendation to serve images in next-gen formats instead of older formats like PNG or JPEG.

- The bulk process is simple and efficient—just click one button to optimize your entire image library.
- Imagify doesn’t use your servers for compression so it won’t overload your bandwidth.
- You can quickly restore your original images if needed.
- You can choose between single file compression or bulk.
❌ What could be improved:
- WebP and AVIF conversions are not available for GIF files.
- There’s no option to remove EXIF data, which stores essential details like when the photo was taken, the camera and lens used, and shooting settings.
📈 Image optimization performance results:
We took the biggest image file size from our test site. (Remember? We have 3 JPEG images on our page).
| Imagify | Before optimization | After optimization |
| Image file size and % savings | 657 KB | 15 KB (-96%) |
| Page speed | 2.2 s | 1.7 s |
| Total page weight | 561 KB | 93 KB |
| Number of HTTP requests | 10 | 9 |
| Image quality check | Great | Still great |
💰 Is it a good value for money?
Yes! The free version gives access to all the features, allowing you to optimize around 200 images per month for free. After that, plans start at $4.99 for 5,000 images or $9.99 monthly for unlimited data. Plus, one Imagify account (API Key) can be used across unlimited websites, so with the unlimited plan, you can optimize all your clients’ images for just $9.99 a month!
2. ShortPixel
ShortPixel offers advanced features that give you control over compression formats. It automatically starts compressing images as soon as you activate the plugin, making optimization quick and effortless. Additionally, it stores your original images in a separate folder, ensuring you can easily restore them if needed.
✅ What we liked:
- It comes with HEIC file support, so you can now add images directly from your iPhone in Apple format (HEIC). They will be automatically converted to JPG and then optimized according to your settings.
- There is an exclusion pattern feature that lets you exclude some type of file from the bulk compression process.
- It automatically reduces image size without sacrificing quality for faster website performance using the SmartCompress technique.
- It offers three compression levels, Lossy/Glossy/Lossless algorithms, allowing you to choose the right balance between file size and image quality.
- It automatically crops images to the optimal dimensions, ensuring they display correctly on all devices with the Smart cropping tool.
- It converts GIF to MP4 to make your video files much smaller.
❌ What could be improved:
- The Adaptive Images feature is not included in this plugin; you’ll need another add-on. This feature lets you serve responsive images for each device, which is fantastic but more expensive because it costs five credits per image.
- The monthly credits can’t be carried over to the next month (free and paid).
- ShortPixel can’t optimize your website’s existing WebP/AVIF images. It can only generate the optimized WebP/AVIF version of any image you’re optimizing.
📈 Image optimization performance results:
We took the biggest image file size.
| ShortPixel | Before optimization | After optimization |
| Image file size and % savings | 657 KB | 93 KB (-86%) |
| Page speed | 2.2 s | 1.8 s |
| Total Page weight | 561 KB | 98 KB |
| Number of HTTP requests | 10 | 8 |
| Image quality check | Great | Still great |
💰 Is it a good value for money?
Yes! You can optimize up to 100 images monthly for free (100 credits). Then, the paid plan with unlimited credits is $9.99/month. You also have the option to buy one-time credits.
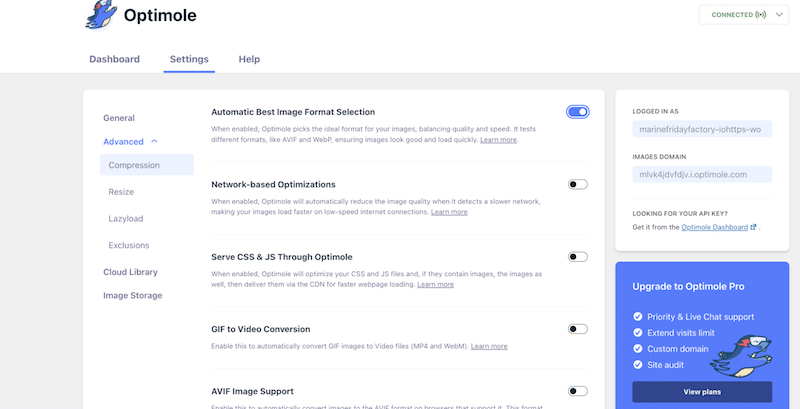
3. Optimole
Optimole is a fully automated image optimization plugin with over 200,000 installs, known for delivering smaller images without sacrificing quality. It supports all image types, making it a “set and forget” solution that simplifies the optimization process for WordPress users.
✅ What we liked:
- It includes lazy loading, and you can add a splash of color to your “lazy-loading” placeholder.
- It has a watermark feature to easily add your logo or any information on all your pictures.
- It optimizes images based on the visitor’s actual device.
- It offers smart cropping to resize images to fit perfectly within the layout automatically.
- It allows you to exclude some files from the automatic process.
❌ What could be improved:
- Regarding AVIF or WebP conversion, they don’t update the file name, so you may be confused about whether the conversion works.
- There is no single file optimization available from the library; it’s either bulk or exclusion.
📈 Image optimization performance results:
We took the biggest image file size.
| Optimole | Before optimization | After optimization |
| Image file size and % savings | 657 KB | 256 KB (-61%) |
| Page speed | 2.2 s | 1.9 s |
| Total page weight | 561 KB | 115 KB |
| Number of HTTP requests | 10 | 8 |
| Image quality check | Great | Still great |
💰 Is it a good value for money?
It is if you don’t have many visitors (it’s free for <1000 visitors). Then, the plans start at $20/month for up to 40,000 visitors.
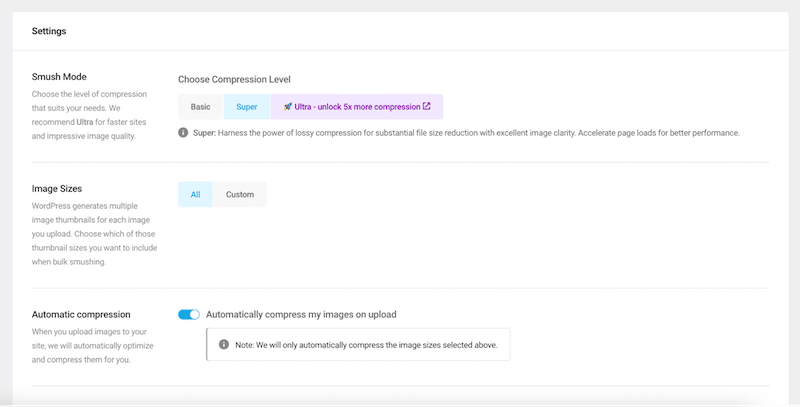
4. Smush
With over 1 million installations, Smush is a top choice for image optimization. Developed by the WPMU DEV team, founded in 2007, it has been relied upon by web professionals worldwide to ensure fast-loading, high-performing websites.
✅ What we liked:
- Bulk image optimization is a time-saver when processing large quantities of images.
- There is no limit on the number of images you can optimize in the free version (only their size is restricted).
- It comes with the lazy load functionality, with placeholders and effects for your images.
- With Smush Pro, you can access all the WPMU DEV plugins and tools, including CDN delivery.
- It’s a reliable plugin supported by a well-established company within the WordPress ecosystem.
❌ What could be improved:
- The free version does not include the option to convert images to the WebP format, which is a downside for those seeking better optimization options without upgrading.
- The powerful lossy compression (x5) is not available in the free version.
- It also lacks support for AVIF image conversion, which is a more modern and efficient format for image compression.
📈 Image optimization performance results:
We took the biggest image file size.
| Smush | Before optimization | After optimization |
| Image file size and % savings | 657 KB | 559 KB (-15%) |
| Page speed | 2.2 s | 2.1 s |
| Total page weight | 561 KB | 504 KB |
| Number of HTTP requests | 10 | 10 |
| Image quality check | Great | Still great |
💰 Is it a good value for money?
It starts at $3 a month for one site and goes up to $20 a month for unlimited sites, making it the more expensive solution. However, it Includes ALL WPMU DEV Pro plugins at no extra cost.
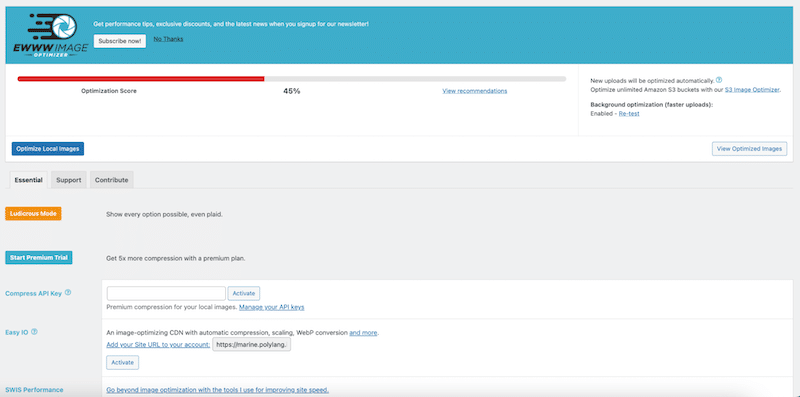
5. EWWW
EWWW Image Optimizer is a highly popular plugin, boasting over 1 million active installs, and is trusted by WordPress users for its powerful image optimization capabilities. It provides a comprehensive solution to enhance website performance by compressing images and converting them to more efficient formats, such as WebP, all while preserving image quality.
✅ What we liked:
- Bulk optimization allows you to optimize all your images from a single page.
- There is a smart installation wizard that makes it easy to activate the best options.
- It supports optimizing formats, including JPG, PNG, GIF, PDF, and SVG (JPG only in the free version).
- It automatically removes metadata from images.
- It enables WebP conversion for better performance.
- It provides lazy loading functionality to speed up page loads.
- It allows scheduled optimizations to keep your site running smoothly over time.
❌ What could be improved:
- The free version performs image optimizations on your server, affecting bandwidth and performance.
- It does not support AVIF image conversion.
📈 Image optimization performance results:
We took the biggest image file size.
| EWWW | Before optimization | After optimization |
| Image file size and % savings | 657 KB | 433 KB (-34%) |
| Page speed | 2.2 s | 2.1 s |
| Total page weight | 561 KB | 381 KB |
| Number of HTTP requests | 10 | 9 |
| Image quality check | Great | Still great |
💰 Is it a good value for money?
A free version of EWWW Image Optimizer is available, with premium monthly plans starting at $7. This entry plan includes unlimited CDN images, 25k API Flex Quota*, support for one site, WebP conversion, and lazy loading. Plans go up to $25 per month, covering unlimited sites.
Now, the following two plugins are different because they don’t offer any compression features. However, they are free and complement the previous five for optimizing your images.
6. LazyLoad by WP Rocket
One of the best free lazy loading plugins for WordPress, it optimizes performance by lazy loading images, videos, and iframes, helping to improve Core Web Vitals scores. While it doesn’t compress images like other plugins, it focuses solely on lazy loading to speed up page load times.
Example:
Imagine you’re reading a long blog post with 20 images. With lazy loading, only the images you see as you scroll will load, while the rest load as you reach them. The experience will be a faster website for you.
✅ What we liked:
- It automatically applies the “lazy loading” script to each image and video, so no coding is required on your part.
- It has a straightforward interface, so you can’t go wrong. You have three boxes to choose from to optimize images and videos or replace YouTube videos with thumbnails.
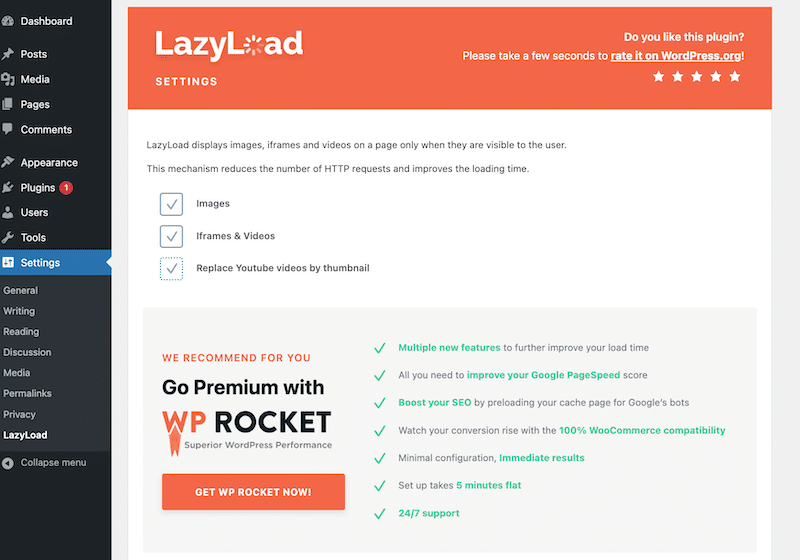
- It serves images to the user when needed, meaning when they are in the viewport. Since content loads only when it becomes visible, this helps your site load faster.
- It reduces the amount of data the browser needs to download, which is especially helpful on mobile or slower connections.
❌ What could be improved
- There is no exclusion field, so you can’t exclude any files.
| 🚀 If you want more control over lazy loading and improve your site speed, look at WP Rocket or jump to the next section! |
📈 Image optimization performance results:
The data differs from the three previous analyses because it’s not a compression plugin. For example, the file size has stayed the same with lazy loading.
| LL by WP Rocket | Before optimization | After optimization |
| Page speed | 2.2 s | 2.0 s |
| Total page weight | 561 KB | 390 KB |
| Number of HTTP requests | 10 | 9 |
💰Is it good value for money?
It’s free.
7. Imsanity
Imsanity is a popular image optimization WordPress plugin with over 200,000 installs. It automatically resizes large image uploads, preventing visitors and contributors from uploading oversized photos to your site and ensuring better performance and storage management.
✅ What we liked: It automatically scales down the image to the configured size and replaces the original image.
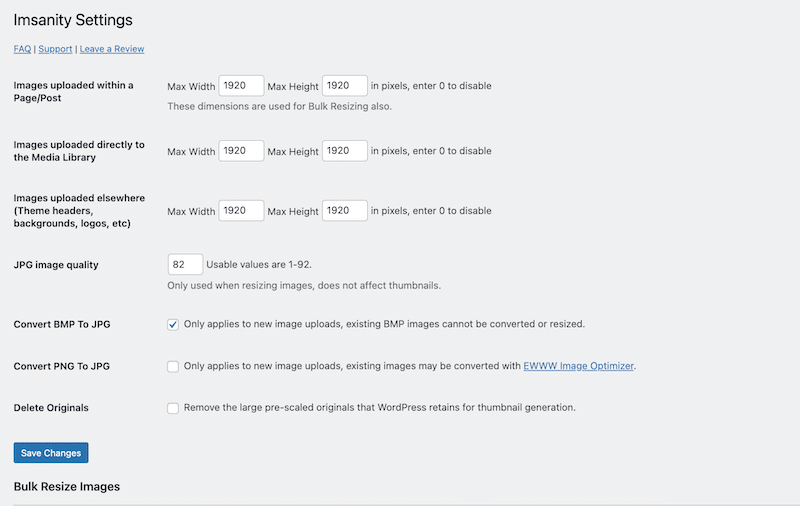
- You have the choice between single and bulk optimization.
- Your visitors can upload their images without needing to scale them beforehand, which is especially useful for user-generated content sites. For example, customers leave product reviews with images on e-commerce websites.
❌ What could be improved:
- The bulk resize feature will alter your original images and cannot be undone.
- The PNG To JPG conversion can only be done on future uploads.
- There are no compression options, so it needs to be used with another compression plugin if you want to optimize speed even more.
📈 Image optimization performance results:
Again, this is not a compression plugin per se, so the results are better than those of a plugin that offers compression. We recommend using it along with Imagify, Shortpixel, or Optimole.
Note that the image file size and the total page weight became smaller with Imsanity.
| Imsanity | Before optimization | After optimization |
| Image file size and % savings | 657 KB | 440 KB |
| Page speed | 2.2 s | 2.0 s |
| Total Page weight | 561 KB | 390 KB |
| Number of HTTP requests | 10 | 9 |
| Image quality check | Great | Still great |
💰 Is it a good value for money?
Yes, it’s free.
How to Choose the Best Image Optimizer for Your WordPress Website
Choosing the right image optimization plugin can significantly affect your site’s speed, performance, and user experience. Depending on your goals and audience, you’ll want to focus on specific features that meet your needs. Here’s what to consider:
- Opt for a plugin that reduces file size without sacrificing visual quality. This ensures faster load times without compromising the look of your images.
- Choose a plugin with the ability to restore unoptimized images to ensure peace of mind if you need to revert changes.
- Get a plugin that allows bulk compression, which means optimizing multiple images at once and saving you time, especially if you’re handling a large number of images.
- Ensure the plugin offers lossy and lossless compression to maintain pixel-perfect quality while reducing file size.
- Choose a plugin that converts images to WebP or AVIF, as Google recommends, for better performance.
- If you need additional control over image dimensions, a built-in resizing and cropping tool can be helpful.
If you are a web designer or an agency
You will need an aggressive compression mode while keeping a high-quality image to create fast websites. Then, choose an all-in-one performance toolbox and combine Imagify with LazyLoad by WP Rocket. Imagify had the best compression results, and the sleek interface was straightforward. Compatibility won’t be an issue since these tools come from the same company.
If you are a photographer
Suppose you don’t want to optimize with lossy compression and want to avoid any quality impact. In that case, you can always select lossless compression (available for Imagify, Shortpixel, and Optimole), then use Imsanity to resize your images and LazyLoad by WP Rocket to apply lazy loading.
If you want to add watermarks automatically on your images
Optimole has the feature to add a watermark on your images easily.
If you are a blogger or a website owner with less than 1000 visits a month
In that case, Optimole is free and has all the premium features.
If you have a high budget and are interested in all the WPMUDEV features
Smush is your go-to solution because Smush Pro includes ALL WPMU DEV Pro plugins at no extra cost.
If you also need a CDN solution
Opt for EWWW, Smush, or Optimole and offer a CDN in the premium plans.
If you need a simpler image resizing
If resizing images without advanced compression is your priority, try Imsanity, a plugin designed to resize images automatically to your specified dimensions without compressing them.
If you are on a budget
For budget-conscious users, the best value-for-money tools are Imagify and ShortPixel. If you don’t need the compression feature and lazy loading is enough, go for LazyLoad by WP Rocket. On the other hand, we don’t recommend Smush, as the free version does not include any lossy compression.
If you want to stay in control but still use bulk optimization
If you want to automate your optimization process but still apply a rule to exclude some files during the optimization, then ShortPixel or Optimole are your best allies.
Optimizing Images: the Impact on Performance
This article shows that image optimization plugins are essential to boost your website performance. They help improve performance KPIs such as page speed, total page weight, and HTTP requests.
All those KPIs can be measured and monitored using a performance tool like GTmetrix:
| 📖 Want to know how images are impacting your site? Read our dedicated guide about how to test and improve performance on WordPress and run your own audit. |
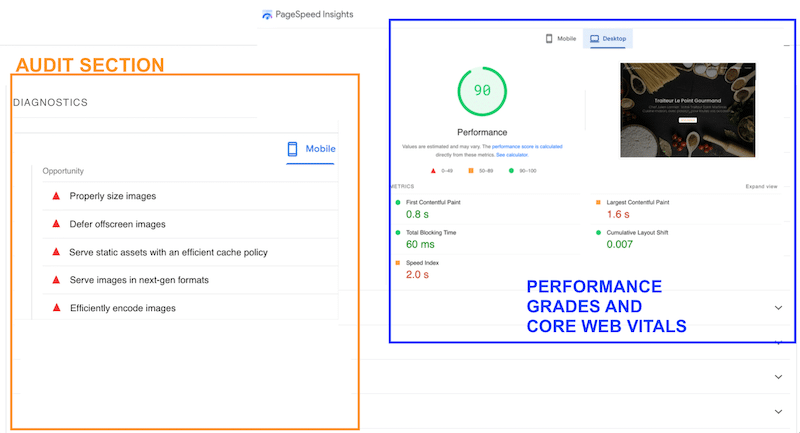
Optimizing images also tackles key performance diagnostics highlighted by PageSpeed Insights (PSI). PageSpeed Insights is a free Google tool based on Lighthouse that audits your site’s speed and user experience, identifying areas for improvement, such as in your code and images.
| 🚀 The more issues flagged by PageSpeed Insights (PSI) and GTmetrix you resolve, more optimized your website’s performance will be. |
How to Fix the Image Performance Issues From PageSpeed Insights Using WordPress Image Optimization Plugins
One of the best ways to address the PageSpeed Insights audit is to use plugins like Imagify and LazyLoad by WP Rocket. Let’s run a test before and after using those plugins on our test site so you can see their impact on your site’s overall performance.
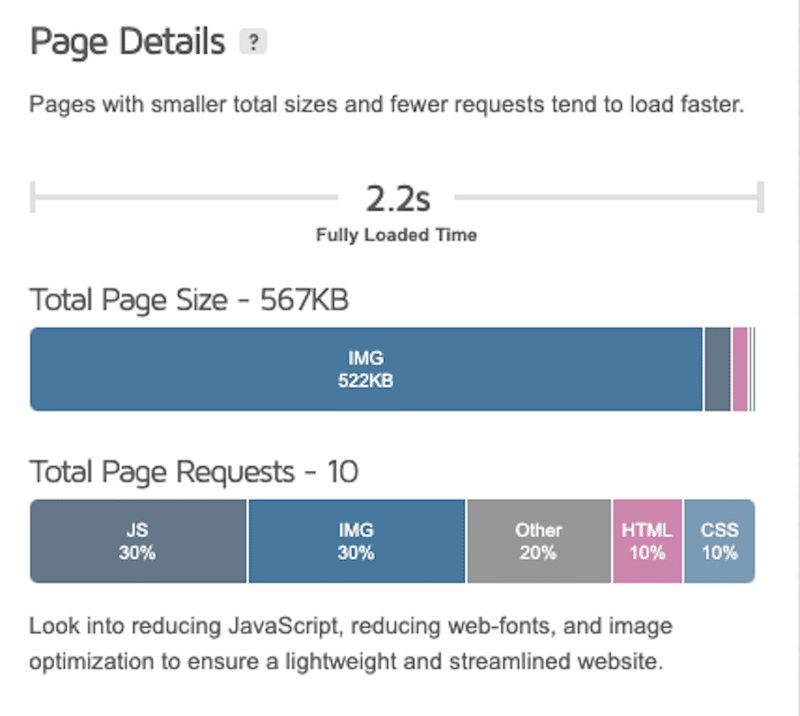
📈Let’s get to the data!
| KPIs before using Imagify and LazyLoad by WP Rocket | KPIs after using Imagify and LazyLoad by WP Rocket | |
| GTmetrix results |  | 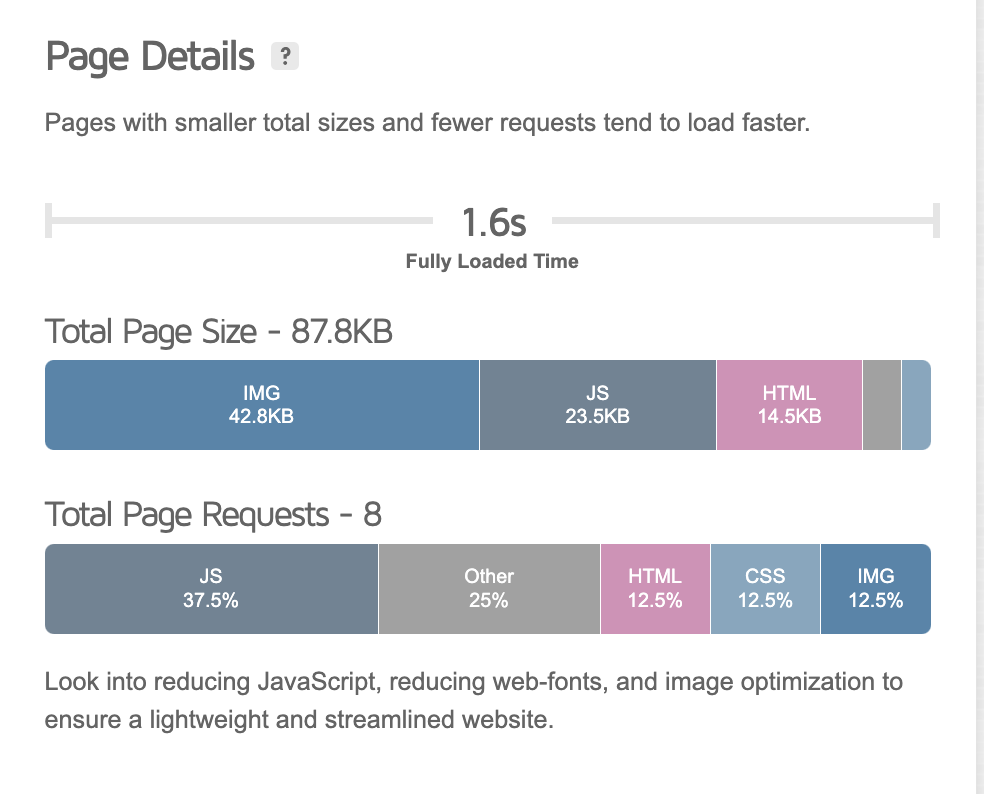 |
| Page speed | 2.2 s | 1.6 s |
| Page weight | 567 KB | 88 KB |
Additionally, you can see all the images-related issues that needed improvement before Imagify and LazyLoad by WP Rocket:
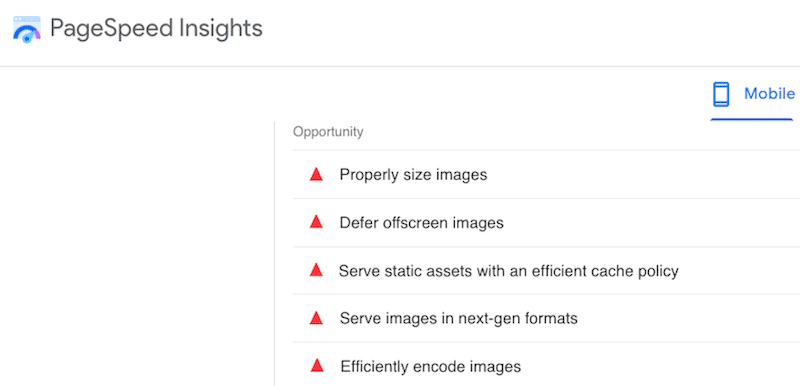
Below is our passed audit section from PageSpeed Insights. You can see the name of each plugin that helped resolve specific issues. The list includes Imagify and LazyLoad by WP Rocket:

🚀 Key performance takeaways when using Imagify and LazyLoad by WP Rocket
- Page loading speed was reduced by 6 seconds.
- The page weight dropped from 567 KB to 88 KB.
- Images used to occupy 40% of the total weight, but now, they occupy only 12.5%.
- All the PageSpeed Insights audits moved to green: defer offscreen images, serve images to next-gen formats, or efficiently encode images, for example.
- Images were all lazy-loaded, converted to AVIF, and compressed while maintaining high quality.
Imagify and LazyLoad by WP Rocket are from the same company, and the three constitute a powerful toolbox that boosts page loading speed.
🚀 While image optimization is a key factor in boosting website performance, it’s not enough to achieve a super-fast website. To maximize speed, additional techniques need to be implemented. This is where WP Rocket – the easiest performance plugin – comes in!
WP Rocket is the most powerful performance plugin that applies 80% of the performance recommendations upon activation, including caching and GZIP compression. On top of that, WP Rocket offers effective features to optimize code, lazy loading, and more with just a click.c
| 🚀 The best WordPress performance toolbox includes: – Imagify to compress images and convert them to WebP or AVIF – LazyLoad by WP Rocket, to implement lazy loading OR – WP Rocket to manage lazy loading and also enable caching, optimize the code, and tackle more performance challenges to improve speed easily and effectively. |
Wrapping Up
This article helped you identify the best WordPress image optimization plugins to load your images faster and deliver a better user experience to your website visitors.
However, web performance doesn’t stop at optimizing images – it requires more optimization techniques.
If you’re looking to give an extra speed boost to your website, WP Rocket can help! Its powerful and easy features can take your site’s performance to the next level. Plus, there’s no risk — WP Rocket has a 14-day money-back guarantee so that you can try it out confidently.