Table of Contents
Last update on
Are you ready to go live with your website and make it finally available to the public? Before you do, check out our pre-launch WordPress checklist about speed and security! After weeks —or even months— of hard work, launching a new website right away is tempting, but a few final precautions can make all the difference.
In this article, you’ll discover:
- The top performance tips to ensure your site loads quickly and keeps users engaged.
- The essential security practices to protect your site and user data.
- As a bonus, the three most important checks about user experience before the ultimate launch.
Follow our 12 tips to launch your WordPress site confidently!
1. Test Your Website’s Performance
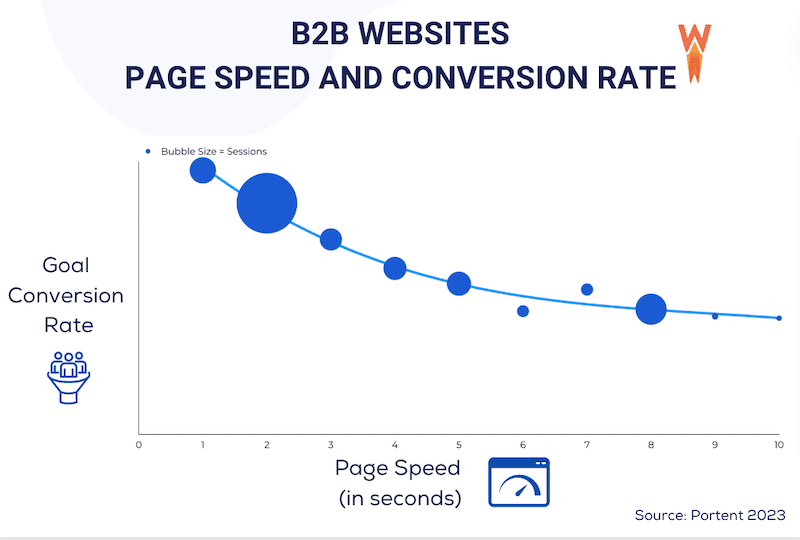
The first step is to test your staging site’s current performance to understand how your site is performing. Why? Because page speed impacts the user experience and your conversion rates. According to Portent’s 2023 research, the loading speed of a website significantly impacts the revenue:
Adame Dahmani, Product Manager at WP Rocket, suggests:
Before launching any WordPress site, baseline performance testing is essential. You should evaluate Core Web Vitals separately on both mobile and desktop, as each typically requires different optimization strategies – and that’s why our plugin tackles optimizations tailored to each device.
To assess performance and the overall user experience before launching your site, you can use Google PageSpeed Insights, a performance testing tool that measures your site speed and the performance of key metrics including the Core Web Vitals.
Based on your website speed, PageSpeed Insights shares a global performance score and specific grades for each of the five metrics analyzed. A green score indicates good performance, orange suggests room for improvement, and red highlights critical issues.
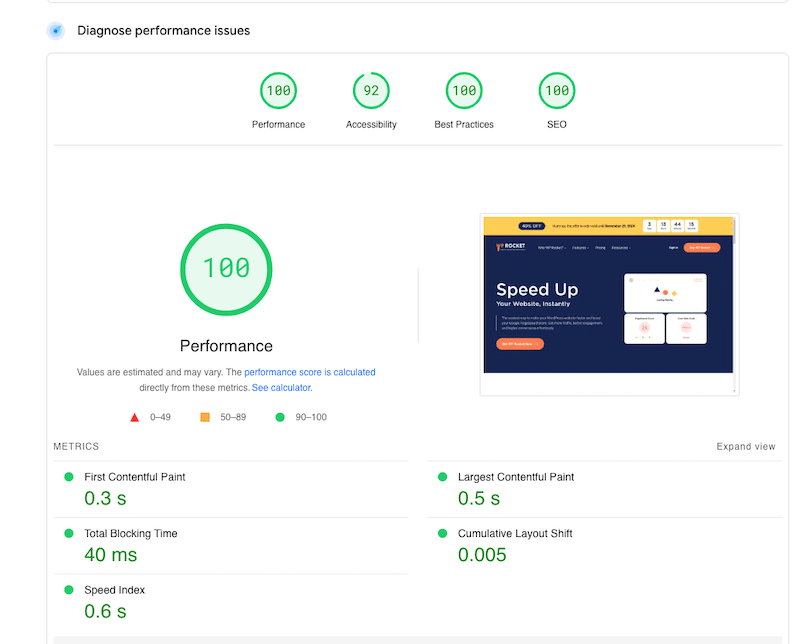
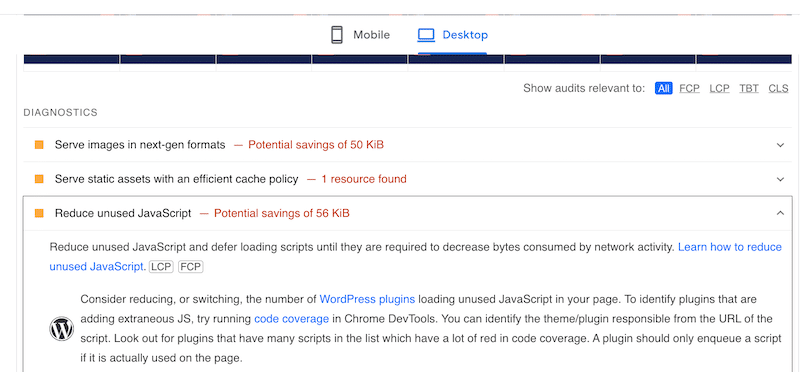
In addition to the overall score and the performance metric grades, the test includes a full performance audit. You’ll find a diagnostics section that helps you identify the main problems and provide actionable recommendations about addressing the issue, resulting in a better score.
✅ Best practices and action plan:
Rule of thumb: Confirm your page load time is 3 seconds or less.
Follow the steps below to run a performance test of your WordPress site:
- Open an incognito Chrome window.
- Go to a performance tool like GTmetrix or PageSpeed Insights and add your URL to start the audit.
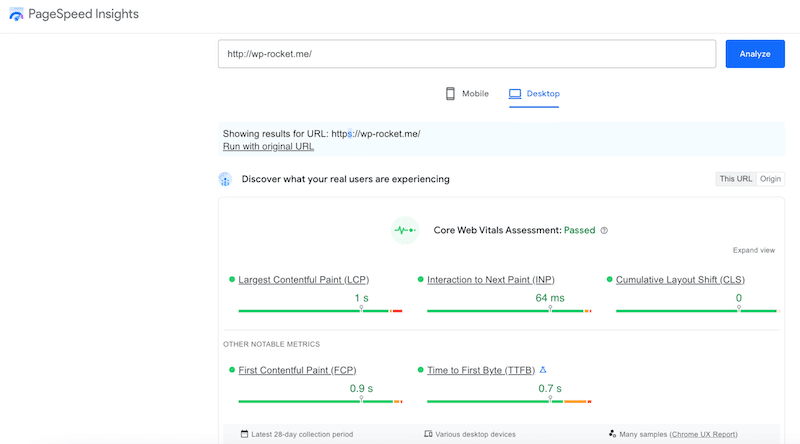
- Read the performance results with the metric scores and then scroll down to the audits.
- Apply the recommendations to boost performance.
- Test again to see if the technical improvements worked.
⚙️ Best tools:
Use both performance tools, GTmetrix and PageSpeed Insights. They give you similar insights with a list of recommendations to follow, but GTMetrix also calculates the page loading time in seconds, the total page size, and the number of HTTP requests.
2. Ensure Your Website is Responsive
Before going live, check that your website displays well on mobile, tablet, and desktop devices. StatCounter says there are more mobile users than desktop or tablet users. For example, in October 2024, approximately 60% of users accessed the web via smartphone, compared to less than 42% from desktop.
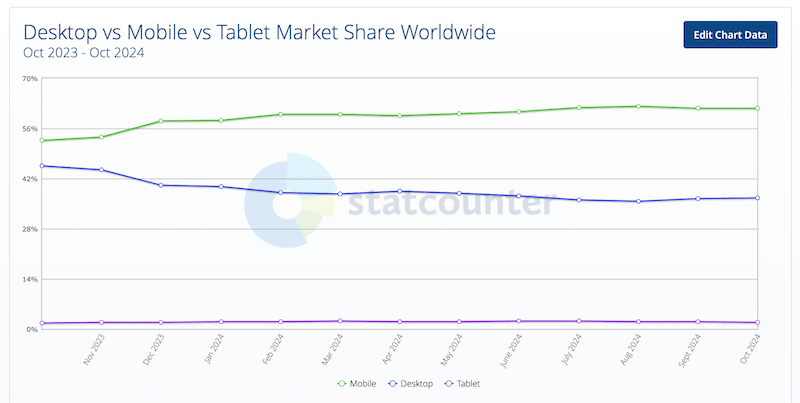
Because of the growing number of mobile users worldwide, you need to focus on serving a positive user experience across all devices. The responsive design strategy is also beneficial for the performance of your site. A responsive site loads faster because it adjusts to the user’s device by providing optimized layouts and resources, such as smaller images for mobile or simplified CSS and JavaScript.
Adame Dahmani explains:
If the desktop experience is too heavy, consider using adaptive design to strip out resource-intensive elements on mobile only. Mobile devices typically have less power and slower connections, so removing things like sliders or animations there can lead to a smoother user experience.
| 💡Hint: A responsive site reduces the amount of data transferred, resulting in faster loading and better performance on all devices. |
✅ Best practices and action plan:
- Choose a WordPress theme or a page builder explicitly marked as mobile-friendly or responsive.
- Test your URL on multiple devices to ensure your site looks good on smartphones, tablets, and desktops.
- Design-wise, use percentages or flexible grids.
- Opt for collapsible or hamburger menus for more straightforward navigation on mobile.
⚙️ Best tools and plugins:
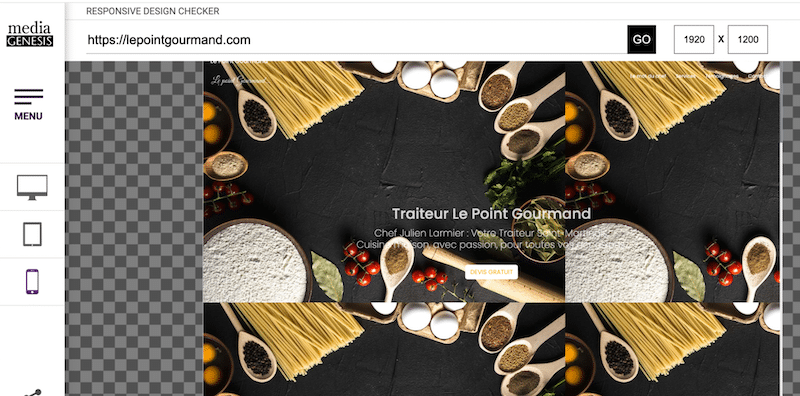
You can use the free Responsive test tool, BrowserStack, or Responsive Design Checker tools to see how your site shows on mobile and tablet.
| 💡Hint: Always measure speed both on desktop and mobile. Check out our guide, which explains how to test mobile performance (including the best performance testing tools). |
3. Implement Caching and GZIP Compression
Caching and GZIP compression are must-haves for your WordPress speed checklist because they improve your performance.
Think of caching as saving a copy of your website’s pages. Instead of loading everything from scratch each time someone visits, your site can quickly display the saved version, saving time and reducing server load.
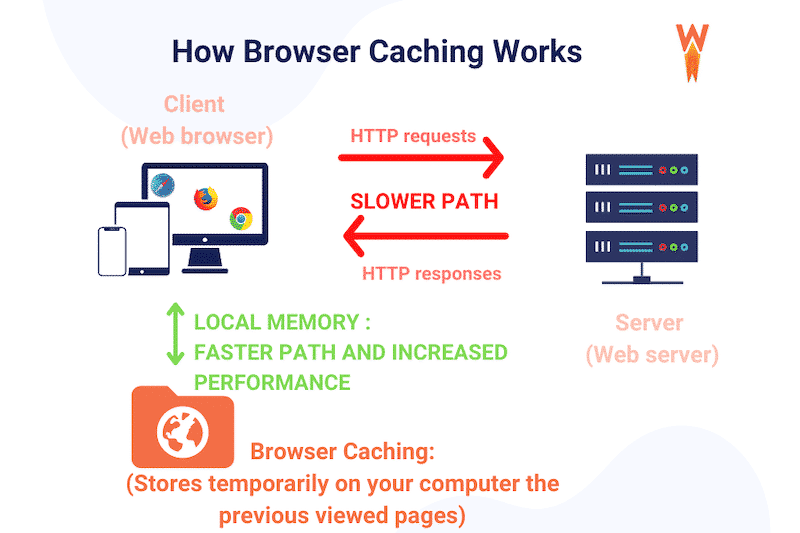
GZIP works like zipping files on your computer. It compresses your website’s code (HTML, CSS, JavaScript) before sending it to visitors’ browsers. Since the whole code file is smaller, it loads and renders the content much faster on the user’s screen.
✅ Best practices and action plan:
- Ask your hosting provider if they provide caching and GZIP.
- Implementing a cache for a WordPress site without a plugin involves two main steps.
- First, enable browser caching by adding specific rules to the .htaccess file.
- Second, implement server-side caching using PHP. This requires creating a cache directory, modifying the theme’s header.php and footer.php files, and managing cached content with custom code.
- If you are uncomfortable with coding or want to save time, install a WordPress plugin that automatically implements caching and GZIP.
- Verify that GZIP is working with tools like the GZIP Compression Test to confirm it’s enabled.
⚙️ Best tools and plugins:
- The WP Rocket plugin automatically applies caching and GZIP compression as soon as it’s activated, covering around 80% of performance best practices right out of the box. This makes it the easiest way to implement caching and GZIP compression on your WordPress site and boost your site’s speed with minimal effort from your side.
- WordPress GZIP compression applies GZIP compression upon installation.
4. Optimize Your Code (JavaScript and CSS)
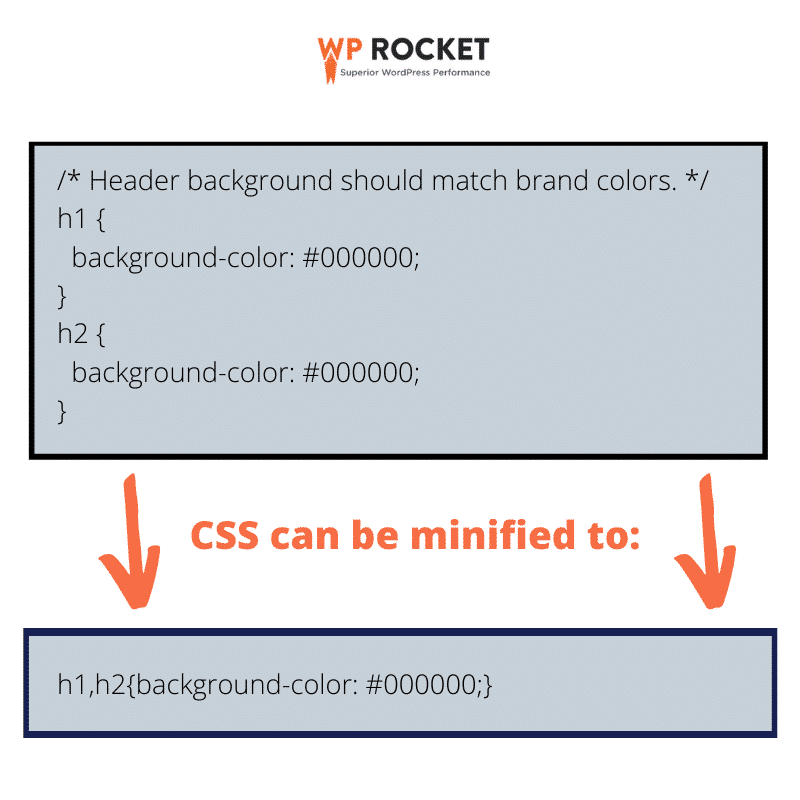
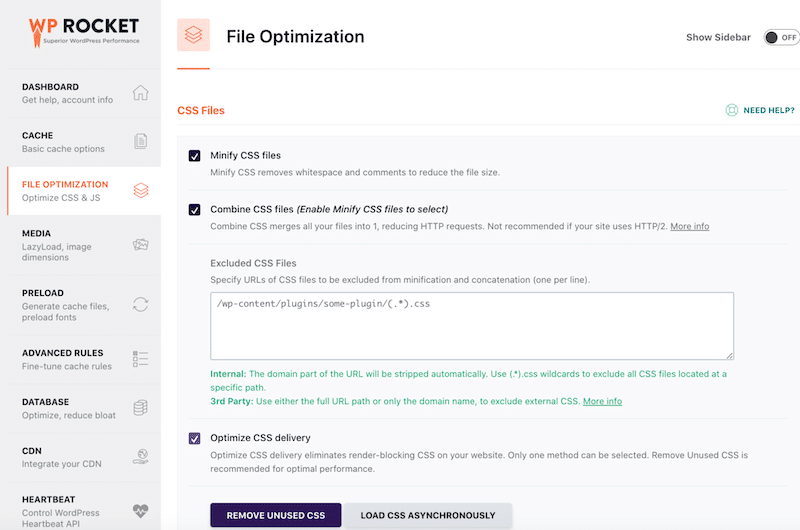
Optimizing your JavaScript and CSS can speed up your site because it reduces the data processed by the browser to render the final content. Code optimization is done with techniques like minification, removing unnecessary code, or delaying and deferring the execution of JavaScript. Let’s go over each optimization technique so you can implement them quickly on your site.
- Minification means eliminating unnecessary spaces, comments, and redundant scripts, making files smaller and faster to load on your visitor’s screen.
- Removing unused CSS makes web pages lighter and faster to load by keeping only the necessary styling information.
- Delaying and deferring the execution of JS ensures the critical content loads first, improving the perceived load time for users. For example, if you install a chat plugin, visitors will see the most important content on your page first, with the chat loading afterward.
✅ Best practices and action plan:
- Always back up your WordPress site before making any changes to your code so you can recover a previous version if something goes wrong.
- Minify CSS and JavaScript and remove unnecessary spaces and comments.
- Remove all the unused CSS code to reduce file sizes.
- Delay JavaScript execution until user interaction, prioritizing essential content and improving initial page load speed.
- Defer non-critical JavaScript that will be loaded after the main content has rendered, allowing users to see and interact with the page more quickly.
- Check on PageSpeed Insights that your code optimization actions are working and are in the “passed audits” section.

⚙️ Best tools and plugins:
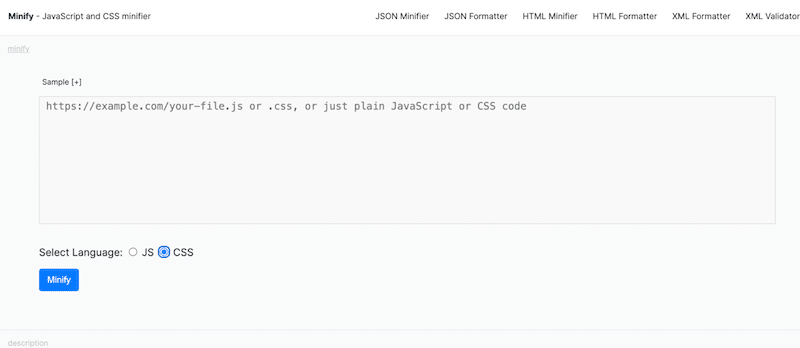
- Manual: You can minify your code by editing files directly, then re-upload them to your site. To help you in this process, you can use a tool like Minifier. This method requires technical knowledge and can be time-consuming.
- Using a plugin: Install a plugin like WP Rocket to automate the process. It handles minification, removes unused CSS and delays and defers JavaScript.
5. Optimize and Compress Images
Optimizing images is one of the most effective techniques for getting a faster site. Images are often the most significant contributor to slow websites, making up more than 50% of a webpage’s content size (source: HTTP Archive).
Image optimization relies on five main techniques: compression, using the correct format, applying lazy loading, managing the critical images loading priority, and delivering image fitting the container.
Adame Dahmani points out:
Having five separate image optimizations might seem excessive, but each one addresses a specific type of load that images place on a website. Fortunately, most of these image optimizations are now fully automated, making it easier to implement them without extra effort.
Let’s find out how some plugins can easily help you in the following section.
✅ Best practices and action plan (based on PageSpeed audits):
- Apply compression to your images to reduce file size without sacrificing quality.
📈 Matching PageSpeed audit: “Efficiently encode images.”

- Convert all your images to next-gen formats like WebP or AVIF. Compared to JPEG or PNG, those new formats are better for the web; they offer superior compression levels with similar visual quality.
📈 Matching PageSpeed audit: “Serve images in a next-gen format.”

- Enable lazy loading, meaning loading images only as users scroll down, improving initial page load time.
📈 Matching PageSpeed audit: “Defer offscreen images.”

⚙️ Best tools and plugins:
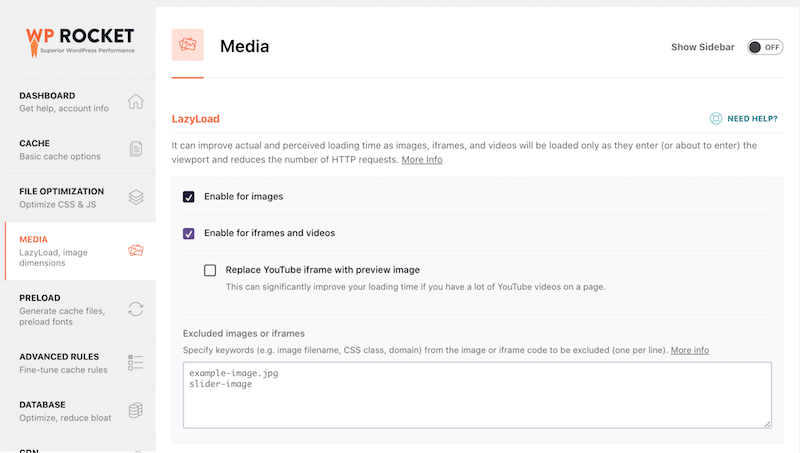
- The WP Rocket plugin has the option to active lazy loading on images, videos and iframes.
- The a3 Lazy Load easily lazy loads your images.
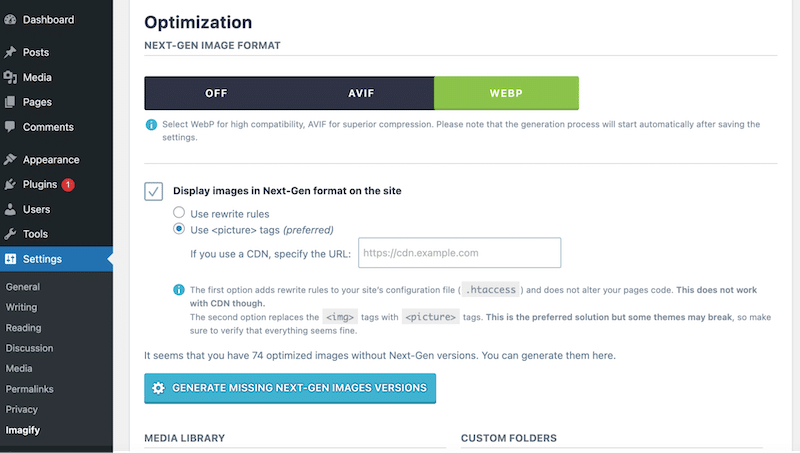
- The Imagify plugin is the easiest image optimization plugin that compresses images without impacting quality. Thanks to the Smart compression feature, Imagify balances performance and quality by default. Imagify can automatically convert your images to WebP, or you can choose AVIF.
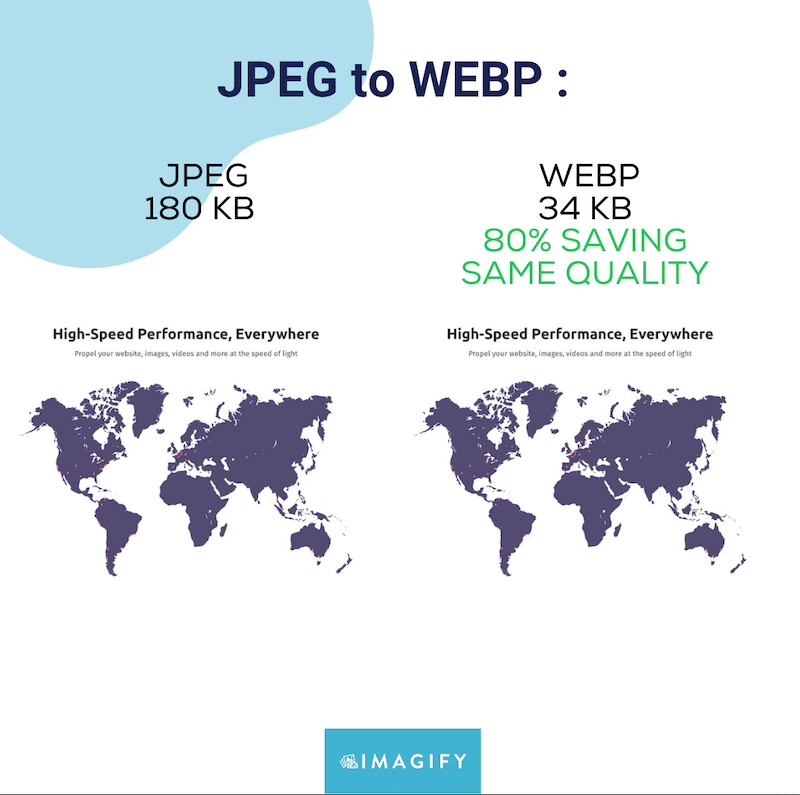
Look at both images below. The one on the right has been compressed and converted to WebP by Imagify. Can you tell any differences in the quality?
6. Use a CDN
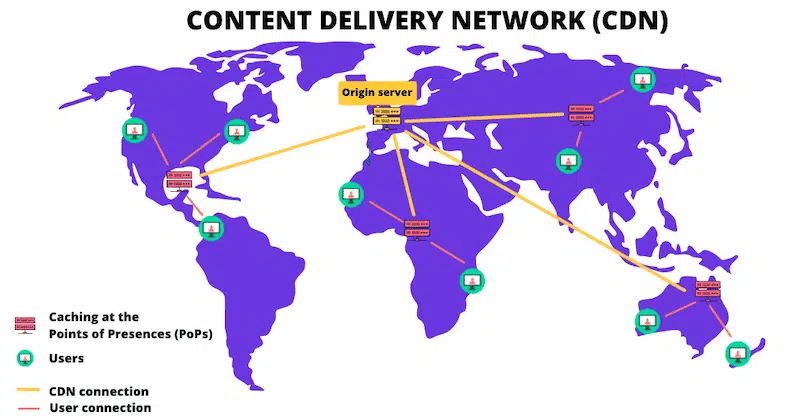
A Content Delivery Network (CDN) is another powerful way to boost your site’s speed before launching it. A CDN stores copies of your website’s files on servers worldwide, meaning international visitors will see content much faster from the server closest to them.
✅ Best practices and action plan:
- Analyze your site’s current speed and performance to establish a baseline (without a CDN).
- Choose a CDN that fits your needs. Start by assessing your performance needs and identifying your target audience. Choose a CDN with a strong network in those areas, offering low latency and quick content delivery.
- Update your domain’s DNS settings to connect with the CDN provider and adjust your server configuration to work with the CDN.
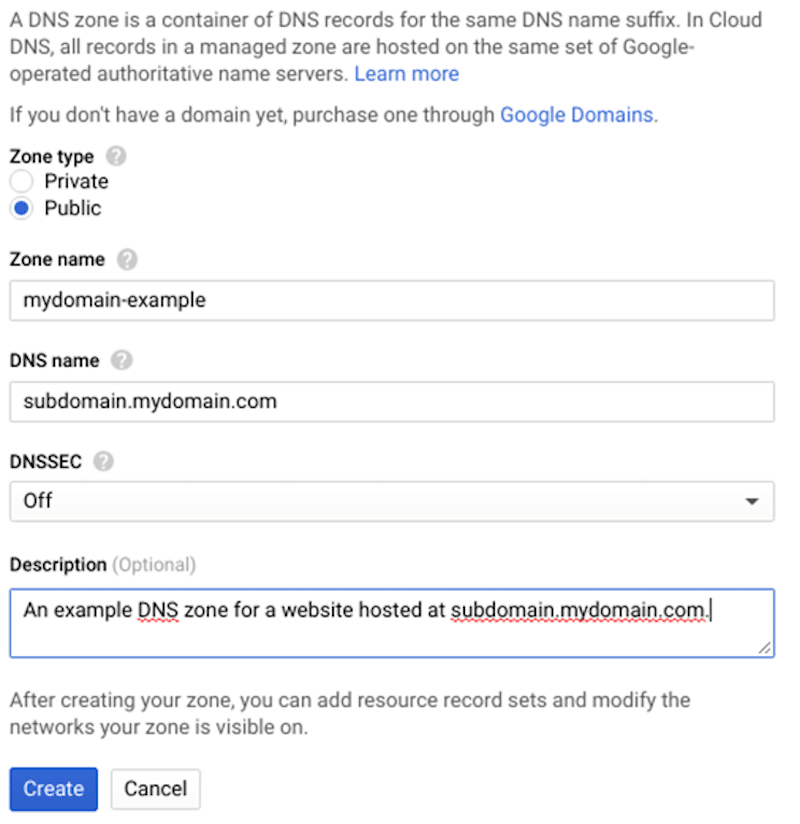
- Ensure your website’s files are distributed across the CDN network.
- Test your performance with the cDN and check your site’s speed and performance to measure improvements after integration.
⚙️ Best tools and plugins:
- RocketCDN: A tool like RocketCDN comes with a WordPress plugin, so all you need to do is activate the plugin—no manual DNS records or complicated technical setups are ever required from you.
- Cloudflare: A powerful CDN that also comes with a WordPress plugin to give your website an extra speed boost easily.
Now that you know more about the most important performance checklist, let’s review the main security tips you can follow to prepare for the launch.
7. Install a Security Plugin
A security plugin protects your WordPress site from potential threats like malware, brute force attacks, and other vulnerabilities that can compromise sensitive data.
✅ Best practices and action plan:
- Choose a security plugin based on the following features:
- Malware protection with firewalls, scanning, DDoS protection, and IP blocking to prevent malicious activity.
- Access control with two-factor authentication (2FA) limits login attempts and manages user roles.
- Spam filters and other tools such as reCaptcha to secure sensitive areas of your site.
- When you have chosen your plugin, install and configure it on your WordPress site.
- Run a security scan to check where your site is currently standing in terms of security.
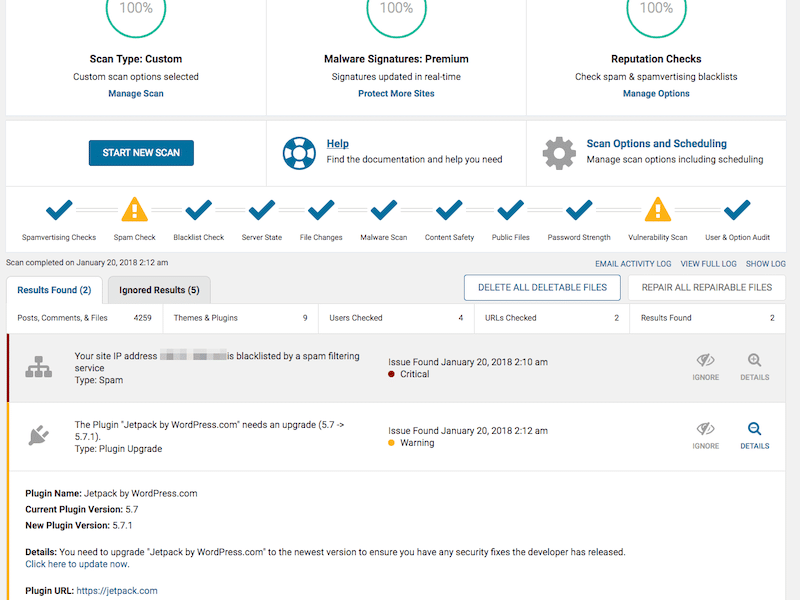
- Be proactive and enable notifications for future potential threats.
⚙️ Best tools and plugins:
Wordfence or Sucuri Security are the two most popular security plugins offering the best features to secure your WordPress site before the launch (and after going live).
8. Update WordPress Core, Plugins, and Themes
Outdated components are a common entry point for hackers. Regular updates of your themes and plugins protect against known vulnerabilities.
✅ Best practices and action plan:
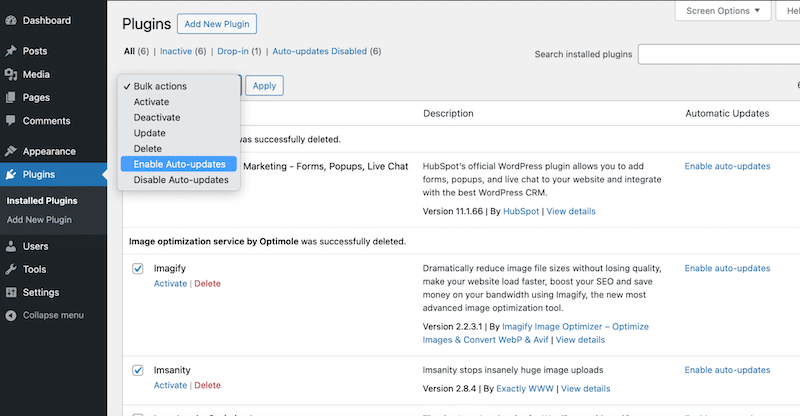
- Enable automatic updates for WordPress core.
- Schedule regular checks and updates for plugins and themes.
- Activate auto-updates on your plugins. Go to Plugins > Installed Plugins > Select all > Enable Auto-updates.
⚙️ Best tools and plugins:
Easy Updates Manager or ManageWP allows you to monitor and track your sites needing global updates.
9. Install a Reliable Backup Solution
Backups are essential for quickly restoring your site after a hack or technical failure. Doing a backup every week, for example, lets you restore your site instantly if a plugin update goes wrong.
✅ Best practices and action plan:
- Set up daily or weekly backups.
- Store your backups on your cloud and your desktop.
- Test your backups occasionally to ensure they can be restored properly.
⚙️ Best tools and plugins:
UpdraftPlus and BackWPup are popular WordPress plugins that allow you to perform a backup in one click.
10. Secure the Login Page and Admin Area
The login page is the most popular target for hackers, so you must strengthen it before launching your WordPress site.
✅ Best practices and action plan:
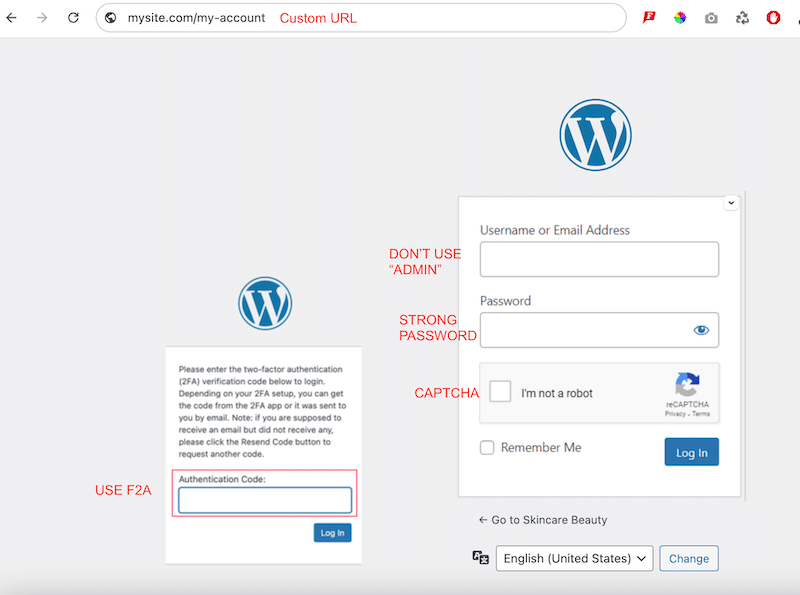
- Enable Two-Factor Authentication (2FA).
- Use a strong password with special characters.
- Change the default “Admin” username.
- Add CAPTCHA and limit login attempts to stop bots from guessing login credentials.
- Use a unique login page URL instead of using the default WordPress one. For example, go from yourwordpressite.com/wp-admin to yourwordpressite.com/my-account.
⚙️ Best tools and plugins:
You can use Google Authenticator for 2FA, Limit Login Attempts Reloaded to ensure login limits, and WPS Hide Login to use a custom URL.
11. Define User Roles Carefully
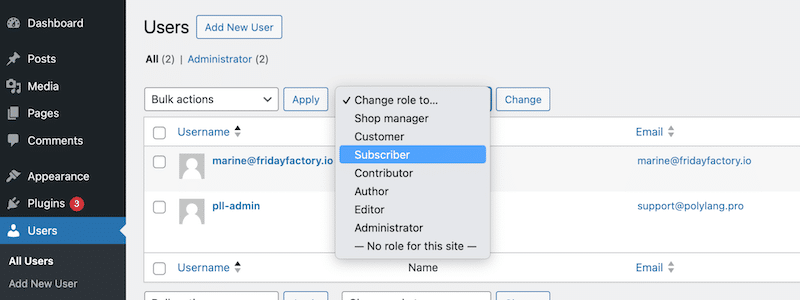
Before you launch your site, limit access to the content based on WordPress roles; this will help prevent unauthorized users from making risky changes. Only administrators should access critical settings, while contributors have limited permissions.
✅ Best practices and action plan:
- Review user roles regularly, assign only necessary permissions, and remove unused accounts from your WordPress admin by going to Users > All Users.
⚙️ Best tools and plugins:
User Role Editor or Members plugins help you set up specific permission levels based on the role of each WordPress user.
12. Install an SSL Certificate (HTTPS)
An SSL certificate means the data exchanged between your site and visitors is encrypted. In short, it provides additional security for important pages such as the login or the checkout page (where clients puts their credit card details). It’s also a sign of credibility and trustability for visitors landing on your site.
✅ Best practices and action plan:
- Obtain an SSL certificate and configure HTTPS across your site.
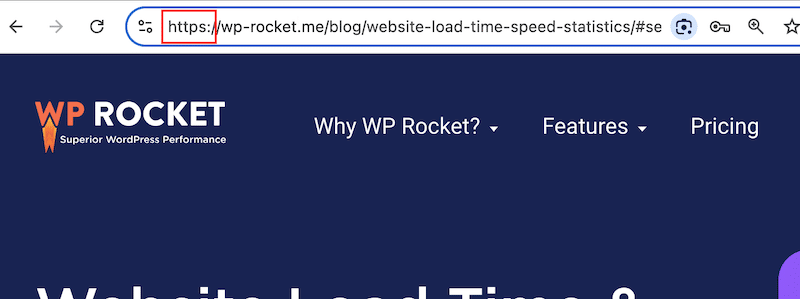
- Ask your host to activate it; the SSL certificate usually comes with your hosting plan.
⚙️ Best tools and plugins:
Try the Really Simple SSL plugin or an independent SSL provider like Let’s Encrypt.
| 📖 Want to become a WordPress security expert? Read more about our security best practices we’ve put together to protect your site. |
Bonus: 3 Quick User-Experience Tips Before Launch
Now that you know more about performance and speed tips to follow before launching, here are three quick user-experience tips to keep in mind:
1. Check for 404 Errors and Broken Links
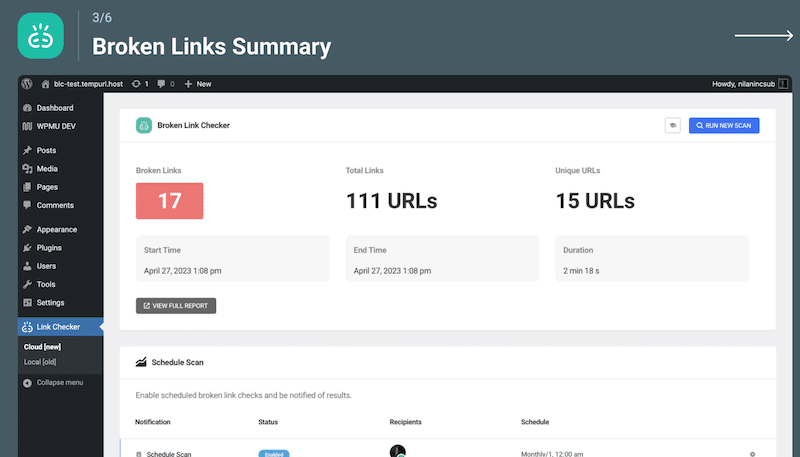
Use tools like Broken Link Checker to identify and fix broken links because they can frustrate visitors, harm your site’s user experience, and negatively impact SEO by signaling poor site maintenance to search engines.
2. Test All Forms
Ensure that contact, login, and newsletter subscription forms are functional, with email notifications adequately set up.
3. Verify WooCommerce Purchasing Process
- For digital products, ensure downloads are working upon the final step of the purchasing process.
- Confirm that checkout, tax calculations, and shipping information for physical goods are clear and correct once a customer has made a purchase.
- Check confirmation emails and ensure delivery or returns policies are visible enough.
| 📖 Read our complete e-commerce checklist for a successful store launch. |
Wrapping Up
By following our WordPress pre-launch checklist, you’re setting the foundation for a website that’s not only protected against malicious attacks but also performs well in terms of performance.
Before you hit “Publish,” take the time to scan your site, test its performance, and implement the recommended tools and tips. Then, we suggest you rerun your tests, and we’re confident you’ll be happy to see all the improvements!
Remember, a few extra steps now will be beneficial in the long run.
Start optimizing your site today with WP Rocket. No risks are taken with the 14-day money-back guarantee and you can enjoy a blazing-fast website immediately!


