
Table of Contents
Last update on
Do you want to improve the SEO performance of your WooCommerce website?
If you optimize on-page and off-page SEO, your online shop has a great chance of ranking on Google’s top pages. Our guide explains the main actions you should undertake to implement an efficient SEO strategy for WooCommerce. You’ll also get some useful and actionable tips to boost performance and improve your shop’s ranking on Google.
Here are 14 techniques to optimize your WooCommerce SEO.
1. Run Keyword Research
To improve SEO in WooCommerce, you should start by running keyword research. This will be the foundation of the SEO strategy because, as an online business, you need to know what your target audience is searching for and what they’re interested in. That’s also why keyword research is closely correlated to your content marketing strategy – it allows you to create more relevant content, making you more likely to appear in the top search results according to the queries relevant to your business.
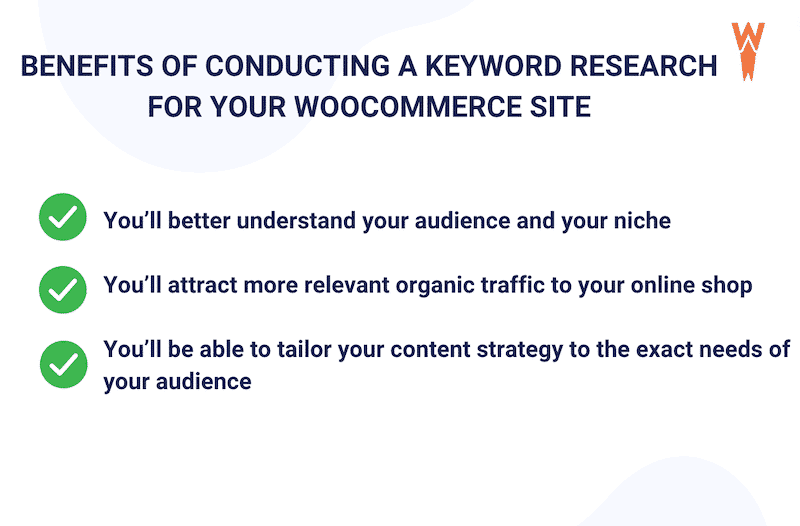
When a potential client does a search on Google, the search engine analyzes all the indexed websites and displays the most relevant ones to the query. That is why it’s crucial to know the search intent and the keywords used by the users, including the long-tail keywords.
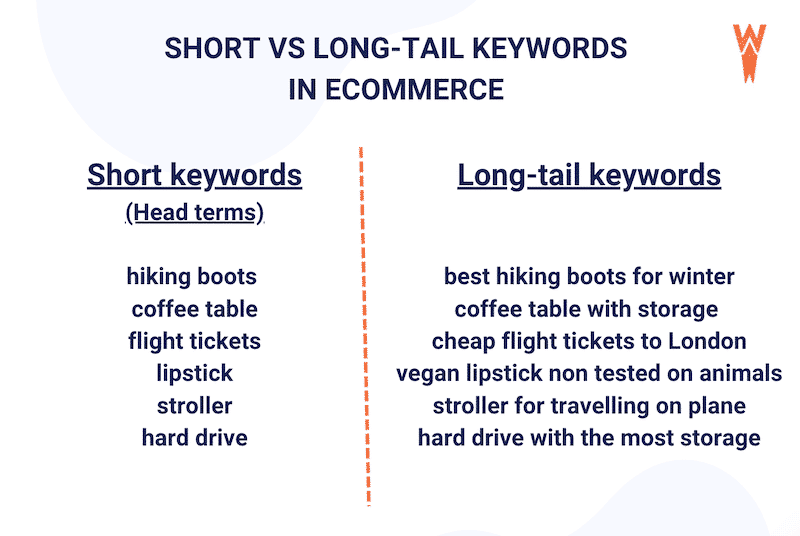
Long-Tail Keywords: What They Are
Long-tail keywords are handy for on-page optimization. They are usually less popular search terms but provide better detail to search engines by explicitly signaling search intent. They can represent up to 80% of the traffic generated by search engines, and the keywords are easier to rank for as there is less competition. Finally, they bring high-quality traffic, resulting in higher conversions and more sales for your business.
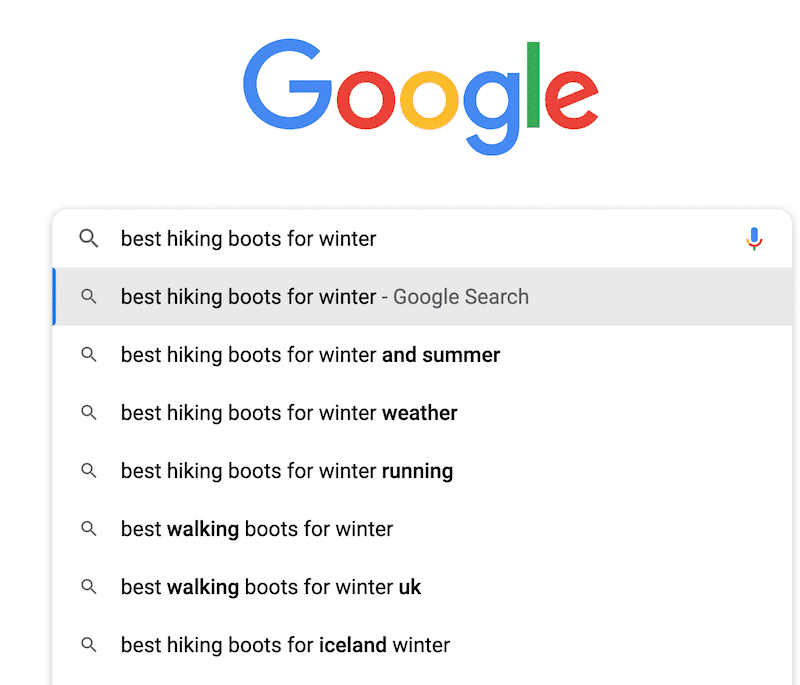
The Best Tools to Conduct a Keyword Research
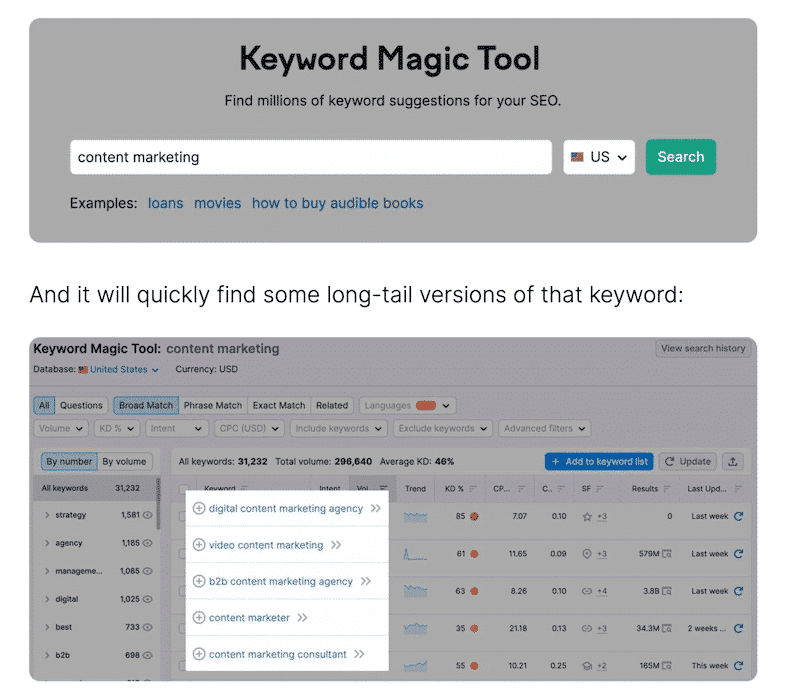
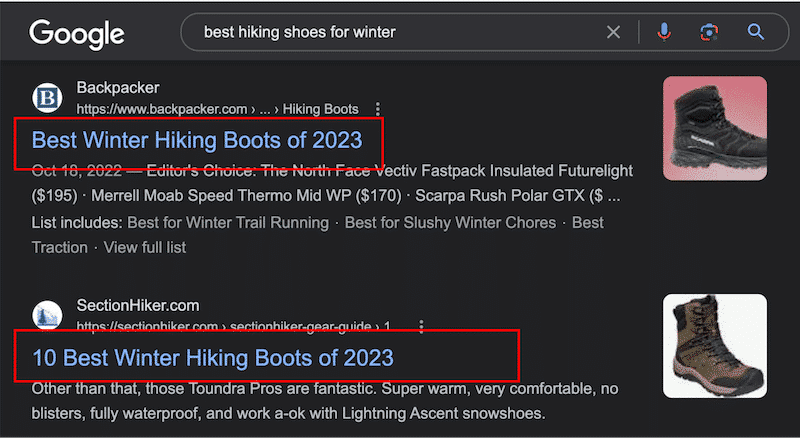
You can find long-tail keywords directly from the Google search box:
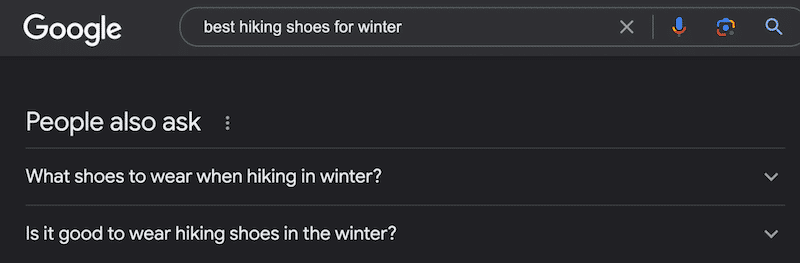
You can also take advantage of the Google PAA (People Ask) feature:
You can use premium tools like Semrush, Ahrefs, or Moz to improve your keyword strategy. All you need to do is go to their keyword tool tab, type a “head term”, and see more suggestions showing up.
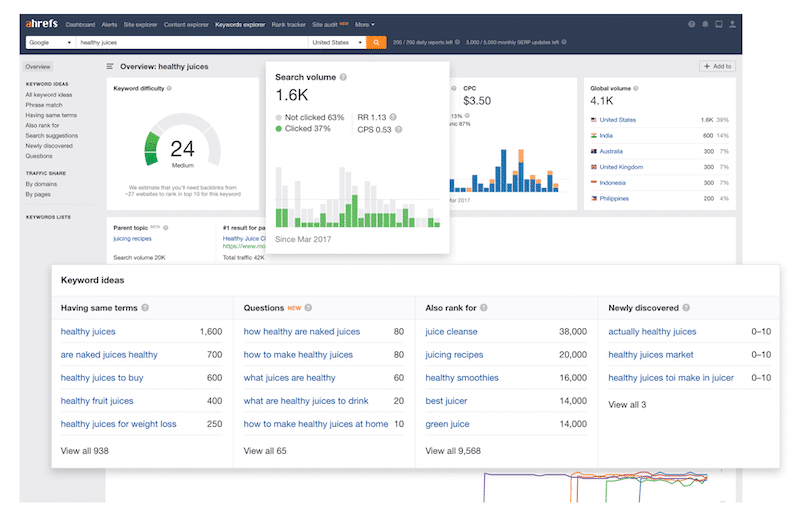
When choosing a keyword, you can look at the search volume (popularity) and the keyword difficulty (how hard it will be to rank for this specific keyword). You can see an example below with Ahrefs:
With those tools, you can build your content strategy, and you’ll also be able to identify for which keywords your competitors are ranking.
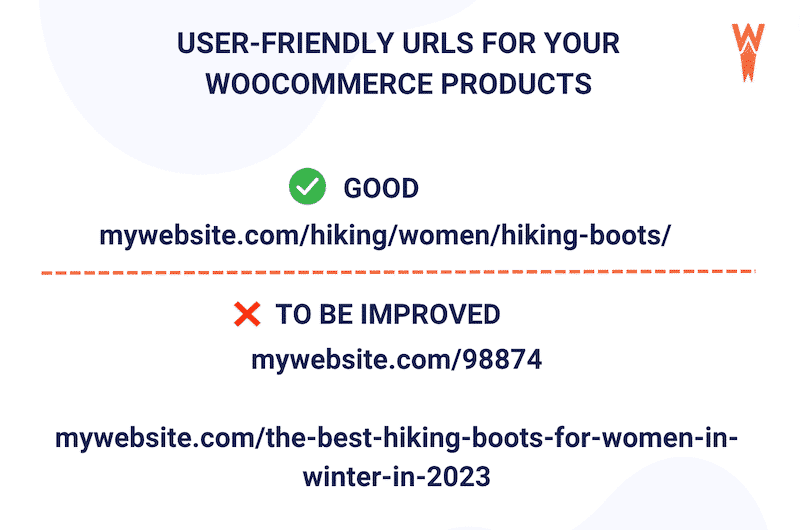
2. Optimize WooCommerce Product URLs and Slugs
Here’s a short checklist your can follow to optimize your WooCommerce product URLs:
- Make them user-friendly and use a descriptive slug to describe the content of a page.
- Keep them concise because long URLs are hard to remember (we advise an average of 4 or 5 words max).
- Use separate words
- Use lowercase
- Avoid special characters, including emoji
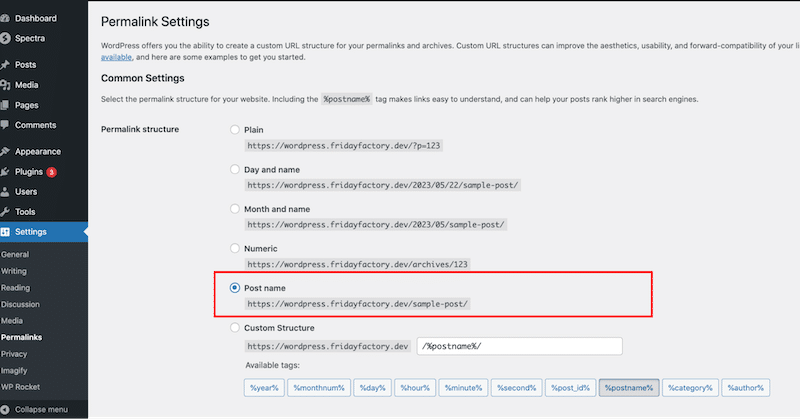
To optimize URLs on WordPress and WooCommerce, navigate to Settings > Permalink and select the Post name structure.
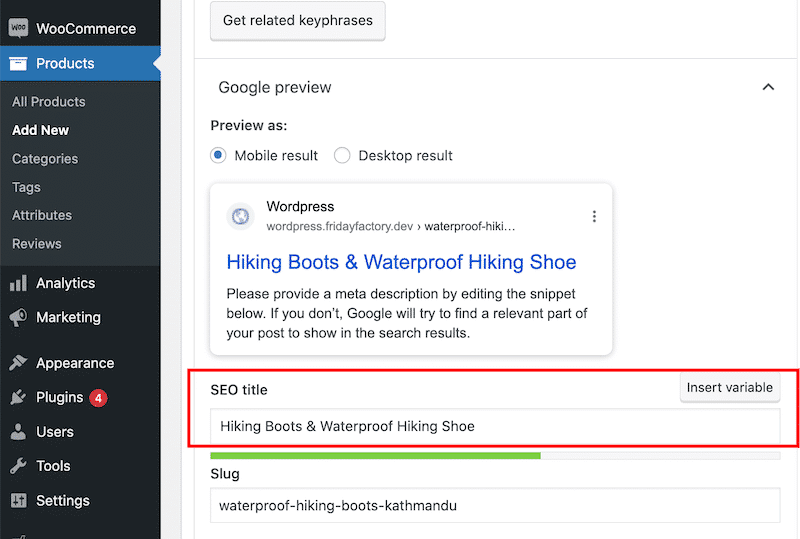
3. Optimize Title Tags
Title tags (or SEO titles) allow you to give a title to your product page, which can be found “in blue” on the search engine results pages. Adding and optimizing your product’s title tags is crucial, as they are essential in organic ranking (SEO).
To optimize your title tags, you can use a WordPress SEO plugin like Rank Math SEO, Yoast SEO, or AIOSEO.
For our example, we are taking Yoast SEO, but the steps are similar for all of them.
Go to your WooCommerce product page > Scroll down to Yoast SEO > Add your title tags (SEO title).
4. Write Clear and Engaging Meta Descriptions
The meta description is an element that summarizes what’s on the WooCommerce product page. It’s displayed in search engine results and aims at giving the user an idea of the content within the page. It’s directly related to its search query, so you should write a clear and engaging description that makes users want to click: make your potential customers curious and use the right keywords.

To illustrate our example, we are taking Rank Math, but the steps are the same for all.
To optimize your meta description, you can use a WordPress SEO plugin like Rank Math SEO, Yoast SEO, or AIOSEO.
Go to your WooCommerce product page > Scroll down to Rank Math SEO> Add your meta description (Description).
5. Create and Optimize Product Categories and Pages
Optimized category pages will make the online shopping experience easier for shoppers and improve your SEO. Categories are essential for several reasons:
- Capturing traffic from high-volume terms.
- Helping users discover your products when navigating your site.
- Helping search engines to understand your information architecture when they crawl your content.
On a WooCommerce site, it’s common to come across two types of category pages:
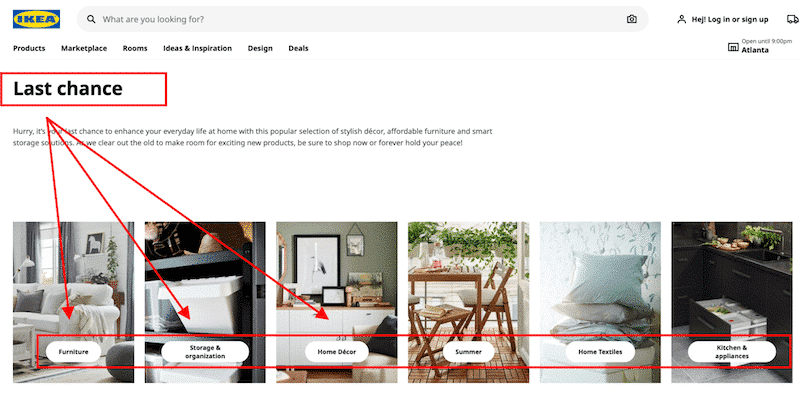
- Category listing pages (CLP) – A global category that lists other categories and targets very broad topics (e.g., Last Chance > Furniture, Home Decor, Home Textiles)
2. Product listing pages (PLP) – Categories listing products that belong to that same category (e.g., Hiking Boots > hiking boots X brand, Y brand, Z brand)
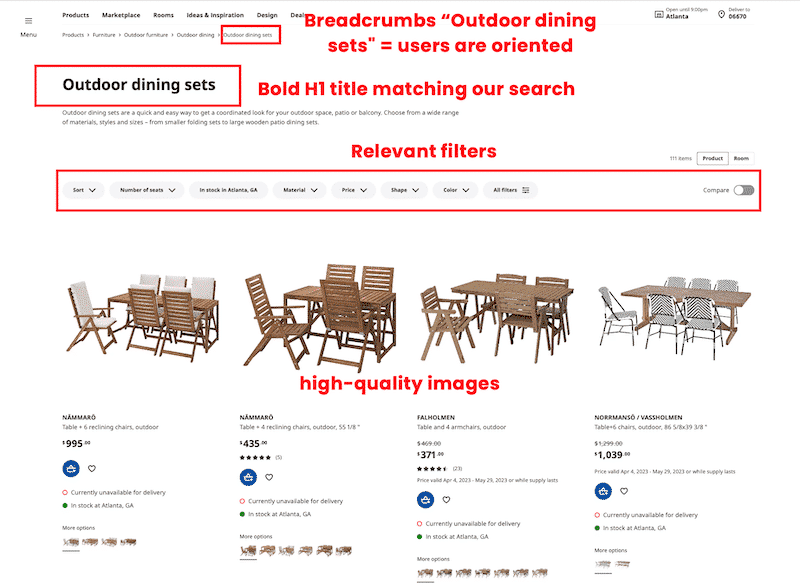
You should consider following the best practices below to optimize your product category page:
- Use a large header highlighting the category (H1)
- Implement breadcrumbs to orientate the users and show that it’s the right category
- Add filters on the page to allow the user to narrow down the search results
How to Create Categories With WooCommerce
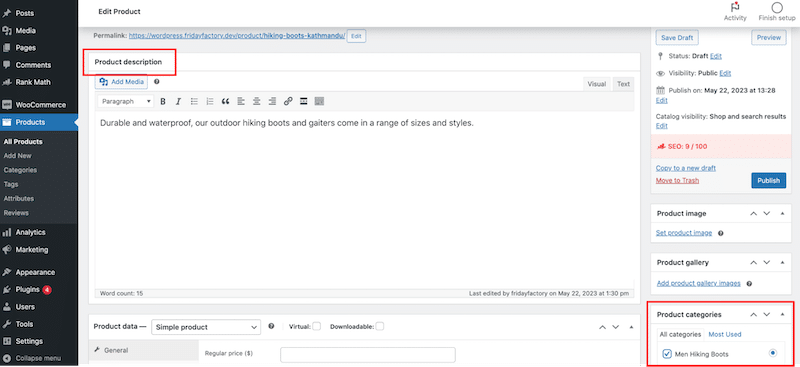
To create categories with WooCommerce, go to Products > Categories and create as many categories as needed. Then, assign the category to the product:
How to Create a Custom WooCommerce Category Page
To create a custom WooCommerce category page design, you can use the WooCommerce blocks that come with the WooCommerce plugin. (Automattic developed a dedicated block plugin, but they recently added the block to WooCommerce Core).
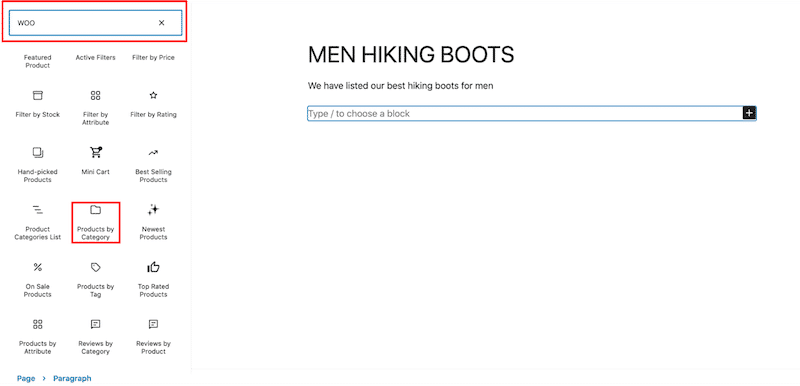
- From your WordPress dashboard, add a new page
- Add a category H1 title
- From the WordPress Editor, search for the WooCommerce blocks and choose the Products by Category one
Finally, organizing your categories into a logical hierarchy results in your site is crucial to orient users.
How to Add Breadcrumbs to My WooCommerce Page
To add breadcrumbs to your WooCommerce site, you can use a WordPress SEO plugin like Rank Math SEO, Breadcrumb NavXT, Yoast SEO, or All in One SEO (AISEO). For our example, we’ll go with AlSEO.
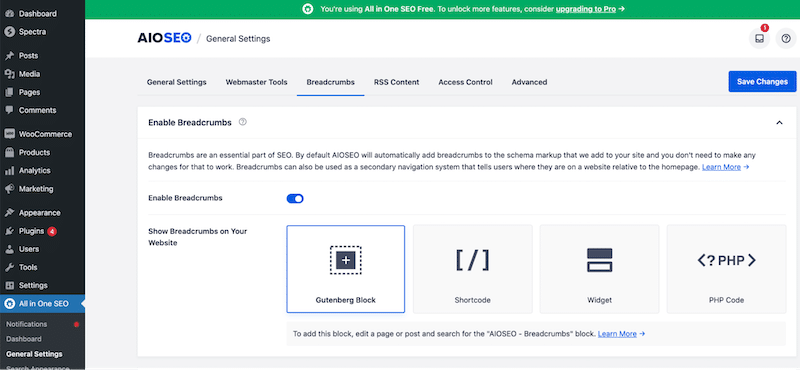
Go to General Settings > select the Breadcrumbs tab and enable breadcrumbs.
6. Optimize Product Descriptions
To write SEO-ready WooCommerce product descriptions, you can follow our 9 tips:
- Before you write, establish buyers’ personas by defining who is likely to read your description so you can adjust your content accordingly.
- Write a clear description of what your product does using the right keywords (that takes us back to our very first point: select high search frequency and low competition keywords).
- Use your brand voice – if you use a laid-back tone across your branding, you should also adjust your product description to ensure it reflects your target audience.
- Mention a specific material that can differentiate you from your competitors (use your unique selling point).
- Specify the color and size of your product.
- Explain the main benefit of your product so the buyer can see the value.
- Use “daily life” writing – don’t just stick to technical features. Put your product into a real-world situation.
- Add reviews (user-generated content).
- Add a call-to-action button to suggest an action to the user.
7. Optimize Images (Performance and SEO)
Optimizing product images on WooCommerce revolves around two major axes:
- Adding the “alt-text” tag on each of your image products to provide a short description of an image for search engines. If the images are not displayed, this tag is also shown to the visitors, so be as descriptive as possible.
- Preparing images for the web to ensure they don’t slow down your shop. Make sure to serve them in the right format and size without impacting performance. We recommend you upload good-quality images with small file sizes – a balance that can be achieved thanks to the image compression technique.
How to Add the Alt-text on WooCommerce Image Product
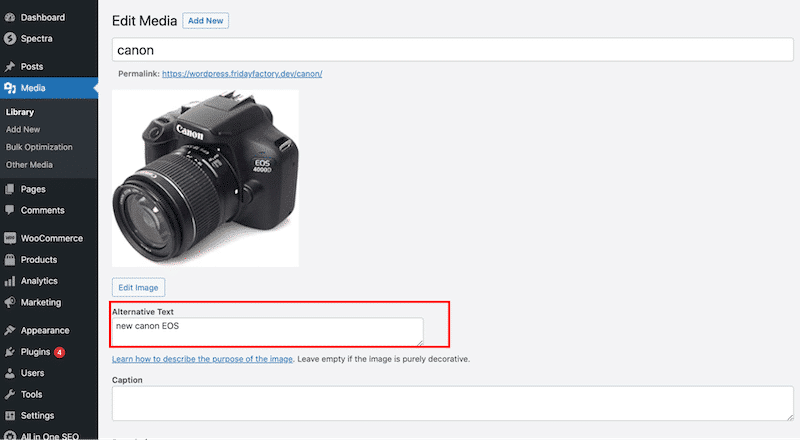
To add the alt-text tag on your WooCommerce image product, go to Media > Library > Edit the image of your choice and go to the Alternative Text box.
How to Compress WooCommerce Image Product
You can use an image optimizer plugin like Imagify or Shortpixel to easily compress your images on WooCommerce without impacting the quality. Such plugins can also help to convert them to WebP, the next-gen format recommended by Google, which reduces the file size even more than the traditional JPEG or PNG formats.
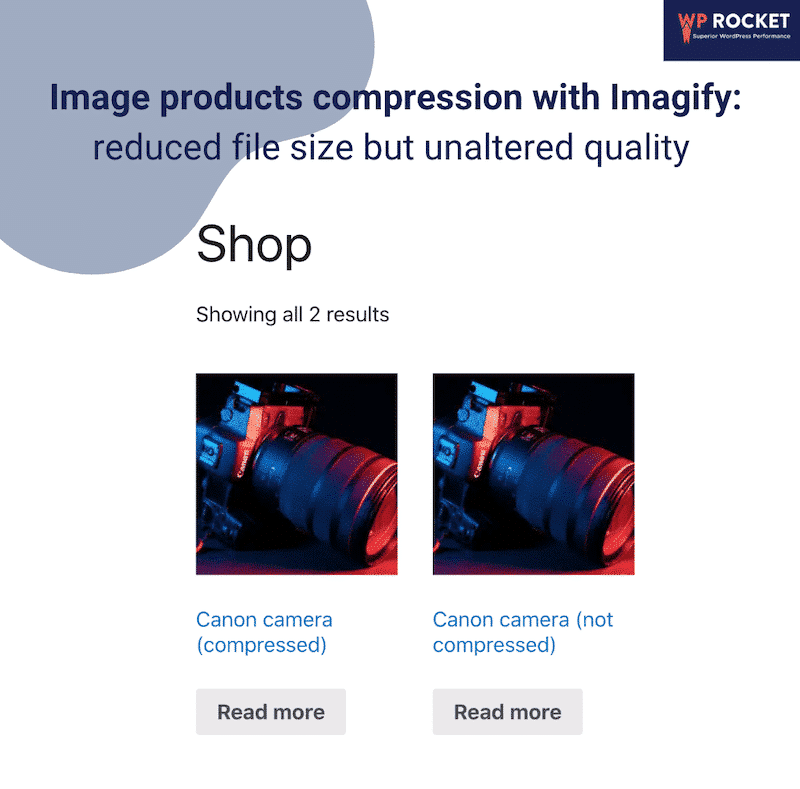
This is how Imagify compressed my product image. The file size went from 424 KB to 230KB, which is a 56% savings! The product image was also converted to WebP.

You can visually compare both products, one with an optimized image (left) and the other with the original picture. We can’t see any difference in the quality, but the file size got much smaller, which will improve the loading speed of the shop page.
| 💡Hint: When it comes to WooCommerce optimization, that’s where the main keyword can be used: – Once in the URL – Once in the product description – Once in the H1 / page title – Once in the image alt=”keyword” |
8. Implement “rel canonical” for Similar Product Categories
A canonical tag or “rel canonical” is essential to manage pages with almost the same content. This tag tells search engines which URL, among similar ones, should be shown on the page results. Canonicalization is key to preventing duplicate content issues that can harm your organic visibility.
According to Google, a canonical URL should be the “URL of the best representative page from a group of duplicate pages”. Imagine you are selling products in different sizes and colors. You could create a canonical URL that leads clients to the main product page but supports viewing options for each color.
You can do it manually by adding the <link> element with the attribute rel=”canonical” to the <head> section of duplicate pages, pointing to the canonical page:

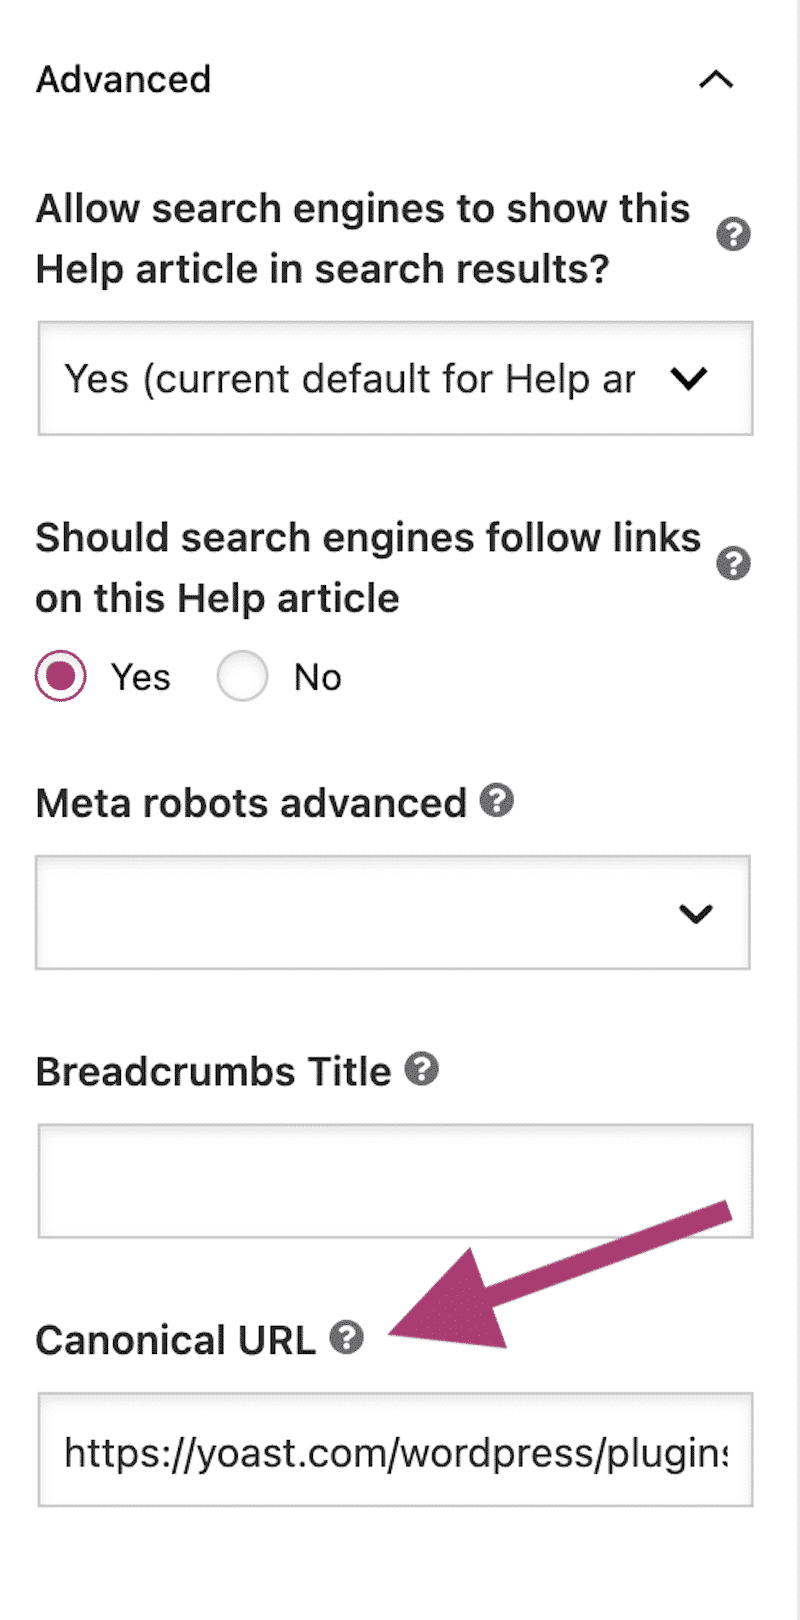
If you don’t feel like adding your code, you can use a WordPress plugin like Yoast SEO to implement the rel canonical tag automatically. And from the Advanced SEO tab, Yoast also lets you change the canonical if needed:
Canonicalization must be done properly otherwise, it will lead search engines to believe your website has duplicate content.
9. Include Structured Data (Schema Markup) Relevant to WooCommerce
Google indexes and crawls your WooCommerce site with an algorithm that “scans and understands” your overall content. To improve the accuracy of Google’s understanding, it’s recommended to include structured data, which is, according to Google Search Central – a “standardized machine-readable format for providing information about a page”.
Structured data is also called schema mark-up, which enables improved search results layouts for different verticals such as jobs, recipes, events, courses, books, and WooCommerce products. (To see the full list, check Google’s elements for structured data).
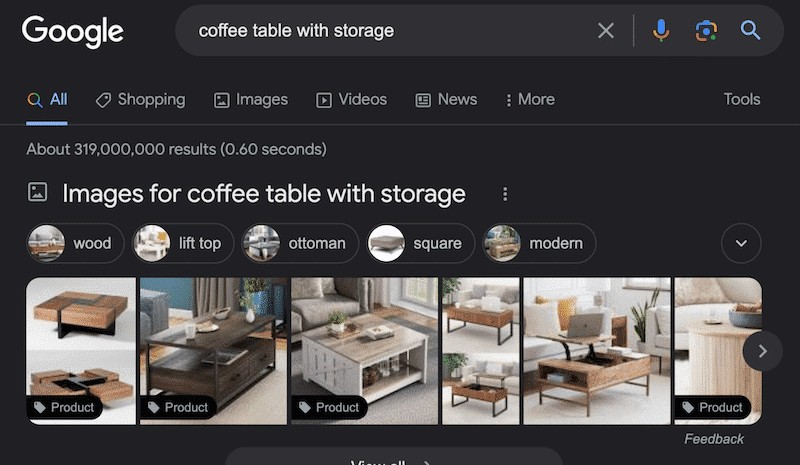
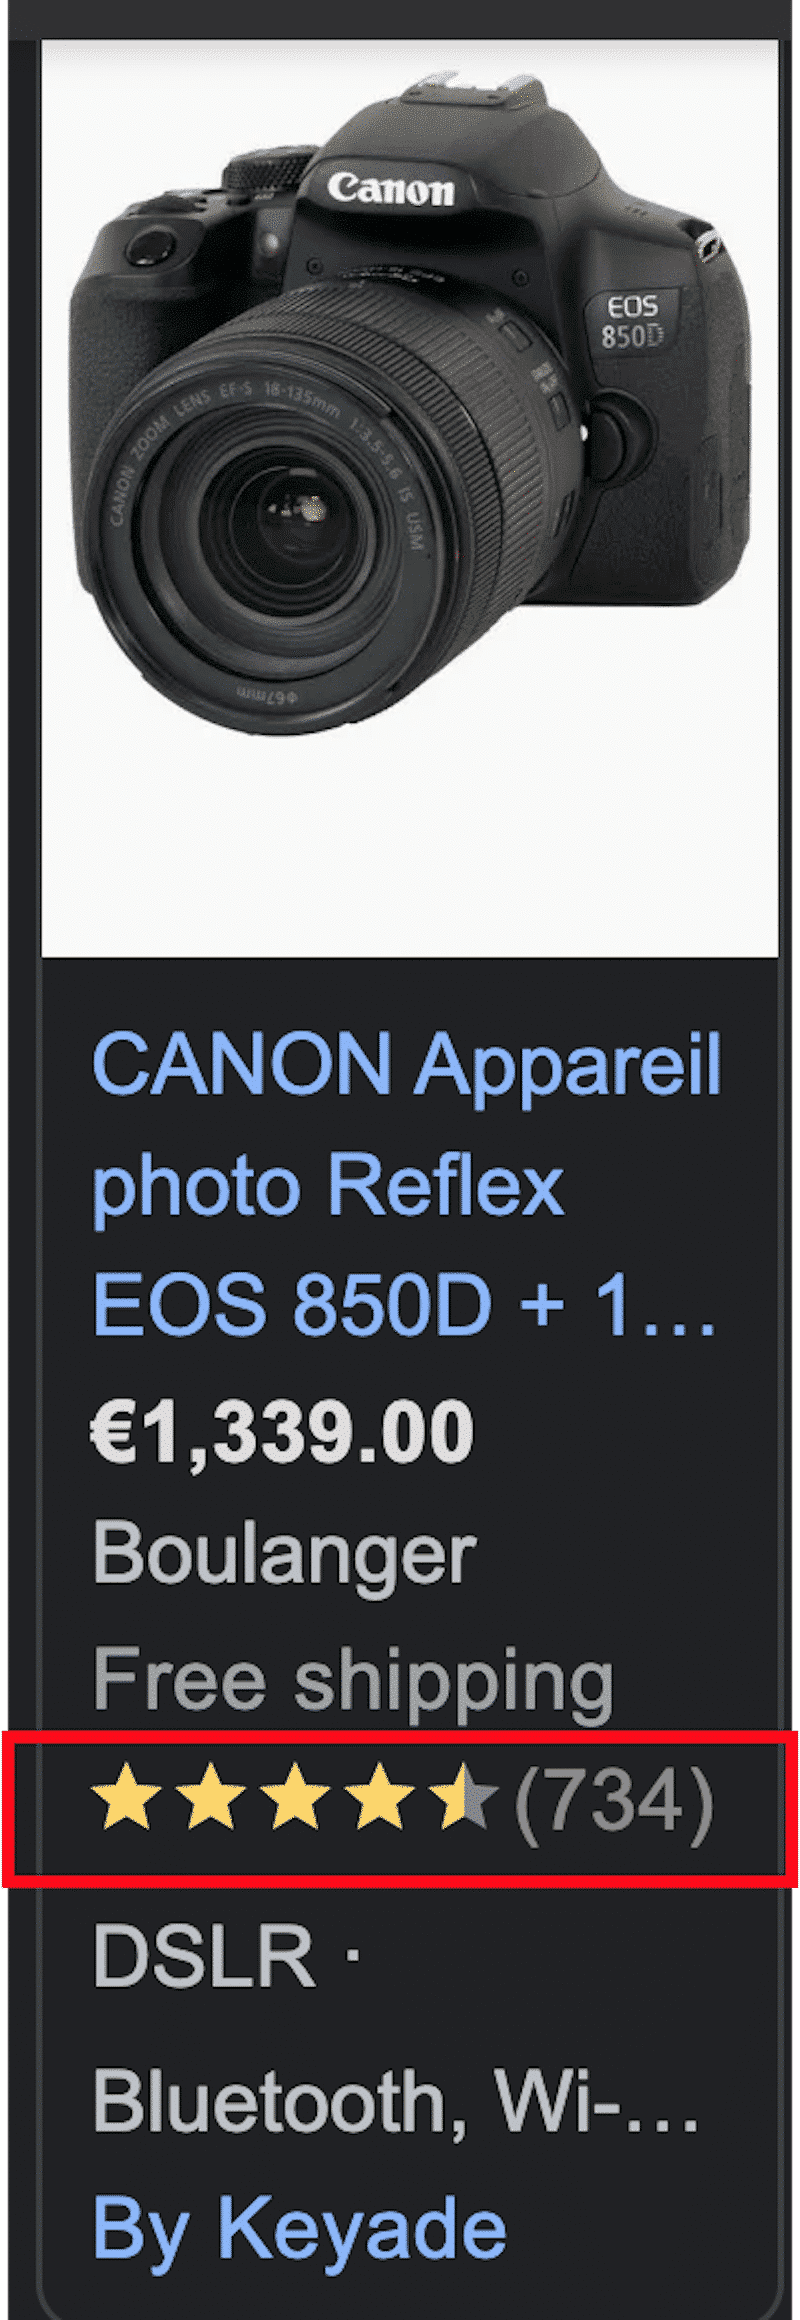
For example, a product page with valid structured data will be eligible to appear in the following enhanced format:
Which Structure Data to Include for a WooCommerce Site?
Here are the e-commerce structured data types you can add to your WooCommerce site:
- Local business information (LocalBusiness structured data) – Tell Google about your business opening hours, address, and pictures of the place. For enhanced SEO, you should also list your business on GoogleMyBusiness and the Merchant Center.
- Product details (Product structured data)- Give more information about your products to Google so the search results can show product details in richer ways with price, stocks, and reviews. There are two types of product results: product snippets and merchant listing experiences.

- Reviews (Reviews structured data) – It helps Google to understand a particular product review and display it in the results.
- How-to (Howto structured data) – A how-to section walks users step-by-step to explain how to complete a task successfully. It can be a written tutorial or even a video.
- FAQ page (FAQPage structured data) – A Q&A section can be useful for the users and provide more information about your product.
- Breadcrumbs (Breadcrumbslist structured data) – To help Google to display the right product category page in the search results.
- Website (Website structured data) – To help Google to understand how the search box works in your WooCommerce site.
- Video Object (VideoObject structured data) – An instructional or marketing video on your product page can help Google present the video appropriately in Google Search results.
All the structured data techniques mentioned above help to get a better CTR (click-through rate) and drive more traffic to your WooCommerce site.
How to Add Structure Data to A WordPress Site?
If you are comfortable with coding, then do it manually by generating the Schema Markup yourself with JavaScript and adding it to the HTML. Google can help you add the data markup.
If you don’t feel like writing a single line of code, try a plugin like Schema Pro. It’s a WordPress plugin that helps you provide clues about the content of a WooCommerce product page to Google.
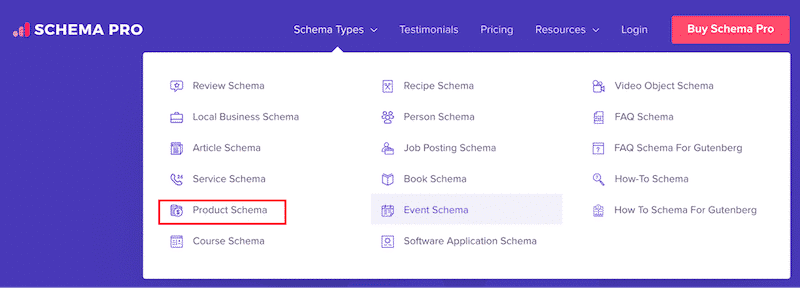
From the dashboard, it lets you map the product data and add all the relevant custom fields to create a schema markup:

How to Check the Structure Data of a WooCommerce Site?
To check if your product page includes structured data, run an audit on the Google Search Console > Rich results
10. Use a WooCommerce-optimized Theme or Page Builder
To improve the SEO for WooCommerce products, choose a fast WooCommerce-optimized theme that offers specific features and blocks for WooCommerce. In the previous part, you’ve seen the importance of content architecture and structure data of an online shop, that’s why you should use a theme or page builder that allows you to create an advanced product page with your fields and layout.
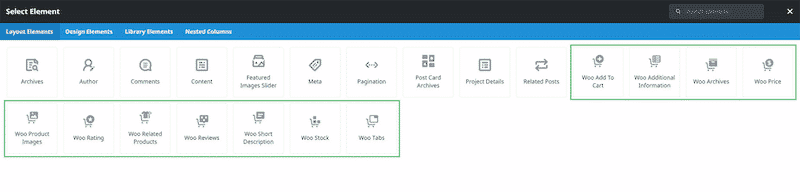
Almost all the most popular WordPress page builders are also WooCommerce builders, as they have the feature to design your product layout, add custom fields and change the entire shop layout. WooCommerce is not enough on its that’s why using a page builder like Elementor Pro, Beaver Builder (with Beaver Themer), or even the Fusion Builder from Avada can enhance the whole experience with dedicated WooCommerce elements:
If you are looking for a theme, then Storefront (by WooCommerce) or even Astra can be a good choice. Make sure that they offer advanced WooCommerce features to create your design and map your content for SEO.
| 📖 Looking for a WooCommerce theme? We’ve compared the fastest WooCommerce WordPress themes for you. |
11. Create a Sitemap
A sitemap informs search engine crawlers about the structure of your WooCommerce site. It also helps categories to be scanned by Google, allowing you to ensure that your products are being indexed.
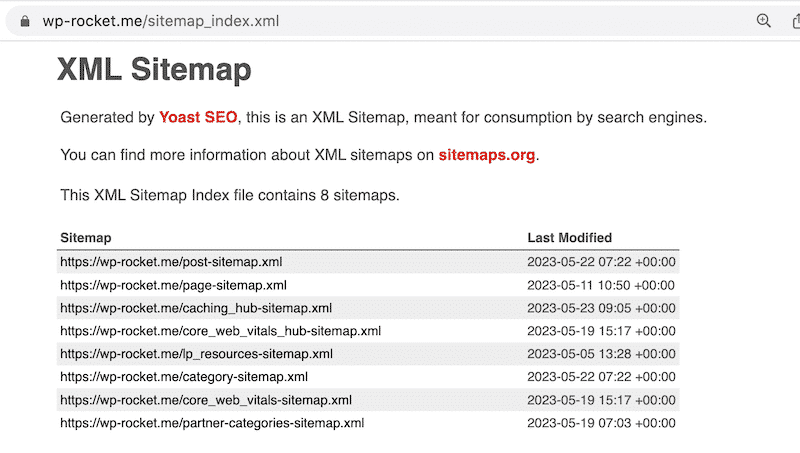
Use a plugin like XML Sitemap Generator for Google to generate your sitemap and improve SEO in WooCommerce.
12. Create a Top-notch Internal Linking Structure
Internal linking is an integral part of on-page SEO optimization, which helps users and search engines navigate your WooCommerce site better. If Google sees that your internal links are pointing to relevant content on your website, then the authority of your site will increase in those key topic areas. You’ll find below a few best practices to keep in mind when implementing internal linking:
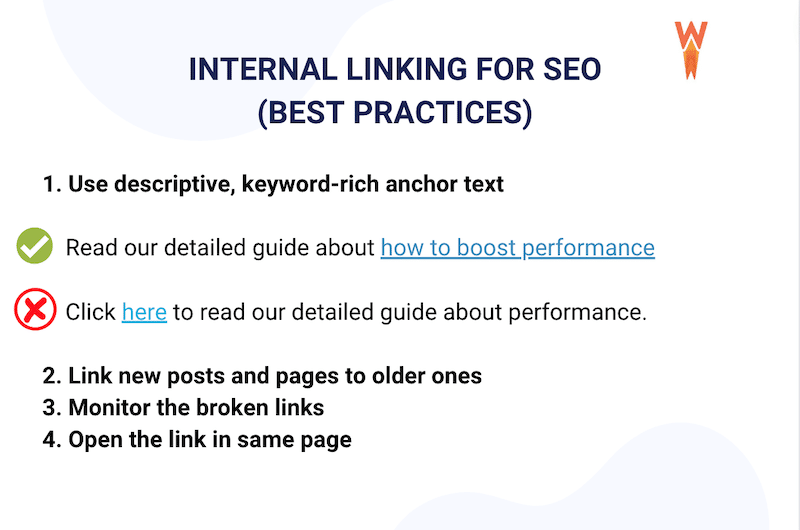
Internal linking is crucial to improve the SEO of your WooCommerce site. You can use one of the top 3 (Rank Math SEO, Yoast SEO, AIOSEO) to implement an efficient linking strategy.
Additionally, the Broken Link Checker plugin can be handy for monitoring your WordPress site’s external and internal links.
13. No-index Internal Search Results
The following internal search results pages should not be indexed by search engines, or it could harm the SEO of your WooCommerce site:
- A thank you page after a user subscribes to the newsletter
- The shopping cart page
- The checkout page
To block Google from crawling a page, you can add the “robots meta tag” in the page’s header. This is what it looks like in the code of a page:
<meta name="robots" content="noindex" />If you prefer using a plugin to no-index some of your WooCommerce pages, you can use a WordPress plugin like All In One SEO. It allows you to no-index a page and hide it in the search result in one click.

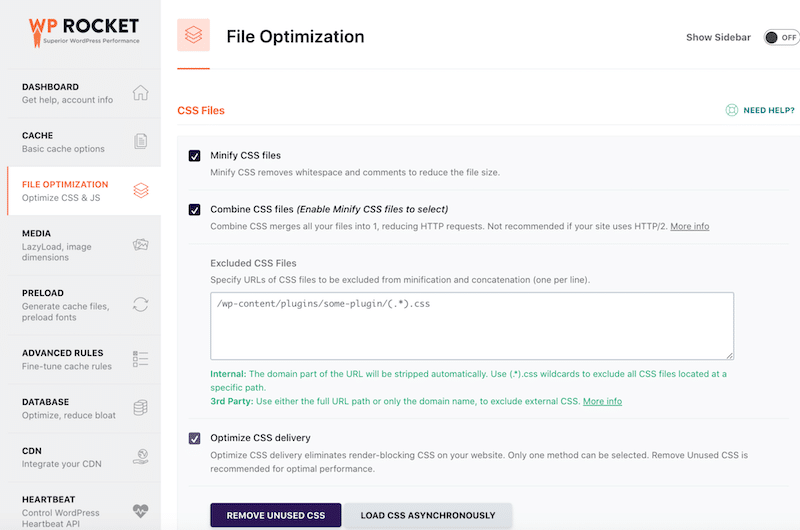
14. Speed Up Your WooCommerce Site
Page speed is a ranking factor in Google’s algorithm and affects your website SEO. To measure performance and the overall user experience, Google uses the Core Web Vitals metrics that directly impact your ranking.
To improve the speed of your WooCommerce site (and therefore boost your SEO), you can apply the guidelines from Lighthouse below. Each of the recommendations to have a better WooCommerce SEO can be addressed easily with a WordPress plugin:
- Optimize your images (e.g., Imagify, TinyPng, Shortpixel)
- Reduce unused code (e.g., WP Rocket, Perfmatters)
- Delay JavaScript and CSS that are not critical (e.g., WP Rocket, Flying Scripts)
- Consider using a CDN – (e.g., RocketCDN)
- Implement caching – (e.g., WP Rocket, WP Super Cache, or WP Fastest Cache)
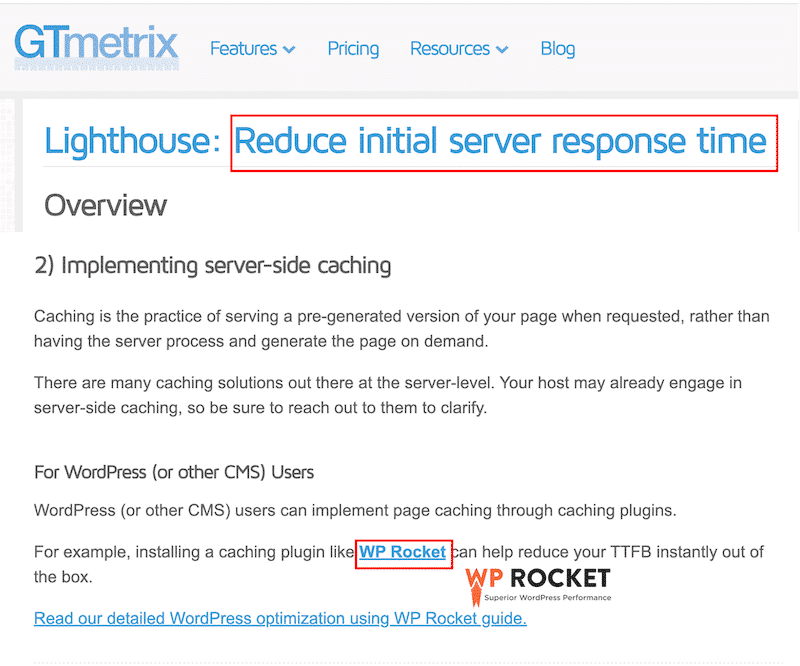
WP Rocket is one of the best caching plugins for WordPress that can help improve the SEO of your WooCommerce site. It does all the heavy lifting for you (and check all the tips from the list above): it allows you to optimize your code and images and improve the Lighthouse score in a few clicks.
GTmetrix recommends using WP Rocket to boost performance and to reduce initial server response time, as you can see in the example below:
Wrapping Up
You should now have a clearer overview of what matters the most for optimizing SEO for WooCommerce. Our WooCommerce guide gathers the best SEO tools and WordPress plugins you can use to start improving your shop’s ranking.
The quality and architecture of your content plus the performance are the 3 axes to consider when it comes to enhancing the SEO for WooCommerce products. WP Rocket is a great start for your speed optimization journey, as it applies 80% of the performance best practices upon activation. The plugin helps you get your Core Web Vitals in the green – a direct ranking factor for Google! You don’t take any risks by trying WP Rocket because you can ask for a full refund if your request is issued within 14 days of the purchase date.