
Table of Contents
Last update on
You’ll most likely hit the back button faster than it takes for a website to load, wouldn’t you agree? Waiting for a site to finish loading is not something we do today. I myself don’t.
As a consumer myself, I don’t enjoy waiting. And as a site owner, I know the pains of high bounce rate and my traffic diminishing as my site takes longer to load. I spent a great deal trying to perfect my site performance so that people would stay on my site and read my content.
So let’s tackle a specific problem regarding web performance.
The problem is how too many DNS lookups can slow down the loading of your pages.
DNS lookup load times are an issue on websites of all sizes. So this concerns everyone who owns a site!
I own several sites of my own and today, I want to share my process for optimizing my site, specifically for DNS lookup. Without being too technical.
This article explains the problem, how to reduce DNS lookups for a WordPress site, and some practical tips to optimize your site’s DNS.
You can follow our guide to getting your WordPress site optimized.
Hint: We used our WP Rocket plugin! And a few bonus tips and tricks at the end.
But first…
What Is a DNS Lookup?
Domain Name Servers (DNSs) are the foundation of the world wide web. They work like phone books for websites, linking them to their IP addresses. In turn, a DNS lookup is the process of finding the correct IP address for a given website URL.
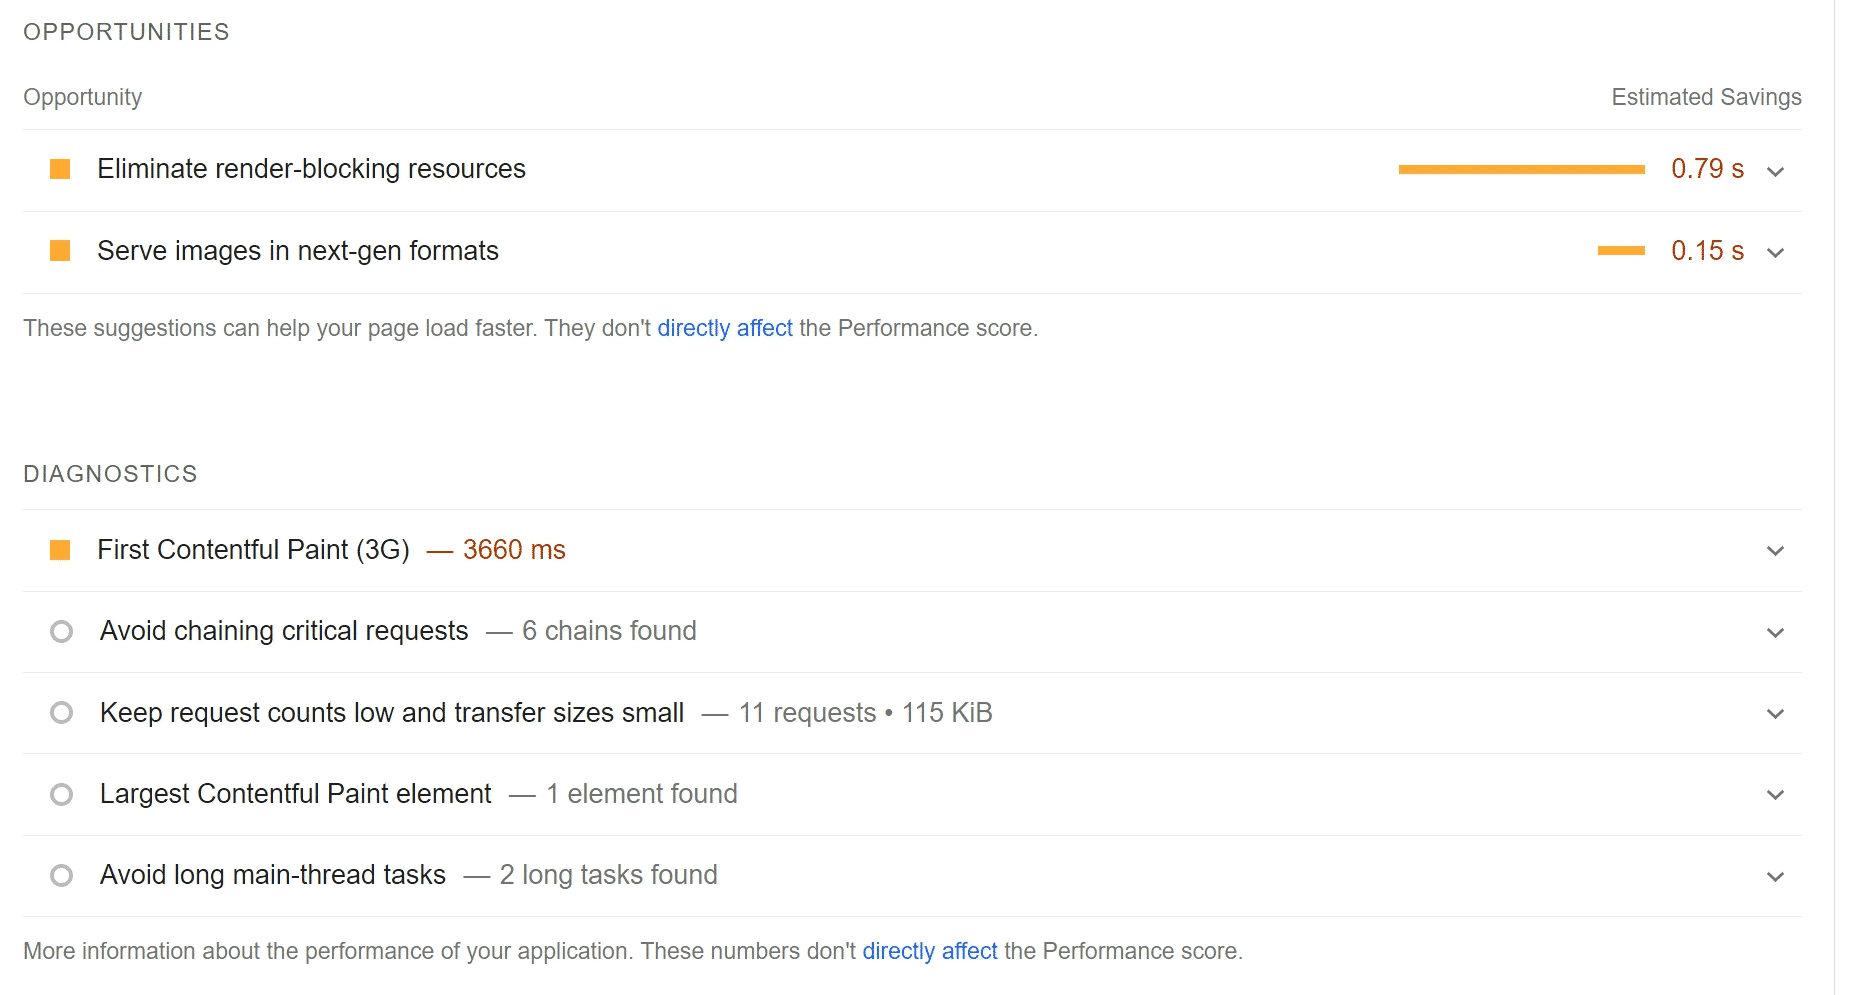
If you are using PageSpeed Insight, DNS lookup is associated with “Reduce initial server response time”:
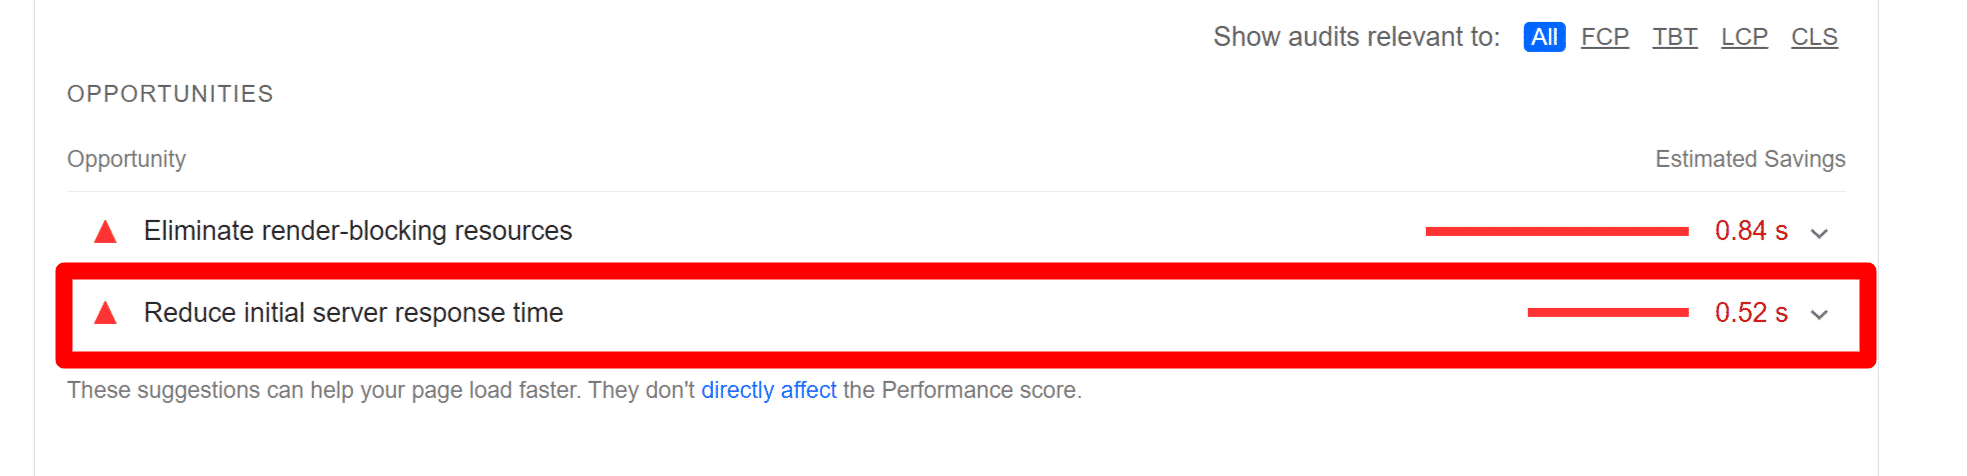
Time spent waiting for the initial response, also known as the Time To First Byte (TTFB) starts with the HTTP request.
The time it takes for a server to receive the request depends on the time it takes to perform a DNS lookup, the speed of the user’s network, the distance to the server, and any interruptions in the connection.
Since PageSpeed Insight does not help us identify what is causing DNS Lookup, we will need to use other tools, to help us isolate and fix this problem. And for us to know how to fix it, let’s see how DNS lookup works.
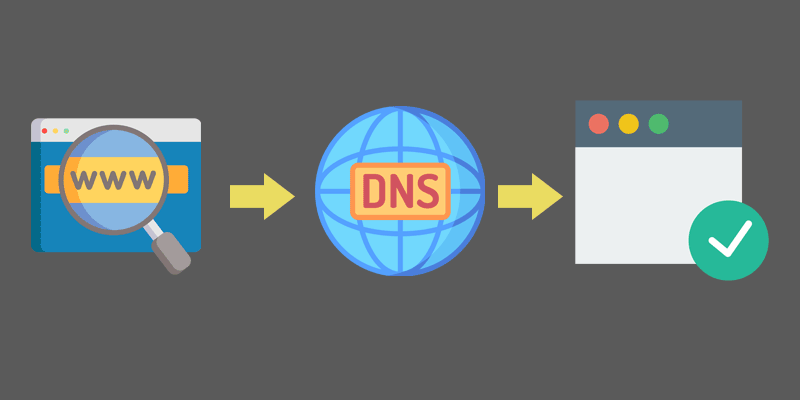
A DNS lookup lets you use a human-readable domain to fetch a website.
How Does DNS Lookup Work?
When you visit a website, your browser discovers all resources that necessitate a DNS query. After that, it waits for the lookup to complete before downloading any resources.
The greater the number of lookups a website requires, the longer it takes the browser to produce its pages.
Here’s a simple explanation.
DNS Lookup Example
If we take a phone book as “optimization” of DNS lookup, you can look at car repairs and find a name and phone number, and call them.
Once you call them, they will answer “ACME car repair” and you found what you were looking for. The same goes with a DNS lookup.
Another example is calling your cell phone provider. Maybe you want to talk to customer service about billing discrepancies. You call, and an automated assistant will tell you to press 1 English 2 for Spanish. For your account information, press 2, and the thing goes on and on.
You just want to talk to customer service, and the automated assistant is trying to figure out what you need and guide you to the right department. While we are most likely to stay on for an hour to talk to customer service about our cellphone bill, your consumer won’t wait for your site to load if there is a long DNS lookup!
If you want the technical answer:
The computer initially checks to see if the website entered is already in its cache or in its hosts’ file. If this is not the case, it approaches the server in charge. This was allocated to it via DHCP or is permanently configured.
When a client or DNS server asks a DNS server to resolve a domain name, the query might be recursive or non-recursive.
Clients, such as PCs, often perform recursive queries, which instruct the DNS server to return solely with a response and not a referral.
A referral is simply a response. If it does not know the answer, it will point to another server.
DNS servers perform non-recursive or iterative queries, which effectively directs the other DNS server to deliver an answer or the address of another DNS server that may have the answer.
If the server can answer the request, it sends the response to the requester. If not, it contacts another server that is in charge of the domain. The browser may connect with the webserver through the IP network using the IP address provided.
I hope that helps you understand the multiple routes DNS lookup can take for it to work and why fast DNS response time is essential.
What Is a Good DNS Response Time?
A good DNS lookup response time is roughly 40 ms, so aim for that or better.
It’s worth noting that every website is unique, so this isn’t a one-size-fits-all timetable.
Higher DNS lookup times, for example, maybe acceptable for a website with a completely local and low traffic website. However, if you have a global audience and want your site to receive a lot of traffic, your DNS response time should be less than 40 ms.
How to Check for DNS Lookup Response Time
The critical part is identifying what is causing the problem. Let’s look at three tools (Pingdom, GTmetrix, and WebPageTest, each with different features and benefits) you can use to identify your DNS lookup response time and how each tool provides that data.
Note: There could be several reasons for long response time, including server load, network variability, race conditions in your JavaScript that cause the load order to change, etc. If your site is loading inconsistently, you should try running a profile in the performance tab of developer tools a few times with network throttling enabled to see what happens.
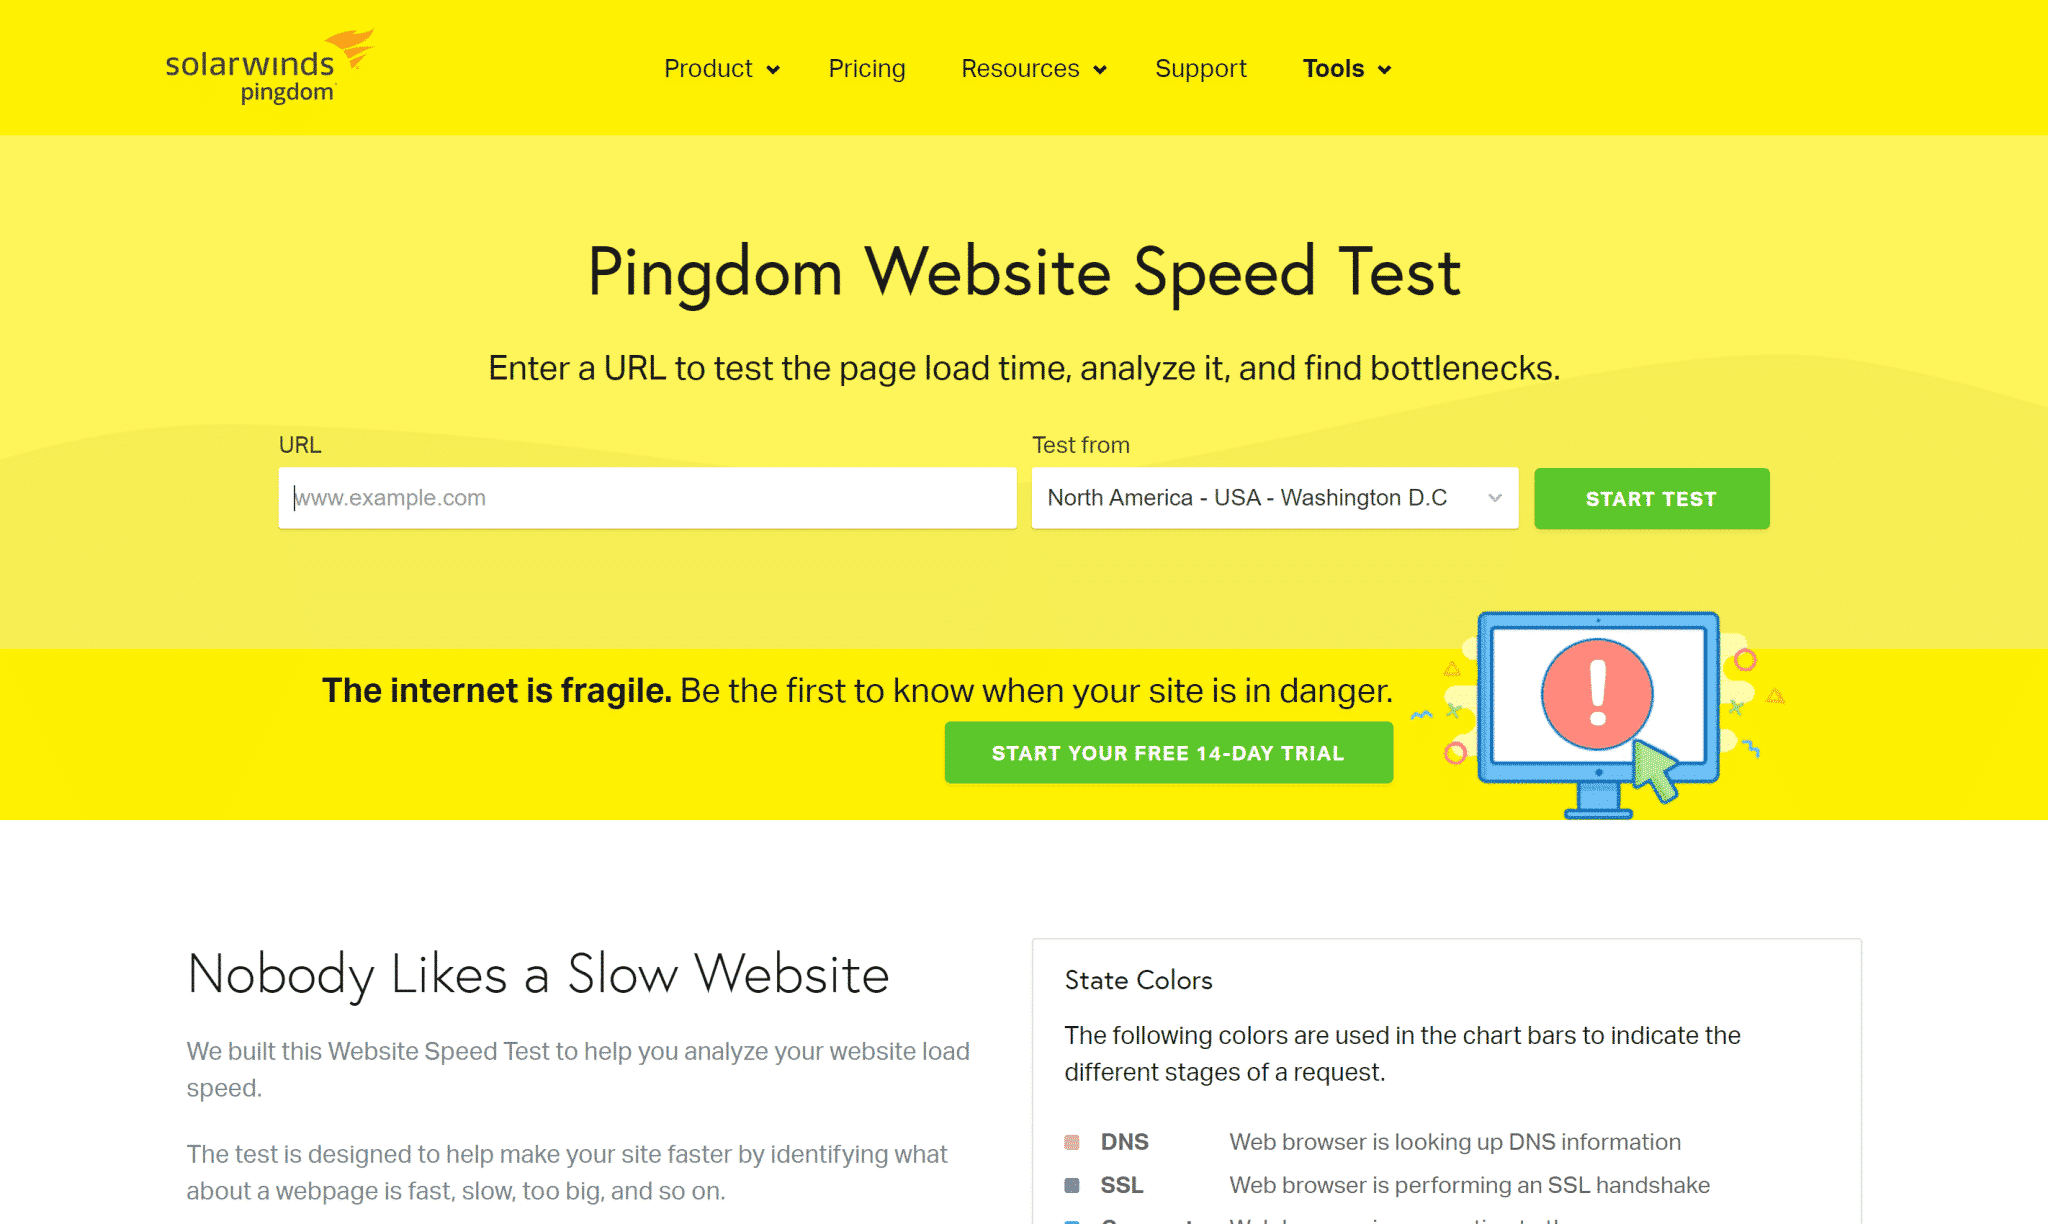
Pingdom DNS Lookups
To check your DNS lookup with Pingdom, go to their tools page and enter your website URL:
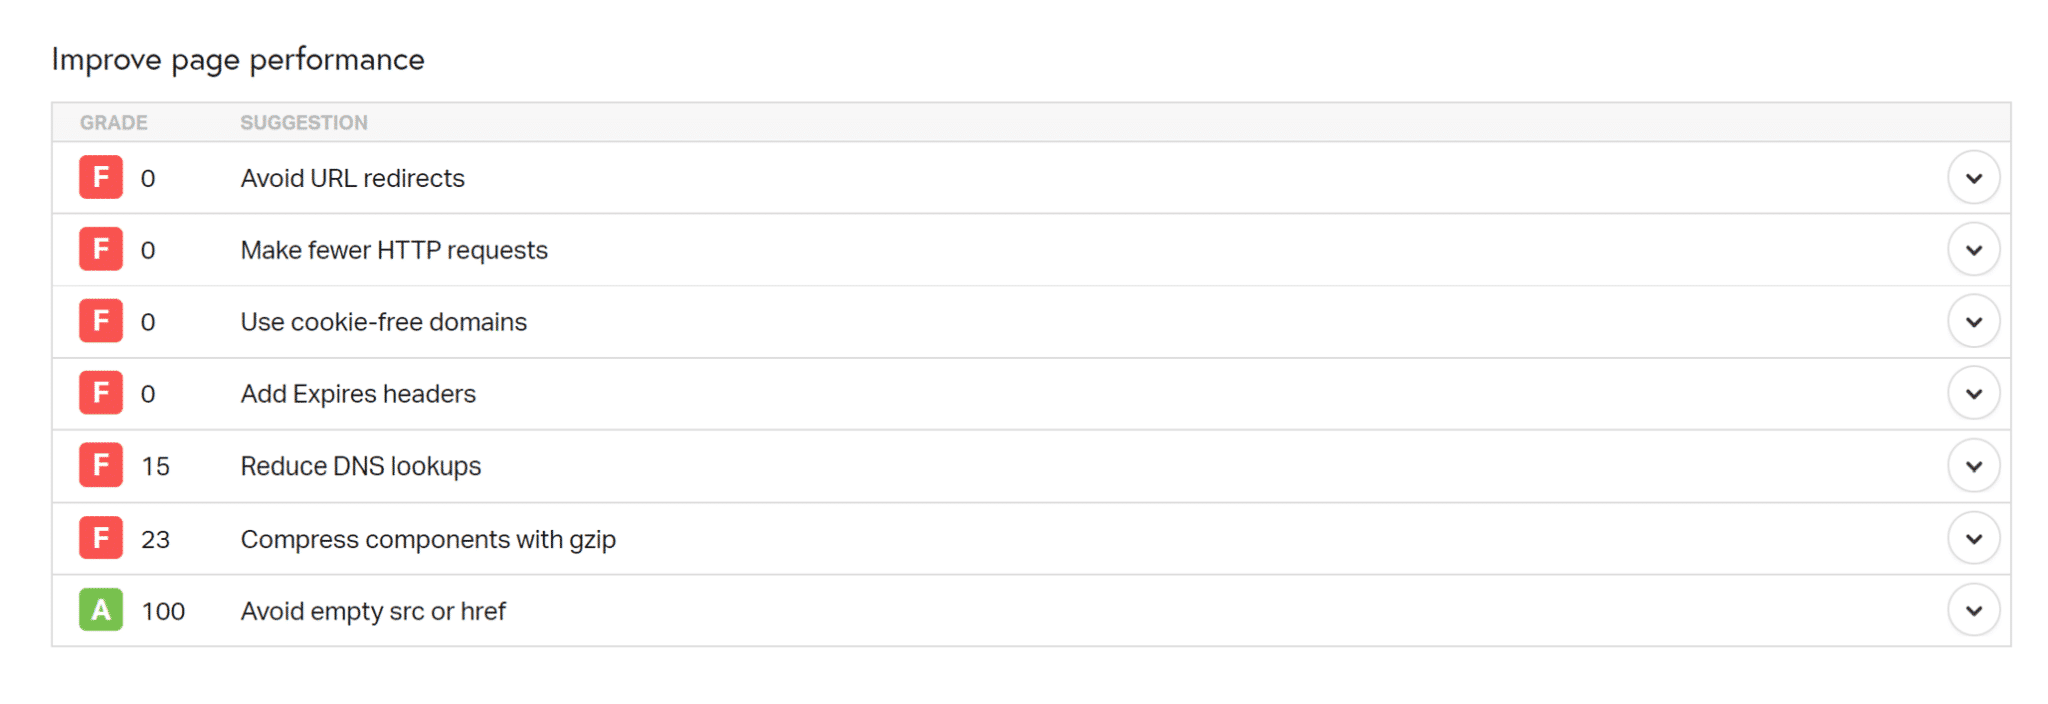
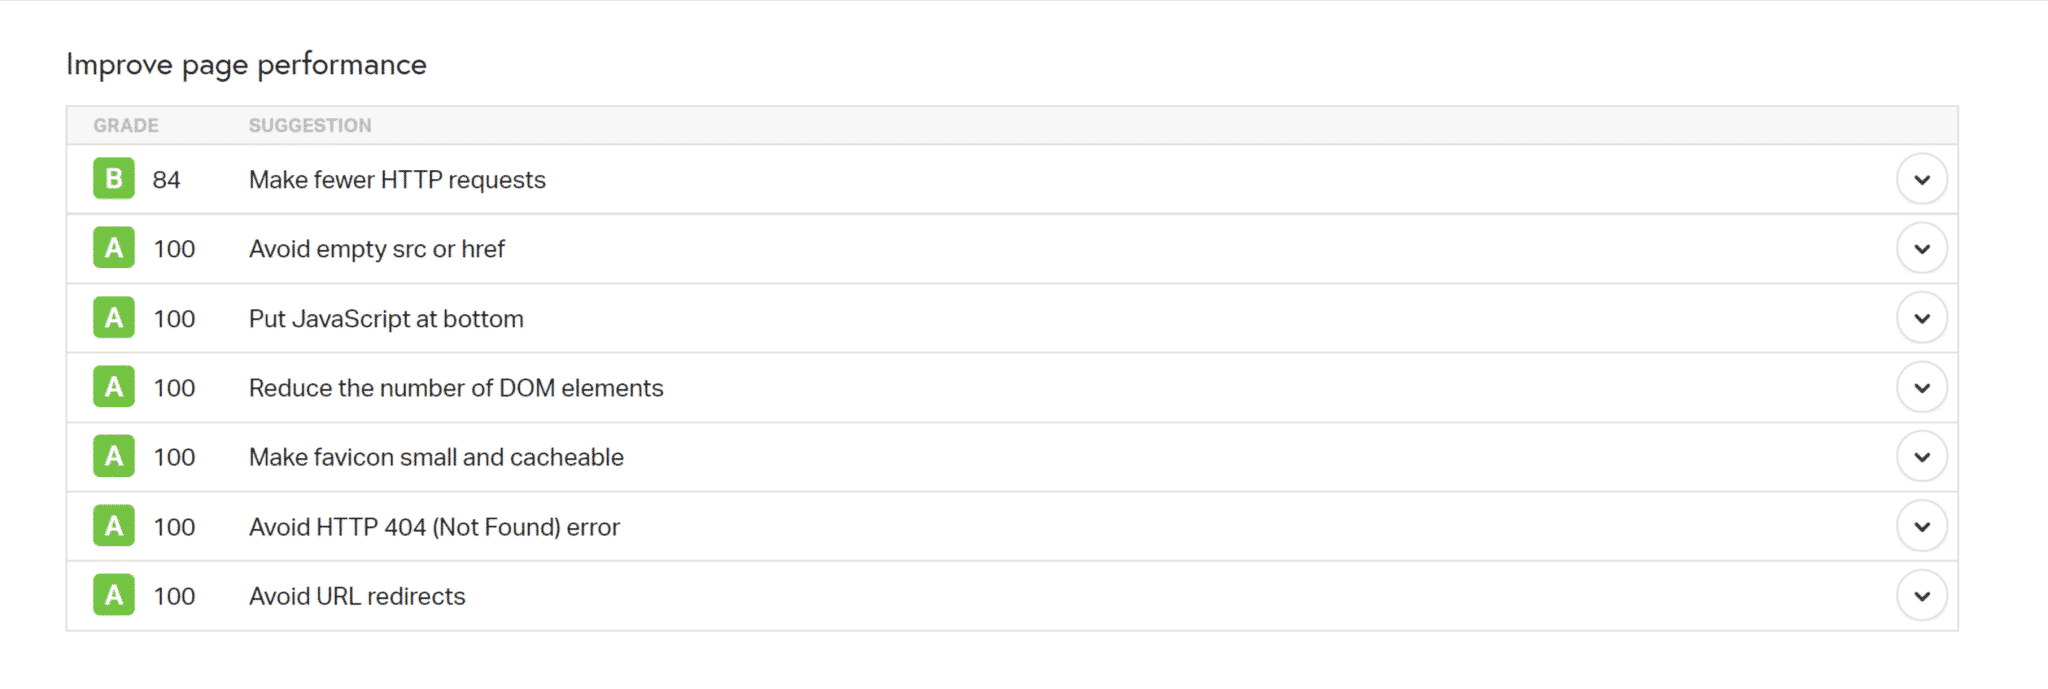
At a glance, you can see if you are having this issue under the “Improve page performance” section (see below):
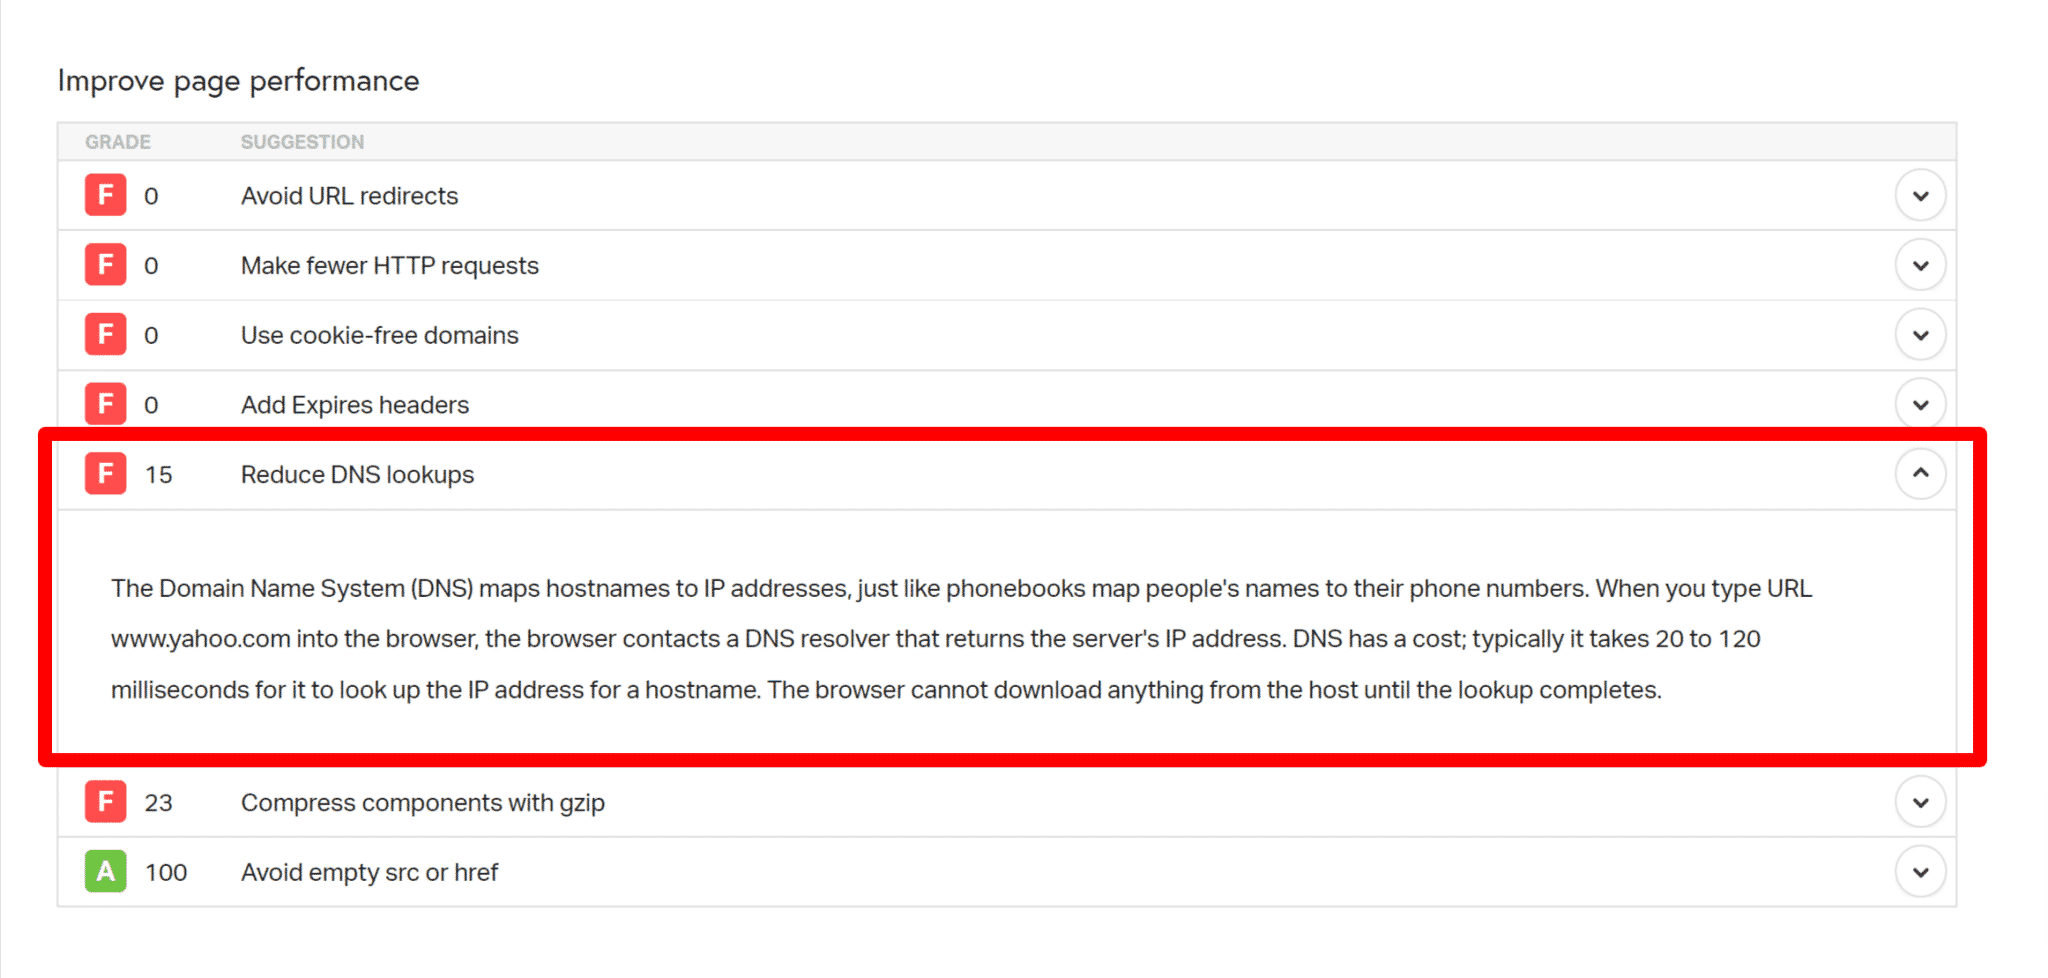
You can see “Reduce DNS lookup” in red and a score of F. This site does not have any caching, no performance plugins, and a ton that causes issues.
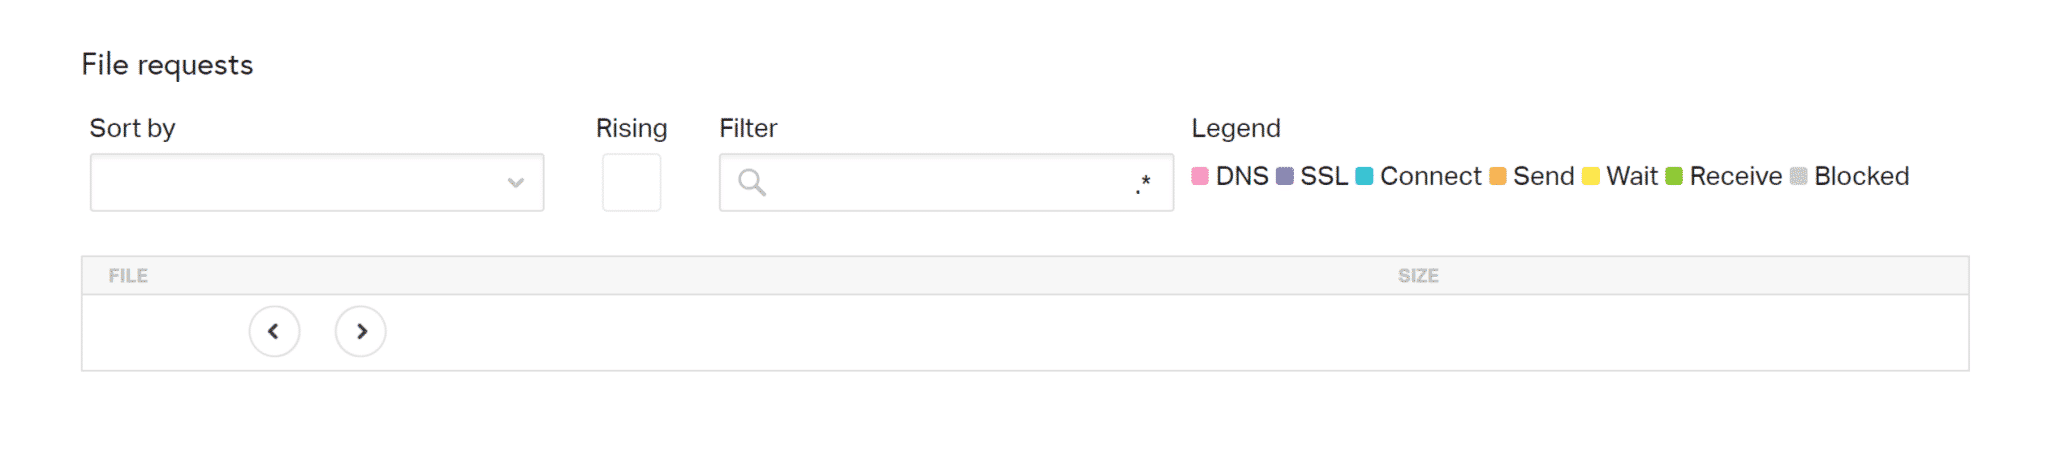
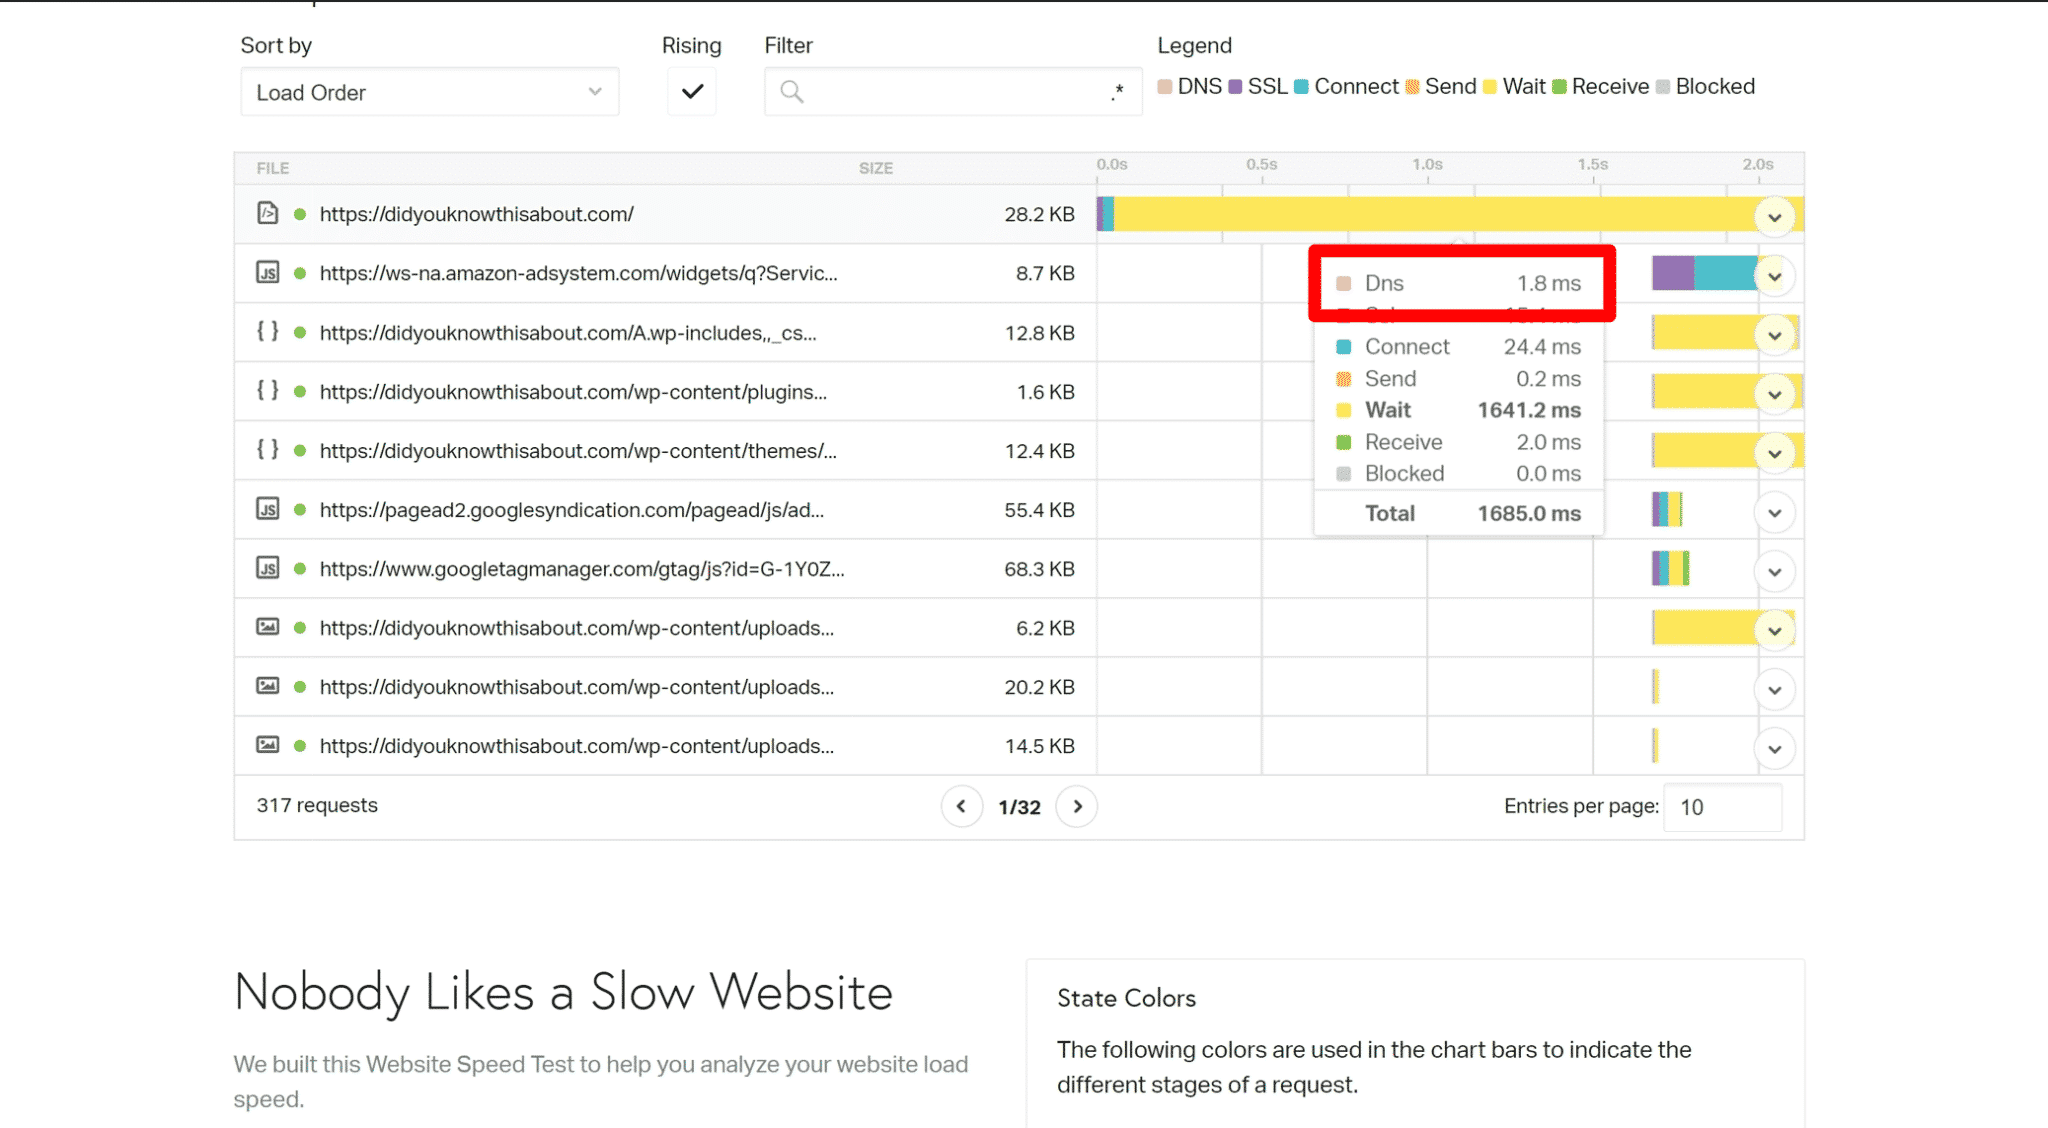
Scroll down to get a better-detailed view of what is causing the DNS lookup issue. The DNS is displayed by the pink bar and is measured in milliseconds. Hover over each file request to see which of the files is causing a DNS lookup and how long it takes to load.

| When you run your website through Pingdom many times, it caches the DNS because it already knows the IP address and does not need to conduct the query again. |
This is one of the reasons why your website seems quicker after many Pingdom tests. The second test’s DNS lookup time on the CDN URL is 0 ms, as seen in the screenshot below. This is an area where many people do it wrong.
You can see that the file request section does not show any requests after running multiple tests with Pingdom. No matter what I tried, I could not get this to show up again!
I would use Pingdom tools to quickly identify if you have Reduce DNS lookup problems and a high level and then go through either GTmetrix or WebPageTest tools to dig deeper.
It’s much easier to see what is wrong with your website performance by looking at the Pingdom result compared with the others:
Note: If you are using a CDN or a WordPress cache plugin, then tools.pingdom.com will show the caching result. You can try to deactivate CDN or WordPress plugin or purge cache and check again on Pingdom.
GTmetrix DNS Lookups
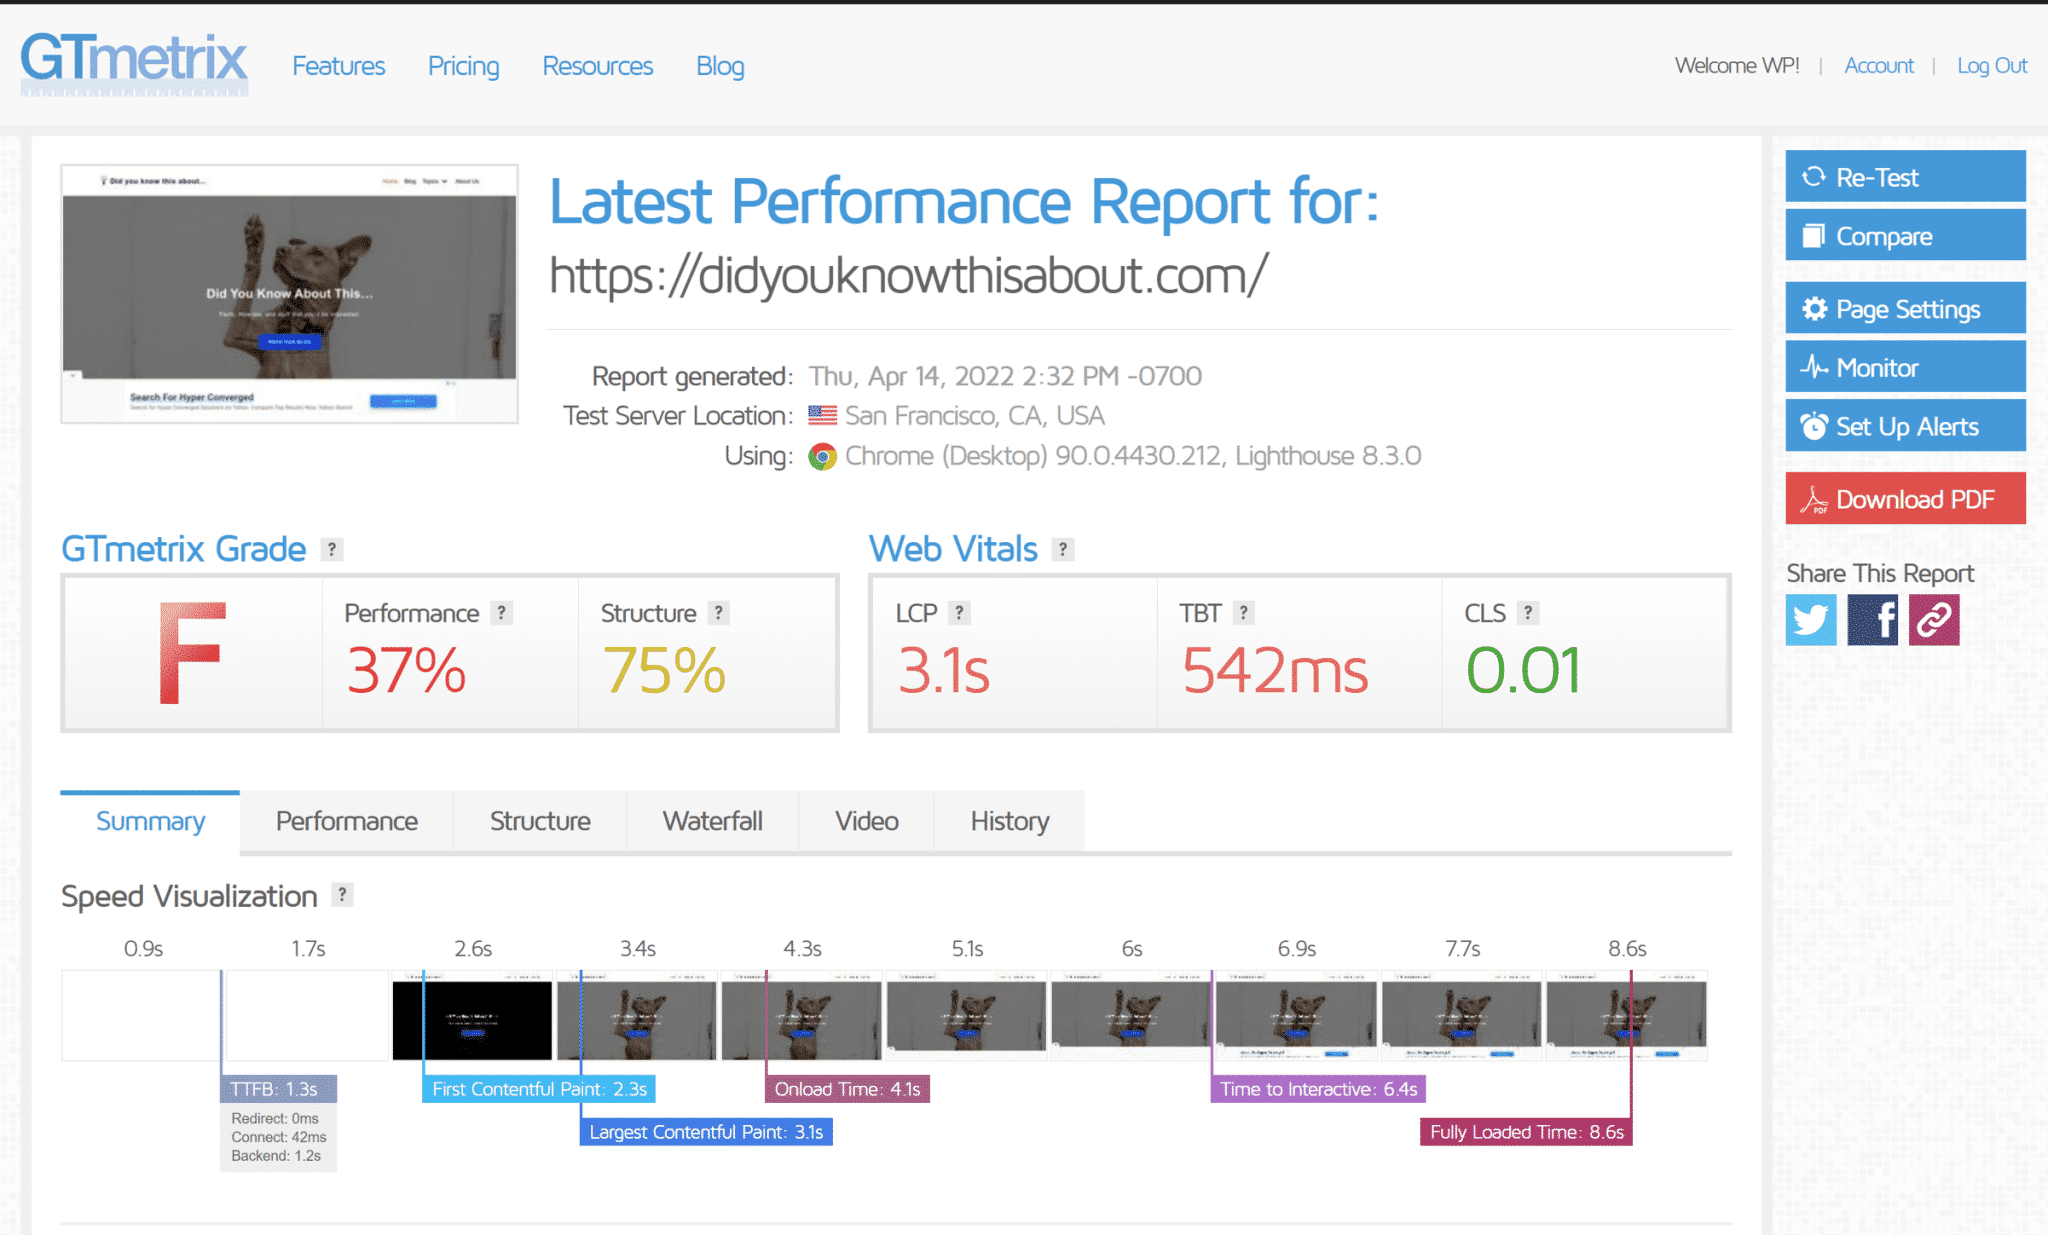
To check what is causing more prolonged DNS lookup on GTmetrix, enter your URL:
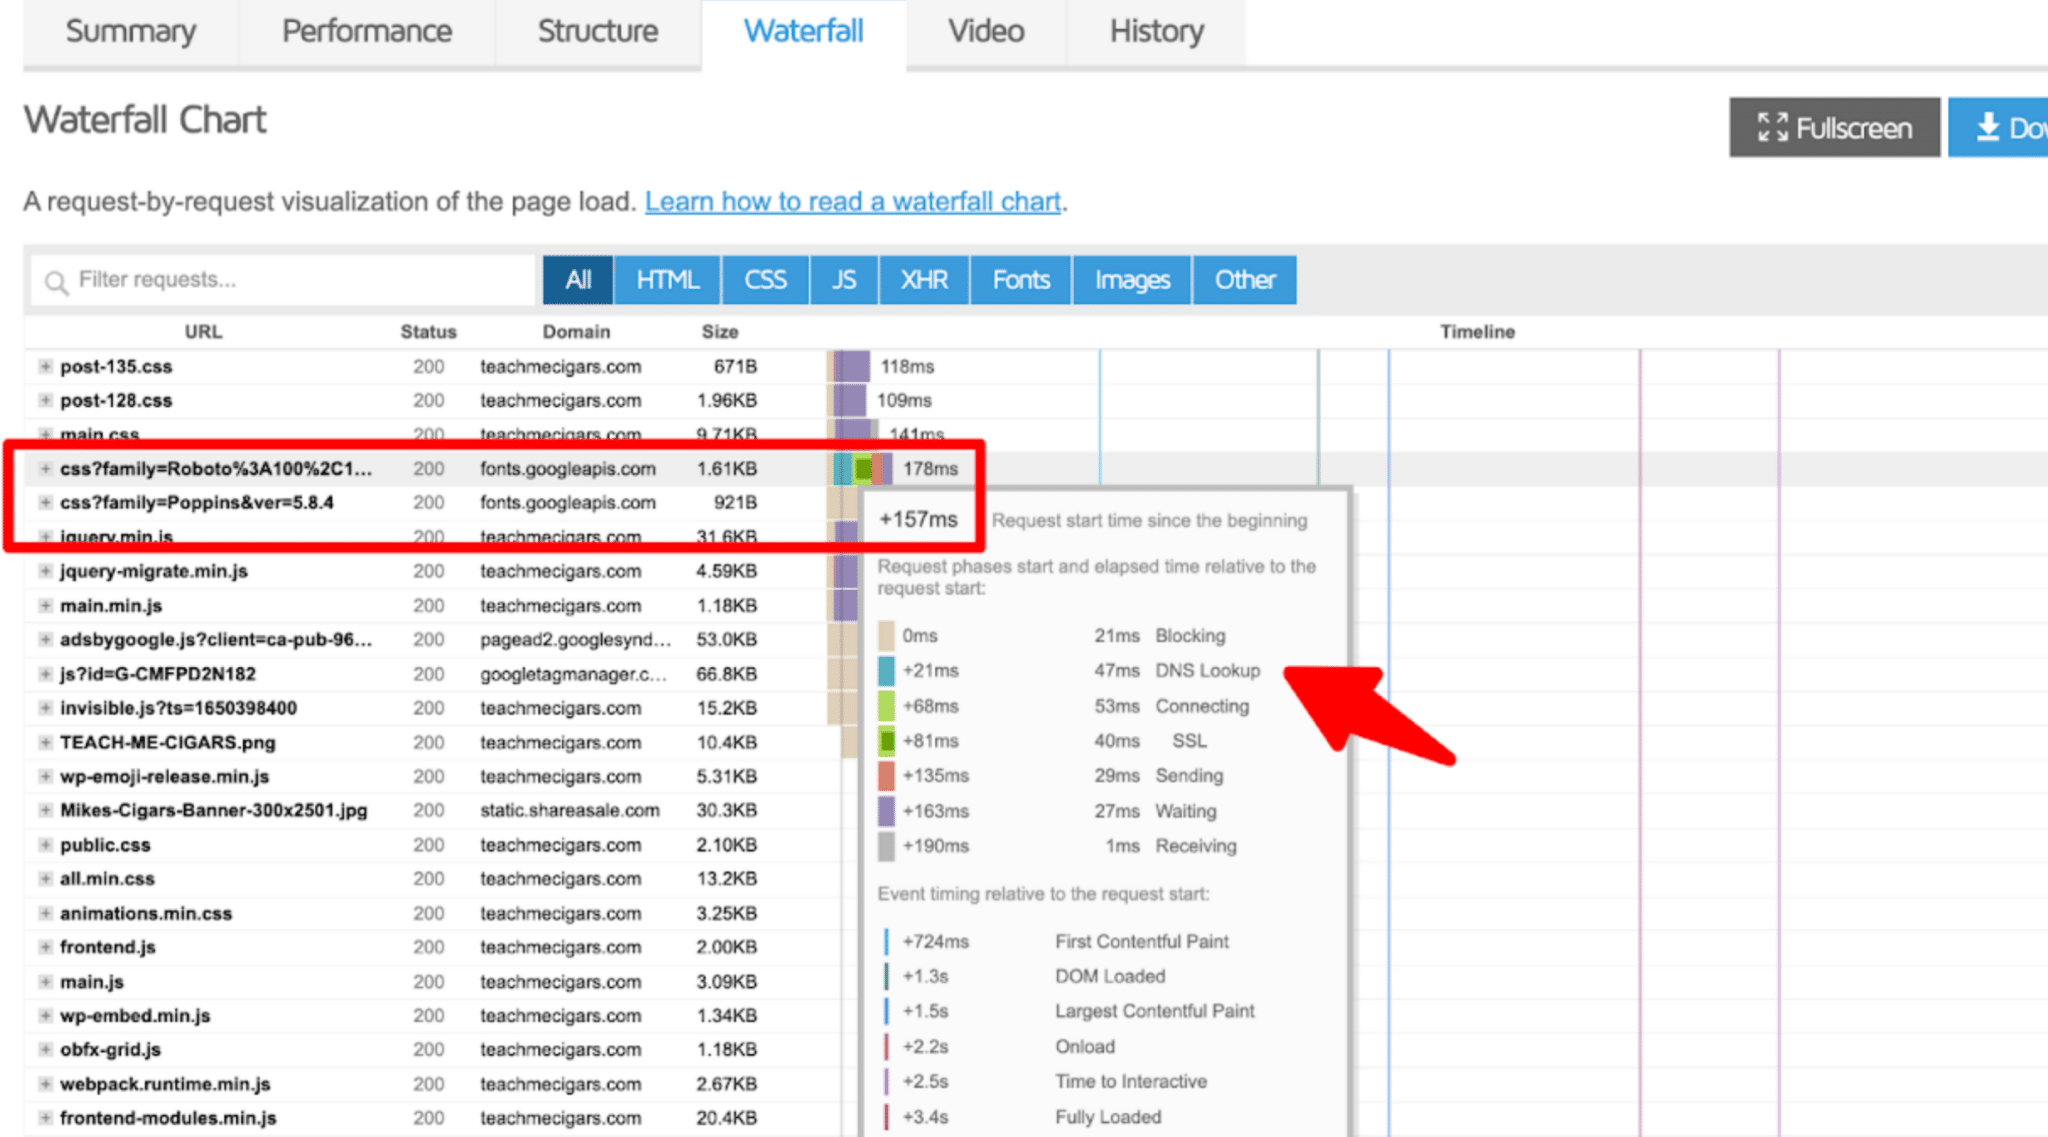
Go to the Waterfall tab, and when you hover specific file request, the DNS lookup is labeled with a green bar and is measured in milliseconds.
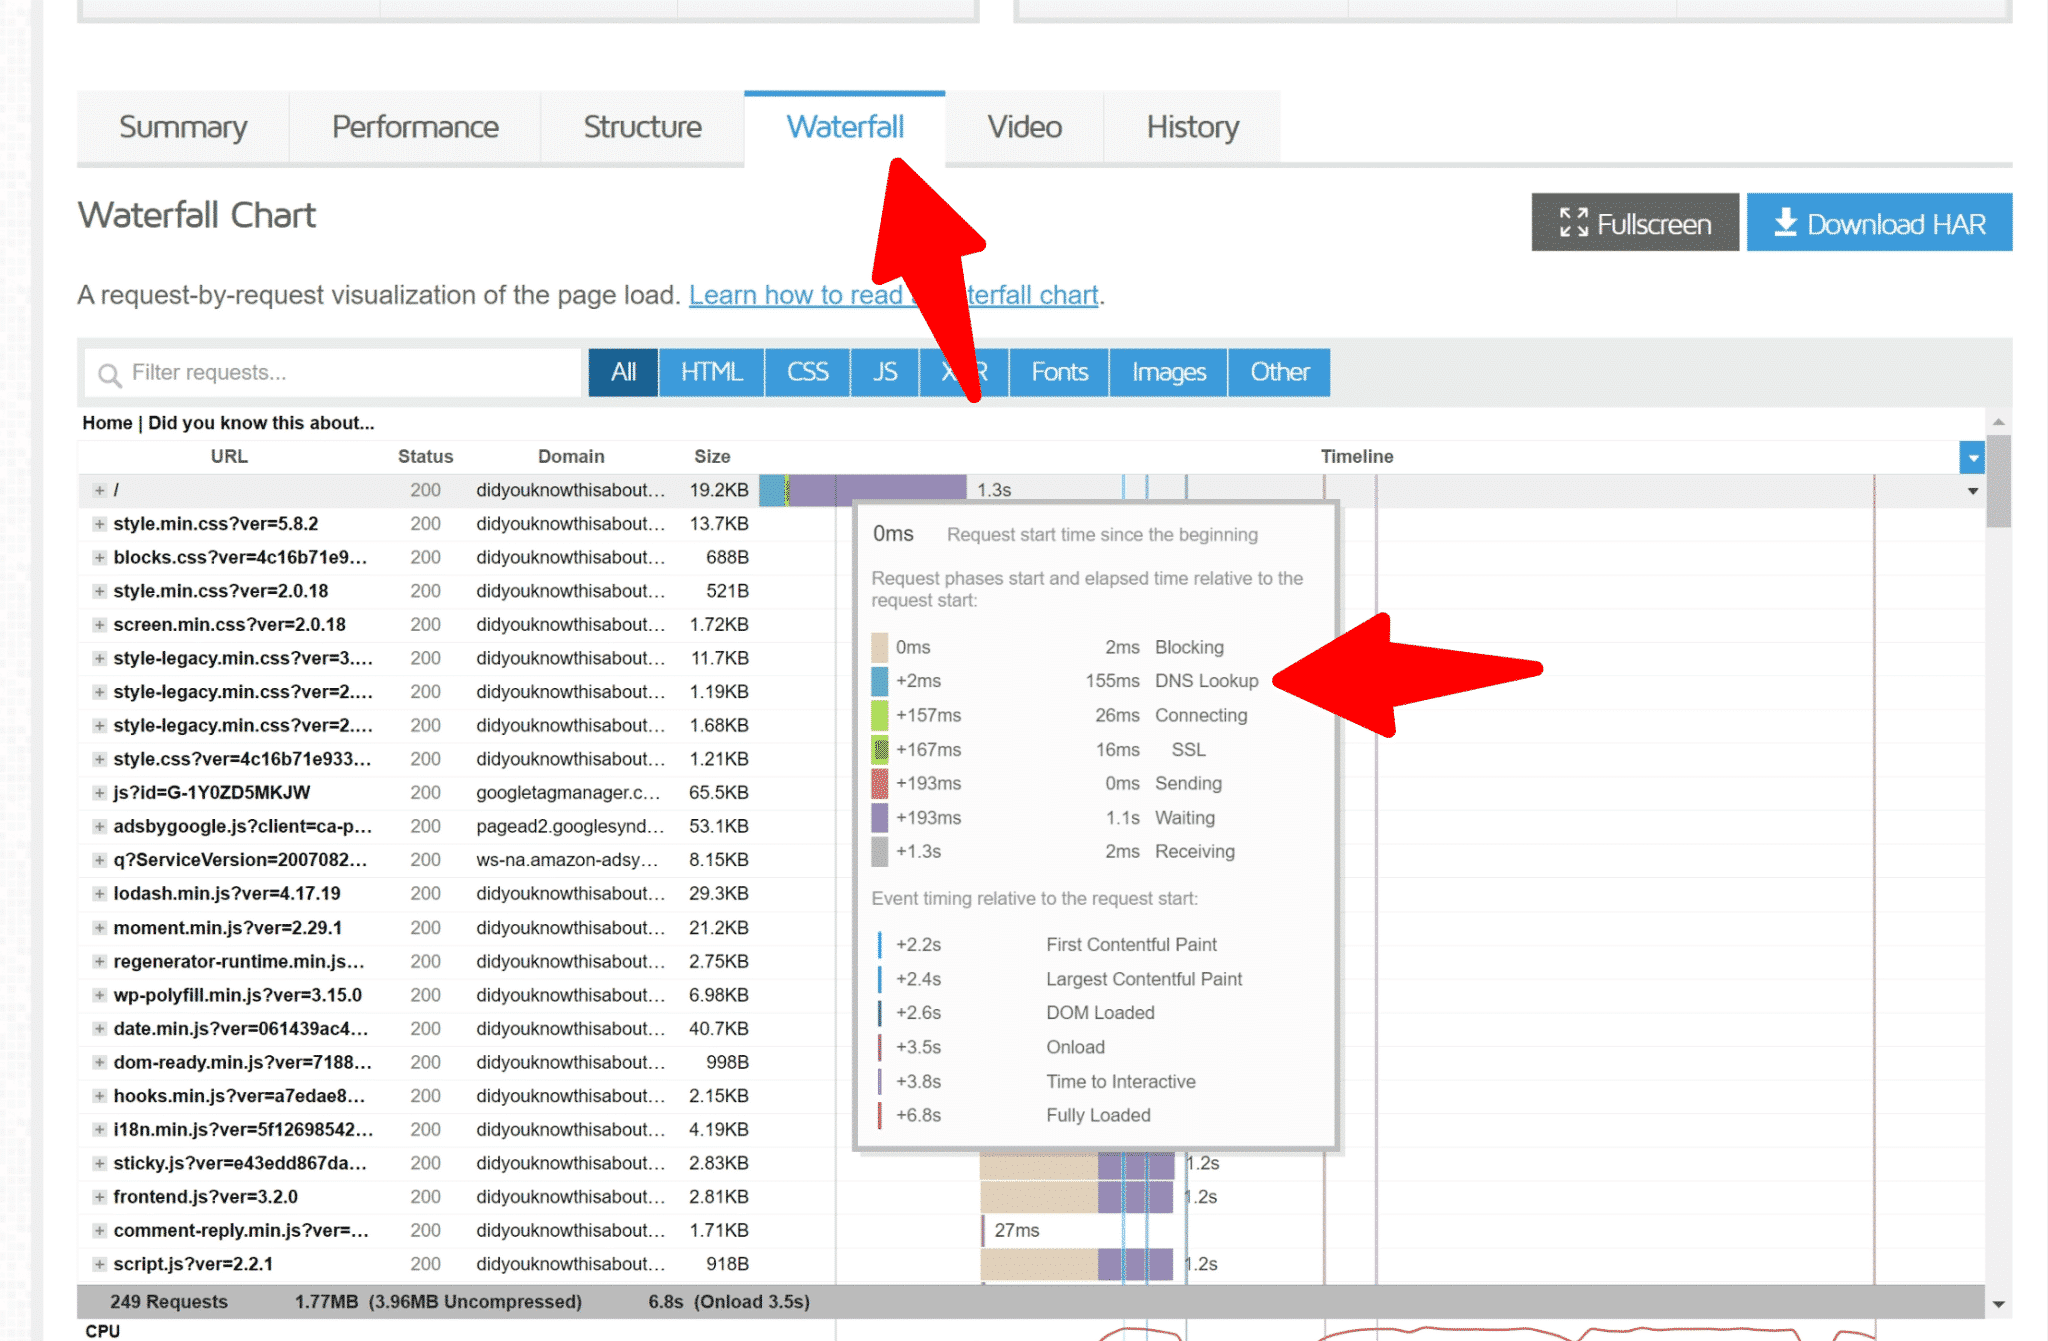
You’ll need to review each file, see which one has a DNS lookup and see their load time. Remember, 40ms or better is what we’re trying to aim for.
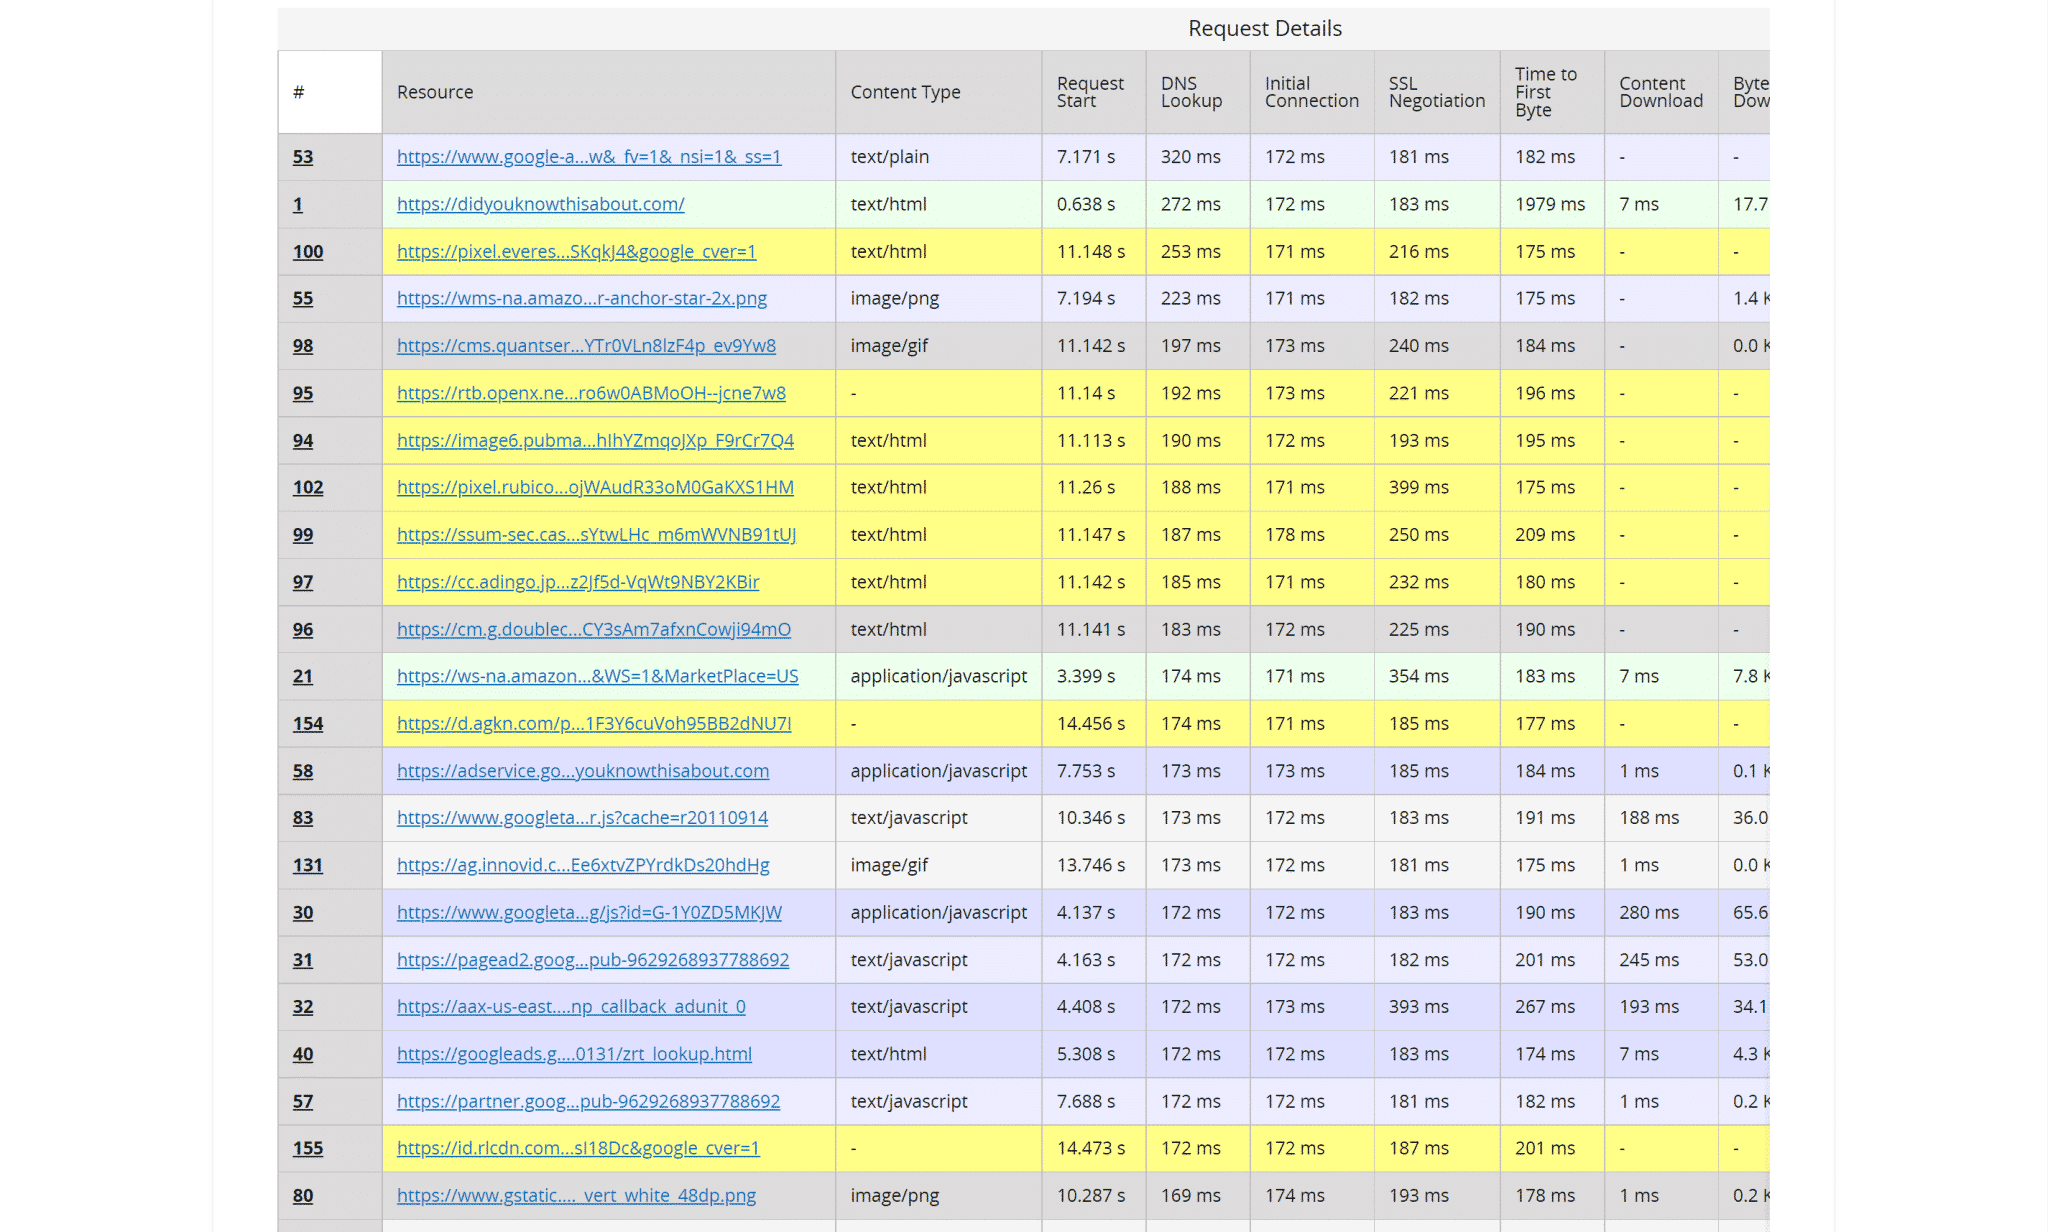
WebPagetest DNS Lookups
While Pingdom and GTmetrix are great tools, WebPagetest seems to provide more straightforward to read data.
Go to their site and enter your URL:
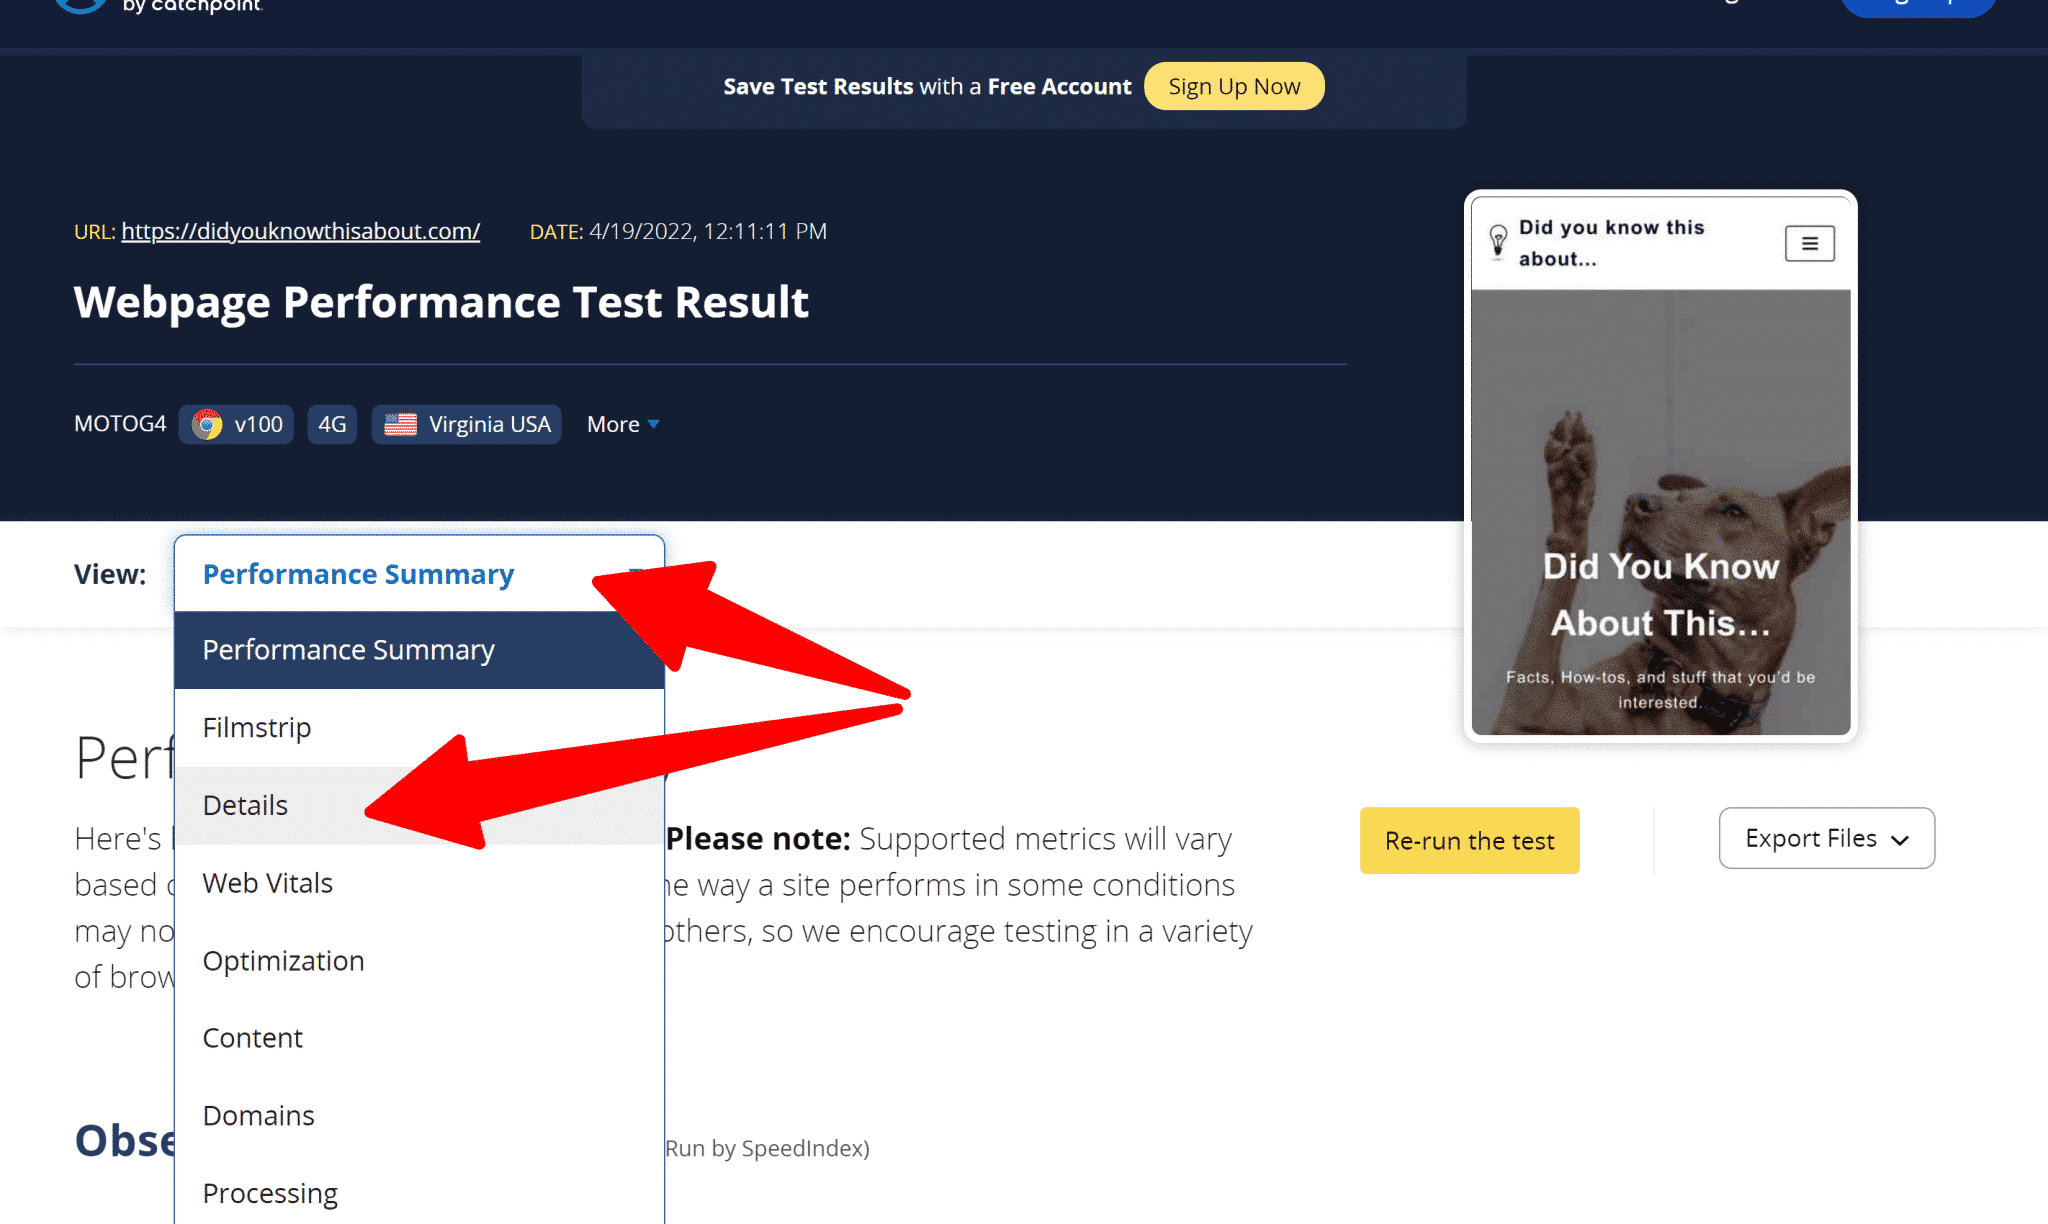
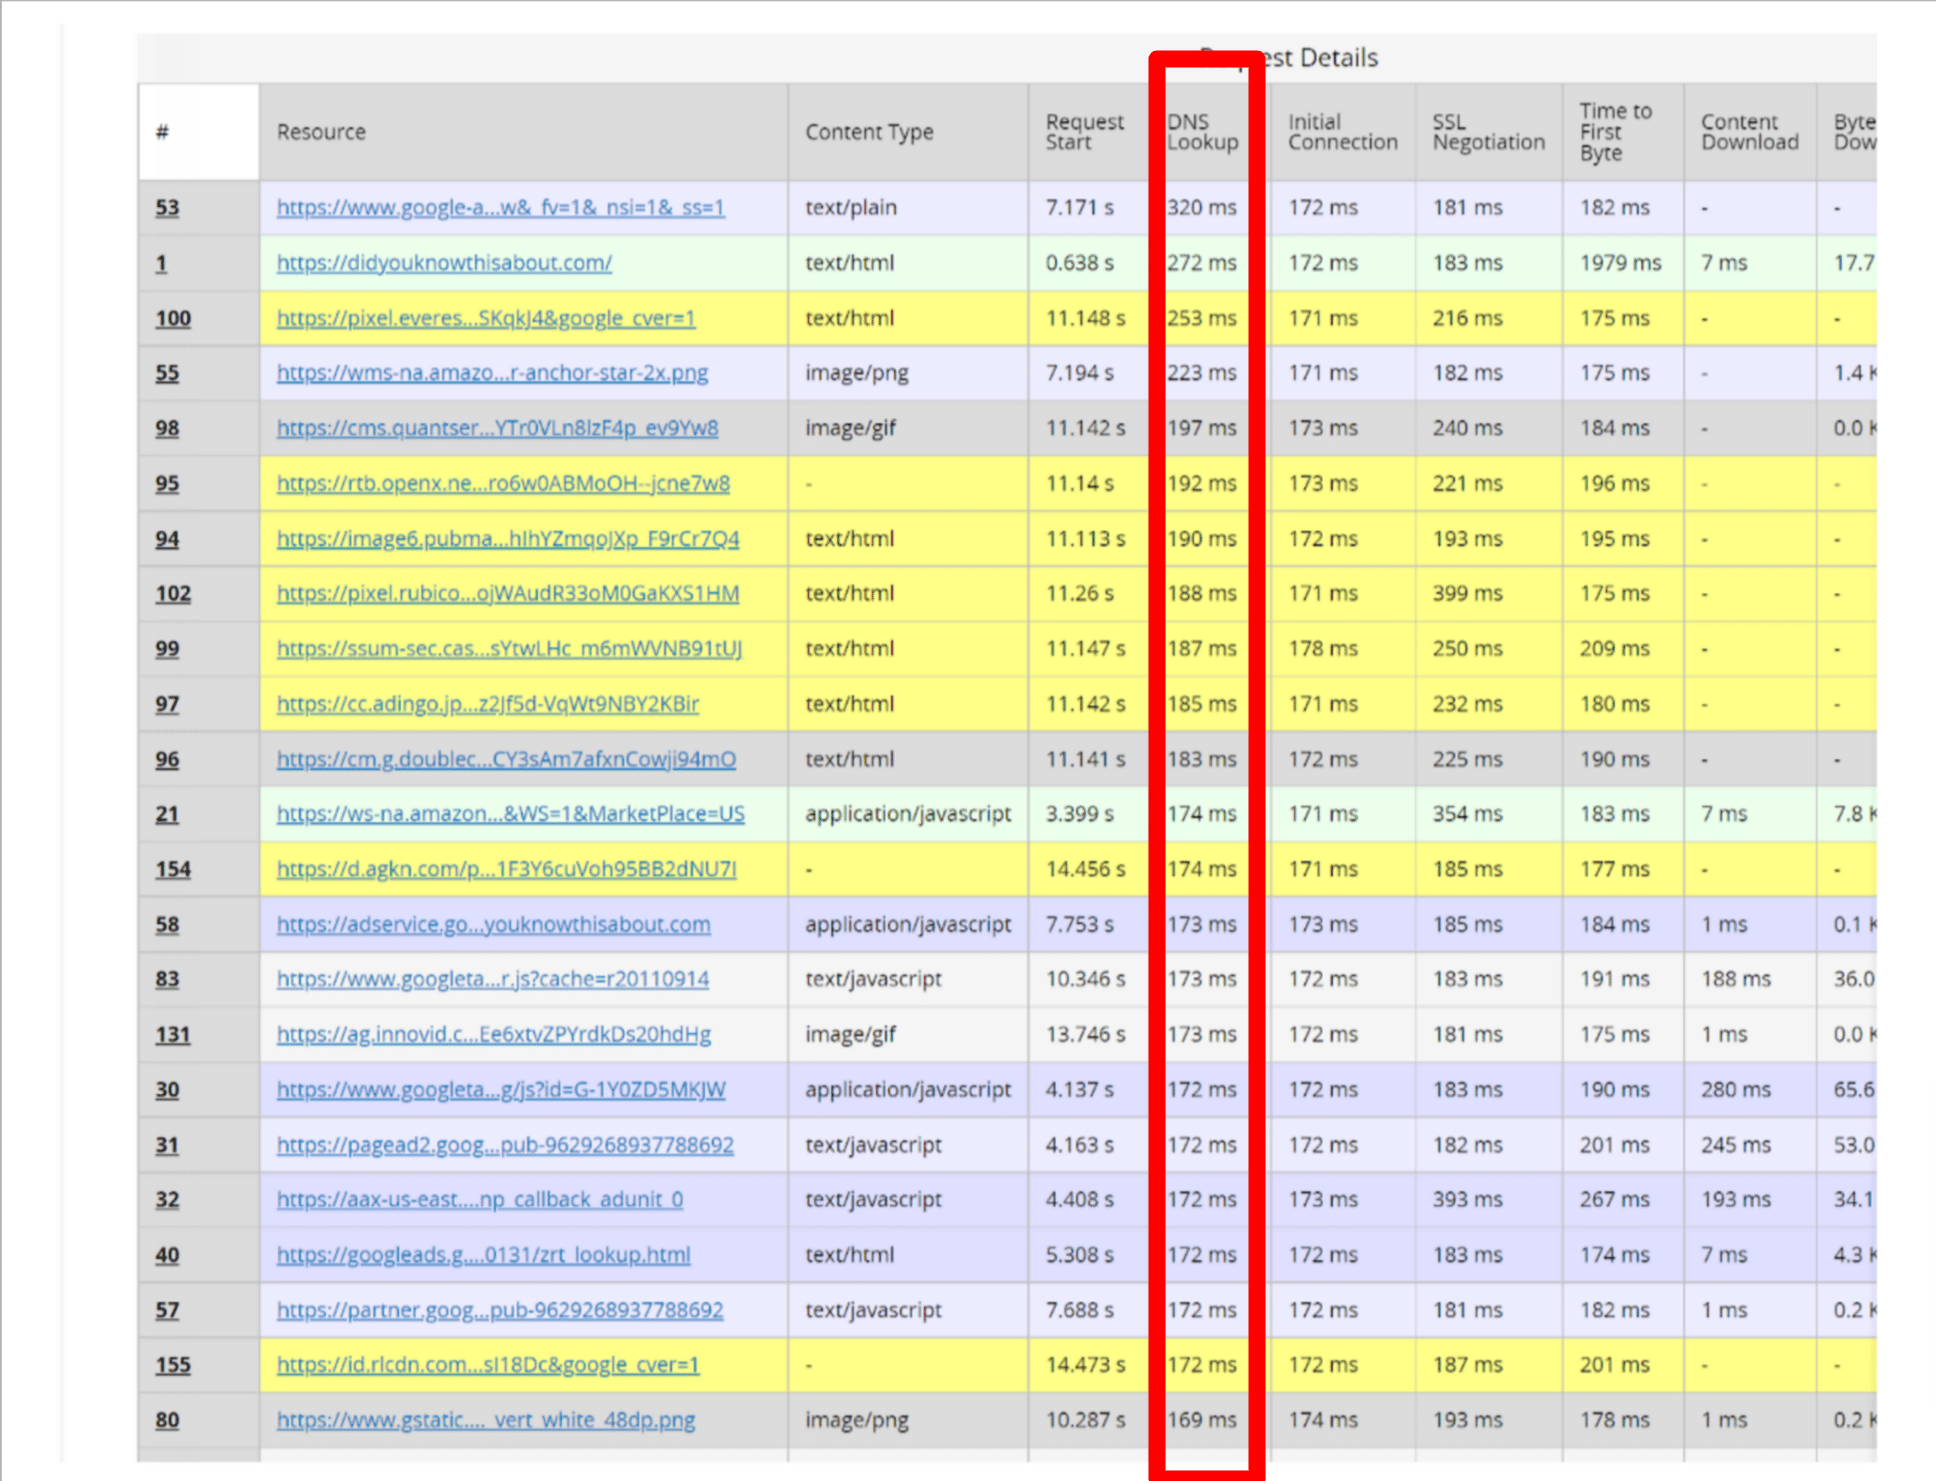
Once the test is completed, go to “View” and select “Details”:
They give a short overview of your request information where you may arrange it by the fastest response times by clicking the “DNS lookup” column.
This is a much easier way to find the culprit causing a slow reduced DNS lookup.
How to Reduce DNS Lookups for WordPress
Many factors contribute to a slow DNS lookup. Here are a few ways to reduce DNS lookups for your site and the best ways to do so.
1. Use a Fast DNS Provider or CDN
A CDN caches your website from a cluster of highly optimized servers.
The first step to reducing the DNS lookup response time is using a fast DNS service or CDN. Like hosting, several DNS service providers are available, but all providers don’t work the same.
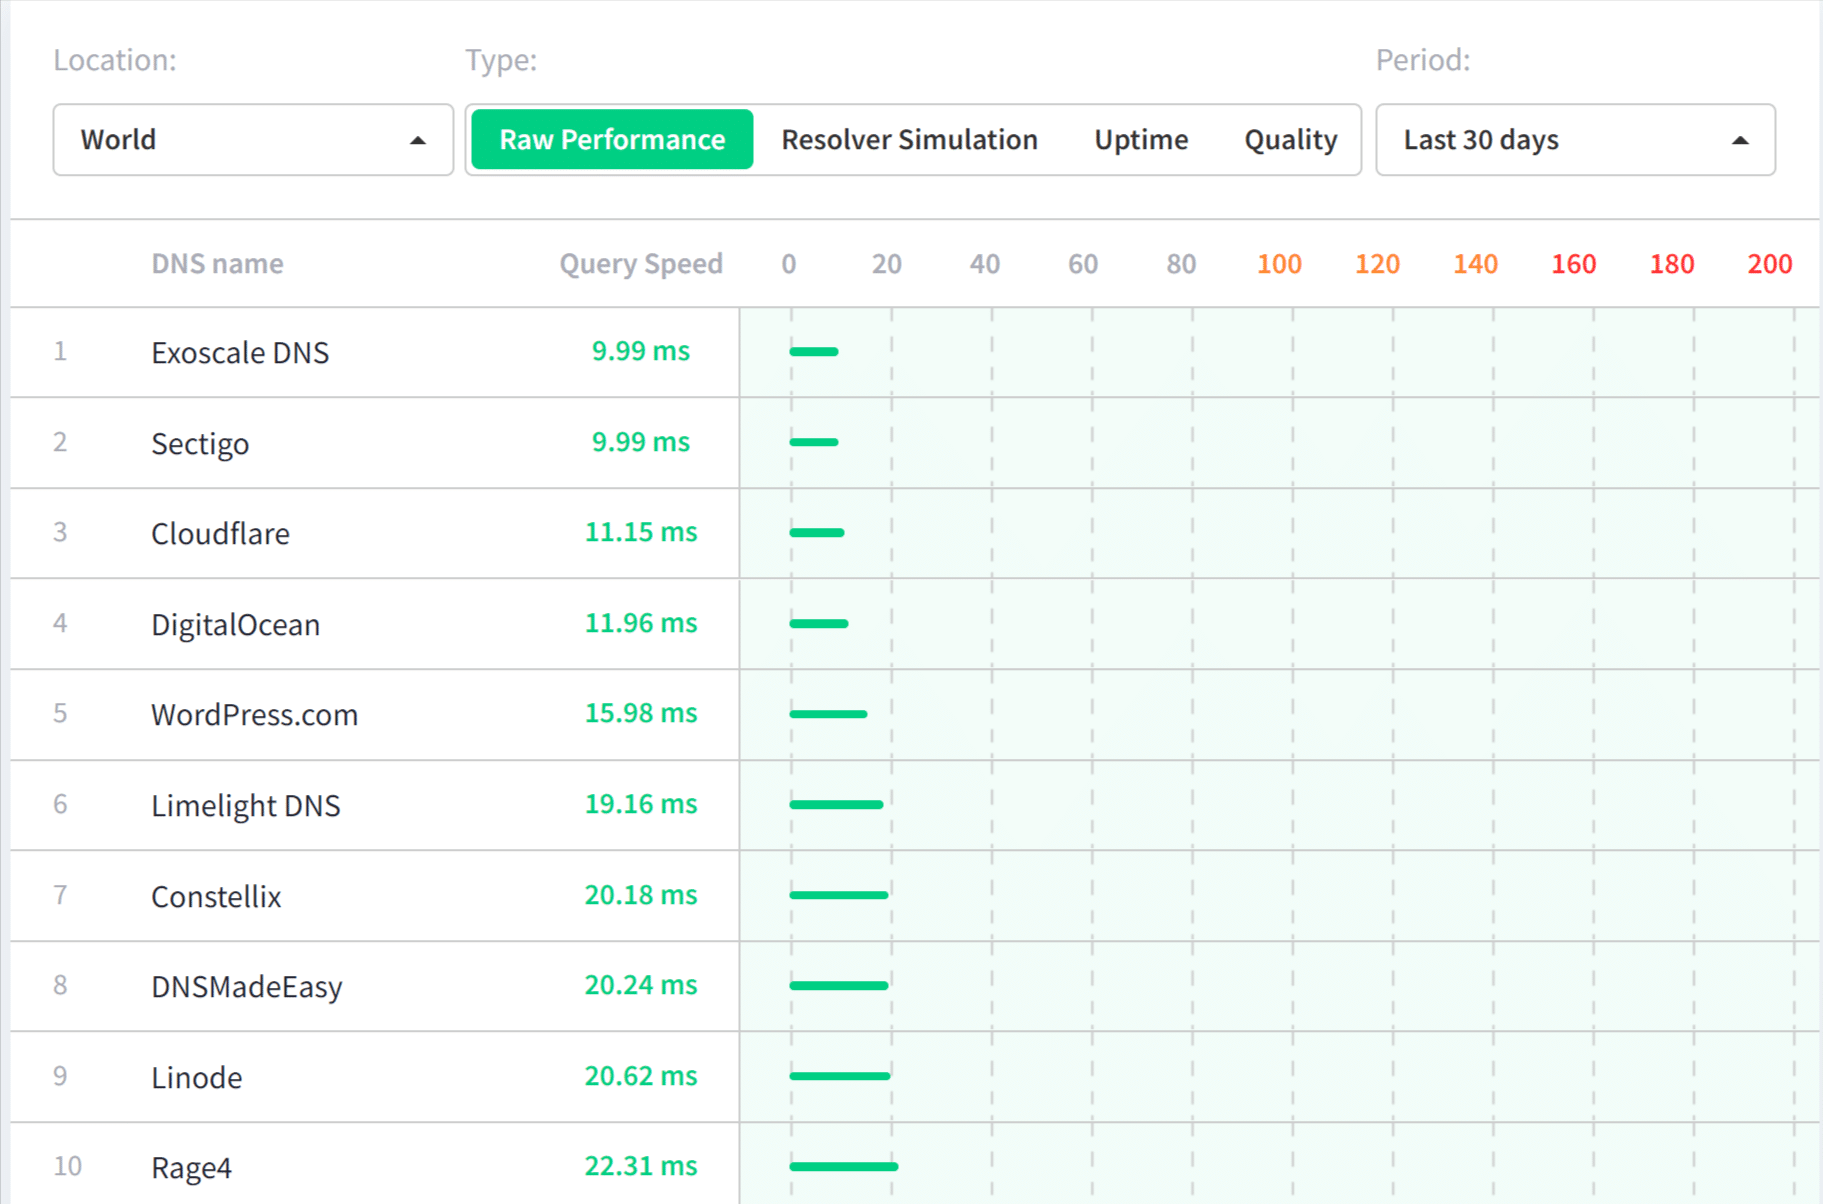
If you find a reliable DNS provider, you can switch to them to reduce DNS lookups. You can also check providers’ speed using DNSPerf, DNS Speed Benchmark, or DNS Speed Test.
If you are looking for a reliable DNS provider, DNSPerf provides all the different providers and their benchmarks. So it’s easy to see which DNS provider you should go with.
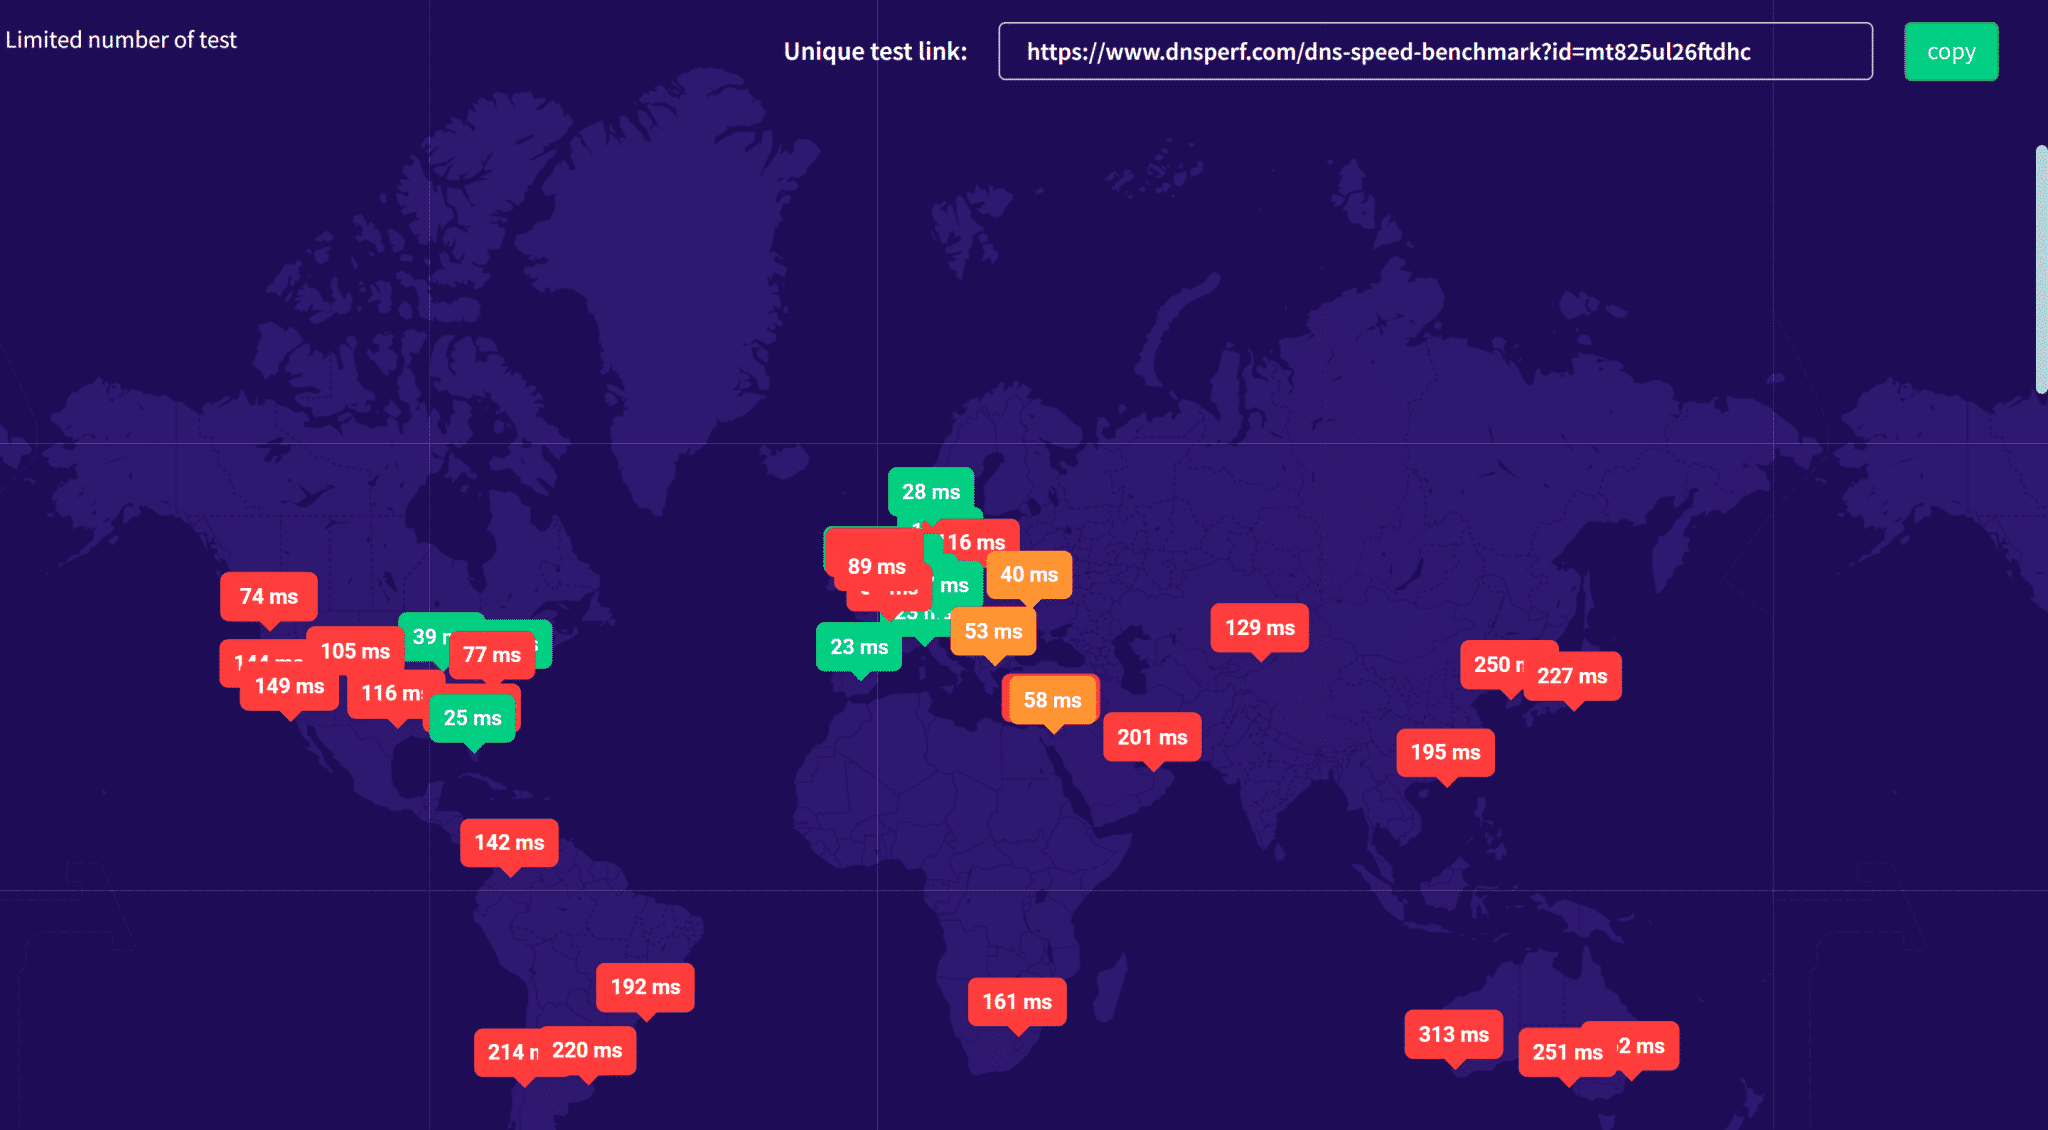
Alternatively, if you want to see how well your current DNS provider performs, you can use DNS Speed Benchmark to see which area of the world serves the best. This way, you can stay with your provider based on your targeted countries. See below:
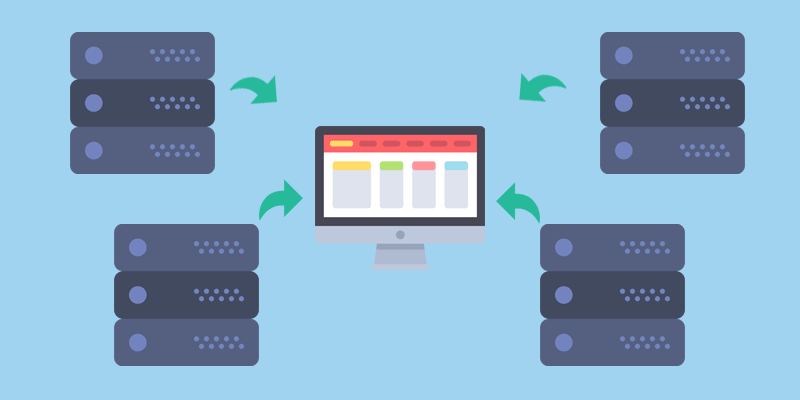
You can also reduce DNS lookups by using a reliable Content Delivery Network (CDN) such as Cloudflare.
A CDN is a service used as an intermediary between a browser and your website. It uses a cluster of high-performance servers rather than just one like what’s available in a typical hosting plan.
You can use it to cache as much of your website’s content as possible so your site can take advantage of the optimized performance to load your website quickly.
| For details, check out How to Test DNS Server Response Time to Troubleshoot Site Speed. |
2. Take Advantage of DNS Caching
Caching can be used to minimize DNS lookups since fewer lookups are required for each subsequent page load.
The DNS cache acts as storage holding the hostname for a set amount of time. When a browser requests the element, the cache provides the hostname instead of requiring a DNS lookup.
Change the Time to Live (TTL) settings for your DNS records to enable DNS caching.
The length of the DNS cache is determined by the Time To Live (TTL).
Not all DNS records should be cached for the same amount of time. Some commonly-accepted guidelines are:
- CNAME Records: 24 hours
- A and AAAA Records: Five minutes to an hour
- TXT Records: 12 hours
- MX Records: 12 hours
Your A and AAAA records must be set to lesser numbers. However, CNAME, MX, and TXT records can normally be set to higher values, such as 12 or 24 hours.
When setting up DNS caching, keep in mind that the TTL values will usually be shown in seconds. This will need to be taken into account when defining your values.
3. Setting Up DNS Prefetching
You can reduce latency by setting DNS Lookups to perform in the background with DNS prefetching. Prefetching enabled browsers to perform DNS lookups in the background. The browser will request prefetch elements as a user reads one web page. This is primarily used for links within your content.
You can set this for assets such as Google Analytics, Font Awesome, Google Fonts, and others.
To enable DNS prefetching on your WordPress site, add the following code to the header of your page files:
<!-- DNS Prefetching -->
<link rel="dns-prefetch" href="//asset1.com">
<link rel="dns-prefetch" href="//asset2.com">
Don’t forget to replace “asset1.com,” and “asset2.com” with the appropriate URLs. You can also repeat the last line as needed.
4. Enable Keep-Alive
Another way you can reduce DNS lookups is by enabling keep-alive. It means keeping the connection between a server and browser consistently active to load more asset files at one time.
Without it, resource files are all loaded as separate requests even though there are multiple resources included in a single domain.
For example, one asset from “website1.com,” and three resources from “website2.com” would collectively be four DNS requests.
With keep-alive enabled, those same resources would be loaded as only two total requests.
All major browsers support keep-alive, and it’s enabled by default in most cases. If it’s disabled, you can re-enable it on Apache and Nginx servers.
For Apache
On the Apache server, you should add the following code via your .htaccess file.
<ifModule mod_headers.c>
Header set Connection keep-alive
</ifModule>
For NGINX
To enable keep-alive on your NGINX server, find out the HTTP core module (ngx_http_core_module), search for a line similar to keep-disable, and replace it with the following one.
keepalive_disable none;5. Reduce the Number of Hostnames
The easiest way to reduce DNS lookups is to get rid of requests for different hostnames. Run your website through a speed test with a speed test tool like Google PageSpeed Insights. The result will show a list of hostnames and assets that trigger a DNS request.
You can audit this list to reduce the number of requests. For instance, external requests for graphics like each social icon button require a DNS lookup. Therefore, while auditing, look out to see if these resources are essential to your website.
6. Locally Host Third-Party Resources
If your hostnames audit reveals that you still have several external resources, try hosting the resources locally instead. Local hosting also allows for additional control over caching and delivery of these resources and the elimination of the DNS search phase.
Download the files you need from wherever they are now kept and upload them to your web server or CDN to host the resources.
However, if you receive requests for constantly updated scripts, such as font libraries, hosting them locally may not be ideal. Because these resources are often changed, it is best to leave their scripts alone, and other efforts can be made to limit the impact of their DNS lookup.
Here are a few common third-party resources that cause long DNS lookup.
Third-Party fonts: Google Fonts or Awesome Fonts
Externally hosted fonts like Google Fonts are also one of the heaviest third-party resources to load. To obtain the CSS file from Google Fonts, you must make an additional DNS request to fonts.googleapis.com. You can then send further queries to fonts.gstatic.com to obtain the font files.
When you host locally, all requests come from the same domain or CDN, and you won’t need another CSS file because it will be contained within your WordPress theme’s CSS file. There are advantages and disadvantages to doing so, but see our in-depth post on how to host fonts locally for more information.
We occasionally see plugin developers and themes incorporate Font Awesome on WordPress sites. However, sometimes they are added in a way that a plugin like CDN enabler would miss by default and cause it to increase your load time. In this scenario, we recommend contacting the developer to inquire about loading it from your CDN.
Another typical Font Awesome situation is that it is occasionally loaded from the default BootstrapCDN (MaxCDN). While there is nothing wrong with this, it adds a DNS query that you do not require. In most circumstances, it is preferable to load Font Awesome from your own CDN to avoid extra lookup.
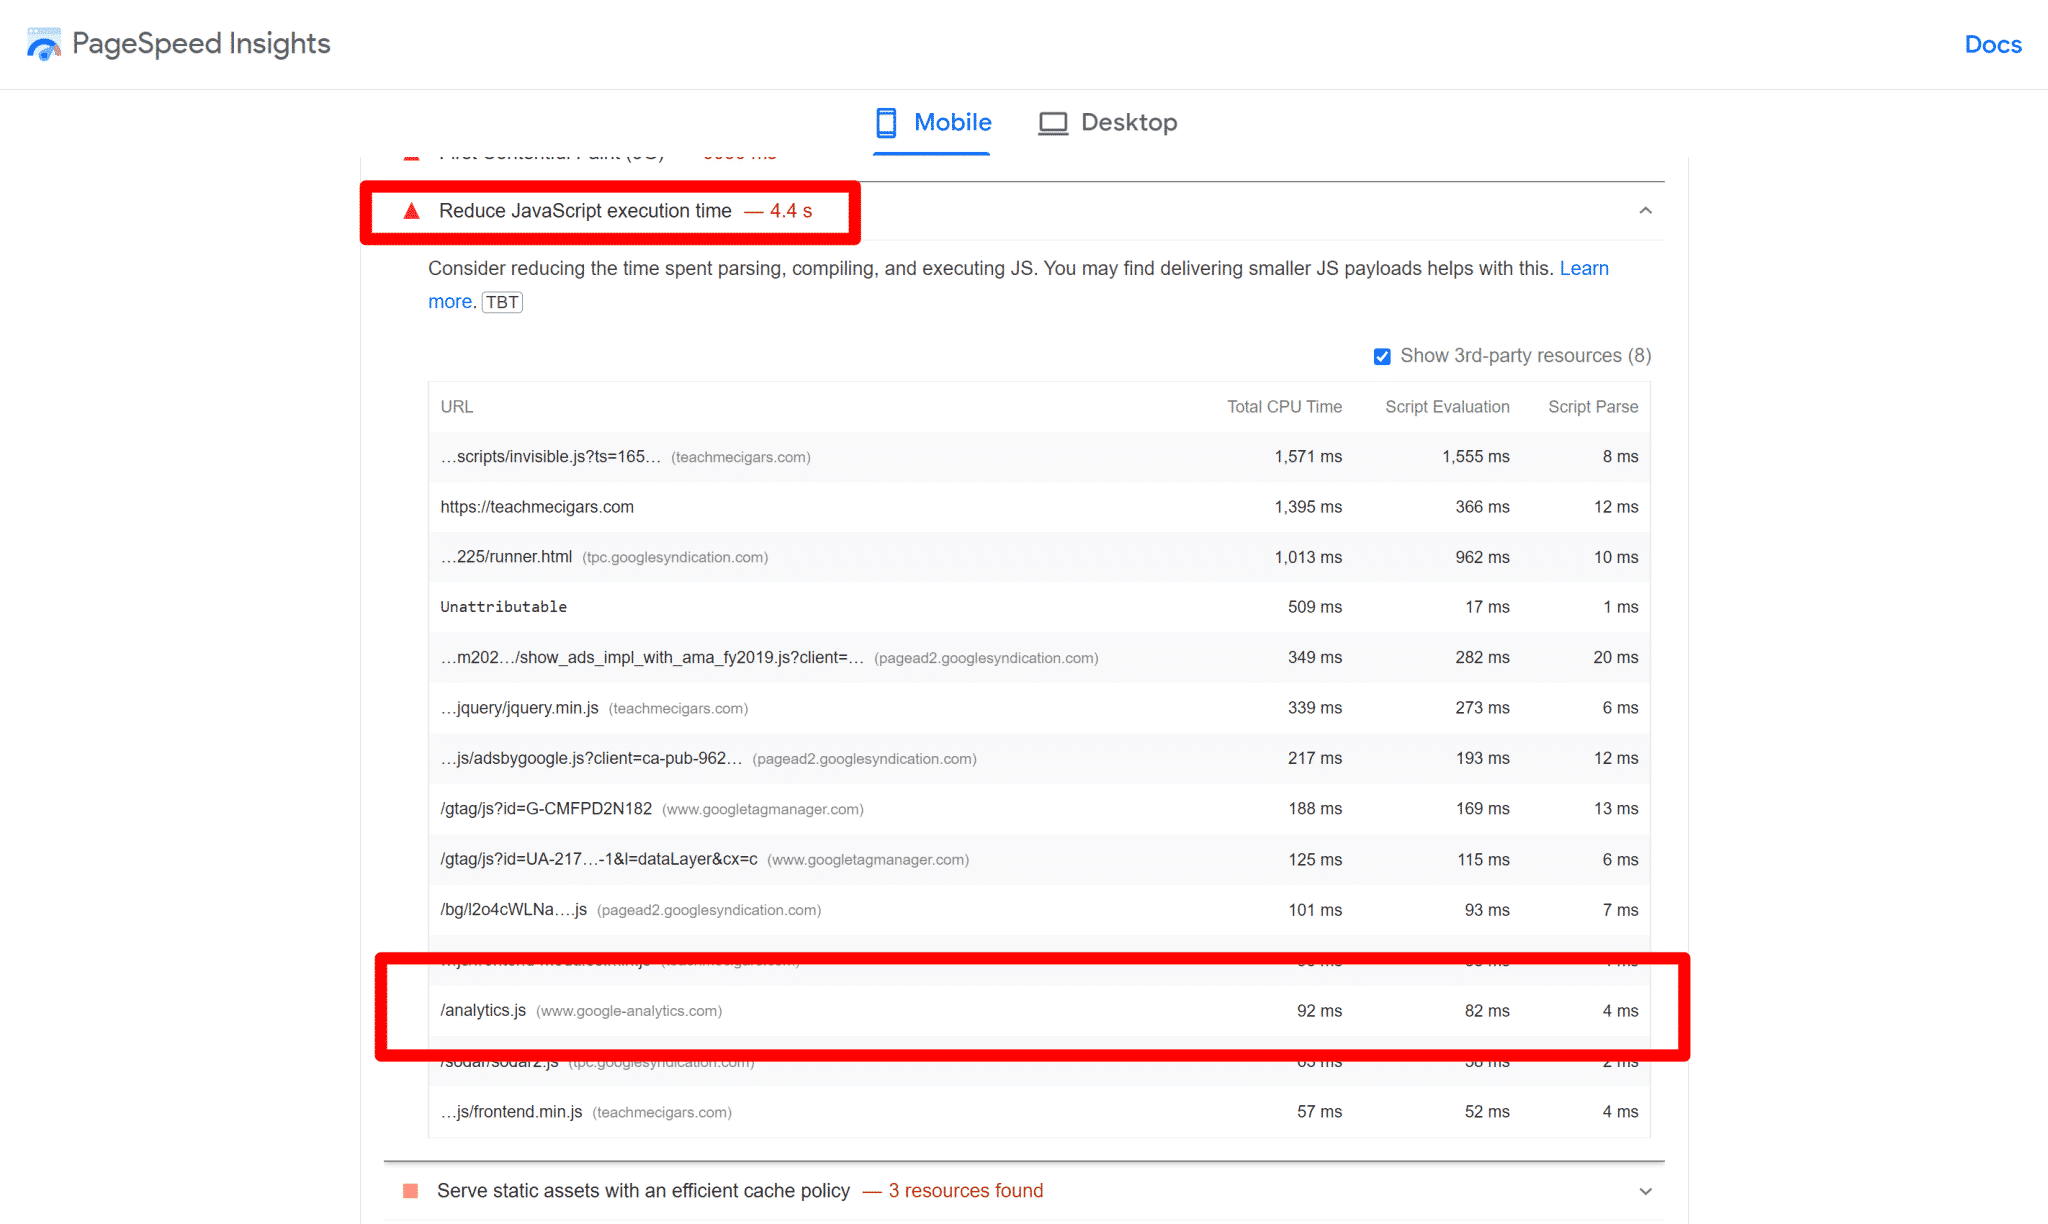
Locally host Google Analytics
Google’s own script issues a caching warning, but this is due to their HTTP caching header expiration being set so short. When you host it yourself, your own CDN or server’s HTTP caching headers will be applied automatically. In other words, you have complete control over the script’s caching.
Google Analytics not only generates a DNS search in GTmetrix, but it also generates a “Serve static assets with an efficient cache policy” issue.

Videos for Slow Loading
Third-party requests from the source are generated by embedded videos (usually YouTube or Vimeo).
You can dramatically improve video load time and DNS lookups by slow loading videos and replacing the iframe with a preview picture.
Using a caching plugin, such as WP Rocket, can grab the YouTube thumbnail as the preview image and allow you to lazy load images and videos.
Alternatively, you can use another plugin to help with video lazy loading:
7. Defer the Loading of JavaScript
Deferring JavaScript is the best solution, without getting too technical. It will not necessarily speed up DNS lookups, but optimize your above-the-fold content.
As a result, users will notice that your website is loading faster, which improves perceived performance. Furthermore, delaying JavaScript processing allows the crucial material to be loaded first, followed by the non-critical JS.
You may also utilize WP Rocket WordPress plugin, which allows you to quickly defer and delay Javascript loading.
However, it is important to note that you must go through all of the running Java scripts and identify the JS ones you do not want to delay. This is due to the fact that some javascript is required to render material above the fold.
8. Avoid Plugins That Are Known For DNS Lookups
Hotjar, Leadpages, live chat, and other plugins that have tracking scripts.
These eventually result in additional DNS lookups and are typically unfixable.
It’s a compromise, much as Google AdSense or Google Tag Manager.
So how do you determine if they should stay on your site or not?
Well, ask yourself if you worry more about how the tools are used or how quickly your website loads?
Look through this list of common sluggish plugins and try to avoid them if at all feasible. Aside from avoiding plugins that do DNS lookups, you should also avoid resource-intensive plugins with large JavaScript or CSS files (like Elementor).
Page builders, ultimate addons, social sharing, statistics, portfolio, slider, backup, chat, calendar, contact form, related post, and those performing continual scans + processes are the most sluggish plugins. WooCommerce sites may be very resource-intensive.
How to Find the Slowest Plugins and Themes
It is typical for a typical website to have 20-30 plugins installed.
Some plugins cause the frontend to load slowly, while others create resource-intensive background processes that raise CPU use. As these plugins gather data, create backups, or construct big database tables.
Query Monitor is an excellent WordPress debugging tool. It gives a wealth of data that might assist users in determining what is causing speed and performance difficulties.
Once installed, go to Query Monitor Settings>>Queries>>Queries by Component. There you can see the load time for each plugin you have installed.
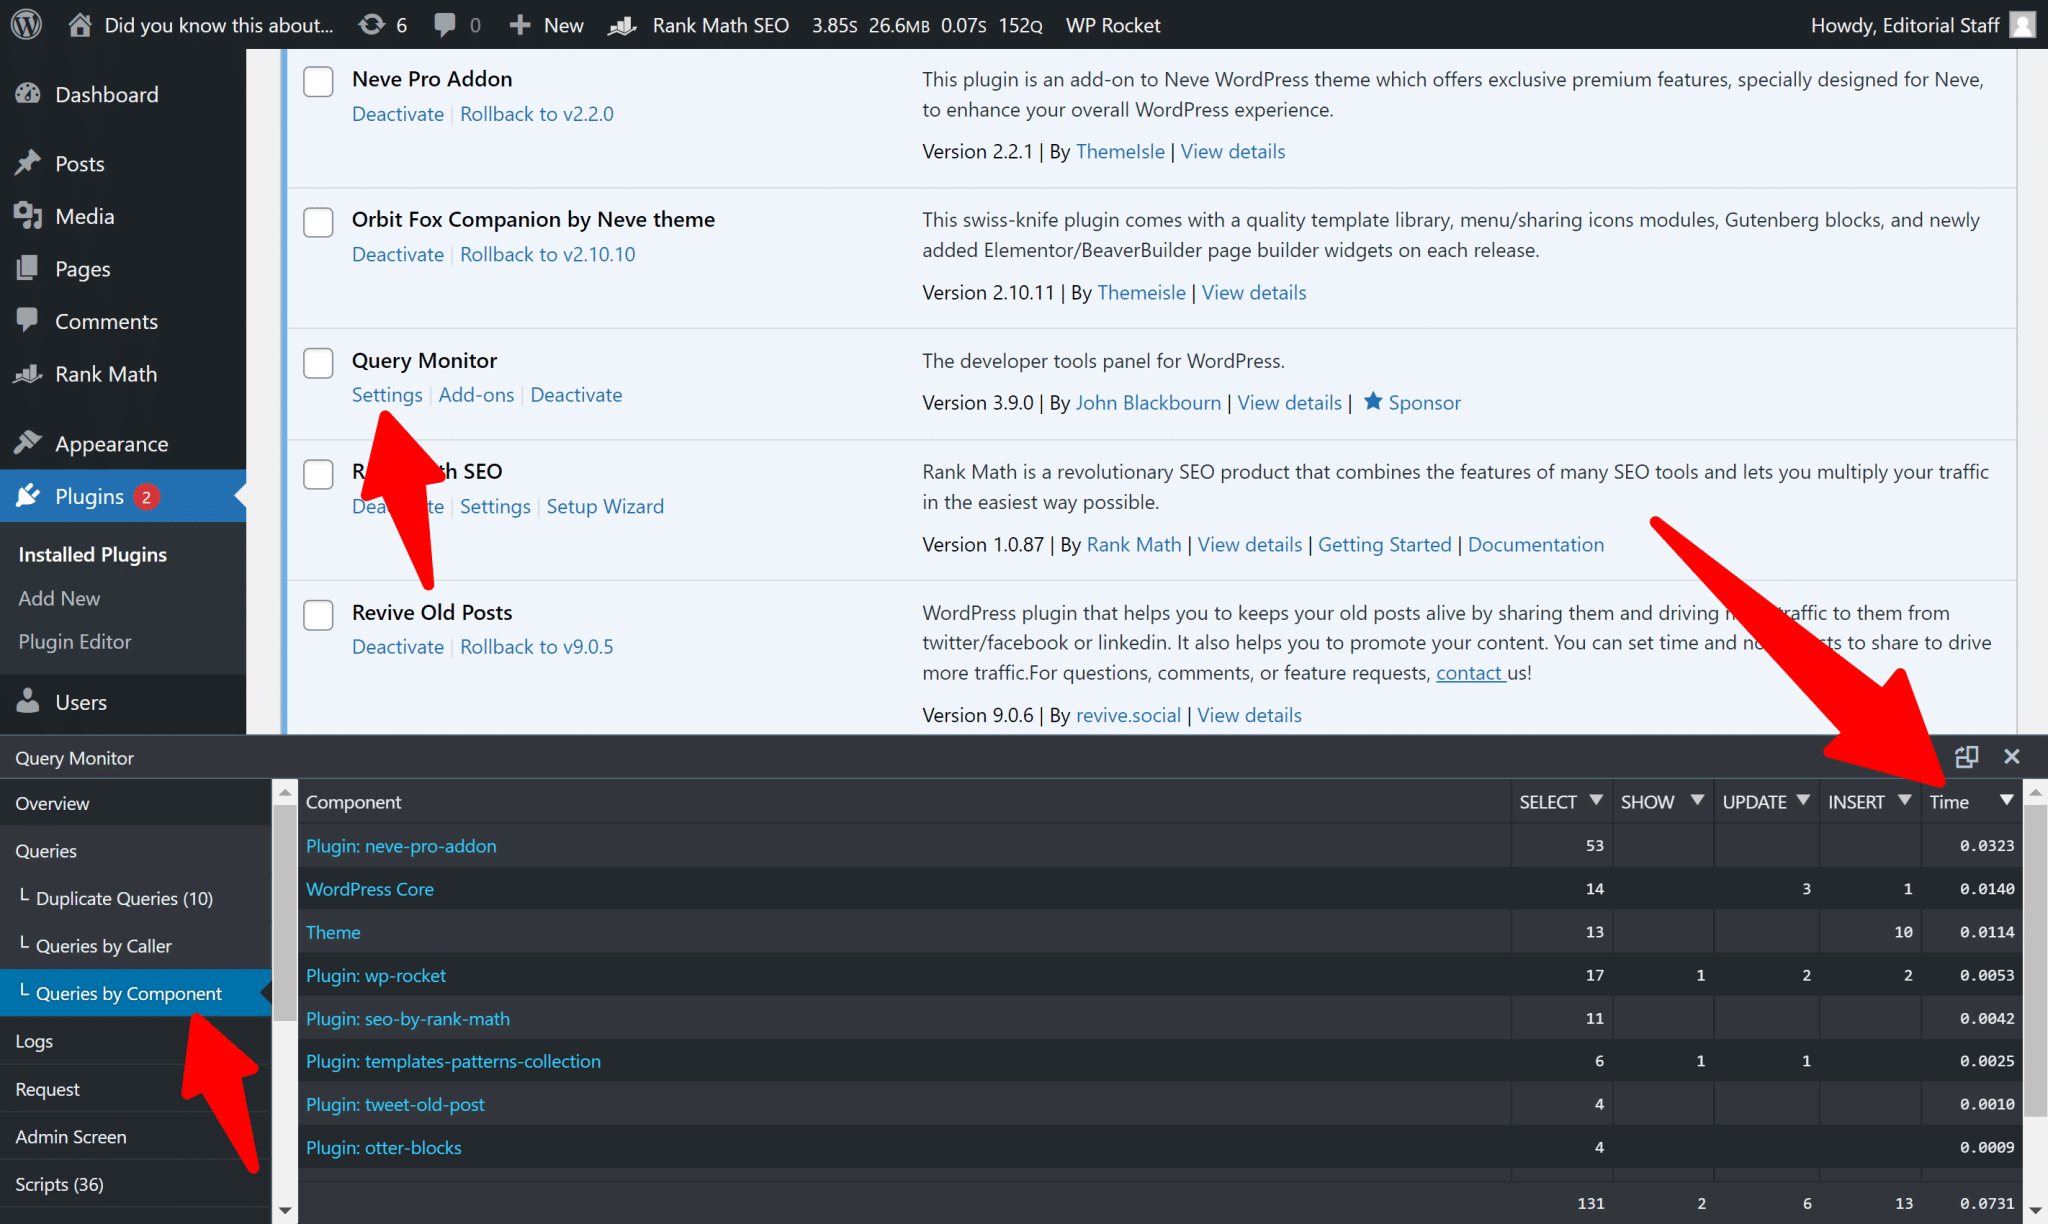
Other tools like New Relic, GTmetrix, and Chrome Developer Tools might also work, but I believe it is more complex to understand than Query Monitor.
Always go for plugins created by specialists with a strong reputation. These plugins will adhere to WordPress code standards and should not have a detrimental influence on the speed and performance of your site.
Don’t forget about themes and how they might cause your site to load slowly. Check out our article on how select the fastest WordPress theme for your site.
9. Reduce DNS Lookups by Using WordPress Plugins
I briefly talked about reducing the number of plugins you should be using. So, why am I recommending a plugin?
I’m no hypocrite! If you can opt-in for an all-in-one solution to help with your whole Core Web Vital performance, I would definitely recommend it, compared to installing several different plugins to do the same job. But if you’re looking for free options, plugins like Asset Cleanup, and Autoptimize, can help reduce DNS lookups.
While manual approaches are recommended for reducing more effective DNS lookups, various WordPress plugins are also available to assist you to minimize DNS lookups more effectively. Call it lazy on my end, I didn’t want to write whole technical documentation on how to do everything manually!
However, do note that plugins will not be able to cover all elements of DNS lookup reduction, but they can make some stages quicker and more automated, such as CDN hosting and browser caching.
Why You Should Install WP Rocket to Reduce DNS Lookup
Writing a whole tutorial on how to use Asset Cleanup, Autoptimize, and other methods would make this article bit too long for anyone to read.
Let’s take a shortcut!
You can install and enable WP Rocket on your WordPress site to automatically speed up your site. WP Rocket is the easiest way to achieve outstanding speed improvements while stopping to use of different plugins to improve performance, no technical knowledge is required.
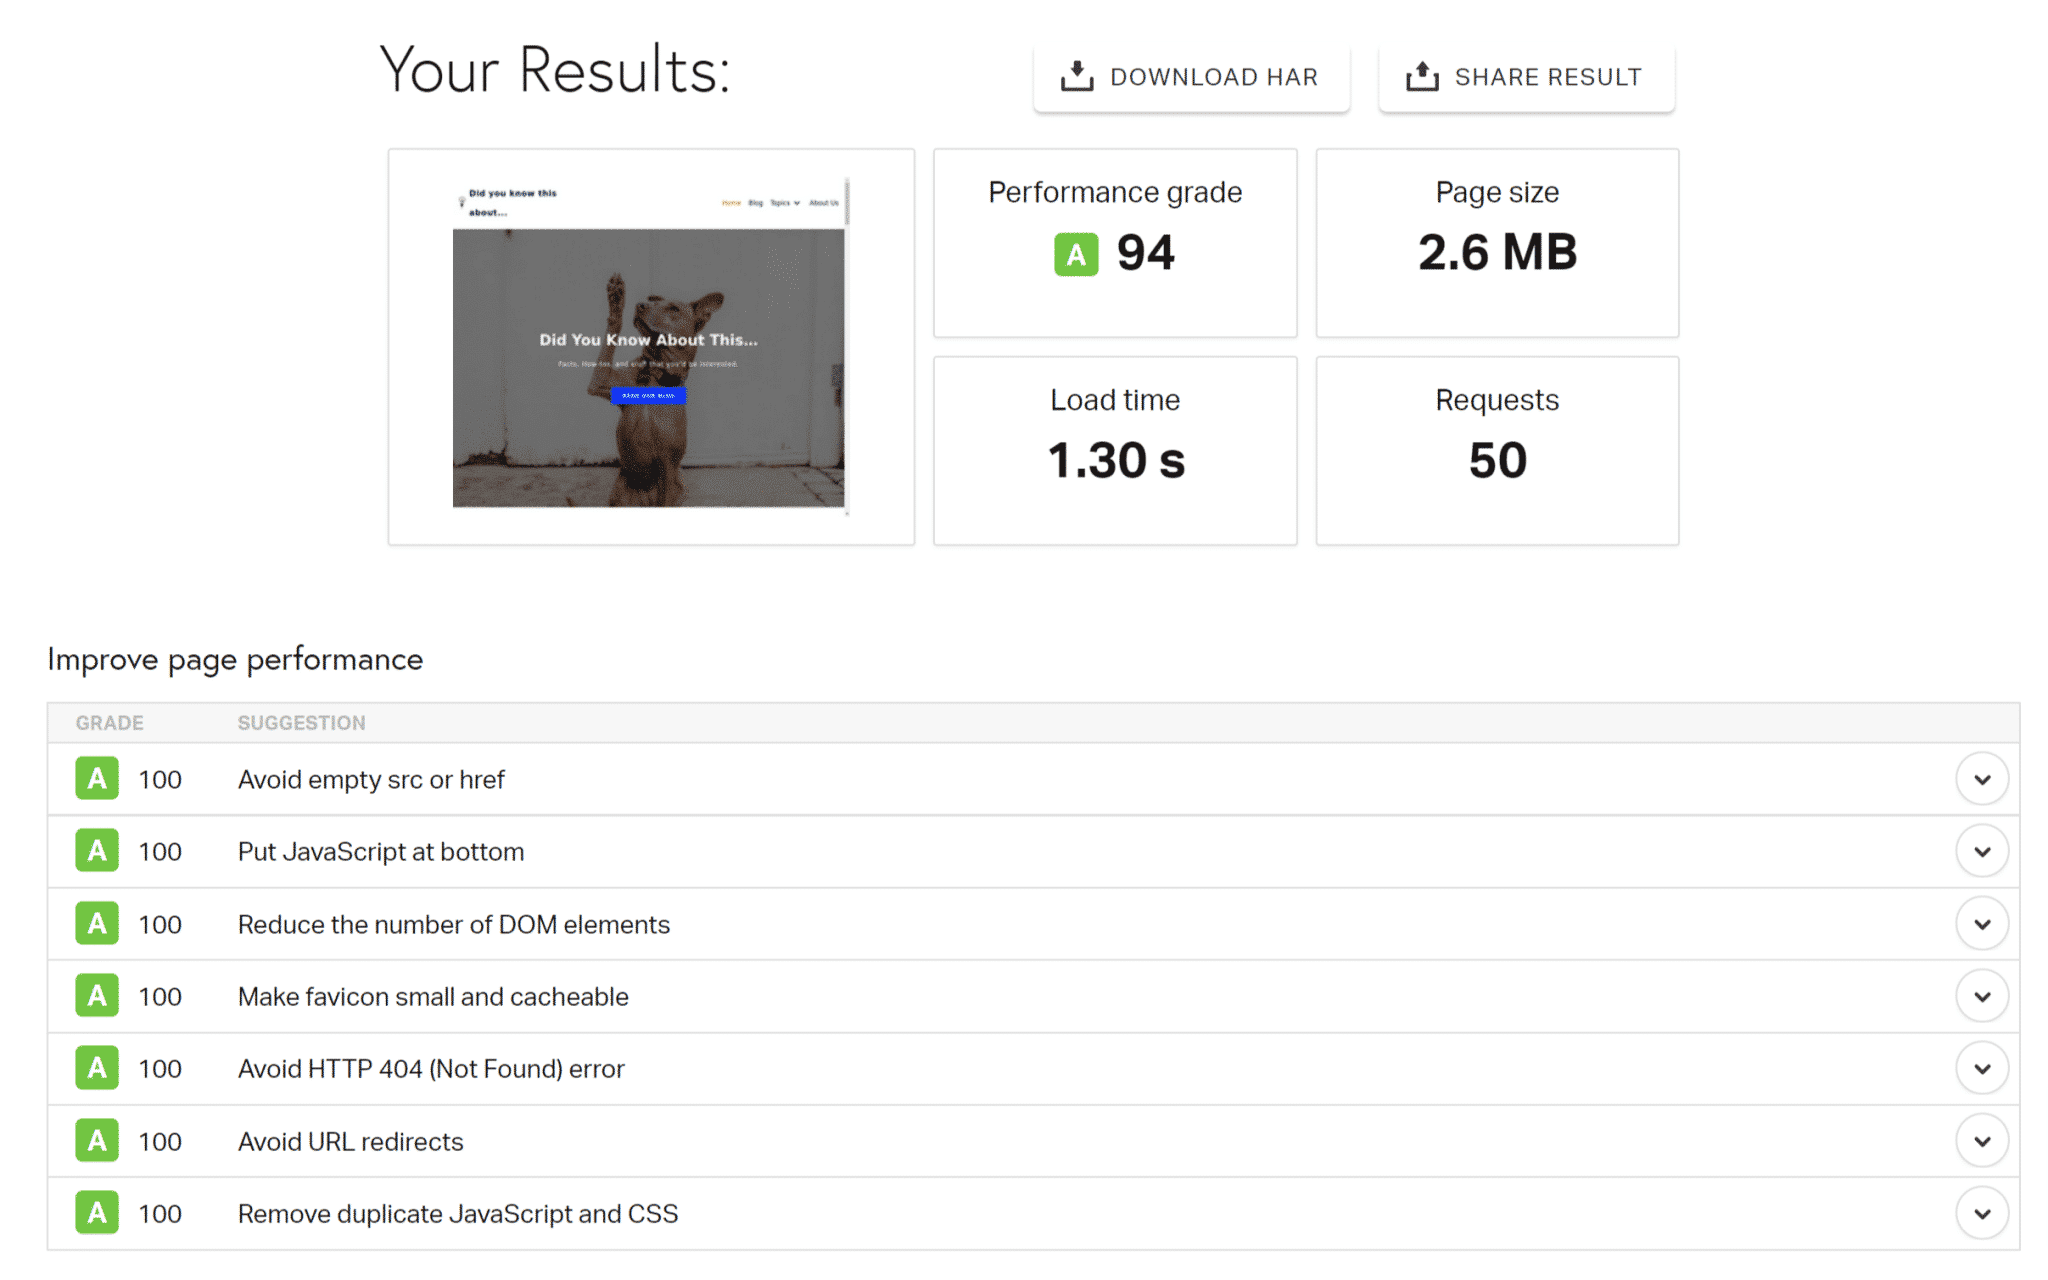
Remember all of the screenshots I’ve provided earlier in this article? Those horrible scores just got better, simply by installing WP Rocket.
Take a look at the PageSpeed Insight results, simply by installing WP Rocket, and no CDN installed:
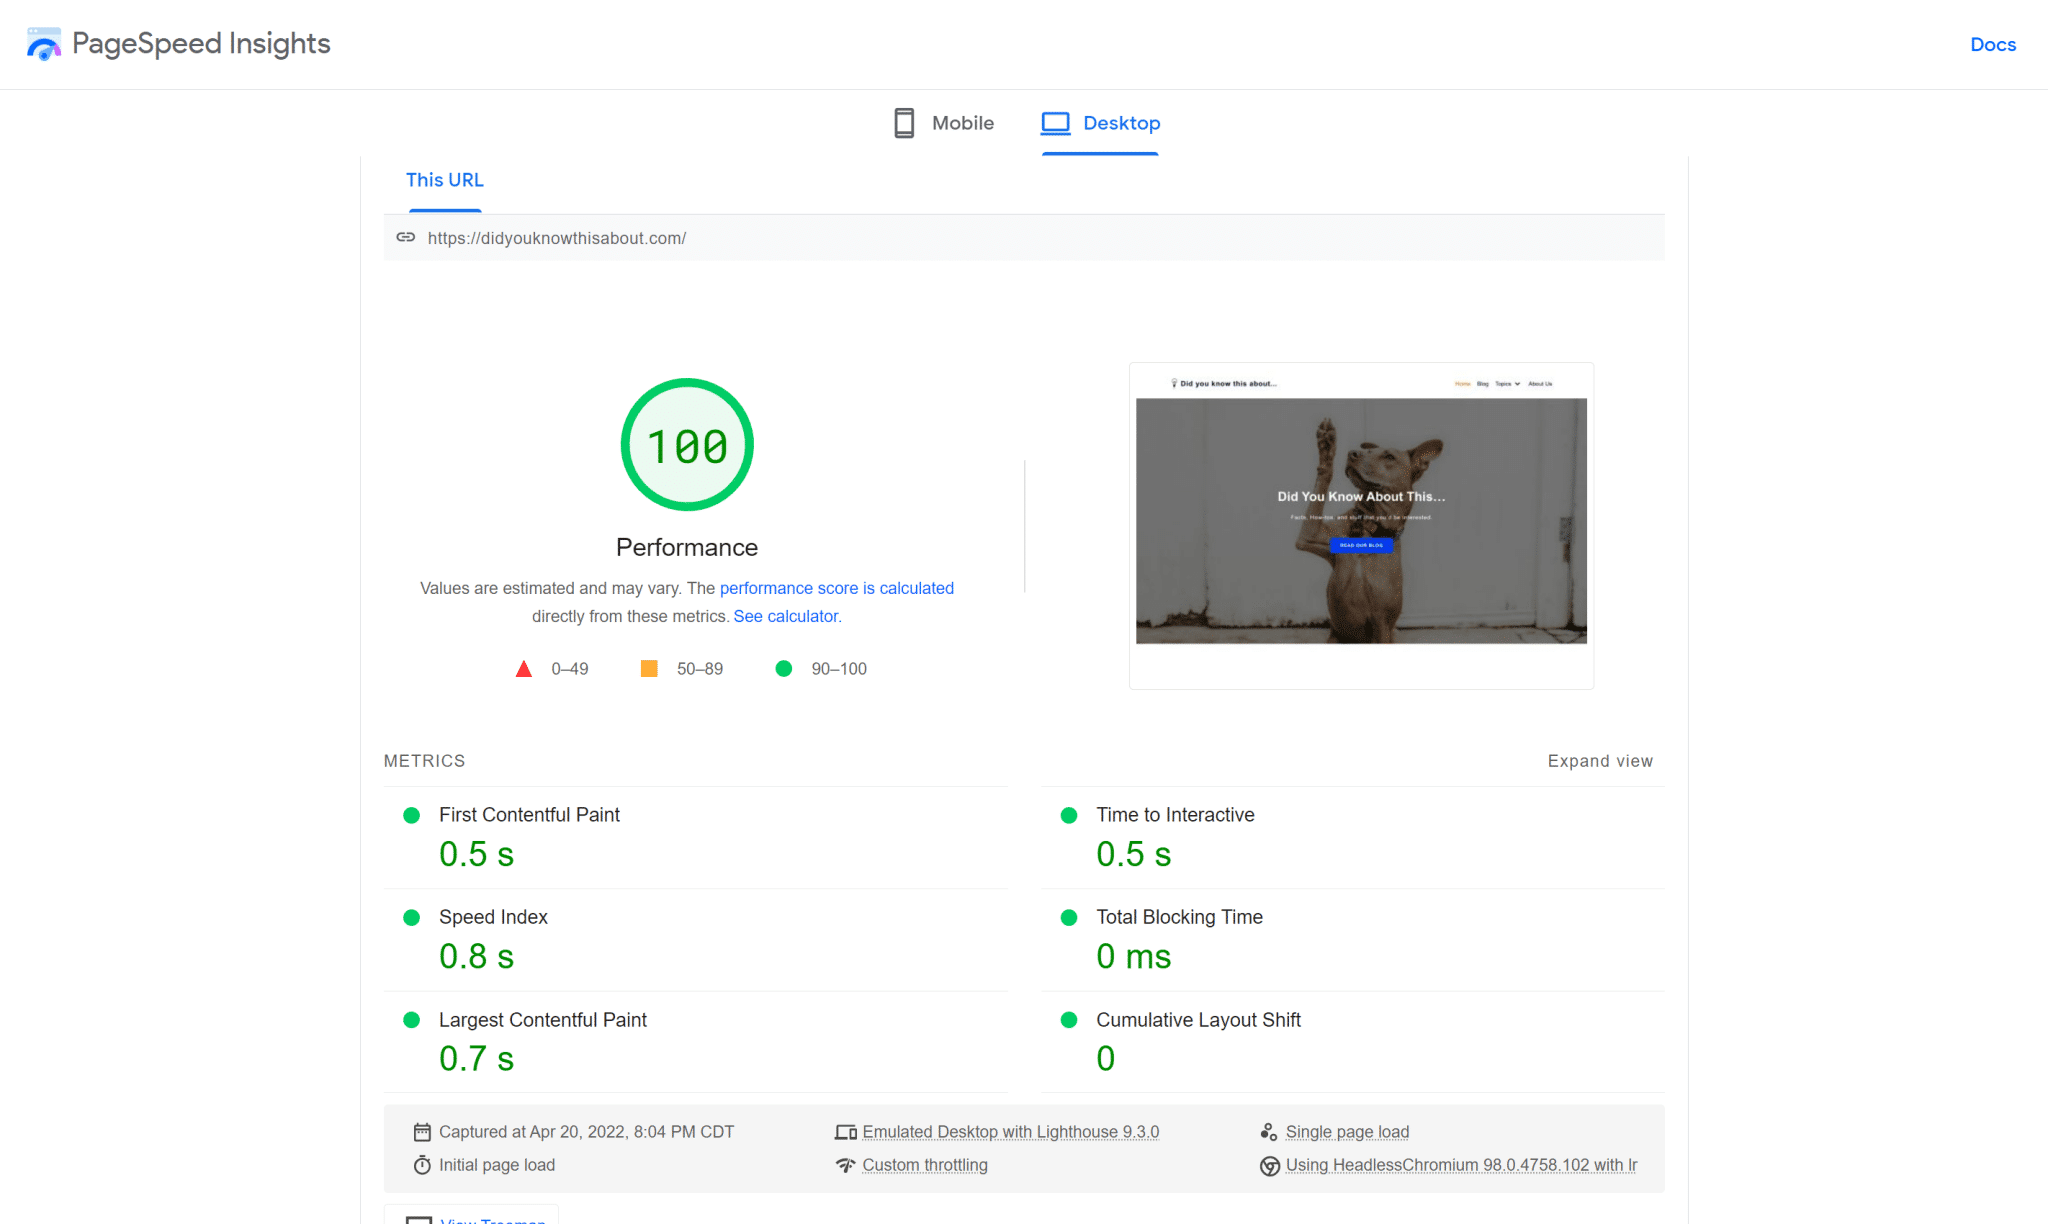
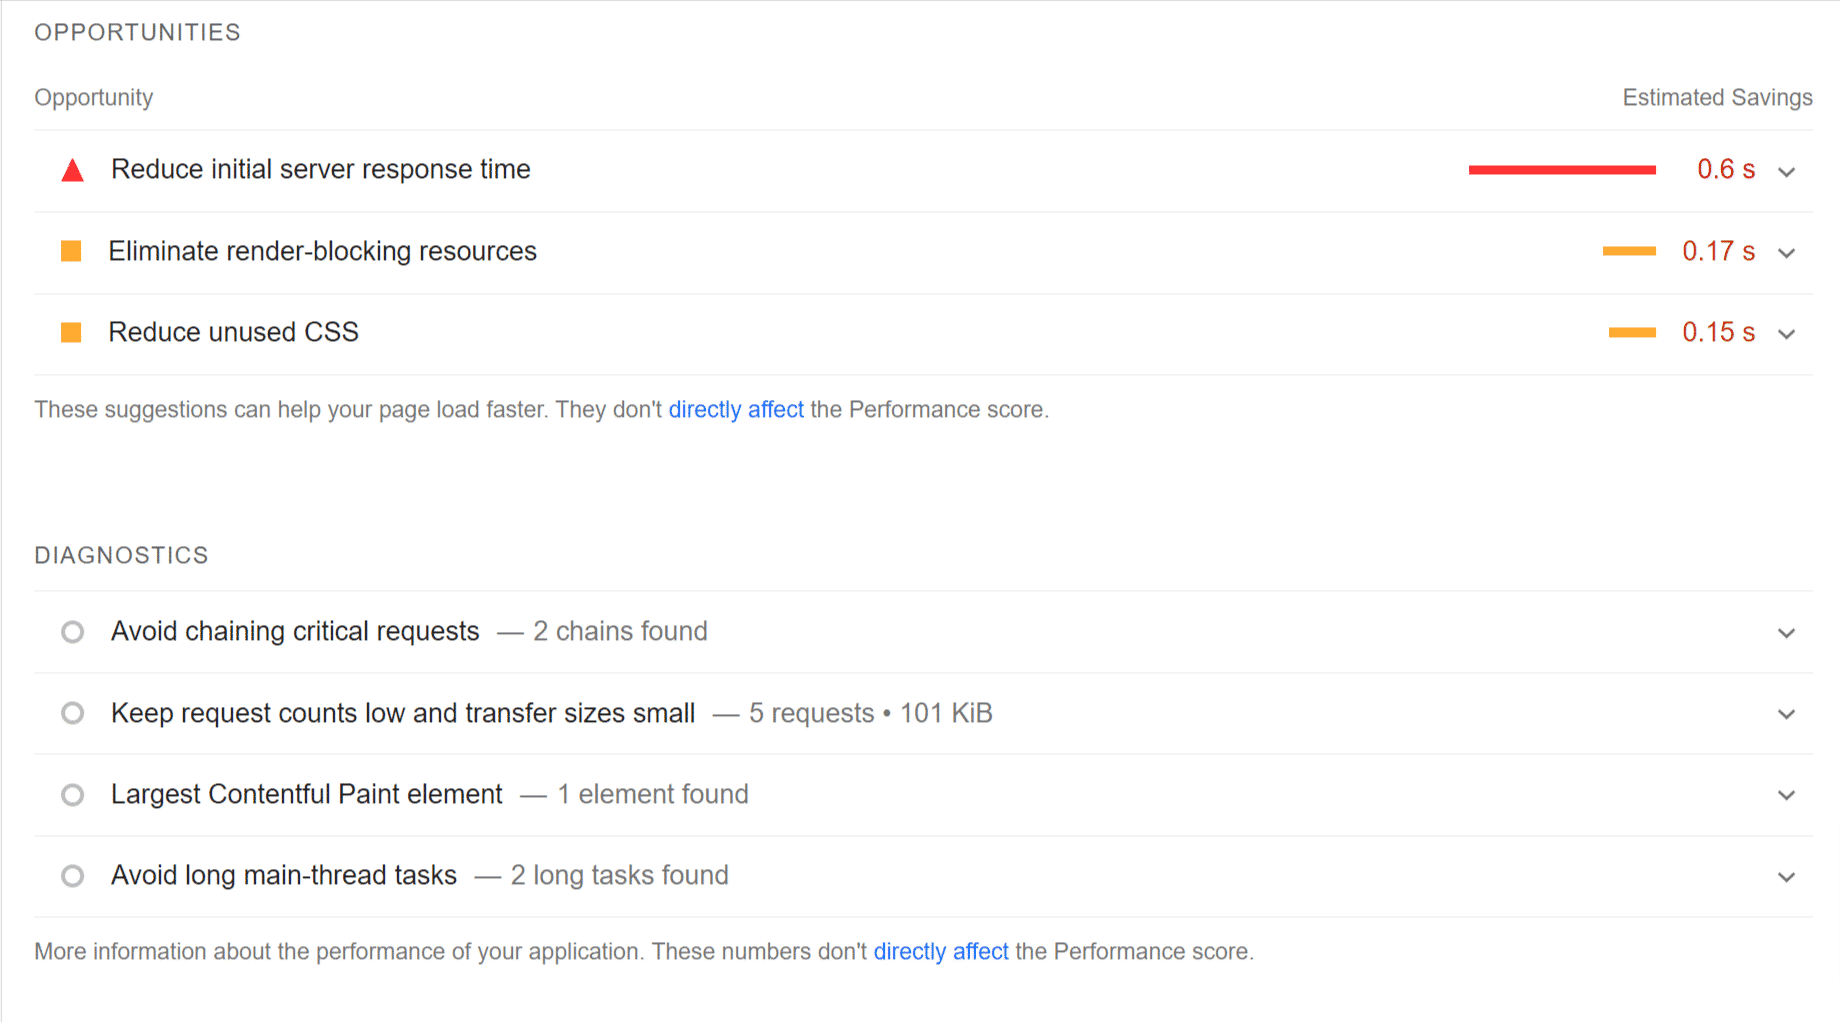
You still see “Reduce initial server response time” due to my hosting provider, but that can be easily resolved by adding a CDN or changing hosting:
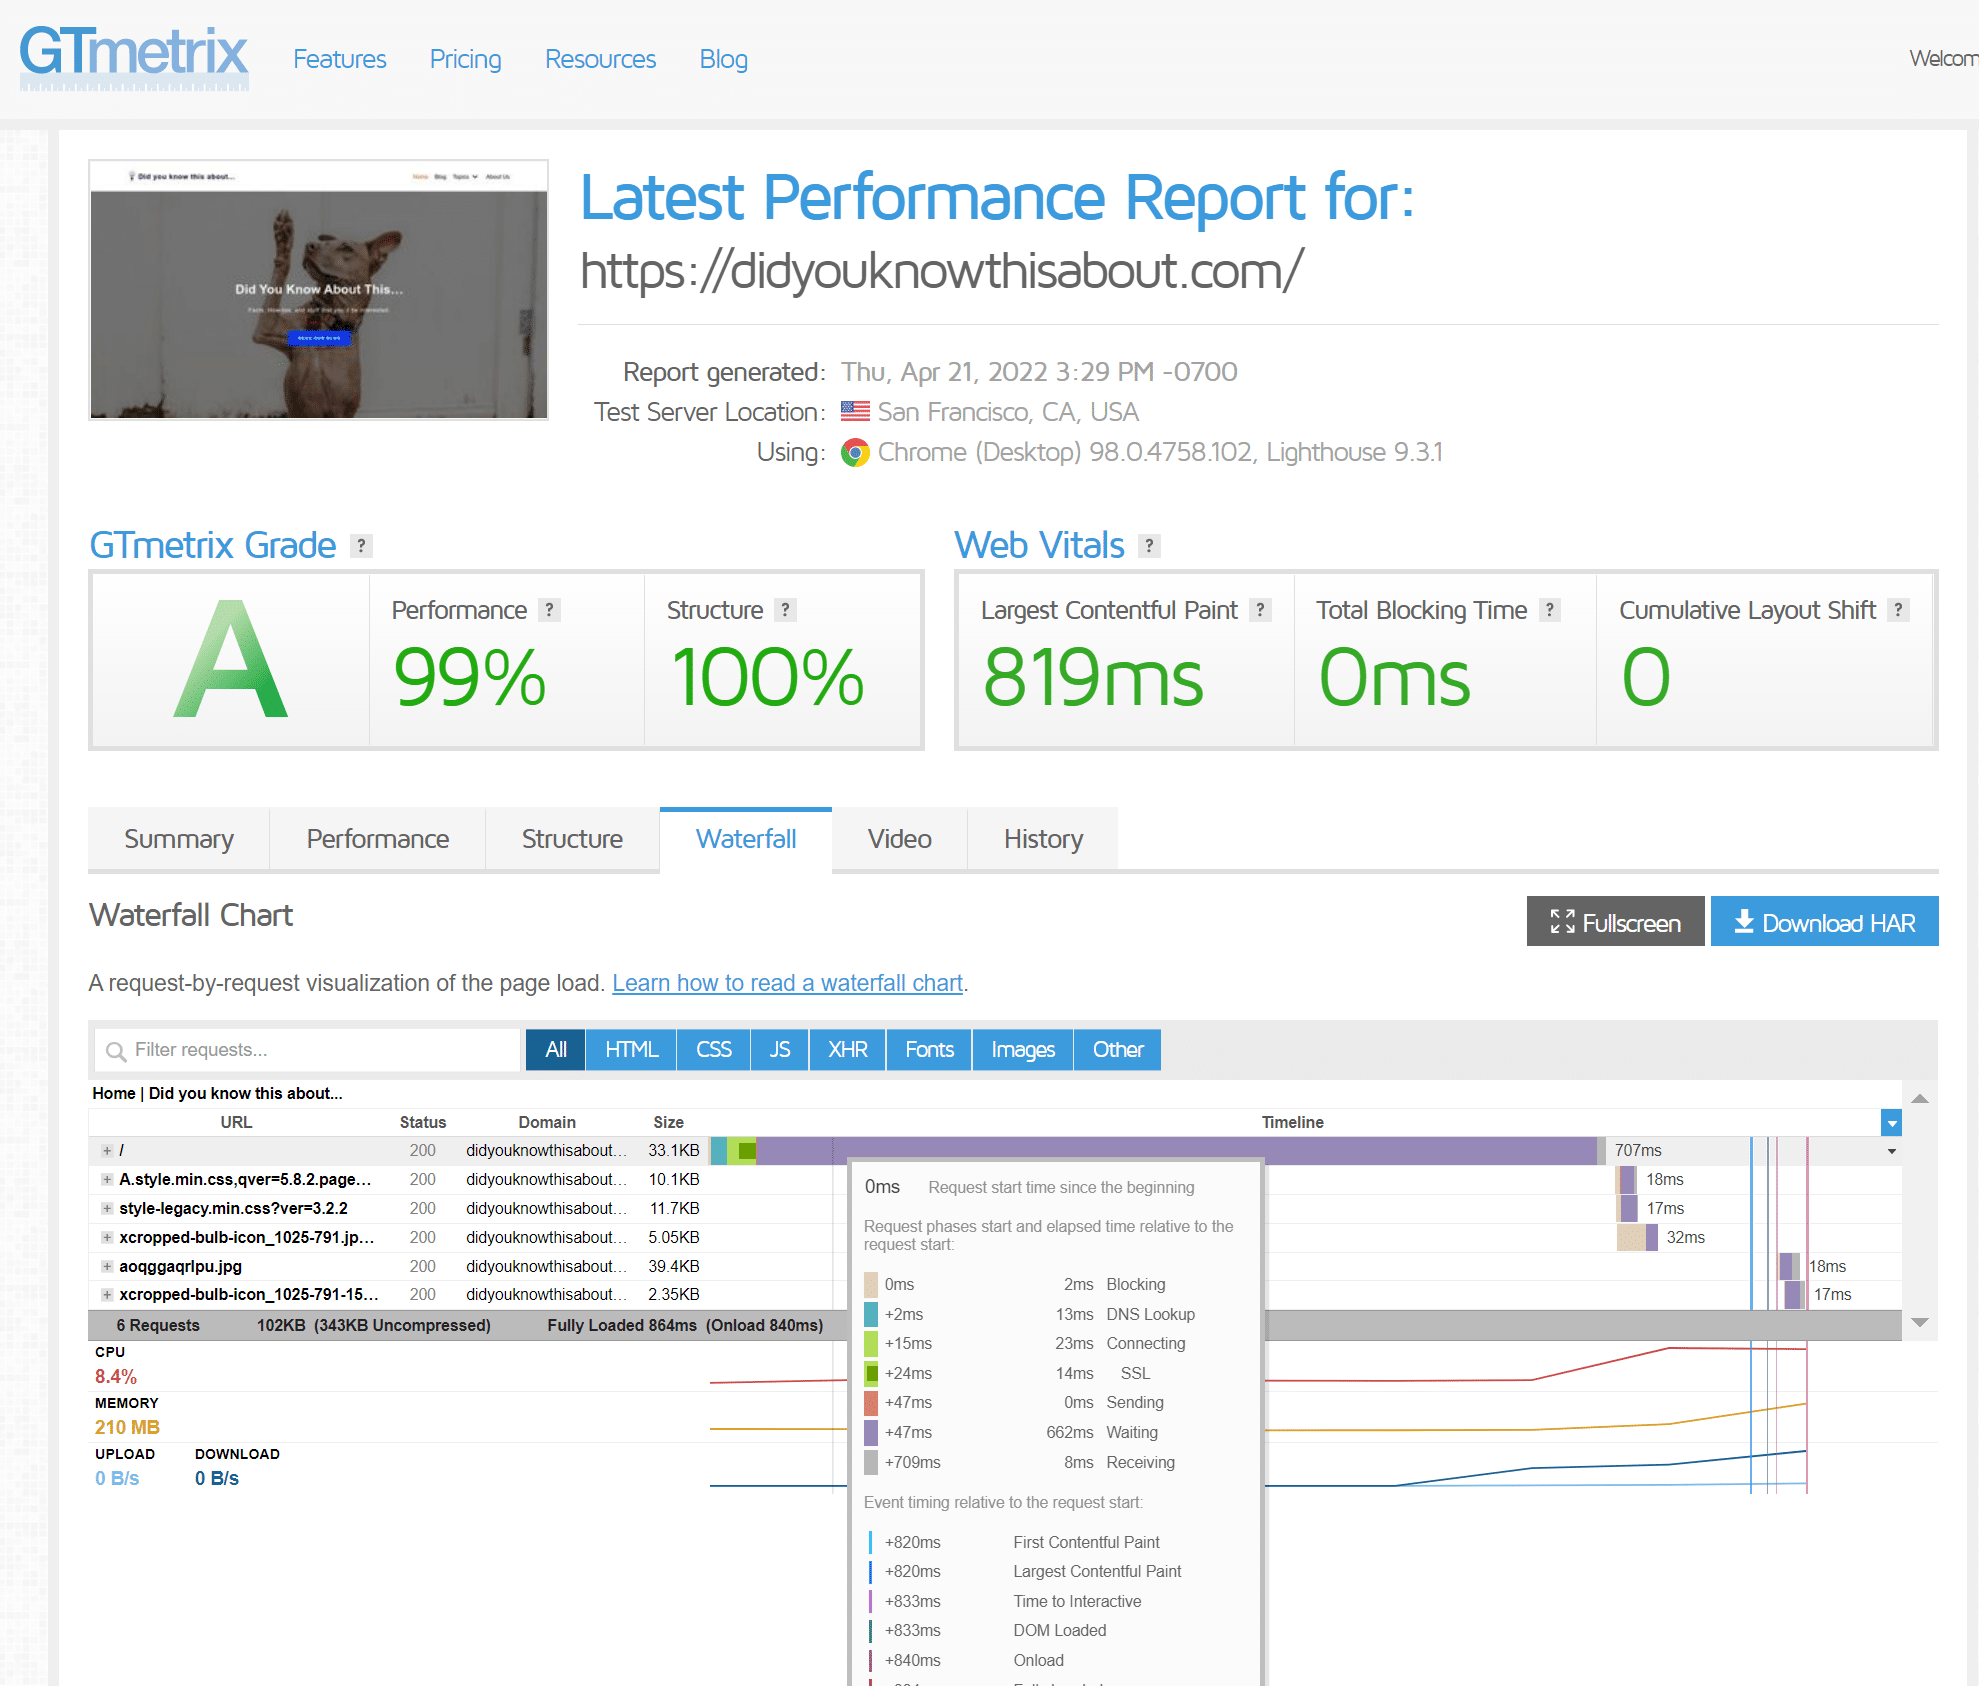
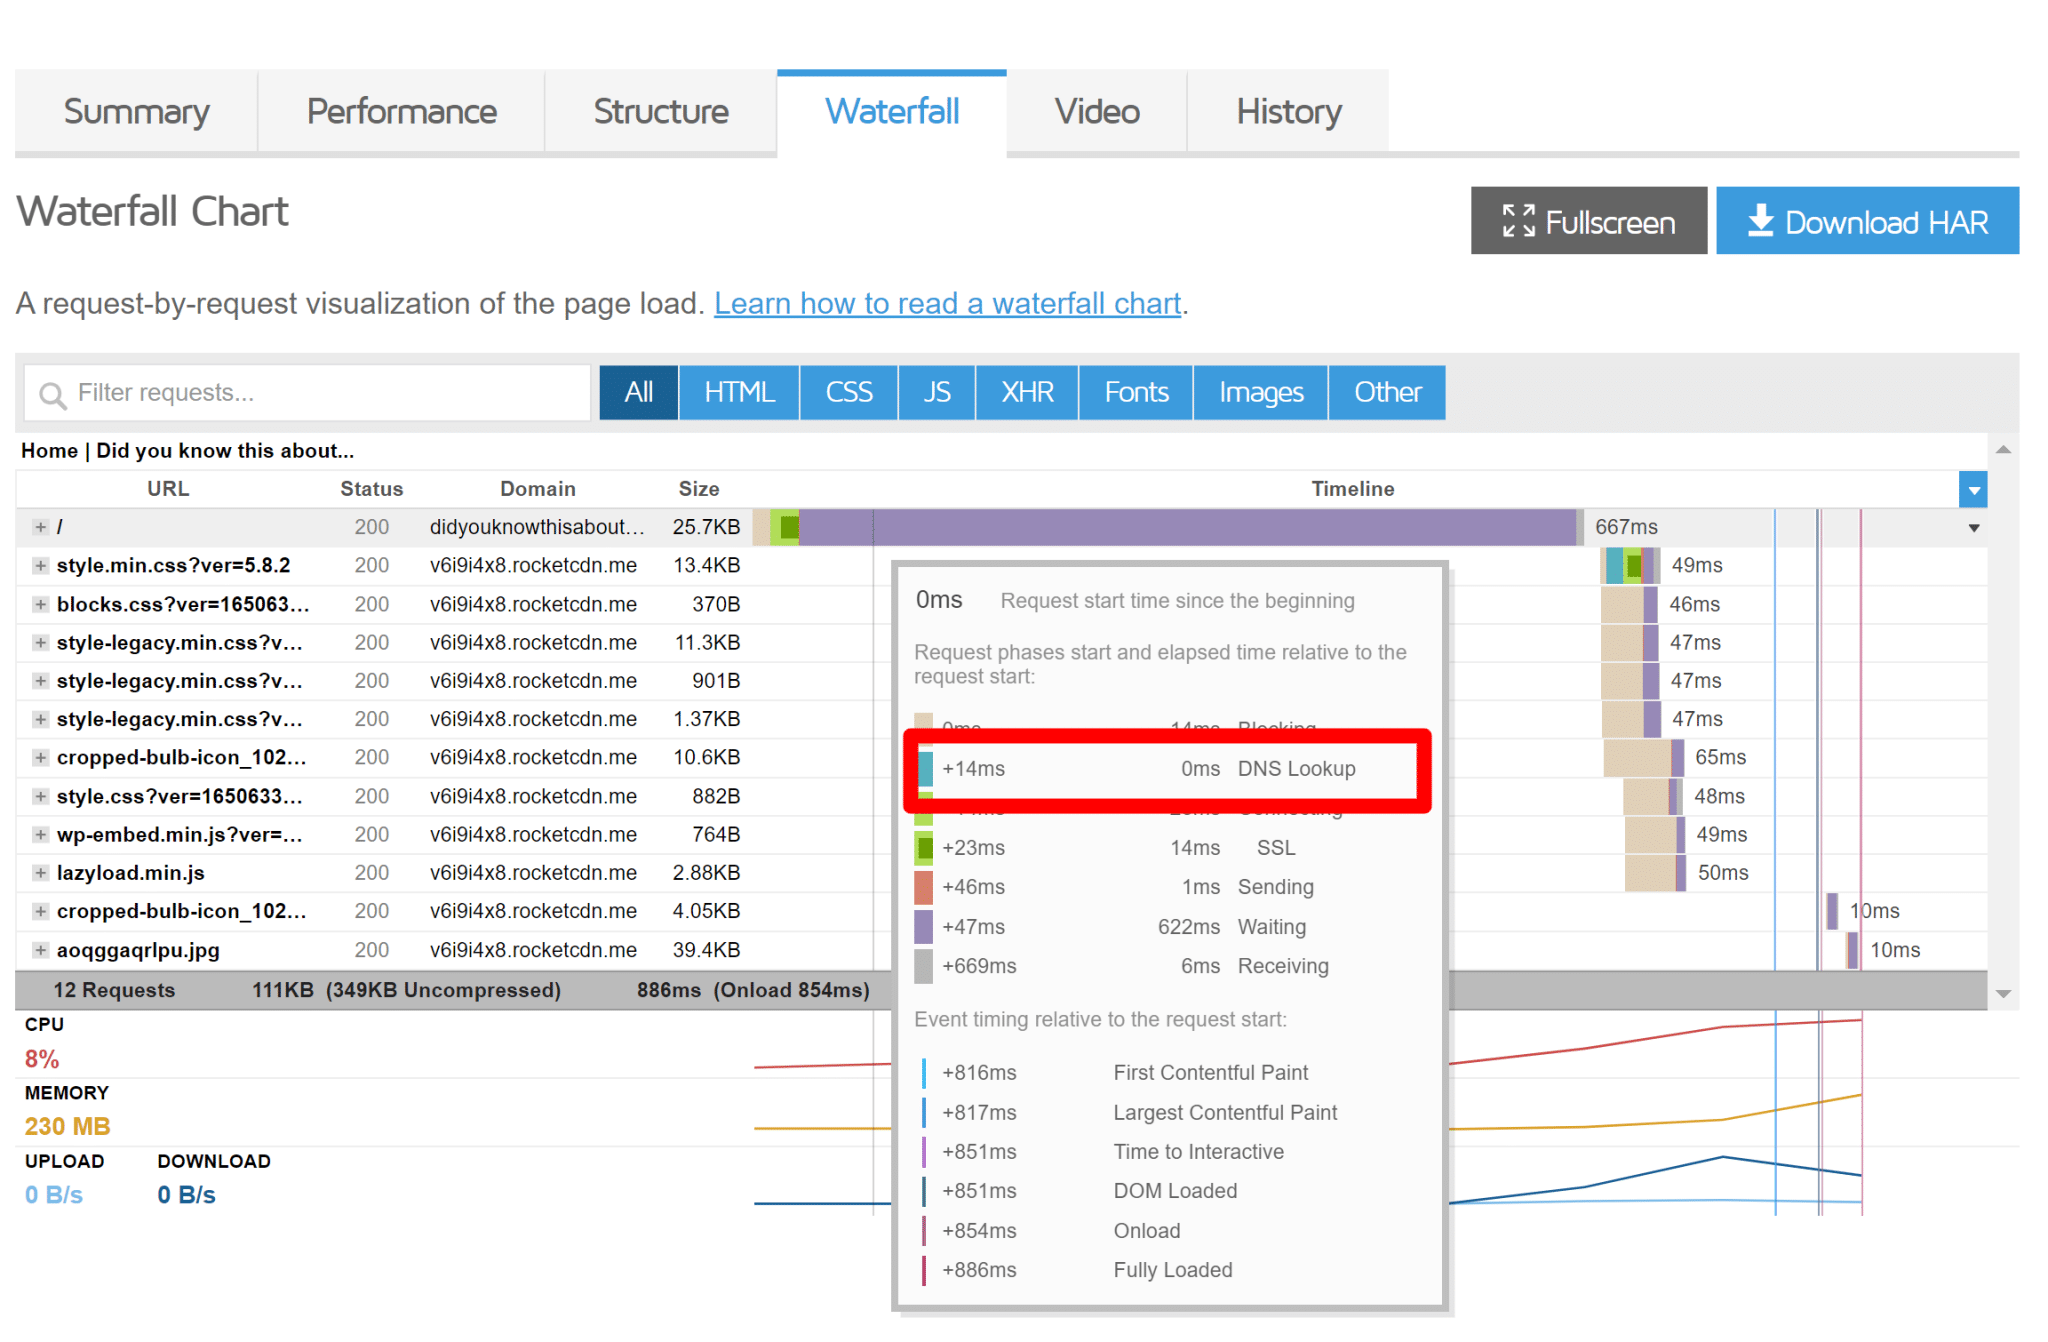
GTmetrix shows a better grade and the DNS lookup is now at 13 ms versus 115 ms prior to installing WP Rocket:
Same goes for Pingdom (see below)
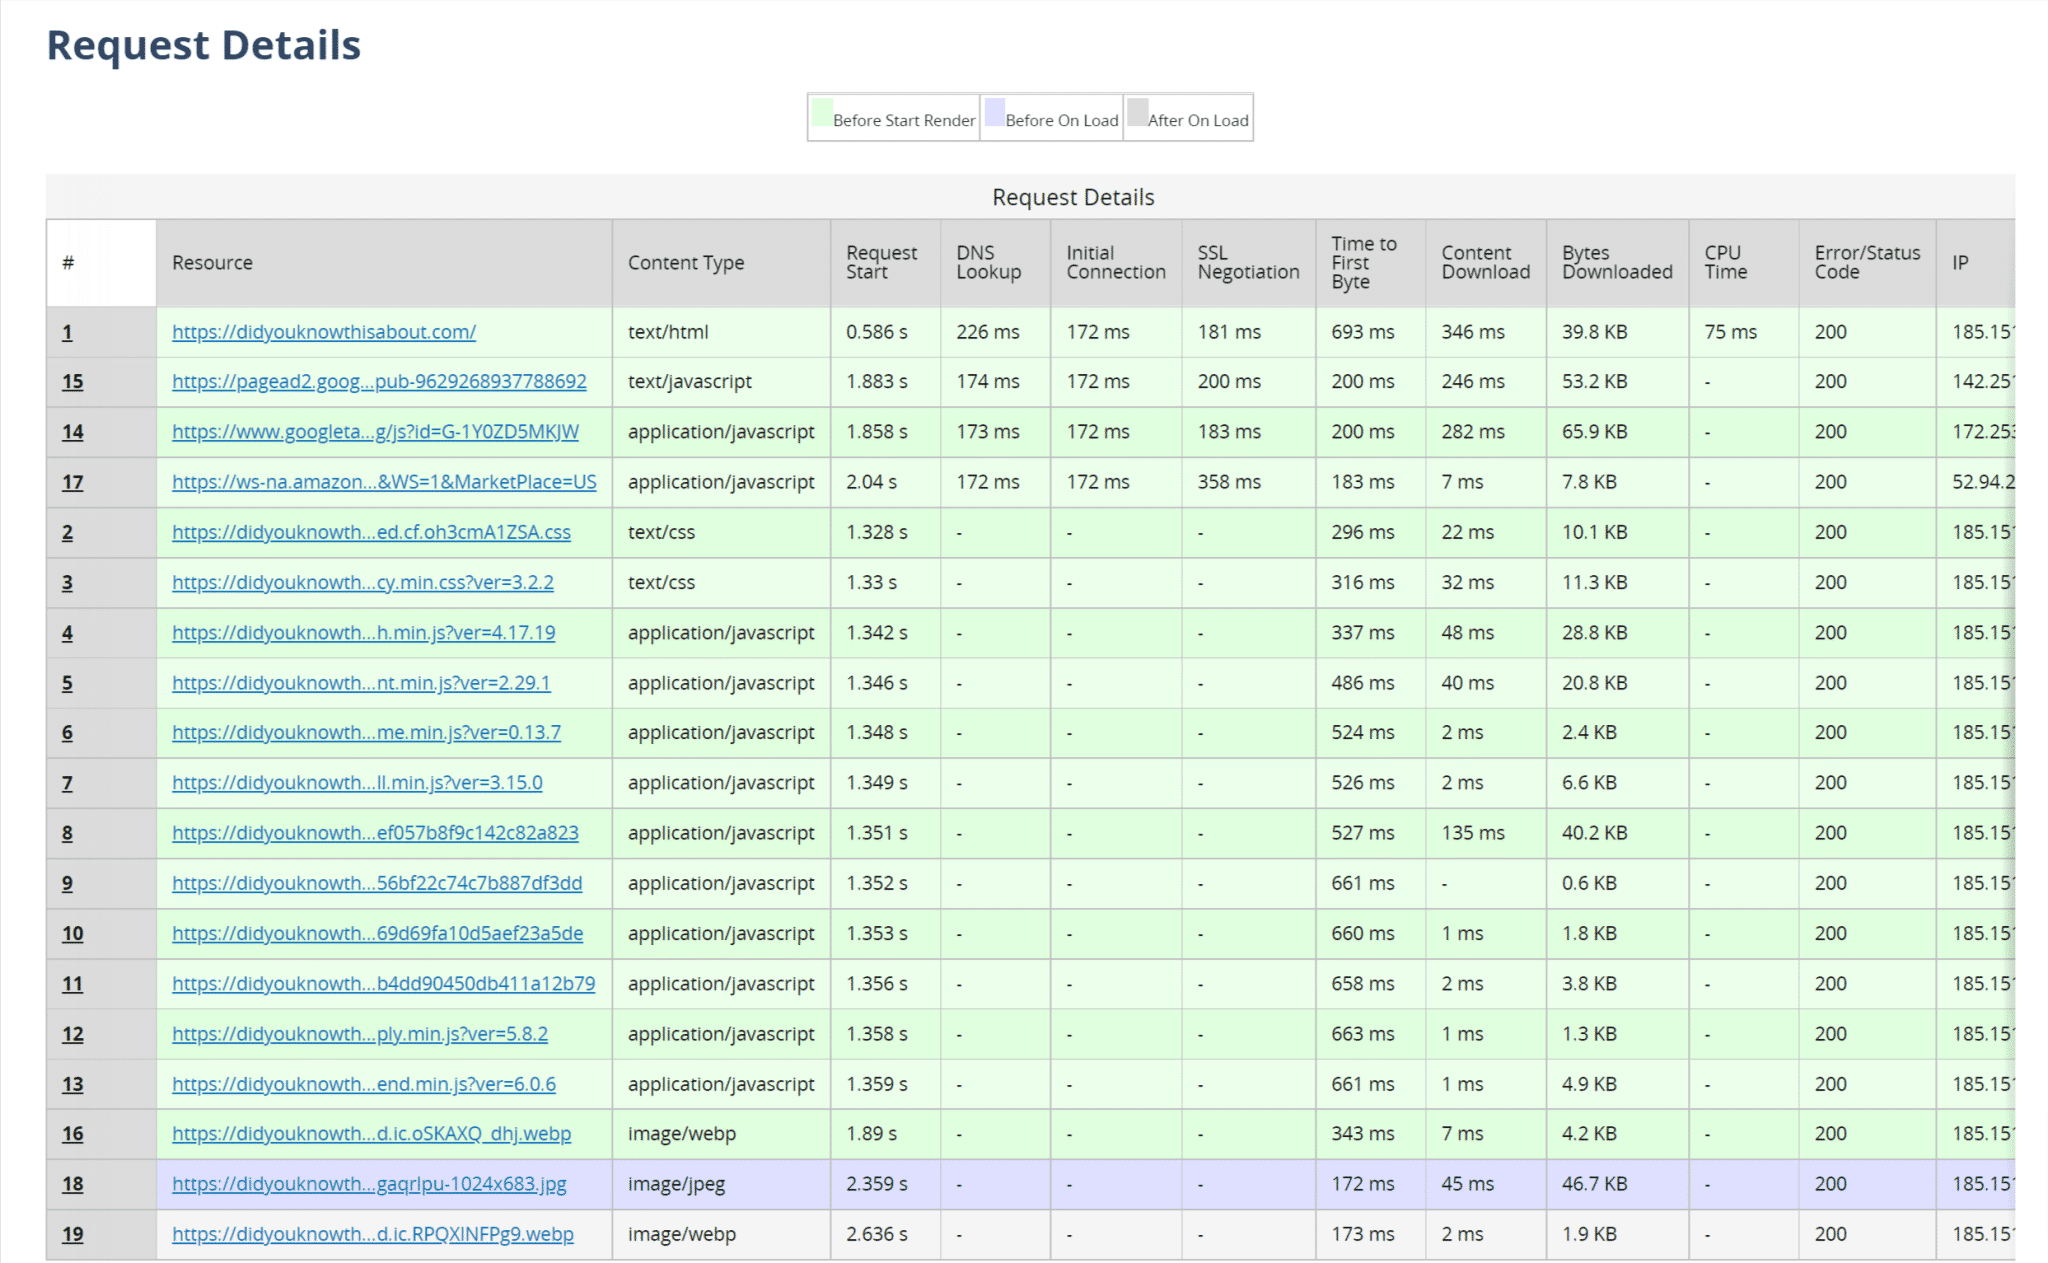
And finally, here’s my previous screenshot of my site without WP Rocket, tested with WebPageTest:
Here, you can see the main DNSlookup contributors left are just Google Adsense and the website server:
While WP Rocket won’t directly reduce DNS lookups in some cases, it complements the strategies above since it helps speed up page load times dramatically.
The reason why each web performance tool score improved drastically is because, with WP Rocket, you can:
- Remove unused CSS
- Enable browser caching
- Use DNS prefetching as mentioned above
- Defer JavaScript and delay JavaScript execution
- Automatically enable a ton more speed optimization options, such as, optimize Google Fonts
While WP Rocket works great out of the box, there are some customizations, depending on your site.
How WP Rocket Can Help Reduce Dns Lookup With DNS Prefetching
One feature I want to highlight is the DNS prefetching. It enables you to resolve domain names performance.
How does this work? By the time the user clicks a link as anticipated, the DNS look has already taken place, thus reducing latency.
There is no way to use third-party content without a DNS lookup for each domain. The Prefetch option doesn’t remove the need for the lookup; it just processes it sooner.
DNS prefetching can be added to a specific URL by adding the rel=”dns-prefetch” tag to the link attribute. For example:
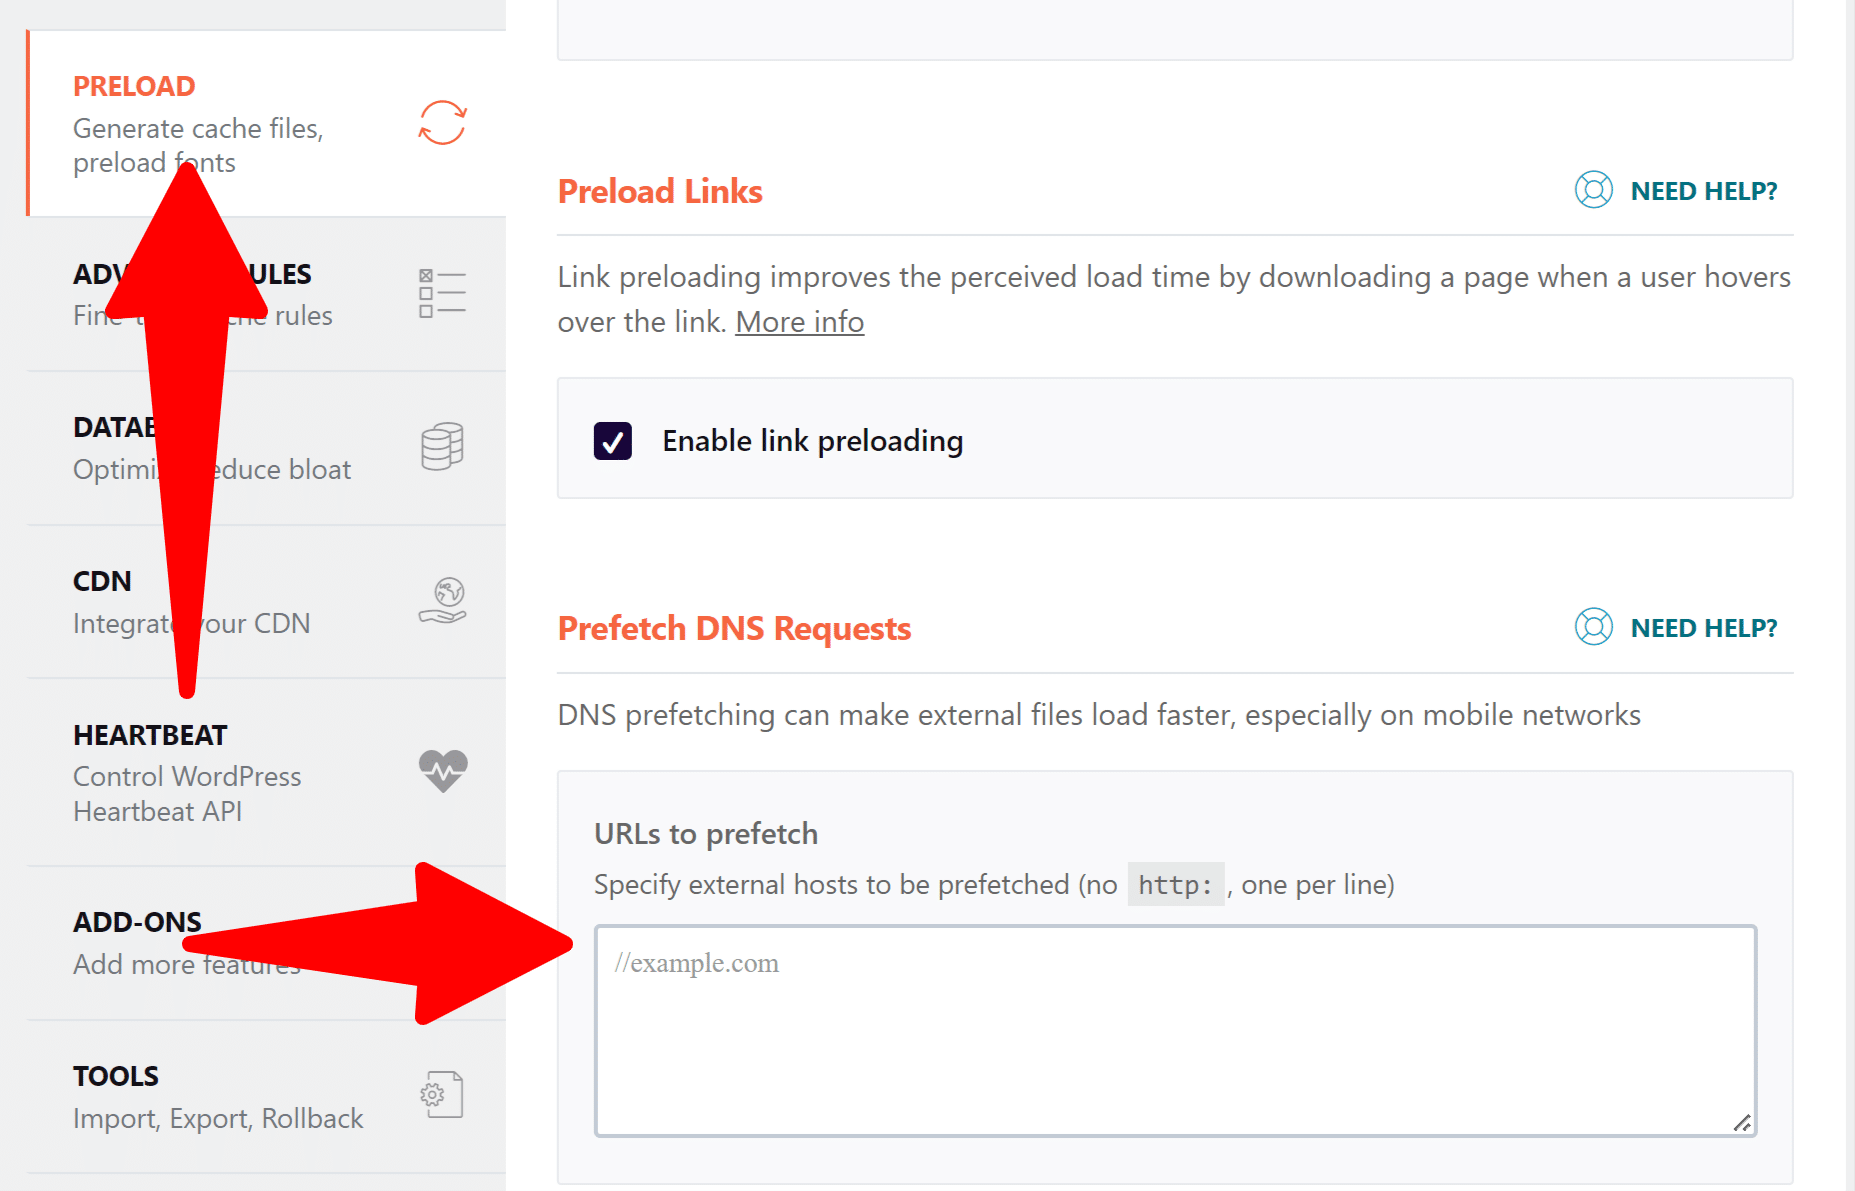
<link rel="dns-prefetch" href="//fonts.googleapis.com">To prefetch DNS requests with WP Rocket in a few clicks, first install and enable it on your WordPress site
Next, go to Settings > WP Rocket and click on the Preload tab.
Then, scroll down to the Prefetch DNS Requests section and enter the URLs of the resource hostnames into the multi-line text box that you want to prefetch to reduce DNS lookups.
Add the origin host, i.e., the domain on which the file is hosted, like so:
- Remove the http or https
- Keep the double slash
For example, if there is a request like this:
https://fonts.googleapis.com/css?family=Roboto:900%2C400%2C500%2C300%7CRaleway:700%2C300%7COpen+Sans:300%2C800
You would enter it as:
//fonts.googleapis.com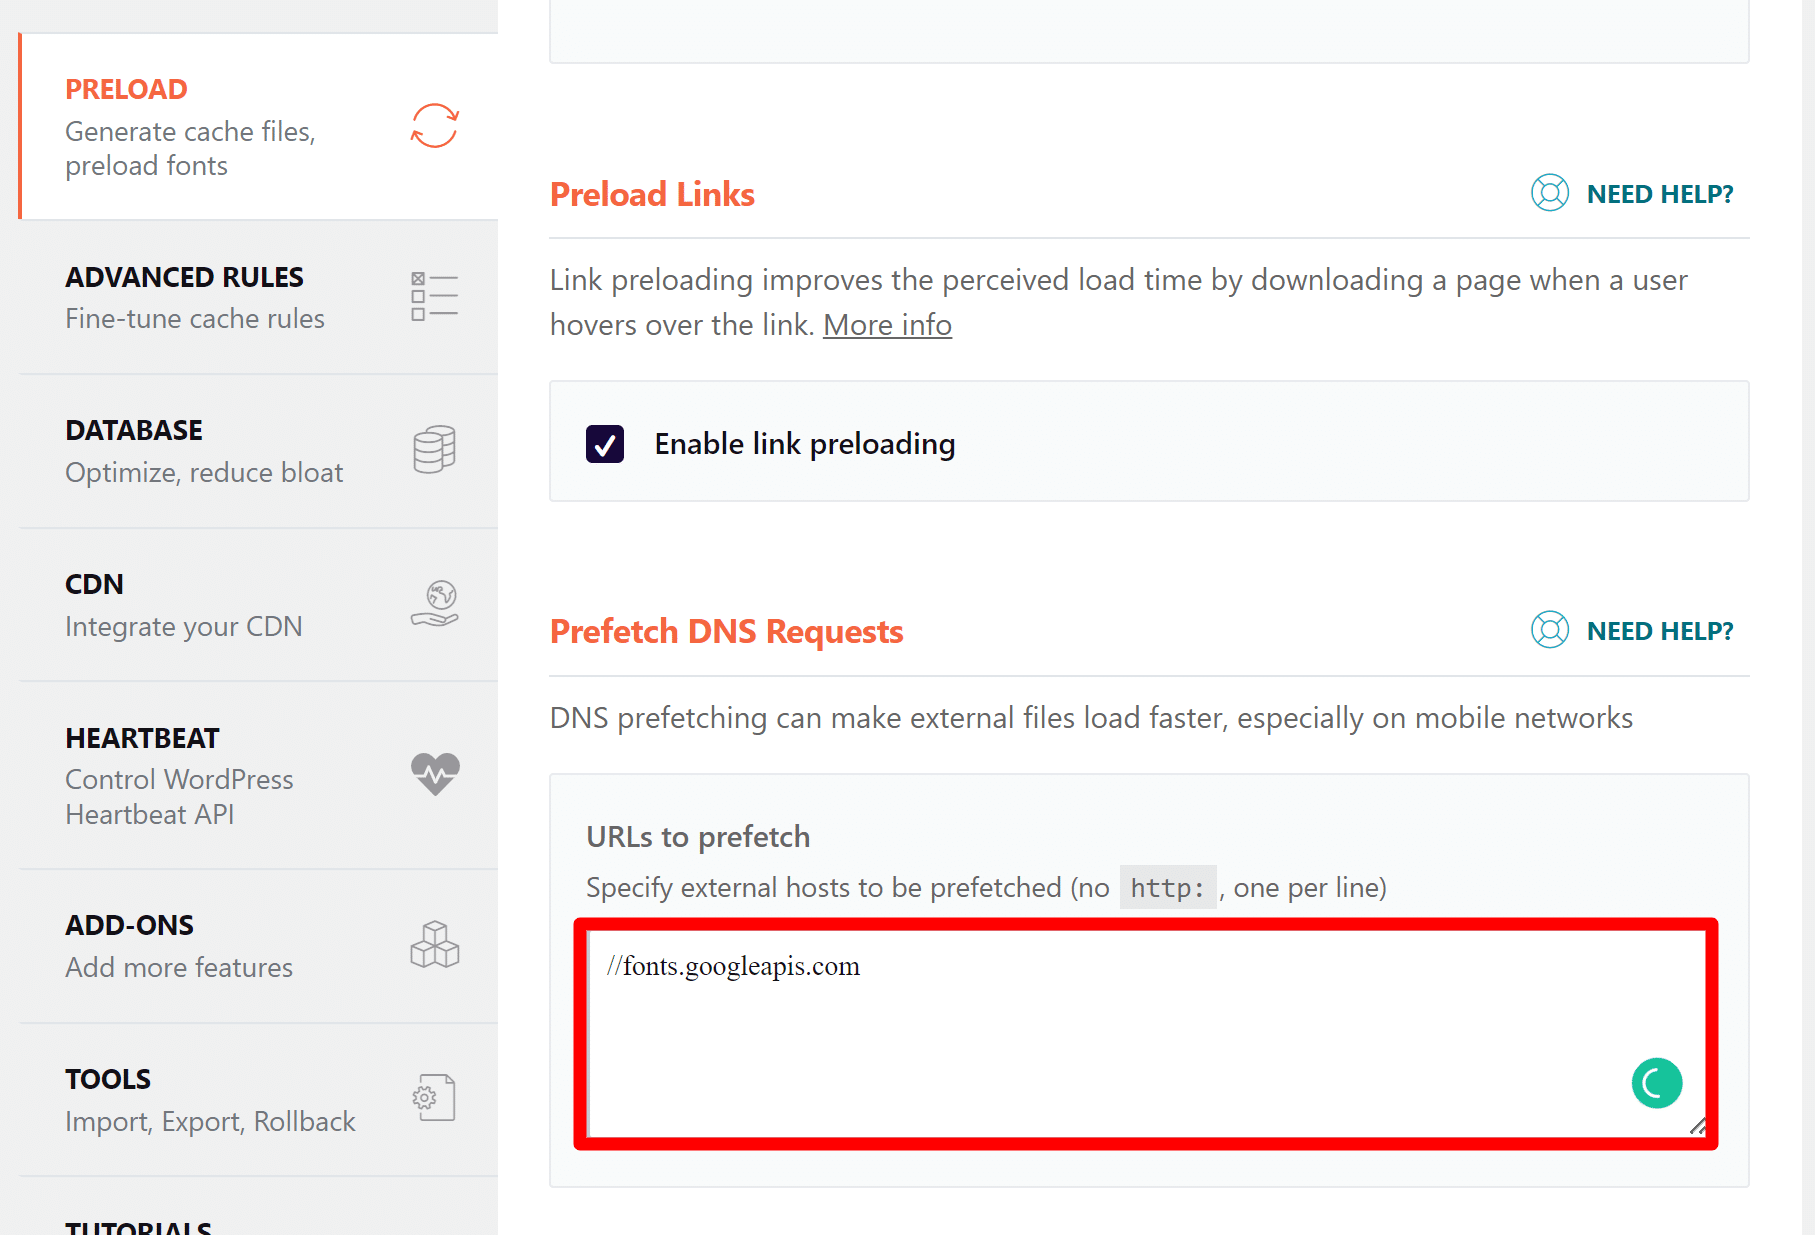
You can add external URLs that are used on a site, e.g. some chat plugins, Fontawesome, other fonts, tracking scripts, etc.
Examples would be:
//ajax.googleapis.com
//maps.google.com
//fonts.google.com
//www.youtube.com
//use.fontawesome.com
///api.twitter.com
Click the following link if you want to know more about how to use our Prefetch DNS feature.
DNS prefetching tells the browser to perform this connection before the file is needed so that it’s already complete by the time the file is requested.
There are other WP Rocket features that run automatically. Optimize Google Fonts for example. While this does not host the fonts locally, it does improve the DNS Lookup.
Bonus: RocketCDN
Our first recommendation to reduce your DNS lookup for your WordPress site was to use a fast DNS provider or a CDN. There’s a variety of options, and we wrote an article on how to choose a CDN and how to test a DNS provider to make sure you get the maximum performance.
In this article, however, I went with RocketCDN, for affordability but also great performance.
While you might able to reduce some with a free Cloudflare account, there’s nothing like a paid service that can get the job done. But if anyone reading this article can produce same or better results with a free Cloudflare account, feel free to leave a comment below!
You can see how Pingdom tool test shows everything green with 100 score:
GTMetrix shows 0 DNS lookup compared to WP Rocket 13 ms:
And prior to installing RocketCDN WebPageTest shows only Google Adsense and Amazon widgets to be the only ones that are causing the issue.

If WP Rocket was not enough to provide all the performance you need, using RocketCDN reduced these ad tracking scripts!
Take a look at the PageSpeed Insight and you can see that “Reduce initial server response time” is no longer showing up:
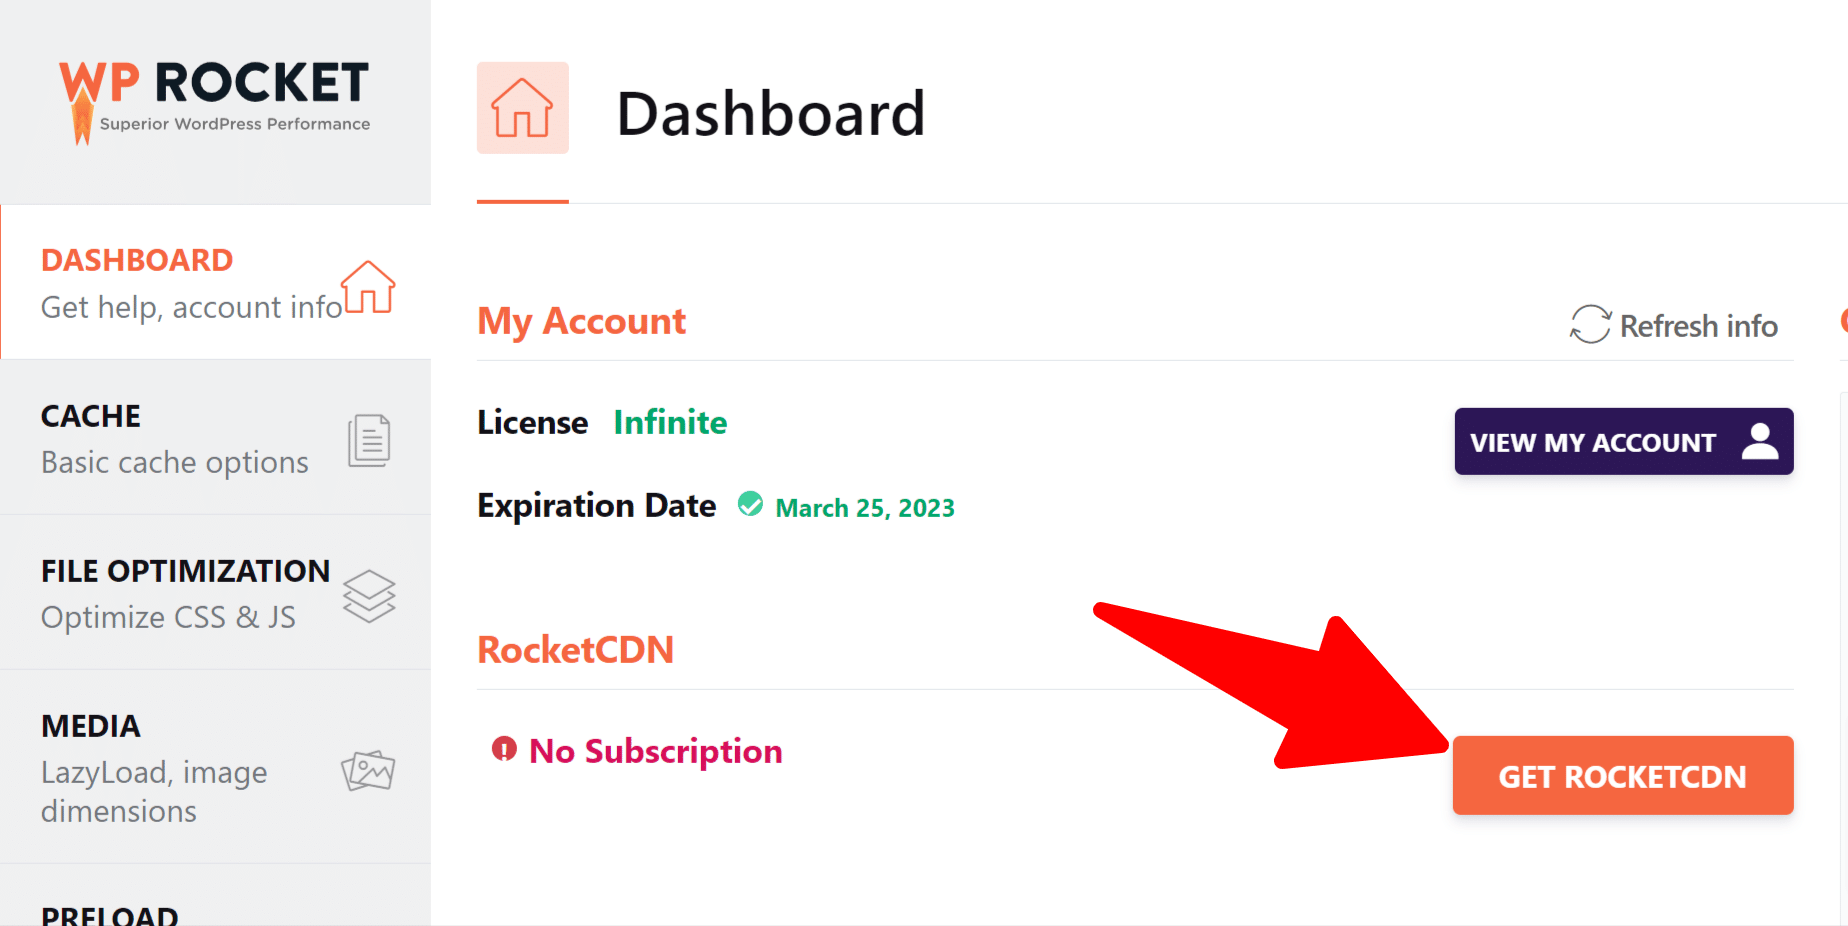
Installing RocketCDN along with WP Rocket is just one click away. Simply go to WP Rocket Dashboard and click “Get RocketCDN”, subscribe and that’s it!
Conclusion
There you have it! Reducing DNS lookups is important in optimizing your site’s performance. Due to abundant third-party services, external requests increase a lot, and it increases the latency for your website visitors.
You can reduce DNS lookups in WordPress much more quickly following all the above steps from this guide.
Save yourself time and let WP Rocket do the job for you: WP Rocket will automatically apply 80% of web performance best practices.
Hopefully, this guide helps you to learn to reduce DNS lookups in easy ways.