Table of Contents
Last update on
PHP accelerators substantially improve the performance of PHP-based software such as WordPress. Running high traffic sites powered by PHP applications is possible only due to PHP accelerators. Their performance benefits vary widely as it depends on multiple factors, including other optimizations that you may need to apply on your site.
In this article you’ll learn how PHP accelerators work, why you need them, which PHP accelerators are the best for your WordPress site, and how you can install and configure them.
Excited? Let’s get started!
What are PHP Accelerators?
A PHP accelerator is a PHP extension that improves the performance of PHP apps. These extensions work by caching opcode (or operation code) generated by PHP files. For this reason, PHP accelerators are also referred to as Opcode Caching.
PHP scripts are written in human readable syntax, but a server (or a central processing unit) cannot understand this code directly. It needs to be converted into a format the server can read directly. This is where Opcode comes in.
Opcode is part of the machine language instruction that directs the server on what operations to perform. Generally, these instructions are fairly simple, like adding two numbers or concatenating two or more strings. Other parts of machine language instructions include operands, items that the opcode manipulates.
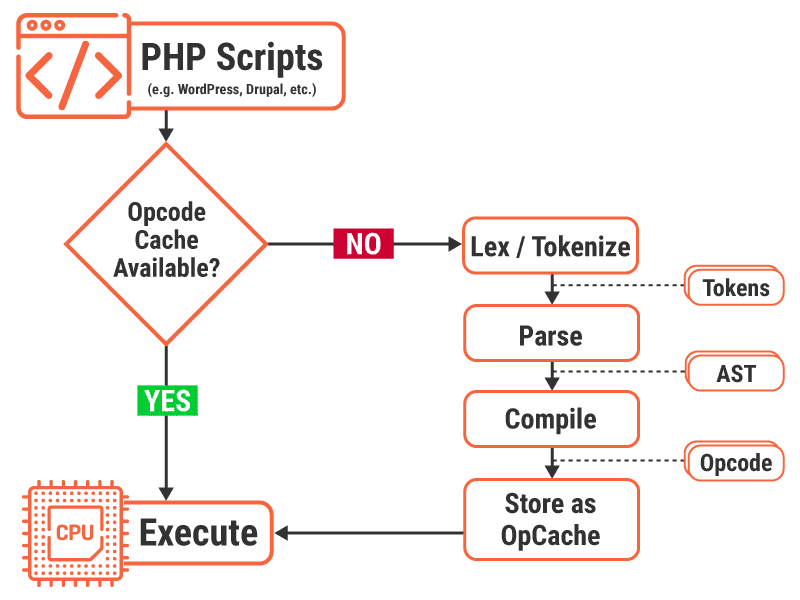
Every time a user requests something on your site, generating the opcode from PHP scripts can be highly taxing on your webserver. First, the scripts need to be tokenized and parsed to generate an abstract syntax tree (AST), which is then compiled to create the opcode.
In some extreme cases, this process can bring your website to a crawl for many users. If the number of requests is large, then the server timeouts for a lot of users, locking them out from accessing the website altogether.
You can bypass this problem by storing the opcode as a cache (OpCache) after it’s generated. You can then serve it directly to all subsequent users without getting the server involved. This is exactly what a PHP accelerator does.
It’s not unusual to see a WordPress site speed up by two to three times (or more) after installing and configuring a PHP accelerator.
The Best PHP Accelerators
PHP was launched in 1995, making it one of the oldest surviving server-side languages today. Throughout its lifetime there have been a lot of accelerators (opcode caching) implemented for it, but for server setups that run on Linux, there’s primarily only one solution that’s well-maintained and useful: PHP OPcache.
For PHP apps running on Windows and Windows Server, there’s an alternative PHP accelerator called Windows Cache Extension for PHP. Plus, there are many extensions to add features to PHP’s built-in opcode caching. I’ll cover all of them in this article.
PHP OPcache (Zend OPcache)
PHP OPcache extension makes PHP code to execute faster through opcode caching and other optimization techniques. It’s bundled along with PHP 5.5 and later versions.
PHP OPcache is also called Zend OPcache since it’s an implementation of Zend’s opcode caching extension. Zend kept this extension proprietary until PHP 5.5 was released. Hence, for many users Alternative PHP Cache (APC) was the go-to solution for opcode caching in PHP.
After Zend open sourced the code for their opcode caching and released it as an extension called Zend OPcache, PHP 5.5 made it part of its core and has been using it as the default opcode caching solution ever since.
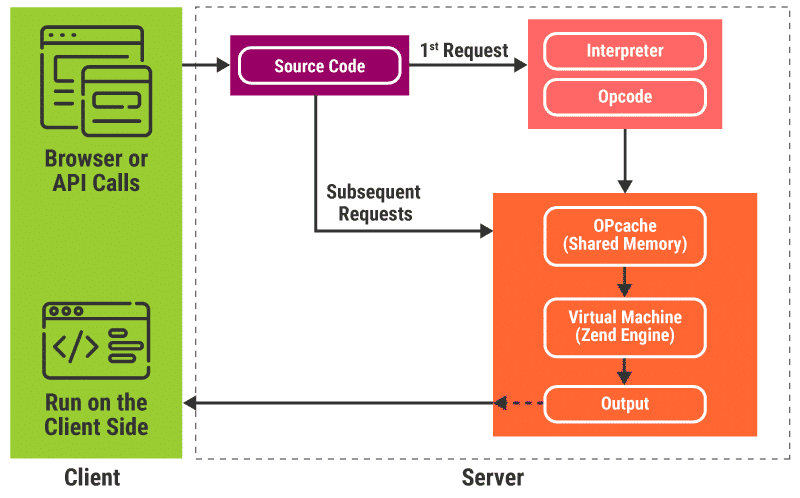
PHP OPcache improves performance by storing the precompiled bytecode in the server’s shared memory when any PHP script is executed for the first time. This eliminates reading and compiling PHP code for future access. PHP OPcache also applies additional bytecode optimization patterns to make PHP code execution faster.
APC User Cache (APCu)
Alternative PHP Cache (APC) is a free and an open source PHP accelerator. Like Zend OPcache, it’s mainly designed to cache the PHP opcode output in the server’s shared memory. Since it has always been FOSS, it was the most popular opcode caching solution for PHP until a few years ago.
After PHP OPcache became a part of PHP 5.5, APC’s development slowed down considerably and is considered dead now. However, some APC features are still not available in PHP OPcache. One of them is the userland shared memory cache functionality. It’s also referred to as “in memory data caching.”
To address this issue, the APC developers stripped it of all its opcode caching features and released it as a separate extension called APCu. It adds support for userland caching of PHP variables.
You can also install the APCu Backwards Compatibility Module to use APCu as a drop in replacement for APC in modern versions of PHP.
You’ll learn later how to enable and configure PHP OPcache and APCu on your server.
Windows Cache Extension for PHP
Windows Cache Extension for PHP is a PHP accelerator that speeds up PHP software on Windows and Windows Server. It doesn’t include support for opcode caching as PHP already includes it in its core, but it includes 4 unique types of cache:
- File Cache — PHP OPCache only caches the opcode generated by PHP scripts. The PHP engine still has to access the script files on the server. Performing file operations can lead to significant performance overhead, so this extension includes a file cache that can store PHP scripts in shared memory.
- Resolve File Path Cache — Most PHP scripts use relative file paths to refer to each unique file. The PHP engine has to convert these to absolute file paths to access them. If there are a lot of files referenced like this, it can lead to performance issues. This extension stores the mappings of all relative and absolute file paths beforehand so that the PHP engine doesn’t spend too much time resolving file paths.
- User Cache — This cache works similarly to APCu’s userland shared memory cache. PHP scripts can use user cache APIs to store objects and variables in the user cache and re-use them on subsequent requests. Not only does it improve the performance of PHP scripts, but it also allows the PHP engine to share data across multiple PHP processes.
- Session Handler — This stores the PHP session data in the server’s shared memory to avoid performing file system operations for reading and writing session data. It’s helpful if an enormous amount of data is being generated in a single PHP session.
Most WordPress installations use a Linux server. In case you’re one of the dozen users who uses a Windows Server to run your site, you can learn more about installing and configuring WinCache on its online manual.
Installing and Configuring PHP OPcache
For PHP 5.5 and above, PHP compiles OPcache by default as a shared extension during PHP installation. However, if you specified –disable-all directive when installing PHP, then you need to allow OPcache explicitly by specifying –enable-opcache directive.
Once you have the OPcache extension compiled, you need to enable it and configure its variables.
You must use the zend_extension directive to enable the OPcache extension. To do that, add all the following code to your php.ini file.
zend_extension=/full/path/to/opcache.soNote: If you have a non-standard server installation and don’t know the full path, then you can specify the extension_dir directive to tell PHP to look for dynamically loaded extensions in that directory. Also, for Windows-based installations the path is C:\path\to\php_opcache.dll.
Once you’ve enabled OPcache, you need to apply the right settings to gain maximum performance out of it. For most use cases, you can add the following settings to your php.ini file:
opcache.memory_consumption=128
opcache.interned_strings_buffer=8
opcache.max_accelerated_files=4000
opcache.revalidate_freq=60
opcache.fast_shutdown=1
opcache.enable_cli=1
Here’s a breakdown of all the directives and what they do:
- opcache.memory_consumption: Sets the size of the shared memory storage available for OPcache. The value is specified in megabytes and its default value for PHP 7.0 and above is 128, but you can set it more than that if needed.
Before changing this value, make sure that your server has enough shared memory space for other services like MySQL.
- opcache.interned_strings_buffer: Specifies the amount of memory available to store interned strings. String interning is a performance optimization method wherein only one copy of each distinct string is stored in the memory, making string processing tasks space- and time-efficient.
Its default value is 8 megabytes. You can increase its value to 16 if you’re running a lot of code on your site.
- opcache.max_accelerated_files: Defines the maximum number of PHP scripts that can be stored in the OPcache hash table. Its minimum value is 200, but you can set it up to 1000000 in PHP 5.5.6 and later versions. You should note that the actual value used by OPcache will be the first prime number that is closest to the value and not the value itself.
To find the perfect value to set here, you can count the number of PHP files in your Linux server by running the
find . -type f -print | grep php | wc -lcommand in your terminal. Set the value of this directive greater than the PHP file count on your server. For most WordPress installations, setting it to 10000 would be ideal.
- opcache.revalidate_freq: Directs OPcache on how often it needs to check the script timestamps for any updates. Its value is set in seconds. If you set it to 0, OPcache will check for updates on every request, which is equivalent to not having any opcode caching enabled.
If you don’t have a lot of frequent updates on your site, you can set this value to 3600 seconds. For development purposes, you can disable by feature by setting the opcache.validate_timestamps directive to 0.
- opcache.fast_shutdown: Enables the fast shutdown sequence for OPcache. It speeds up response and recycling time of PHP workers so they’re ready for additional requests immediately. OPcache achieves this by using the Zend Engine memory manager to unassign all requests in one go.
Since PHP 7.2, a variant of this directive has been integrated into core PHP and will be used automatically whenever possible.
- opcache.enable_cli: Enables opcode caching for the CLI version of PHP. Setting the flag to 1 will enable opcode caching on your server. You can disable opcode caching for development and testing by setting its flag to 0.
For further details and definitions of OPcache directives you can use, refer to PHP OPcache’s runtime configuration manual. If you’re switching between development and production stage, then it’s recommended to get familiar with all the OPcache directives to take maximum advantage of them all.
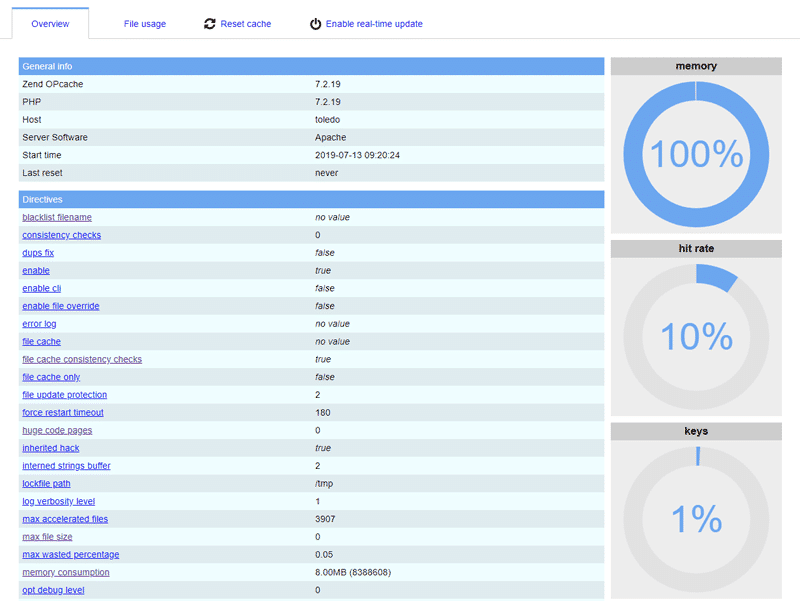
Checking PHP OPcache Status
You can check the status of OPcache on your server by running the opcache_get_status() function.
If OPCache is enabled on your server, it’ll return an array containing all the opcode caching properties. Here’s an example output of this function. If OPcache is disabled on your server though, then it’ll just return false.
You can plug in the optional get_scripts parameter to this function to get script specific state information. Alternatively, you can also use the opcache_get_configuration() function to get OPcache configuration information, including INI, blacklist, and the OPcache version in use.
For a detailed list of all OPcache functions, you can refer to the PHP OPcache functions manual.
Monitoring and Managing PHP OPcache
There are a lot of PHP extensions that let you manage OPcache features with ease through a graphical interface. Two of the most recommended extensions for this purpose are OpCacheGUI and opcache-gui (similar names, but different extensions).
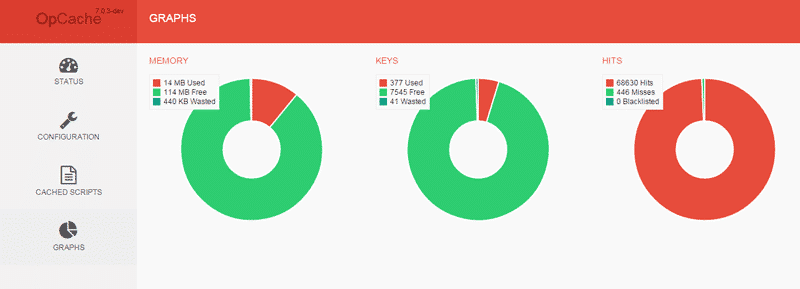
While OpCacheGUI is the better looking extension of the two, the opcache-gui extension is updated regularly to work with the latest PHP versions. You can use either of them to manage and monitor PHP OPcache easily.
Installing and Configuring APCu
You can install the APCu extension from the PECL repository or directly from PHP. Run the following command in your terminal to get started:
sudo apt-get install php7.3-apcuNote: Depending on your PHP version, you need to use the right directive. Here it’s PHP 7.3, but you may have a different PHP version installed on your server.
During the installation, you may come across questions on how to configure APCu on your server. Choose the defaults for all of them.
Next, check the php.ini file and add the below line if it’s not already added by PHP.
extension=apcu.soThis will enable the apc.so module on your server after it’s restarted. For servers running on NGINX, you must use the following command:
sudo service php7.3-fpm restart
sudo service nginx reload
If your server is using Apache, then you can use the following command:
sudo service apache2 reloadThe default APCu settings are perfect for most setups, including WordPress installations. However, if you’re considering fine tuning them, then you can read all the APCu configuration options available.
For example, the apcu.shm_size directive is set to 32M by default. If you find that APCu is running out of its allocated space on shared memory, then you can allocate more space to APCu by adding the apcu.shm_size directive with a custom value in your php.ini value.
Note: APCu on PHP 7+ versions doesn’t have full backwards compatibility with APC. If you require it, then you also need to install the APCu Backwards Compatibility (apc-bu) extension from PECL repository.
For more in-depth, highly technical information on APCu, you can check out its TECHNOTES documentation.
Summary
PHP’s default OPcache functionality provides a noticeable performance improvement for WordPress sites. Most times, the speed gains are as much as 3 times more. If you have a medium to high traffic site, then it’s highly recommended to enable opcode caching on your server. Plus, they could make a difference if you want to fix a slow WordPress admin.
As for the best PHP accelerator, there’s only one that works flawlessly for opcode caching today, and that’s PHP’s built-in OPcache. You can also install the APCu PHP extension to take advantage of its userland shared memory caching functionality.
I hope this article answered all your questions regarding PHP accelerators. Get started with speeding up your site now!