Table of Contents
Last update on
Do you want to learn how to customize the WooCommerce checkout page? It’s one of the best strategies to boost sales, improve conversion rates, and reduce cart abandonment. While the default WooCommerce checkout works, there’s plenty of room for improvement.
Sounds promising? Let’s dive in!
In this article, you’ll discover:
- How to edit and customize the WooCommerce Checkout page.
- The best practices and strategies to optimize the cart and checkout pages.
- The top tools and plugins to help you boost conversions.
- How to measure the success of your checkout strategy.
Understanding WooCommerce Checkout Optimization on Cart Abandonment
Do you know why visitors abandon their carts? Most say the checkout process is slow, the extra costs are too high, or it does not inspire trust.
The checkout experience plays an important role in whether people complete their purchases or abandon their carts and leave your site. A user-friendly checkout process makes it easier for customers to buy, which boosts conversion rates (the percentage of visitors who finish their purchase).
Here are a few interesting conversion rates and website stats that show the impact of a well-designed checkout process on cart abandonment.
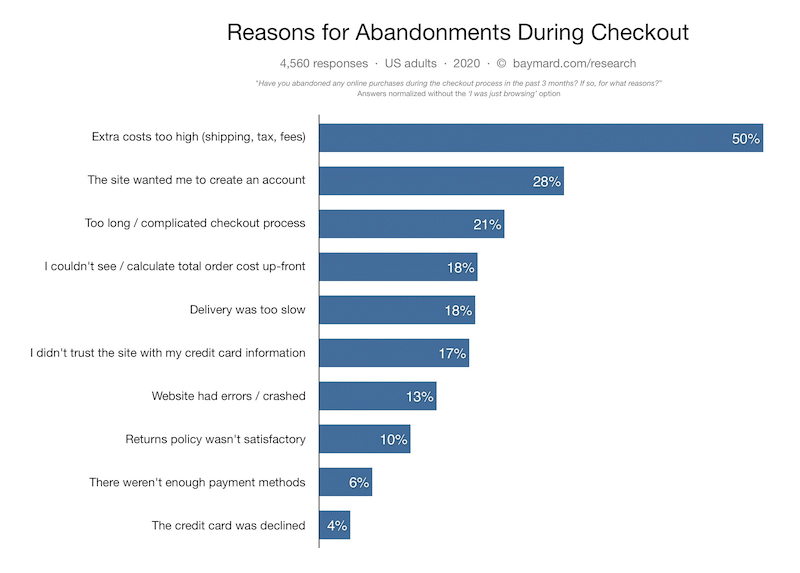
Key takeaways:
- Half of shoppers will likely leave a cart because of excessive shipping, tax, and processing fees.
- Almost a third of shoppers won’t complete the purchase if forced to create an account.
- 21% will abandon their cart if the process is too long and overcomplicated.
It’s no surprise that customizing the checkout flow can directly improve conversion rates.
How to CustomizeWooCommerce Checkout Page to Reduce Cart Abandonment
You can easily edit the WooCommerce Checkout page directly from the WordPress editor. First, let’s look at the default design of a WooCommerce Checkout page. If you don’t tweak anything on the Checkout page, the following WooCommerce fields are shown to your customers:
- Contact information
- Billing details
- First and last name
- Address (Town/City, Country, District, and Postcode/ZIP)
- Phone number
- Order notes
- Payment options
- Privacy policy statement
Visually, there is no multistep process, just a pretty long page with some fields to fill in:
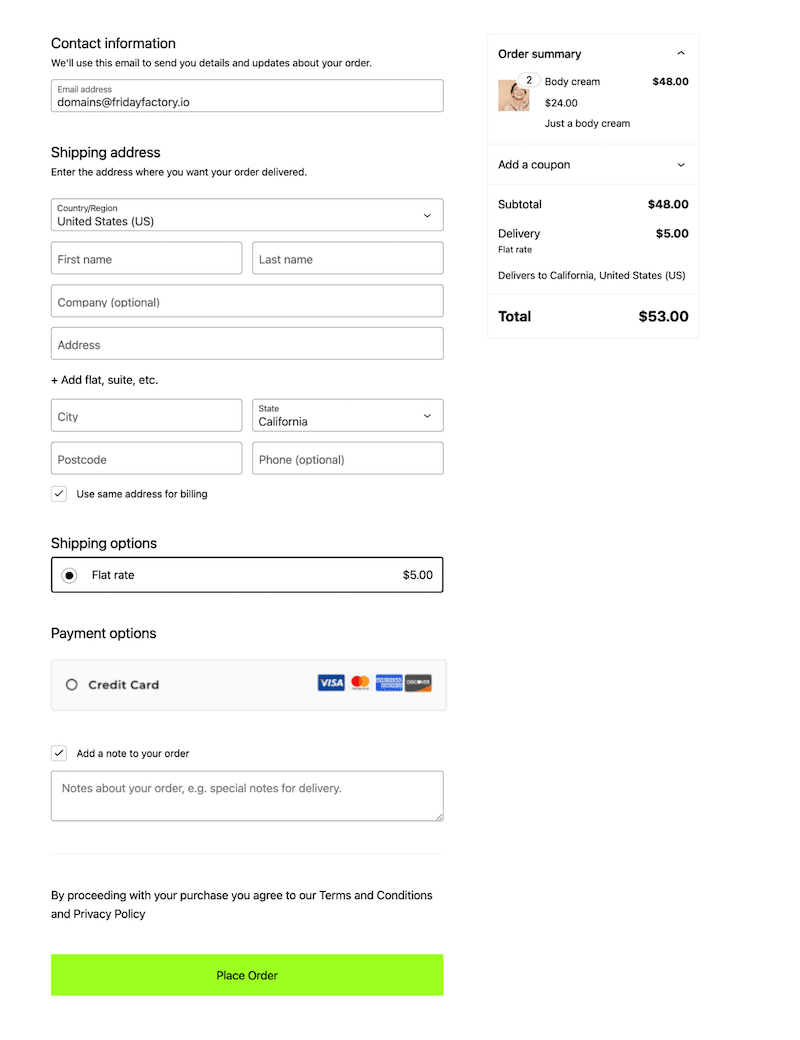
Let’s change that in just four easy steps! Here’s how to edit your WooCommerce Checkout page.
Step 1. Localize and Open the WooCommerce Checkout Page
Go to Pages > All pages and click the Edit button in the Checkout Page section.
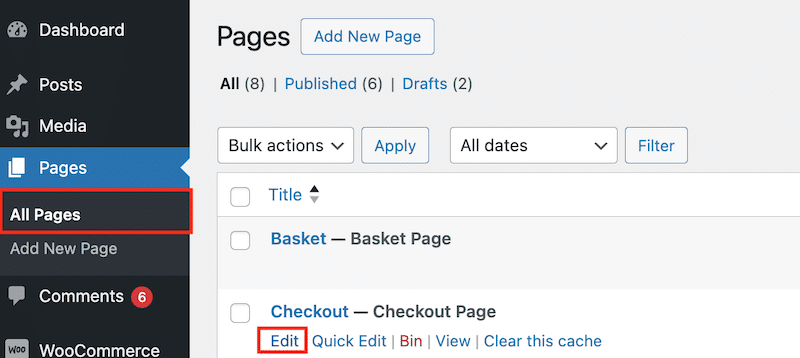
Step 2. Edit the Checkout Page Using the Editor
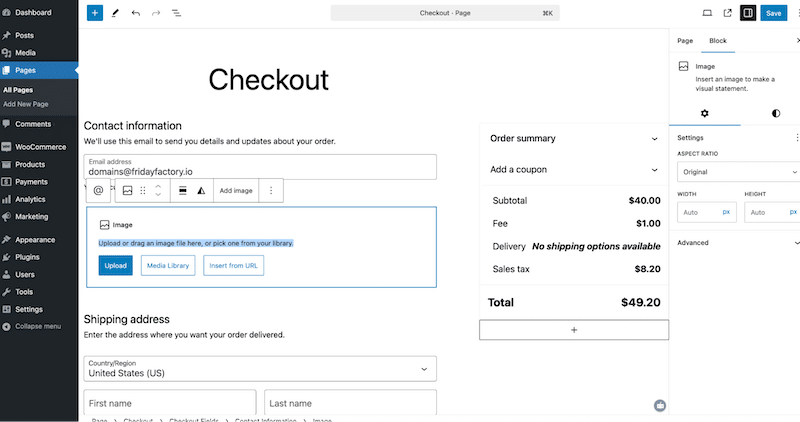
You can remove or add any fields from the Checkout page. Using the editor, you can also add some images and any other important information.
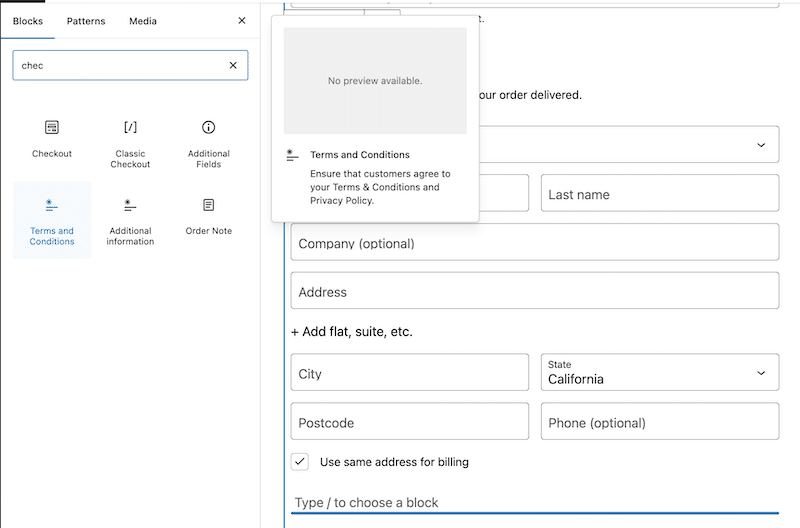
For example, you can also add extra fields using the WooCommerce blocks, such as terms and conditions or order notes.
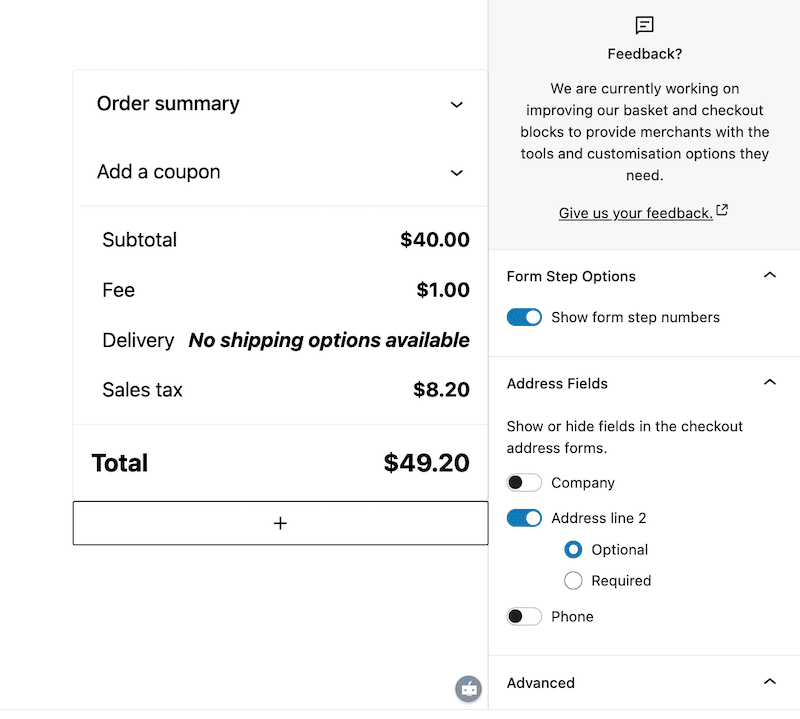
Finally, you can enable or disable some information and make it “optional” or “required.”
Step 3. Edit the Dynamic Information
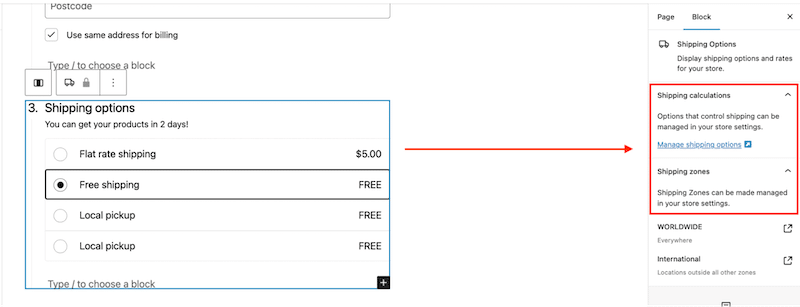
The dynamic fields on the Checkout page can’t be edited with the editor. You must adjust the settings from the WooCommerce > Settings interface to see some changes.
For example, if you want to edit the shipping options, you need to go to the Shipping settings panel. It can’t be done from the editor.
Step 4. Observe the Checkout Page Changes on the Frontend
We’ve made a few adjustments to optimize the Checkout page and reduce cart abandonment. Here are the minor improvements we implemented, which are all available in the core version of the WooCommerce plugin:
- We added numbered steps to guide users through the entire checkout process.
- We designed a shorter and faster checkout experience.
- We kept only the essential fields. For example, since our company does not offer promo codes, we removed the promo code field. Additionally, as we target only B2C customers, we removed the “Company Name” and “VAT Number” fields.
- We added PayPal as an extra payment gateway.
| The default WooCommerce Checkout page. | The optimized WooCommerce Checkout page. |
6 Common Issues to Avoid When Customizing WooCommerce Checkout Page
If you plan to edit your Checkout page, remember that while it’s pretty easy to customize, there are six common issues you might accidentally overlook during the process. Here’s what you need to watch out for to avoid hurting the user experience and losing potential sales.
1. Ignoring Mobile Optimization
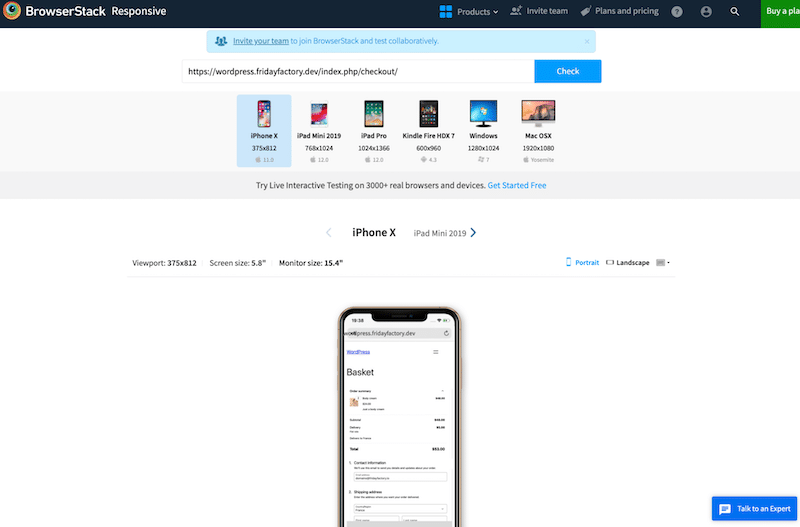
More than two-thirds of potential customers shop from their phones, so a checkout page that isn’t mobile-friendly (e.g., small call-to-actions) can cause frustration and abandonment.
💡 Quick hack: Ensure your checkout page is fully responsive. Every time you make a change, test the page on mobile devices to see how it looks and functions. A tool like BrowserStack can show you how your page looks on various devices.
2. Not Considering Page Loading Times
A slow-loading checkout page can cause users to abandon their purchases. Therefore, performance should always be checked after making edits to your page with tools like PageSpeed Insights or GTmetrix.
💡 Quick hack: Avoid heavy code or unnecessary design elements that slow down the page. Use an easy and powerful performance plugin like WP Rocket! In the next section, we will provide more details when introducing strategies to optimize your Checkout process.
3. Not Providing Enough Payment Options
Restricting payment methods can hurt conversion rates because customers will not be comfortable purchasing with the payment getaway they are unfamiliar with.
💡 Quick hack: To accommodate a variety of preferences, offer multiple payment options, such as credit cards, PayPal, and digital wallets. Go to WooCommerce > Payments and add more payment gateways to the Checkout page.
4. Forcing Account Creation
Requiring users to create an account before completing their purchase adds unnecessary friction.
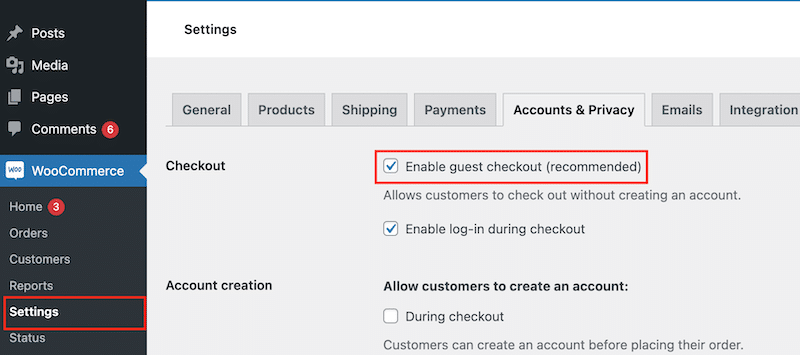
💡 Quick hack: Always provide a guest checkout option to make the process quicker and easier. You can enable this from WooCommerce > Accounts & Privacy settings.
5. Forgetting to Add a Clear Shipping and Delivery Policy
Your customers want to know exactly how and when they’ll receive their order. Your clients will likely not complete the purchase without a clear shipping and delivery policy.
💡 Quick hack: To reassure users, prominently display shipping fees, delivery timelines, and options (e.g., express shipping is available) on the checkout page.
6. Overthinking the Checkout Process and Using an Old Design
Adding too many fields or steps to the checkout process is the best way to overwhelm users and make them abandon the purchase. On top of that, an old design will decrease trust in your company. However, using a modern WordPress theme will positively impact the user experience.
💡 Quick hack: Stick to essential fields only, such as name, address, and payment details. Avoid making non-critical fields like “birthday” mandatory.
Now that you know what not to do regarding WooCommerce checkout, check out the next sections to implement the best practices to optimize it.
7 Strategies to Customize WooCommerce Checkout and Increase Conversion Rate
Editing the WooCommerce Checkout page with the WordPress Editor is a great first step to improving conversion rates, but the options are limited. We’ll provide an example for each optimization, and if a feature isn’t available in the core version of WooCommerce, we’ll recommend additional tools to help.
Let’s review 7 strategies you can implement to optimize WooCommerce checkout and boost conversion rates.
1. Maximize Speed and Performance
If your WooCommerce site is slow and your checkout process takes forever to load, your clients will leave and go to the competition. Focusing your effort on page speed and performance is essential to avoid this. There are plenty of optimizations you can do to make sure the purchasing process is fast, such as:
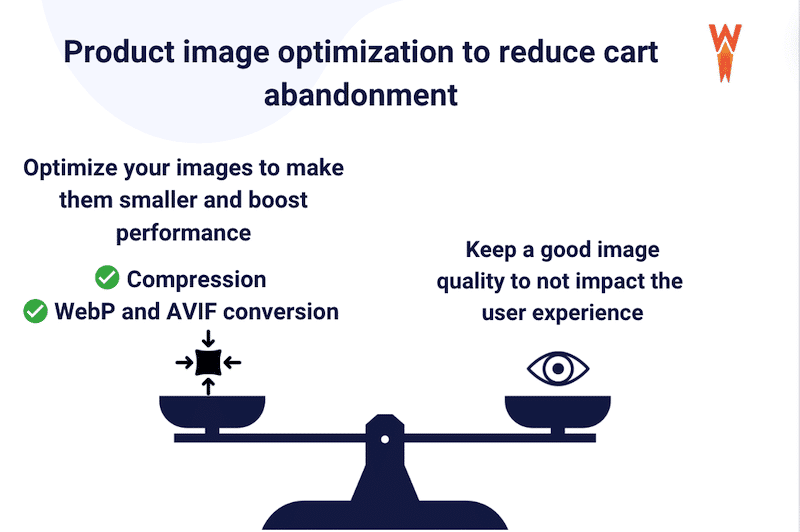
- Optimize your product images by applying compression to reduce the file size.
- Implement caching and GZIP compression.
- Optimize JavaScript and CSS files.
- Use a fast and secure hosting provider.
- Use a lightweight theme.
📈 Conversion rate stats (Source: WP Rocket page speed stats)
- For every second delay in mobile page load, conversions can fall by up to 20%.
- Almost 90% of mobile users will leave a site if it’s slow (Source: Linearity).
- A site that loads in 1 second has an e-commerce conversion rate 2.5x higher than a site that loads in 5 seconds.
✅ Example
Imagine you’re shopping online, and when it’s time to check out, the process is simple, fast, and secure. All the key details—like the price and delivery fees—are clearly displayed on one screen. You’re far more likely to complete your purchase.
Now, picture the opposite: the site is slow to load and crashes. Frustrated, you might decide to abandon your cart and leave without buying.
🛒 Do you need an extra plugin beyond WooCommerce?
Although performance is at the heart of its strategy, WooCommerce is not a performance plugin, so you’ll need extra tools to make your site faster.
⚒️ Recommended plugins
- WP Rocket: as mentioned above, it’s the easiest and most powerful performance plugin that implements 80% of performance best practices upon its activation, giving a significant speed boost to your site.
Let’s go over some interesting features that help improve performance and reduce cart abandonment:
🚀WP Rocket applies 80% of best practices upon activation, including caching, preload cache, critical image optimization, automatic lazy rendering, and GZIP compression.
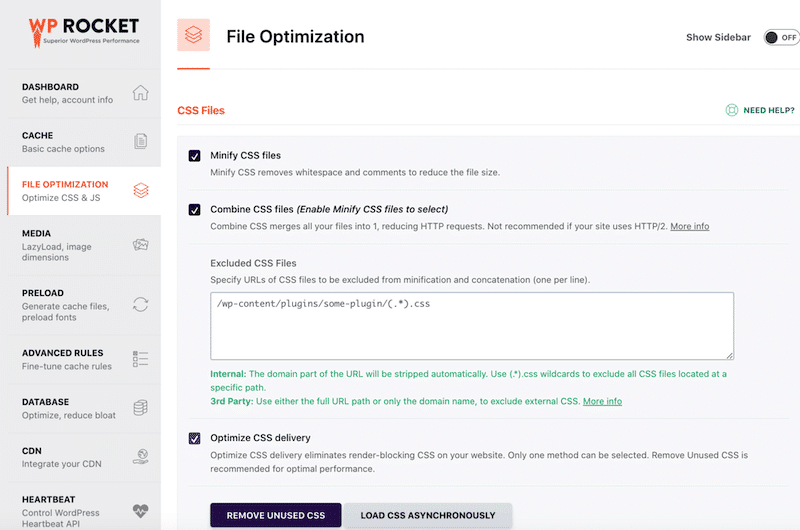
🚀 It also optimizes JavaScript and CSS files –among the main culprits for a slow website– thanks to minification and advanced and powerful features such as Remove unused CSS, Load JS deferred, and Delay JS execution.
🚀 WP Rocket allows you to lazy load images, videos, iframes, and CSS background images.
- Imagify: it’s the easiest plugin to optimize your product images. Imagify compresses your images while maintaining an optimal quality thanks to the Smart compression feature. You get a faster site while preserving high-definition visuals for your visitors.
| 💡 Hint: We suggest running a performance test on PageSpeed Insights before and after using Imagify and WP Rocket. |
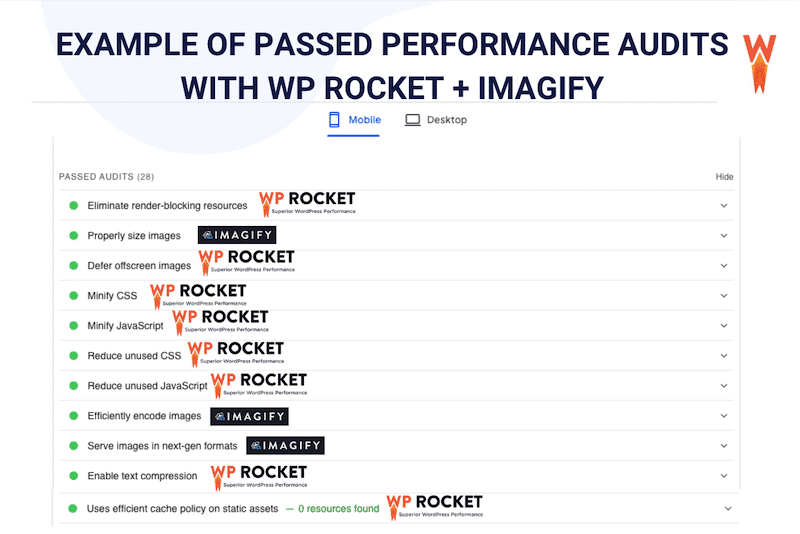
The last interesting point about these two plugins is that their features align with PageSpeed Insights’ recommendations for performance and user experience, which can boost performance and user experience and ultimately reduce cart abandonment.
PageSpeed Insights is a tool that audits your site’s performance and user experience, providing a grade out of 100, along with key performance indicators (KPIs). It also highlights areas for improvement, such as implementing caching, optimizing images, minimizing unused CSS or JavaScript, and improving code efficiency.
By using Imagify and WP Rocket, you’re addressing these recommendations directly, increasing your chances of getting a higher score on PageSpeed Insights. As a result, your WooCommerce shop’s performance is significantly improved, leading to a better user experience and potentially reducing cart abandonment.
For instance, here’s how Imagify and WP Rocket can help you fix performance issues and ensure your Checkout process is not slow.
| 📖 Check out our in-depth guide, which explains how to speed up a slow WooCommerce site. |
2. Show Clear Shipping and Delivery Policies
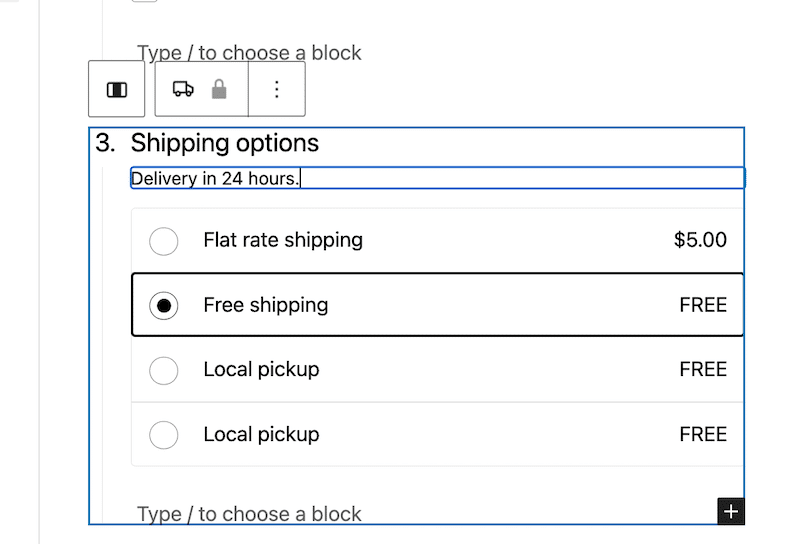
To build trust and manage customer expectations, you should display clear shipping and delivery policies as early as on the product page. When shoppers know exactly how much shipping costs, the estimated delivery time, and any additional details upfront, they’re more likely to complete their purchase on the checkout page. This transparency reduces uncertainty and avoids unpleasant surprises that can lead to cart abandonment.
📈 Conversion rate stats (Source: Baymard)
- 21% of shoppers would leave your site and abandon the item in the cart if they could not see or calculate the total order cost up-front.
✅ Example
Imagine you’re about to buy a product online, and just as you reach the checkout page, you discover unexpected high shipping fees or vague delivery timelines like “shipping may take 10-20 business days.” This lack of clarity can be frustrating and negatively impact the conversion rate.
🛒 Do you need an extra plugin beyond WooCommerce?
No extra plugins are needed. You can add your shipping classes and display the information directly on the product and checkout pages from WooCommerce admin.
3. Provide Convenient Payments Gateways
Convenient payment gateways are essential for optimizing the checkout process and directly impacting your conversion rate. Customers are more likely to complete their purchase when they find their preferred payment method, such as Venmo in the US, Klarna in Germany, or Alma in France. Offering various payment options makes the checkout experience smoother, builds trust, and reduces the chances of cart abandonment. The easier you make it for customers to pay, the higher the likelihood they’ll follow through with the transaction.
📈 Conversion rate stats (Source: StableWP)
- 40% of shoppers have more confidence in online shops that offer multiple payment options.
- 59% will not complete a transaction if their preferred payment method is not available.
✅ Example
Let’s say you’re shopping online, but when you reach the checkout page, your preferred payment method isn’t available—no Venmo for US shoppers or no Alma for French buyers wanting to pay in 4 installments without fees. This lack of convenience can frustrate customers and push them to abandon the checkout process.
🛒 Do you need an extra plugin beyond WooCommerce?
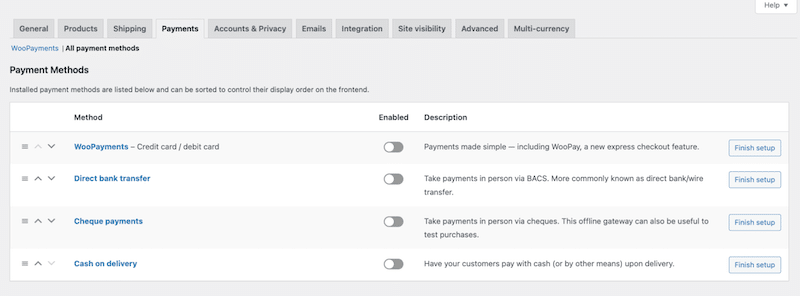
You can add extra payment gateways with WooCommerce, but online wallets like Paypal are missing in the core plugin. By default, WooCommerce offers WooPayments, direct bank transfers, cheque payments, and cash on delivery. However, you will need another plugin to activate online wallets like Paypal, Alipay, or Klarna.
⚒️ Recommended plugins
- Paypal payments for WooCommerce: it lets you add PayPal, Pay Later, Venmo, Apple Pay, Google Pay, and PUI (popular in Germany) to your Checkout process.
- AliPay and WeChatPay: it allows you to accept payment from Chinese shoppers. AliPay and WeChatPay are the most popular payment gateways in China.
4. Keep Only the Essential Fields and Use AutoFill
When the checkout process requires too many fields, customers may abandon their carts simply out of “laziness” or frustration. A lengthy form with unnecessary details like account creation, birthdays, or multiple address fields can visually discourage shoppers—especially on mobile devices—making them leave before completing the purchase.
For the cart, optimize the experience by showing the essential fields:
- Clearly display the number of items, size, and colors and a clear picture of the product.
- Allow easy modifications, like changing size or color or deleting an item.
- Show the total cost of the transaction with a clear breakdown: VAT, processing fees, or any other extras.
- Clearly highlight your shipping and delivery policy, such as 24-hour delivery, to set expectations and build confidence.
✅ Example
Imagine you’ve found the perfect handbag: you’ve selected the color, the size, and the price is just right. But when you land on a checkout page with 15 mandatory fields to fill out, you quickly lose motivation and leave. This impacts the conversion rate.
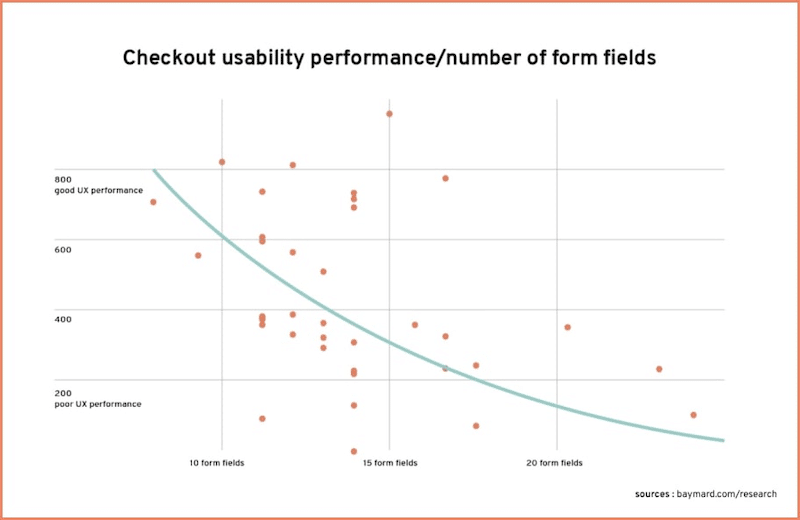
📈 Conversion rate stats (Source: Baymard)
Research shows that websites with fewer form fields have a better chance of increasing their website checkout rate.
🛒 Do you need an extra plugin beyond WooCommerce?
With WooCommerce, you can activate or deactivate various fields directly from the WordPress editor. However, for a fully customized form with a modern and user-friendly design, you’ll need a dedicated plugin or a theme offering WooCommerce templates.
Recommended tools:
- Google AutoFill Customer Addresses for WooCommerce: it allows users to quickly input their personal details, saving time and effort using Google’s API.
- Custom Fields for WooCommerce: it allows you to create unlimited fields and display them within the Registration, Checkout, and My Account pages.
- CartFlows: it’s one of the best plugins for creating a custom, optimized checkout page with the fields and design of your choice.
- Themes like Astra, Avada, or Divi offer beautiful WooCommerce templates with sleek and modern designs.
5. Make Your Checkout Process Trustworthy
To boost conversions, you must build trust throughout the shopping experience, from browsing and adding items to the cart to making a payment. Start by meticulously describing your product descriptions and images to reflect professionalism and accuracy. Add verified reviews from platforms like TrustPilot or Google, adding credibility.
📈 Conversion rate stats (Source: Baymard)
- 17% of the shoppers won’t put their credit card details if they don’t trust the whole checkout process.
For the Checkout page, optimize the security experience by:
- Highlighting security features, such as HTTPS, 3D Secure, or a lock icon, to reassure users their data is safe.
- Using clean, modern design templates to encourage customers to use their credit card and complete the payment.
🛒 Do you need an extra plugin beyond WooCommerce?
WooCommerce lets you add some manual reviews by default, but you will need a plugin to connect to Trustpilot or Google. The cart itself is well done but pretty basic. For example, if you want to allow the customer to change the size of the basket, you’ll need a dedicated plugin.
⚒️ Recommended plugins
- Customer Reviews WooCommerce – it helps you to get more reviews and social proof to improve your site’s credibility.
- WordFence or Sucuri – they both help you to have a secure WordPress site and protect you against malicious attacks.
6. Offer Guests Checkout
A guest option allows you to complete a purchase easily, saving time and effort. If you don’t want to lose a sale, you must offer that option to your customers.
📈 Conversion rate stats (Source: Baymard)
- 28% of the shoppers won’t buy if they are forced to create an account.
✅ Example
If you just want to buy a jacket quickly, being forced to create an account feels like too much hassle. Without a guest checkout option, you’d likely abandon your cart—you want the jacket, not a membership to the online shop.
🛒 Do you need an extra plugin beyond WooCommerce?
No, you can use WooCommerce features to do this.
Go to WooCommerce > Settings > Accounts & Privacy > Checkout and check the Enable guest checkout option.
7. Choose Between Multistep Checkout or One-Page Checkout
Another way to optimize your checkout process and boost conversion is to decide between a multistep or a one-page checkout.
Pro multistep checkout
A multistep checkout is ideal for guiding users through the process, especially for older demographics or those making larger, more thoughtful purchases. Clear progress indicators help users stay oriented and reduce overwhelm. This approach can boost conversions for products that require detailed information or involve a significant financial commitment.
✅ Example
Booking a flight ticket to French Polynesia. Customers need to carefully review dates, baggage options, and passenger details step by step.

Pro one-page checkout
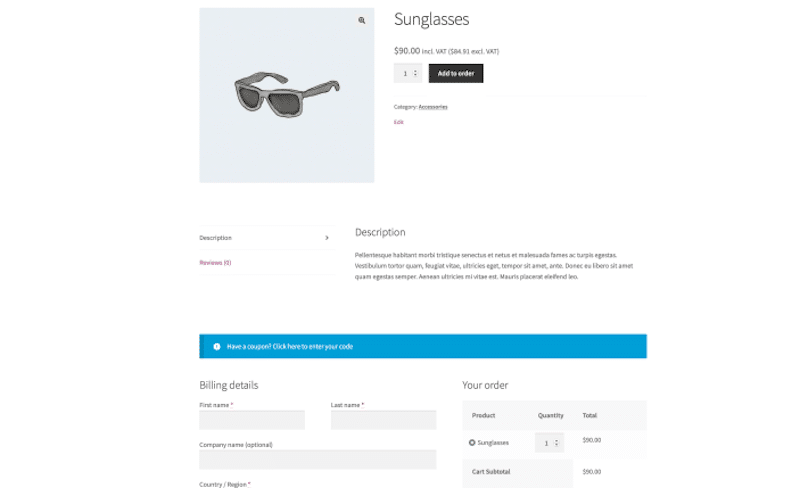
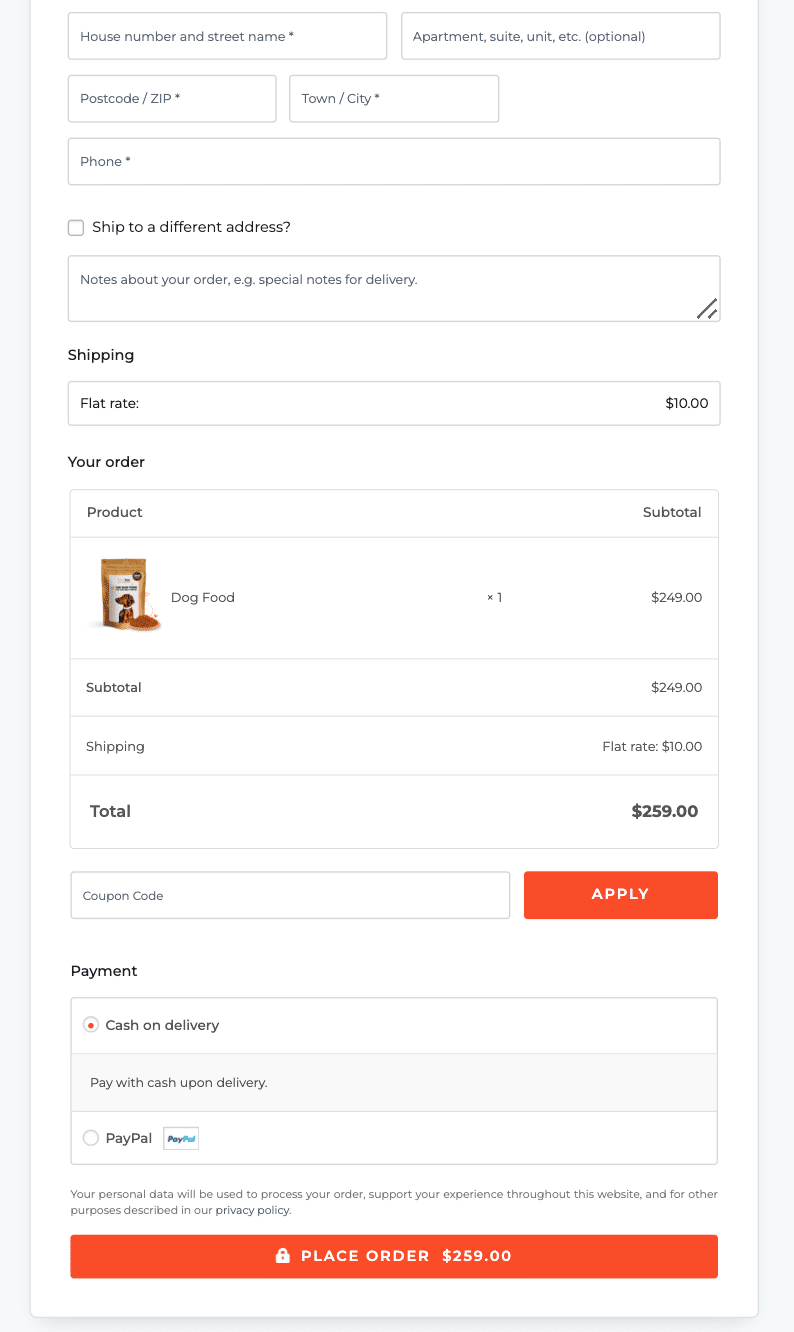
A one-page checkout is perfect for cheap items, impulse buys, and tech-savvy shoppers who value speed and simplicity. It’s particularly effective for mobile users or recurring clientele who want to complete purchases quickly and directly from the product page.
✅ Example
Buying a pair of sunglasses seen on TikTok. The customer sees the product and completes the purchase without even adding it to the cart—all in minutes.
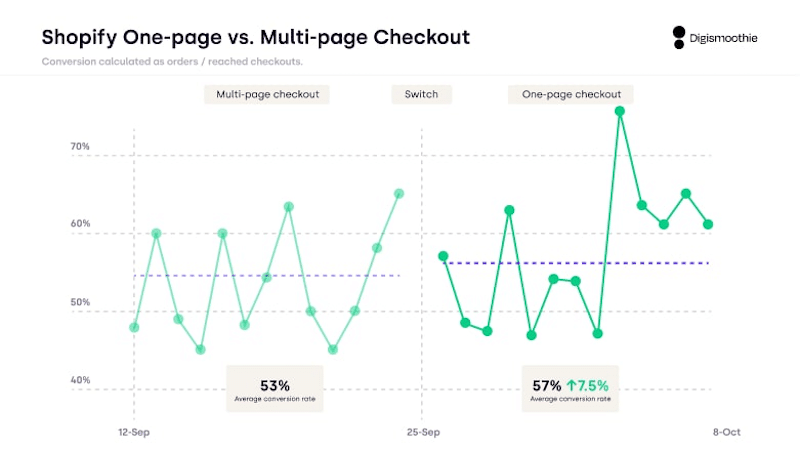
🛒Conversion rate stats (Source: DigiSmoothie)
- The conversion rate is usually higher for a one-page checkout (+7.5%) than for a multistep checkout.
- There are more cross-sell opportunities with the multistep checkout.
🛒 Do you need an extra plugin beyond WooCommerce?
The default WooCommerce checkout does not offer the multistep functionality. It only allows you to number sections (e.g., billing information, payment, etc.) but doesn’t break them into separate steps. WooCommerce offers a one-page checkout as a separate step of the purchasing process, not directly on the product page.
⚒️ Recommended plugins
- WooCommerce One Page Checkout: it simplifies checkout into a single page for fast transactions.
- Multi-Step Checkout for WooCommerce: it breaks the process into clear steps with progress indicators.
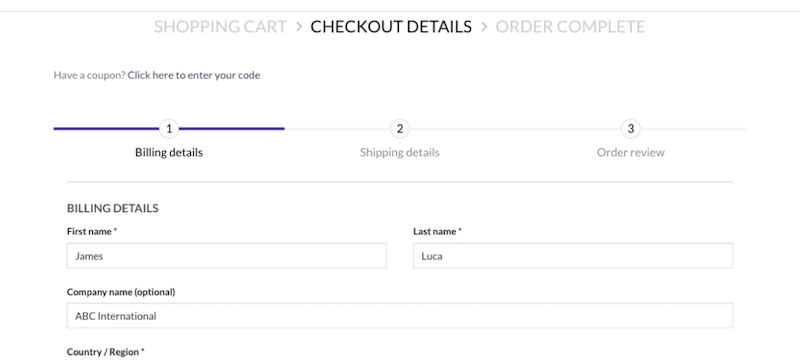
- CartFlows: it’s a comprehensive tool for building optimized multistep and one-page checkout processes.
Measuring the Success of Your WooCommerce Checkout
Now that you know how to customize a successful WooCommerce Checkout process, it’s time to implement it in your online store. Before making any changes, here are some tips you can follow to measure the success of your checkout properly.
1. What’s the Current Checkout Experience?
To assess your current Checkout experience, start by analyzing the existing landscape. You can create a simple table with the following KPIs:
- Conversion rate: it tracks the percentage of visitors who complete a purchase (e.g., 3 out of 100 visitors buy, so your conversion rate is 3%).
- Number of sales: it measures how many transactions are completed per day or per month (e.g., your store makes 200 sales in a month).
- Revenue: Shows the total income generated from sales (e.g., you earn €10,000 in revenue in December).
- Average order value: it calculates the average amount spent per order (e.g., dividing €6,000 revenue by 60 orders gives an AOV of €100).
- Cart abandonment rate: it tracks how many shoppers add items to their cart but don’t complete the purchase (e.g., 70 out of 100 visitors abandon their cart, giving a 70% abandonment rate).
- Checkout completion rate: it measures the percentage of users who finish the checkout process after starting it (e.g., if 50 out of 60 users complete checkout, your rate is 83%).
2. Does Your Checkout Process Adhere to Our List of Best Practices
Next, add the best practices mentioned in the previous section to your table and see if you check all the boxes:
- Don’t overwhelm users with unnecessary fields.
- Offer guest checkout.
- Propose a fast checkout with a beautiful design.
- Provide enough payment methods.
- (…)
If you’re missing some key elements, implement the strategies mentioned earlier and review the results a week later and then a month later.
3. Implement A/B Testing
Sometimes, testing two strategies side by side helps you identify the most effective one. A/B testing allows you to compare performance, for example, between a single-page checkout and a multi-step checkout.
4. Measure the Results Using GA4
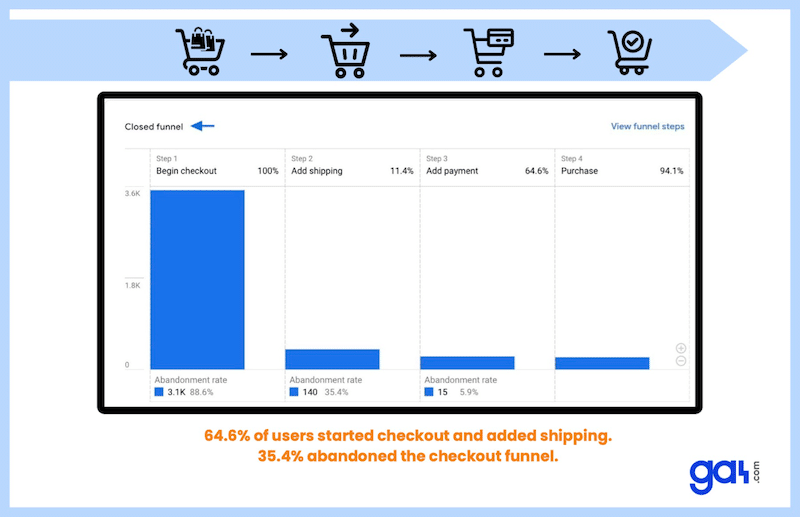
Google Analytics has a feature called “The Checkout Journey report” that shows the number of users who began the checkout and completed each step in the checkout funnel. To open the report, go to Go to Reports > Monetization > Checkout Journey.
Wrapping Up
You’ve now learned how to edit your WooCommerce checkout to reduce cart abandonment and boost conversions. It’s time to put these strategies into action! Start by ensuring your WooCommerce site is fast, which is an essential step you can achieve with just a few clicks with WP Rocket. With the 14-day money-back guarantee, there’s no risk involved—give it a try today and offer a faster checkout experience to your potential customers!


