Table of Contents
Last update on
Image optimization is an art that you cannot refuse to acknowledge if you want your website to be as fast as possible and give your readers the best user experience.
As any painter needs to know the technicalities of their job (the use of color, styles, and artistic supports), you—as an image optimizer artist—should dig into the study of your images and understand their format capabilities, quality, pixel dimensions and so on.
The good news is that, with the right techniques, you can significantly reduce the size of your images and make your pages a lot faster.
In this article, we are going to walk you through the secrets of image compression for the web: you’ll learn how to determine the ”right weight” of your images and which tools you can use to compress them and reduce their file size.
What Does Compressing an Image Mean (And Why You Should Do It)
Compressing an image for the web means reducing its file size: this is achieved by minimizing the size in bytes of the image file without any quality loss.
In other words, when you compress an image you reduce the amount of storage space that image file will occupy: storage space is measured in kilobytes (KB) and megabytes (MB), where 1MB = 1000KB.
And here’s why you should compress your images: We all want our images to be crisp and high-quality, but it’s important to balance this desire with the time required for the pictures on your pages to be downloaded from the browser. Performance and speed matter more than ever.
The lighter your images will be, the faster your pages will download: it’s a constant struggle between pleasing your users —who love reading your content supported by beautiful images— and making King Google happy! Keep in mind that compressing and reducing your images’ size will also help you optimize the Largest Contentful Paint grade, one of the Core Web Vitals metrics.
How to Determine the Ideal Weight for an Image?
There’s no single answer to this question: the ideal size of an image file is the one allowing you to have the lightest image possible while preserving the quality necessary for excellent performance on the page.
To find your answer to the question, try to see the subject from a different angle and ask yourself instead:
Do I really need an image here?
Is an image necessary to achieve the special effect I’m seeking on this page?
Can I spare my users some bandwidth and prevent them the download unuseful bytes from the browser?
Sometimes, effective design and well-formatted content can already do miracles. Whenever you can remove an image resource, and avoid its burden (in terms of HTML, CSS, or JavaScript), you’re already applying the golden rule of a good image optimization strategy: less is more.
That said, placing an image that conveys your message most effectively is a win-win situation for your content marketing strategy.
Your images need to be hi-res and neat. Unfortunately, most of the time, hi-resolution and neat images tend to have huge file sizes.
When you upload a hi-res picture on your pages, you should always keep in mind the equation:
Huge file size = slower loading time = higher bounce rates and customers running away from your site.
Which Tools Can Be Used to Identify the Size of an Image?
There are several free tools that will help to identify particularly large images on your pages.
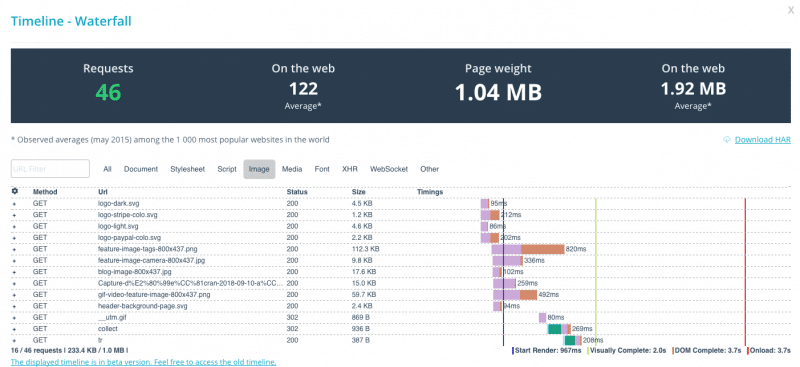
You can run a speed test with GTMetrix or Dareboost; both of them will reveal the total page size and, within their waterfall, will indicate which files are the heaviest:
Even your browser is a useful ally in this quest for the best image size.
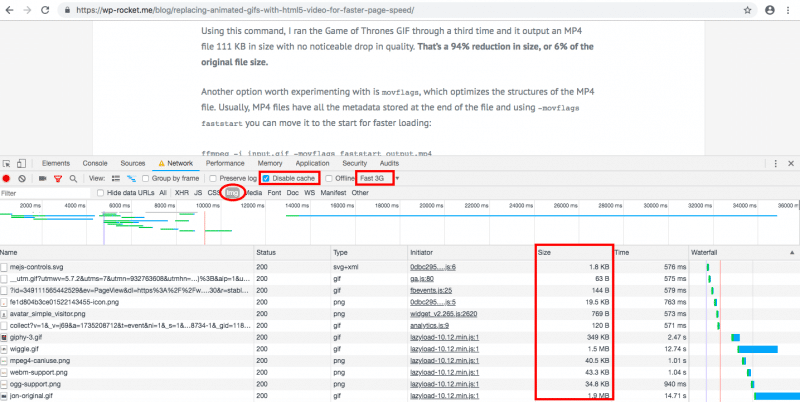
For example, on Google Chrome, you can open its Dev Tools and do the following:
- Open up the Network Panel
- Set the Throttling to Good 3G
- Click on Disable cache
- Filter the results by Images (Img)
- Refresh the page and check the Size column
Once you know which images are burdening your pages, optimizing them will be a lot easier!
Which Steps Should You Follow to Reduce the File Size of Your Images?
The first important rule you should religiously implement every time you deal with images for your website is learning to save them in a suitable web format.
Every little KB is important: even when you think that optimizing an image will only save a little 10% of its size…go with it! You’ll be grateful for it in the future 🙂
1. Select the Right Image Format
We can usually distinguish between two categories of images: vector and raster.
Commonly, vector graphics are in the SVG, EPS, and PDF formats: you can find them in images consisting of geometric shapes; furthermore, they are zoom and resolution-independent.
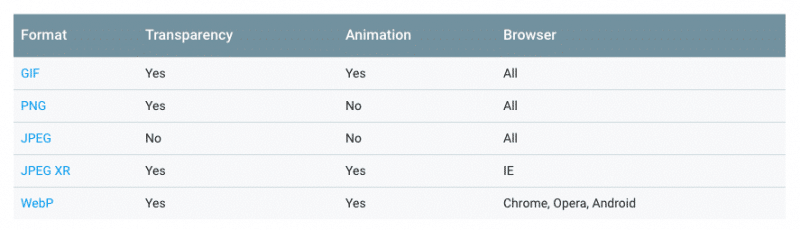
Raster images are ideally suited for complex scenes including irregular shapes and details, like pictures. The most common raster image formats are GIF, PNG, JPEG; more modern formats are also spreading, such as JPEG-XR and WebP.
Raster images are not resolution or zoom independent: that’s why, when you scale them up, you’ll end up with blurry graphics. Consequently, it’s always better to save multiple versions of the same raster image at different resolutions so that your users could benefit from an optimal experience.
GIF, PNG, and JPEG images are the three universally supported image formats for the web.
Some browsers also support the most recent image formats such as WebP and JPEG XR, which offer better overall compression and more features.
Check this table from Google Developers Guides to learn the different characteristics of each image format:
2. Resize Using the Right Dimensions
Whenever you use an image which size is larger than the dimensions needed in your web page, you are sending redundant bytes over the wire.
Web performance tools such as Google PageSpeed often refer to this point using the recommendation Serve scaled images.
Scaling images with an image editor before uploading them is the way to go; make sure to specify those dimensions in the page as well using the srcset attribute.
3. Compress Your Images With the Right Tool
Before looking for a compression tool, keep in mind these two tips when you start optimizing your images:
- Remove unnecessary image metadata: sometimes your images can contain private EXIF metadata from digital cameras, embedded thumbnails or comments. Removing them is not only a good security practice, but it will also improve the size of your files.
There are different tools able to delete this data. - Automate as much as you can: think about investing in automated tools or plugins that will ensure that all your image assets are always optimized.
After this, you’ll be ready to dive into the world of image compression tools and choose the one which best suits your need.
Which Are the 5 Best Tools to Compress Your Pictures in WordPress?
You know that your users and Google love images, which are a powerful tool to improve your content and your SEO strategy.
But to be loved, your images must be of good quality; making them lighter is not enough.
The biggest problem you’ll probably face when trying to optimize your images is that modifying their size often reduces their quality. And you don’t want your readers to hate your website just because of that!
As with many things related to web optimization, compressing images is a matter of balancing expertise and time-consuming techniques: your goal is to compress your images while keeping them pretty enough and not sinking into complex image editing software.
There are many tools to format your images and make them a perfect fit for your website. Here are the most common image editing tools:
They all are great tools, but some of them can be expensive or require time to learn how to use effectively.
That’s when online image optimization tools come in handy!
Online tools for image compression have spread around the web. They come in different shapes and designs, some of them are rather minimal and some more complex to use.
In our opinion, a valid online tool for image editing should be able to balance usability and effectiveness. You don’t need fancy designs if the outcome doesn’t meet your needs; at the same time, achieving the best result is easier when the user interface is intuitive and straightforward: online tools shouldn’t need a user’s manual!
Let’s see in detail five of the best tools to compress your images online and obtain greater results in terms of size/quality.
1. Imagify.io
Imagify is an image optimization tool available online, as a WordPress plugin, and through an API.
To benefit from all its features, you should create a free account, which comes with free 25MB of images per month.
With a free account, you can optimize any JPEG, PNG, and GIF (animated or not) image files up to 2MB; there’s no max upload size limit for paid accounts.
Imagify’s user interface is clean and simple to browse.
You’ll find three compression levels: Normal, Aggressive, and Ultra.
Normal compression is lossless, meaning there’s no image quality loss; Aggressive and Ultra compressions are more powerful and they could imply a very slight quality loss, but the size of the image will be a lot less.
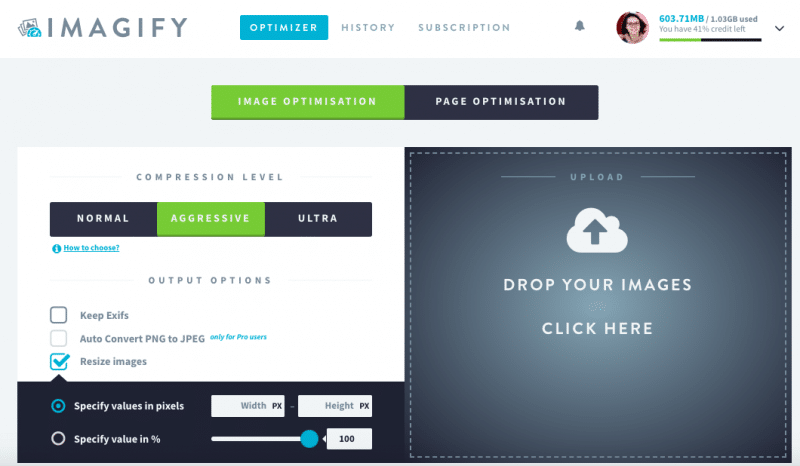
Among the Output Options, you can specify custom values for width and height (in pixel or percentage); by default Exifs data will be removed, but you can check the option if you want to keep them.
If you use this online application with a free plan, your images will be stored for 24 hours in your account; if you go for a paid subscription, you can save your pictures for unlimited time.
Bonus point: Imagify gives you the possibility to run a page optimization. Just add the URL of the page you wish to optimize, and it will scan it, retrieving the list of all the images contained in it and compressing them all at once. Download the .zip file provided, and use the optimized images on your page!
2. Compressor.io
Compressor.io is a very straightforward one-page image optimization tool for JPEG, PNG, GIF, and SVG files. You have to click on the Try it! button and it will do all the work.
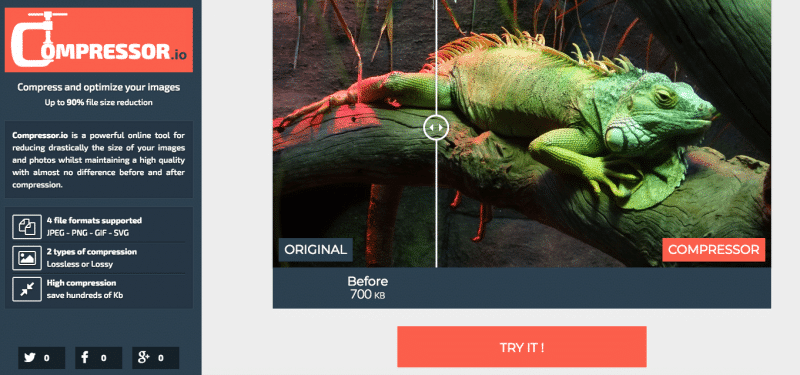
There’s the possibility to choose between two levels of compression, Lossless or Lossy: the first will guarantee better quality but less size reduction; the second one focuses more on file size with a little quality loss.
3. TinyJPG | TinyPNG
TinyJPG and TinyPNG are two free online tools to optimize JPEG and PNG files respectively. They are very easy to use: drop your .jpg/.png file, and they will automatically compress it.
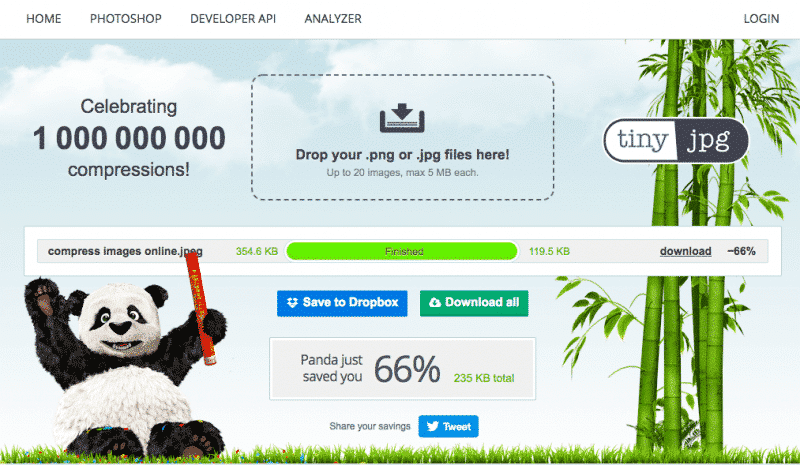
You can upload up to 20 images of maximum of 5MB each; if you go for a Pro account, there’s no limit in the size of the upload.
4. Kraken
Kraken is available as an online tool, a plugin for WordPress and Magento, and an API.
It offers several optimization modes: Lossless, Lossy, and Expert.
The last one can be used to set different quality levels for lossy JPEG and PNG optimization, keep some EXIF metadata, and automatically orient images.
If you open a free account, you’ll be able to upload through the web interface images up to 1MB.
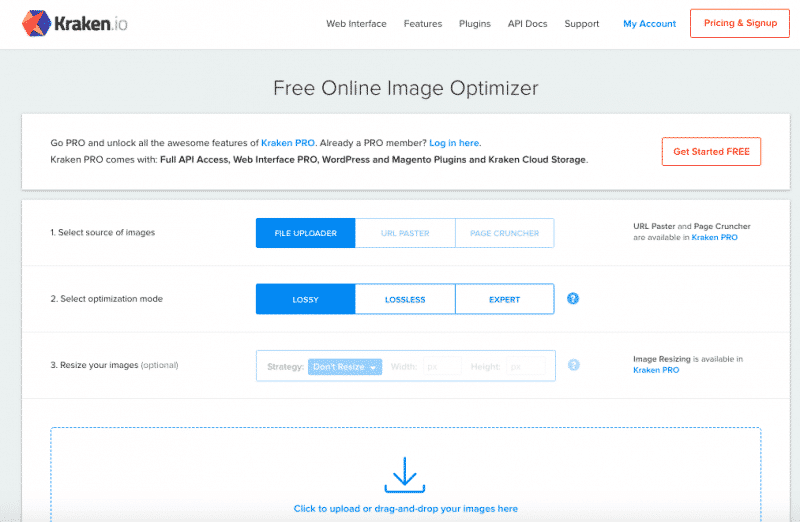
Some of its options are available to Pro customers only, such as URL Paster, Page Cruncher, or image resizing. Pro users can retrieve their images at any time through Kraken Cloud Storage, while free users can download their optimized images within 12 hours.
5. Optimizilla
Optimizilla is a super easy-to-use online image optimizer relying on a combination of optimization and lossy compression algorithms. It works with JPEG and PNG images and can reduce them to the minimum possible size without having a negative impact on quality.
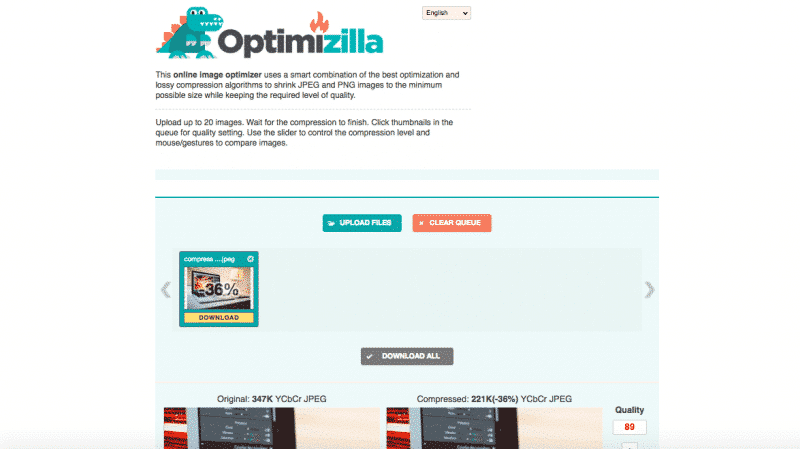
You can obtain optimized images in a few steps: upload up to 20 images at a time and wait for the compression to stop. In the end, you can use the slider to control the compression level and compare the original image with the final one.
Everything You Need to Know About Image Optimization in WordPress
In this article you learned:
- What compressing an image for the web really means
- What do we mean by ideal weight for an image and how to measure it
- How to identify the size of an image
- Which steps you should follow to reduce the file size of an image
- Which tools can be used to compress images
Now that you know everything about image compression, it’s time to go ahead and learn other tricks about image optimization:
- How To Resize Your Images And Boost Your Site?
- What’s Image Lazy Loading and Why You Should Use It
- How to Lazy Load Your Images on WordPress
- Image Optimization With Imagify: The Definitive WordPress Plugin To Optimize Your Images
Last but not least, don’t forget to take a look at the list of the best image optimization plugins for WordPress!