
Table of Contents
Last update on
If you’ve found yourself frustrated by sluggish loading times and wondering, “Why is my WordPress website slow?”—you’re not alone. Whether you’re a seasoned WordPress user or a novice, understanding the factors contributing to bad performance is the first step towards reclaiming the speed and efficiency your website deserves! The loading time of your WordPress website plays a crucial role in shaping user experiences and determining your online success.
This article reveals the most common reasons behind a slow WordPress website, delving into the common culprits that hinder performance and offering practical solutions to accelerate your site’s loading times.
11 Reasons Why Your WordPress Website is Slow
To fix a WordPress site loading slowly, you need to explore each factor that impacts performance, from code optimization to server-side issues.
Watch the video or keep reading and start by discovering the most common reasons behind a slow website.
1. You’re Using a Heavy Theme
A heavy WordPress theme, characterized by excessive code, large file sizes, and complex design elements, can significantly impact website performance. Key issues associated with heavy themes include higher page load times, higher bounce rates, and potential SEO penalties. To avoid this, it’s crucial to prioritize themes with efficient coding, optimized assets, and a balance between aesthetics and performance to ensure a smooth and responsive website.
How To Test Your WordPress Theme Speed
To measure your WordPress theme’s performance, follow these steps:
- Set up a new WordPress installation without any content
- Install and activate your selected theme (avoid adding demo content or making adjustments to the settings)
- Use tools such as GTmetrix and PageSpeed Insights to test your website to have results for desktop and mobile versions.
- Check the key performance indicators (KPIs), including Core Web Vitals, Speed index, total page loading time, the number of HTTP requests, and page size.
How To Fix a Slow WordPress Theme
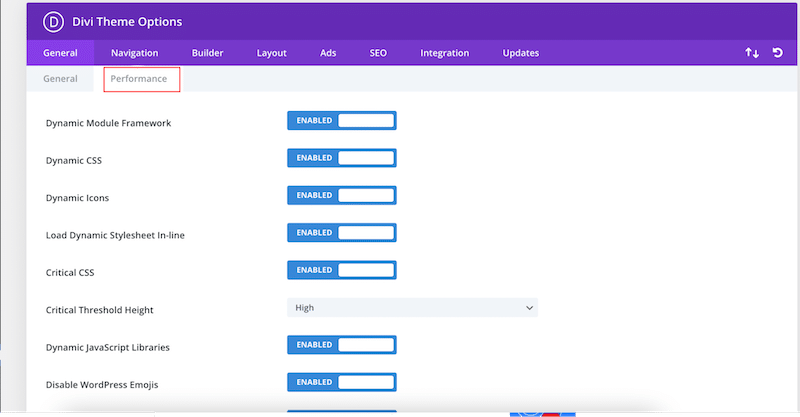
- Check if the theme has some performance settings you can tweak. Divi has a performance tab that allows you to turn some options on and off:
- Use caching and GZIP compression and run the performance tests again. If nothing changes, then we recommend switching the theme.
| 🚀 You can use WP Rocket, one of the best caching for WordPress, which applies caching and GZIP compression upon its activation. |
2. You Are Not Using the Right Hosting Plan
Choosing the right WordPress hosting is crucial for your website’s performance, security, and overall success. Here are some key factors to consider when selecting a WordPress hosting provider:
- Type of hosting: Shared, managed WordPress hosting, or dedicated hosting. For example, dedicated hosting will provide the highest level of performance but also the highest cost.
- Resource limits: Be aware of any limitations on bandwidth, storage, and other resources in the hosting plan. If you plan to develop a site with videos, images, and WooCommerce with hundreds of products, you must get a plan matching your needs.
- Scalability: Ensure the hosting plan allows easy scalability as your website grows. If you have a peak of visitors during a special promotion, for example, you don’t want to end up with a malfunctioning site that takes forever to load (or does not load at all).
- Uptime and reliability: Look for a hosting provider with a high uptime guarantee (99.9% or higher) and check customer reviews for insights into the host’s reliability.
- WordPress-oriented: If you are using WordPress, we recommend you opt for a hosting dedicated to WordPress. Kinsta is a great example; you’ll get features like one-click WordPress installation, staging environments, and automatic updates, which are crucial to maintaining performance.
How to Check Your Hosting Provider Speed
- Browse the hosting provider’s website:
- Begin by navigating to the hosting provider’s website. Since hosting companies host their pages on their servers, the issue is likely with the company itself if you notice slow performance on their main page.
- Conduct a free website speed test on the provider’s site for more accurate results using PageSpeed Insights. You can then compare these results with the speed test conducted on your website.
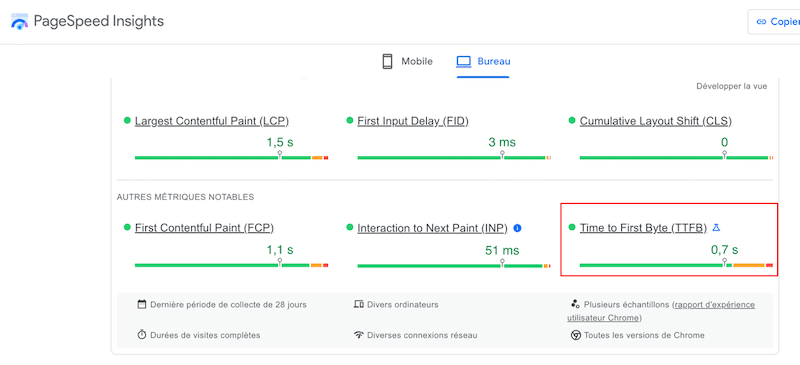
- Check your WordPress site’s Time To First Byte (TTFB) using PageSpeed Insights. This KPI assesses the duration from sending a request to your website until receiving the initial byte of information.
The hosting company is likely at fault if the interval for obtaining the first byte is long. Ideally, your site should strive for a Time To First Byte of 0.8 seconds or less.
| 💡 Hint: If your TTFB is higher than 0.8 seconds, the issue may come from your host. It’s worth contacting them. |
| Looking for a reliable hosting provider? 🙌 We have curated a list of the best WordPress hosting services for you. |
3. You’re Not Caching Your Pages
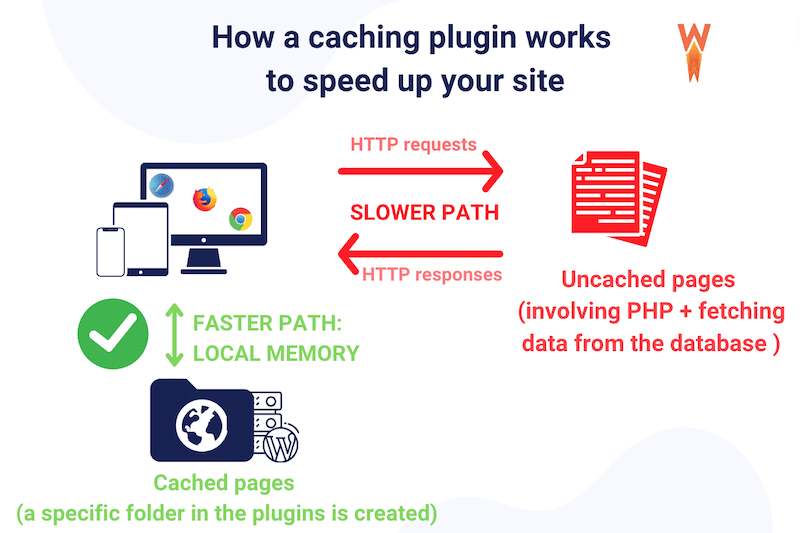
Caching is one of the best techniques to fix a slow WordPress site by storing static copies of web pages and reducing the need to regenerate content for each visitor. Thanks to caching, you can also decrease the load on the server and improve user experience by delivering pre-rendered pages promptly, especially for frequently accessed content.
How To Check if You Are Using Caching
Use PageSpeed Insights and run an audit of your website. If the “Serve static assets with an efficient cache policy” warning comes up, then you have one reason more to install a cache.

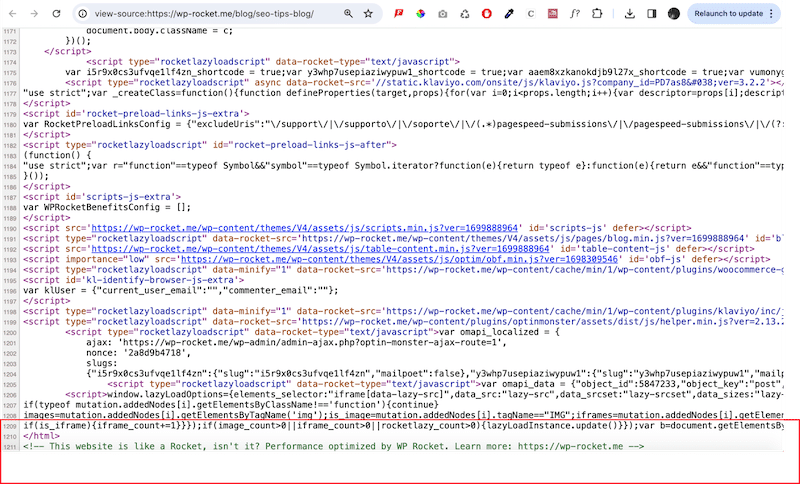
As an alternative, you can open the developer Chrome tab and select View Source:
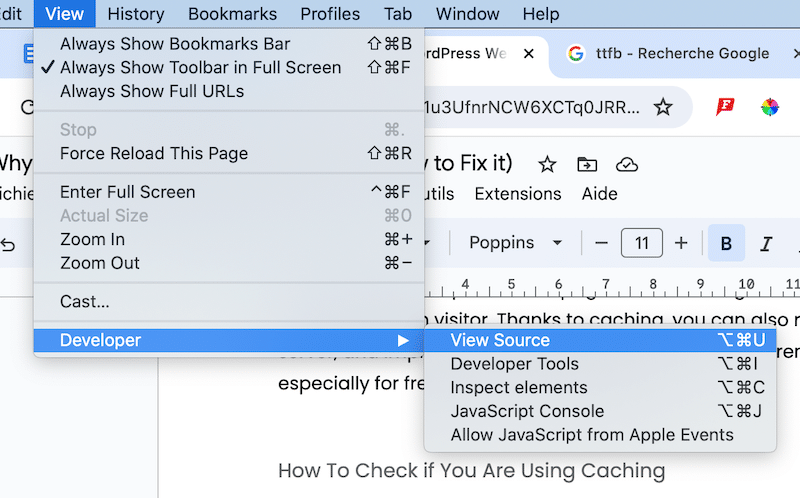
Scroll down to the end of the page. If you have activated a cache plugin, you should see it at the end. Here’s an example with WP Rocket:
How To Implement Caching
As mentioned above, you can use a plugin like WP Rocket to implement caching and fix a slow website. The plugin activates caching upon its simple activation. WP Rocket automatically generates static HTML pages for dynamic WordPress sites. When a user visits a page, the cached HTML version is served, making the page load faster – as well as the entire website.
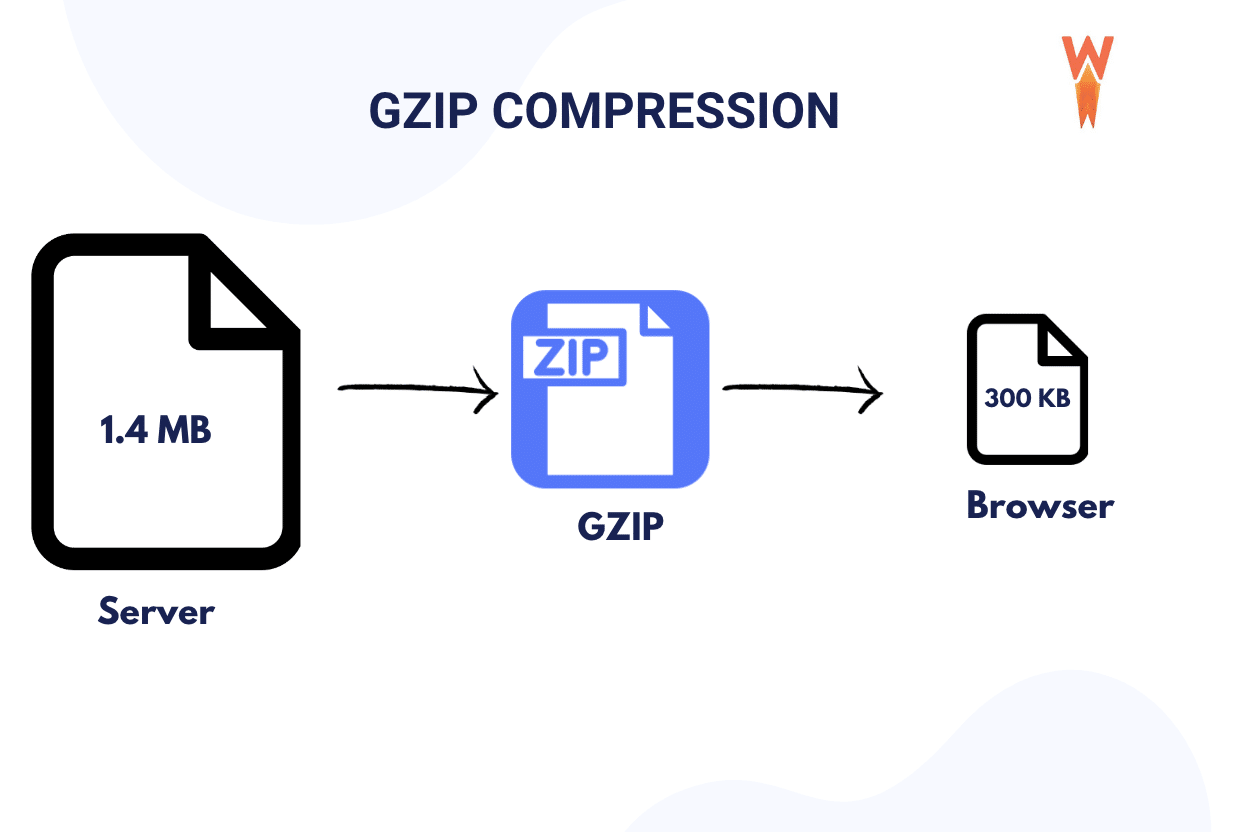
4. You’re Not Using GZIP Compression
GZIP compression improves performance by reducing the size of data transmitted over the network. It compresses files or data before they are sent and decompresses them on the receiving end. GZIP compression reduces file sizes by up to 90%, significantly decreasing the time it takes to transmit HTML, CSS, and JS files.
How to Check if You Are Using GZIP Compression
Head to PageSpeed Insights and run an audit of your site. If the following warning – Enable text compression – appears, you must implement it.

How To Add GZIP Compression and Enabling Text Compression
The easiest way to enable text compression, such as GZIP compression, on your WordPress site is by using a caching or performance optimization plugin. You can also opt for the manual way if you are comfortable coding. We’ll explore both techniques so you can choose which direction to take.
How to Add GZIP Compression Manually
- Enable GZIP compression on your server (check with your hosting provider)
- Create a file named test.php with the code below and upload it to your server root:
<?php phpinfo(); ?>
- From the cPanel find your .htaccess file
- Right click the .htaccess file and edit it with the code below inside the file:
# BEGIN GZIP Compression
<IfModule mod_deflate.c>
AddOutputFilterByType DEFLATE application/javascript
AddOutputFilterByType DEFLATE application/rss+xml
AddOutputFilterByType DEFLATE application/vnd.ms-fontobject
AddOutputFilterByType DEFLATE application/x-font
AddOutputFilterByType DEFLATE application/x-font-opentype
AddOutputFilterByType DEFLATE application/x-font-otf
AddOutputFilterByType DEFLATE application/x-font-truetype
AddOutputFilterByType DEFLATE application/x-font-ttf
AddOutputFilterByType DEFLATE application/x-javascript
AddOutputFilterByType DEFLATE application/xhtml+xml
AddOutputFilterByType DEFLATE application/xml
AddOutputFilterByType DEFLATE font/opentype
AddOutputFilterByType DEFLATE font/otf
AddOutputFilterByType DEFLATE font/ttf
AddOutputFilterByType DEFLATE image/svg+xml
AddOutputFilterByType DEFLATE image/x-icon
AddOutputFilterByType DEFLATE text/css
AddOutputFilterByType DEFLATE text/html
AddOutputFilterByType DEFLATE text/javascript
AddOutputFilterByType DEFLATE text/plain
AddOutputFilterByType DEFLATE text/xml
</IfModule>

# END GZIP Compression
(Source for the code: Zuziko)
How to Add GZIP Compression With a WordPress plugin (the easiest way)
The easiest (and safest way) to add GZIP compression is to use a WordPress plugin such as:
- WPO Tweaks and optimization – A plugin that applies GZIP compression and deactivates many unnecessary codes and scripts to save hosting resources and costs.
- WP Rocket – A complete performance plugin that applies GZIP compression automatically upon its activation.
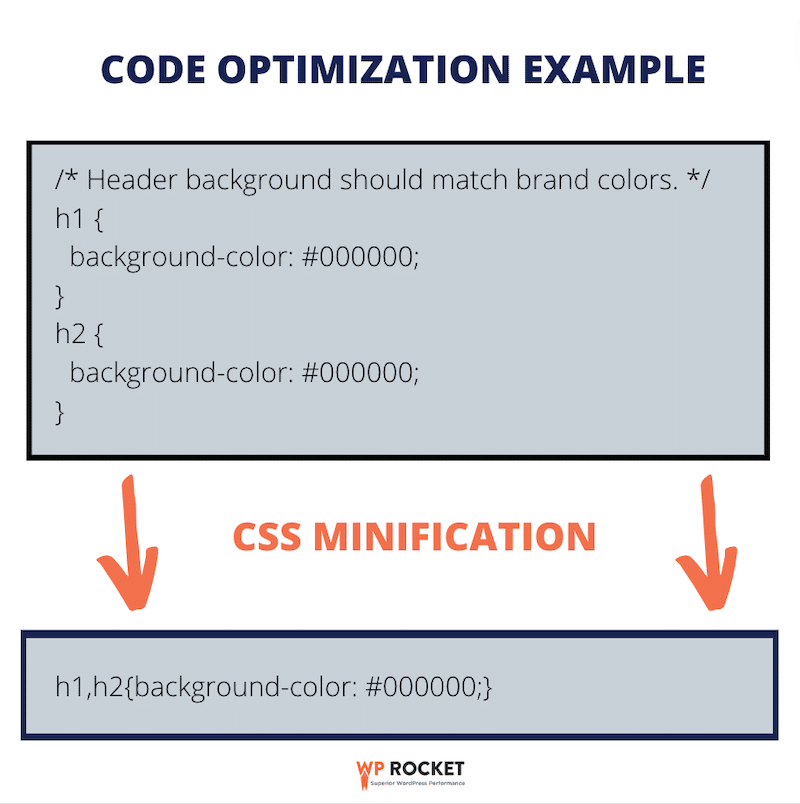
5. You’re Not Optimizing Your Code
Code optimization improves performance by reducing file sizes, leading to faster download times, lower bandwidth usage, and quicker page loading. The main code optimization techniques are the following:
- Minification – Removes unnecessary characters as you can see below:
- Remove unused CSS: Identifying and eliminating styles from your website’s stylesheet that are not applied to any elements on the page.
- Delay non-critical JS: This means loading the JavaScript later and focusing on rendering the page first to optimize user experience.
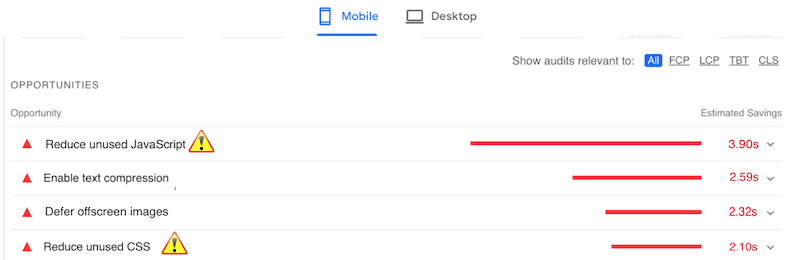
How to Check if You Have a Code Optimization Issue
Head to PageSpeed Insights and run a performance audit with your URL. If you see any of those warnings below, then you may need to optimize your code:
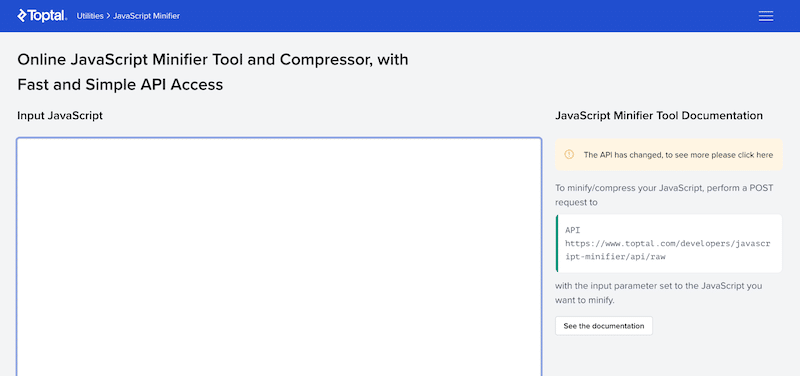
How to Minify Your Code Manually
You can paste your code into tools like Toptal to minify JavaScript and obtain the minified output. Afterward, upload it to your WordPress site. However, exercise caution and create a site backup before proceeding.
Similarly, you can minify CSS using online tools like minifier.org and re-upload your minified code to your WordPress site.
How to Optimize Your Code With a WordPress plugin (the easiest way)
The easiest (and safest way) to optimize your code even beyond minification is to use one of those plugins:
- WP Super Minify – Combines, minifies and caches inline JavaScript and CSS files on demand.
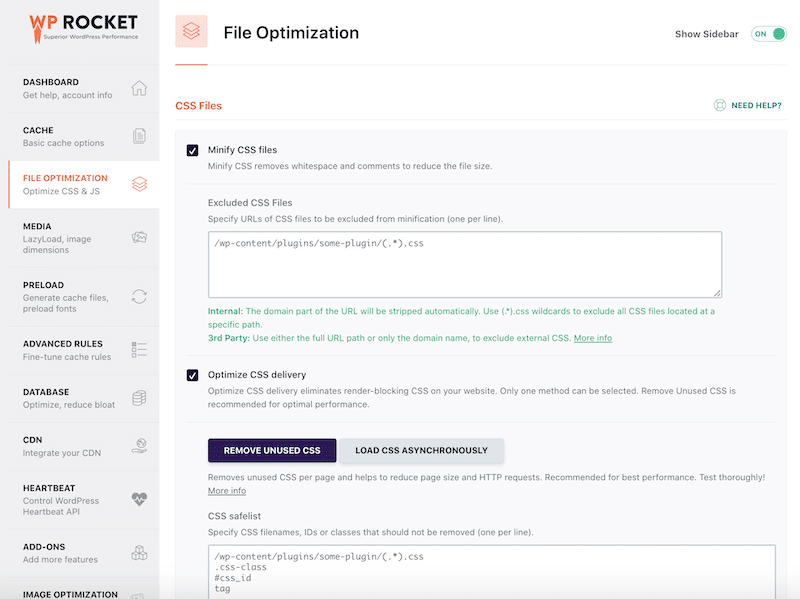
- WP Rocket – Allows you to optimize your code on the following levels efficiently:
- Minify JS and CSS
- Optimize CSS delivery
- Load Defer JS
- Defer JS execution
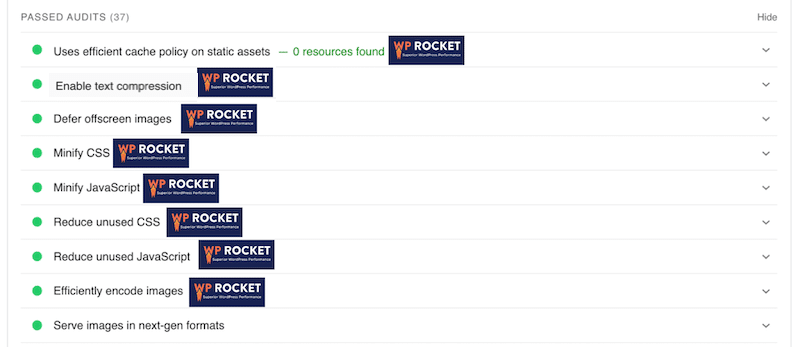
Last but not least, WP Rocket can assist you in resolving all code optimization warnings, ensuring your website passes audits in PageSpeed Insights.
| 🚀 Learn more about optimizing CSS and JavaScript on WordPress. |
6. Your Website Has Too Many External HTTP Requests
A high number of HTTP requests can negatively impact speed because each request triggers a communication process between the browser and server, consuming time and resources. Minimizing HTTP requests is crucial for optimizing website performance.
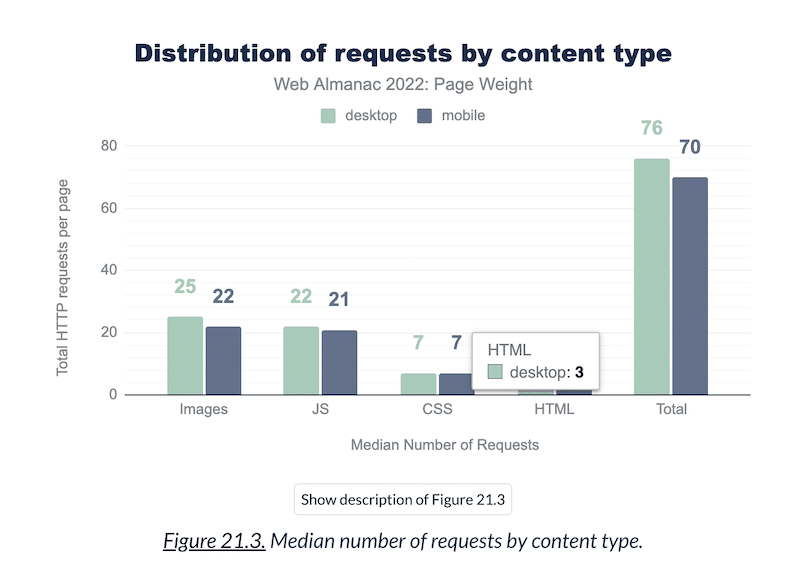
As a point of reference, in 2022, the typical number of requests per page across the web averaged approximately 70 for mobile and 76 for desktop.
How to Check the Numbers of HTTP Requests
To check the number of HTTP requests your WordPress makes, you can use GTmetrix and run an audit with your URL. Then scroll down to the Page Details section and check the number near the Total Page Requests KPI.
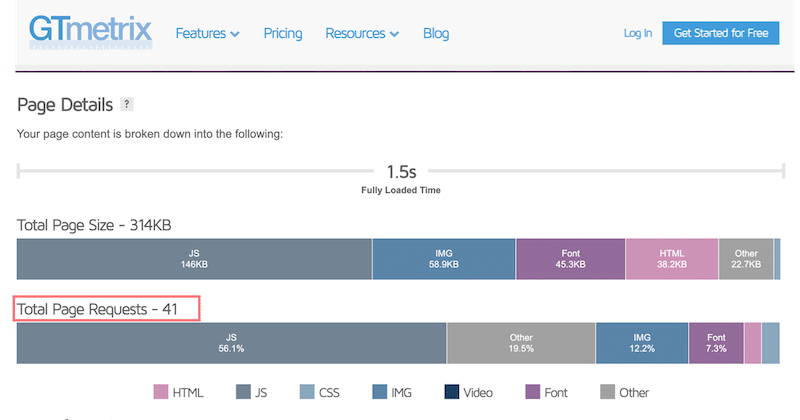
| 🏆 For optimal performance, you should aim at having a max of 50 HTTP requests per page. |
How to Fix a High Number of HTTP requests
- Minify CSS and JavaScript files – With the help of WP Rocket, as we saw before.
- Enable Lazy Load on Images – This is possible with WP Rocket too.
- Loads script only when needed – You can use the Perfmatters plugin to disable a script on a page or post.
| 🚀 Explore more detailed techniques about reducing the number of HTTP requests to boost the speed of your WordPress site. |
7. You’re Not Optimizing Images
Image optimization is crucial for website speed, involving compression and format selection techniques to reduce file sizes without sacrificing quality. It also includes serving images to WebP and applying lazy-loading on them.
| 📖 Image Optimization Glossary WebP: a next-generation format created by Google to compress images even more than the traditional JPEG or PNG. The best format to boost performance on WordPress. Lazy Loading: Lazy loading on images is a web optimization technique that delays the loading of images until they are about to be viewed by the user = only necessary resources are loaded first. |
Ensuring images are appropriately sized and formatted decreases page load time, improving user experience, SEO rankings, and site performance.
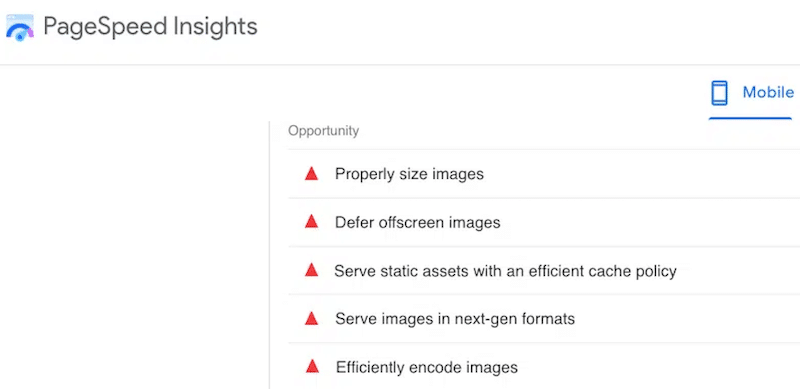
How to Check that Images are Optimized
Run an audit on PageSpeed Insights, and if any of the warnings below appear, then you probably need to optimize your images:
- Properly size images (for every device)
- Defer offscreen images (lazy loading)
- Serve image in next-gen formats (WebP or AVIF)
- Efficiently encode images (image compression)
How to Optimize Images on WordPress
Image optimization on WordPress means that you need to:
- Compress images while keeping an acceptable quality
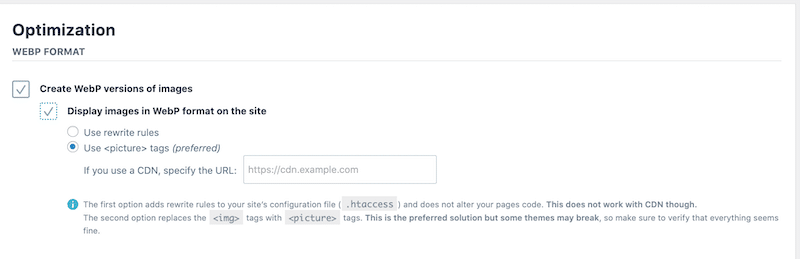
- Serve images to WebP
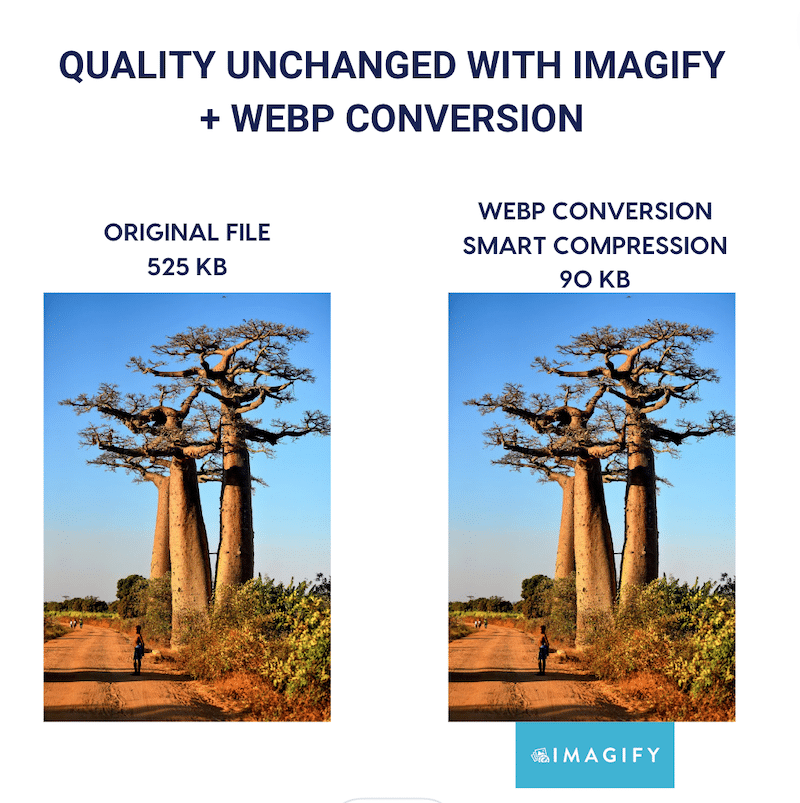
Both optimization techniques can be done with Imagify, one of WordPress’s easiest image optimization plugins. Thanks to Smart Compression, Imagify significantly reduces file size without impacting quality. See for yourself, can you spot the difference?
On top of that, Imagify also converts your images to WebP in one single click:
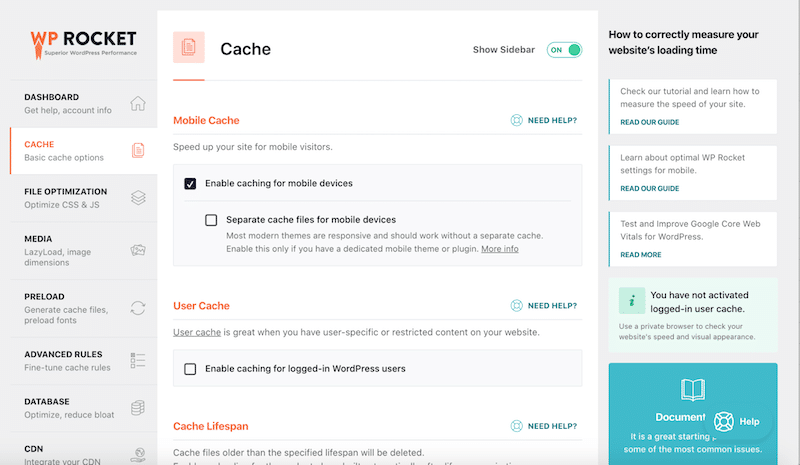
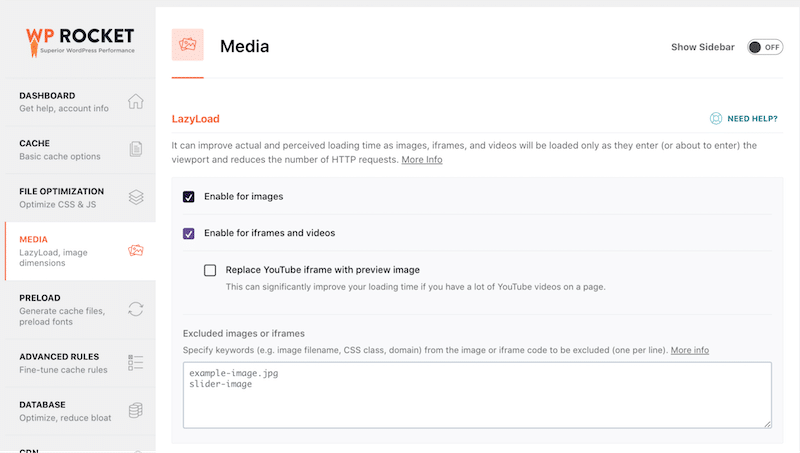
- Apply lazy loading – This can be easily done with WP Rocket:
Go to Settings > WP Rocket > Media panel in your WordPress admin dashboard. In the LazyLoad section at the top of the page, check the Enable for images option and then press the Save Changes button.
8. You’re Using Too Many Plugins (or They’re Too Heavy)
Excessive WordPress plugins can negatively impact performance by increasing server load, causing slower page loading times and potential compatibility conflicts.
How to Identify the Plugins You Really Need
To maintain site speed, let’s start by choosing plugins that are well-optimized:
- Restrict the number of installed plugins
- Assess them based on online reviews, the number of installs, and the latest update
- Check the quality of the documentation and support.
Then, you should find the plugins that may affect performance.
How To Detect Slow WordPress Plugins
- Disable plugins one by one. Deactivate plugins individually and reload your site after each deactivation so you can pinpoint which plugins are affecting performance and to what extent.
You can also head to PageSpeed Insights and run a performance audit every time you deactivate a plugin until you find the culprit.
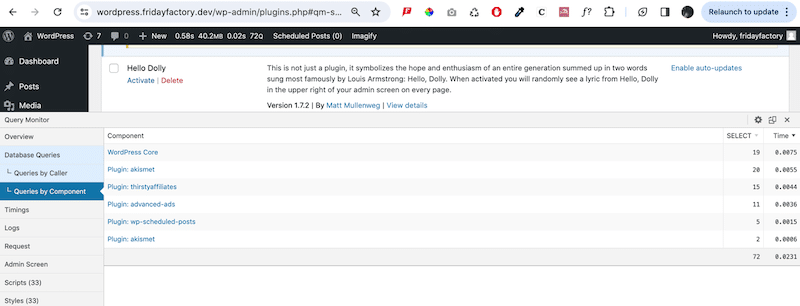
- Use Query Monitor. It’s a free, powerful WordPress plugin that provides detailed insights into your website’s performance. Notably, it allows you to narrow down and identify the poorly performing plugins, themes, or functions. Don’t forget to delete it when you are done.
9. You’ve Not Updated Your PHP Version
Running an outdated PHP version on WordPress can adversely affect performance. Upgrading to the latest PHP version is crucial for speed, security, and compatibility with modern plugins and themes. In 2023, PHP 8 was released, emphasizing the importance of ensuring that your site runs on at least PHP 8 for optimized performance.
How to Check Which PHP Version is Running On WordPress
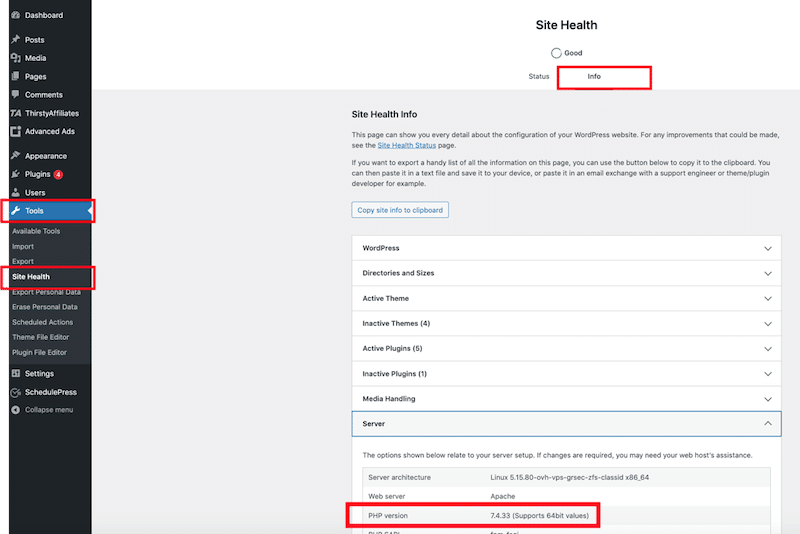
Log in to your WordPress dashboard, then go to Tools → Site Health. Switch to the Info tab and click on Server to expand the section. Here, you can view server information, including details about the PHP version used by your server.
How to Update PHP Version on WordPress
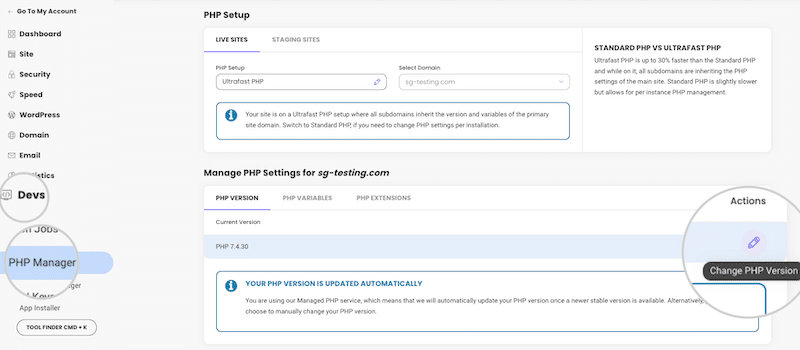
- Check your hosting provider. Usually, WordPress hosts automatically update the PHP version in the background. You can also do this manually from the cPanel. For example, on Siteground, go to the PHP management settings from Site Tools > Devs > PHP Manager > PHP Version. From there, you can choose which version to use:
10. You’re Forgetting to Clean Your Database
Cleaning and optimizing the WordPress database is essential for performance. Removing unnecessary data, such as revisions and transients, reduces database bloat, leading to faster queries and improved overall site speed. You should run regular database maintenance to keep your website running smoothly.
How to Clean a Database on WordPress
If you want to do it manually, you can use PhPMyAdmin, or if you opt for the fastest way, use a WordPress plugin that will do the job for you. Let’s go over both ways.
Cleaning a database the manual way
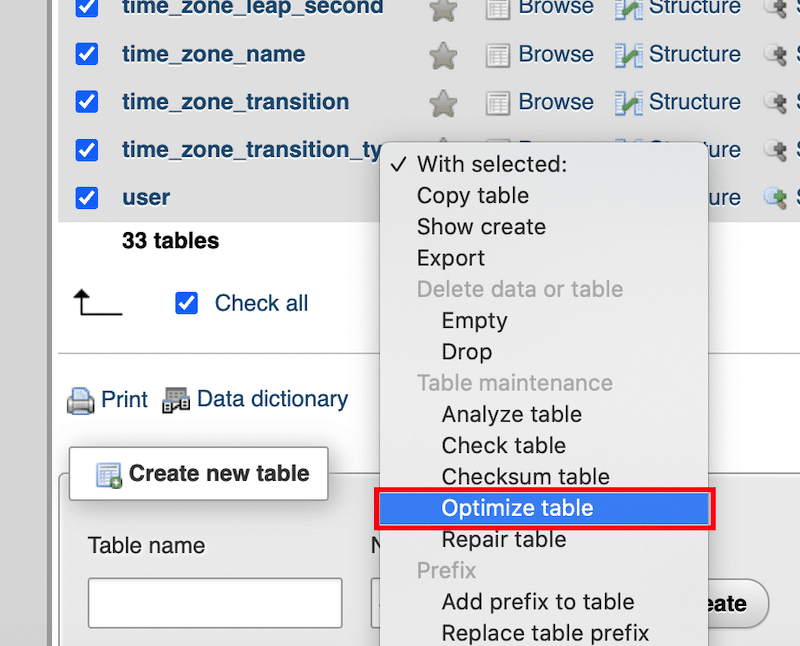
To optimize your WordPress database manually, access PHPMyAdmin through your hosting provider and proceed with the following instructions:
- Sign in to cPanel and launch the PHPMyAdmin tool.
- Choose the tables requiring optimization from the structure tab. Alternatively, you can opt for the “Check all” box below the table lists to select them all.
Cleaning a database with a WordPress plugin
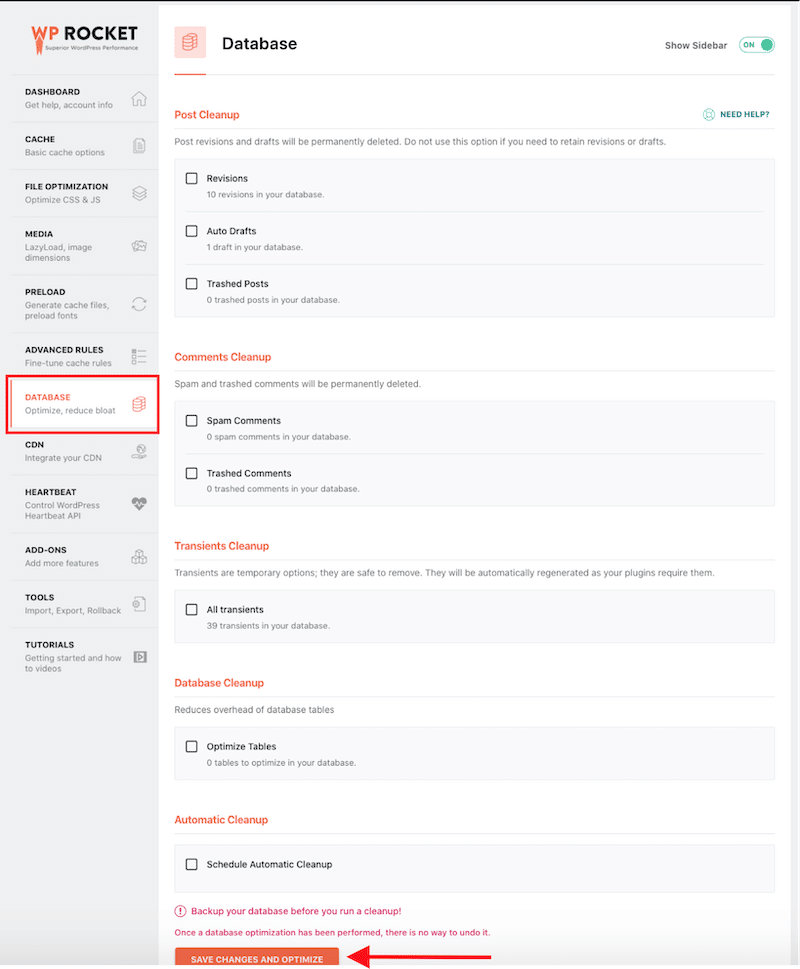
- WP Rocket – To optimize your database in one click. From the WordPress admin, open the DATABASE tab and select the advanced options of your choice. You can limit the number of revisions, trash the spammy comments and all the transients, and even schedule an automatic clean-up.
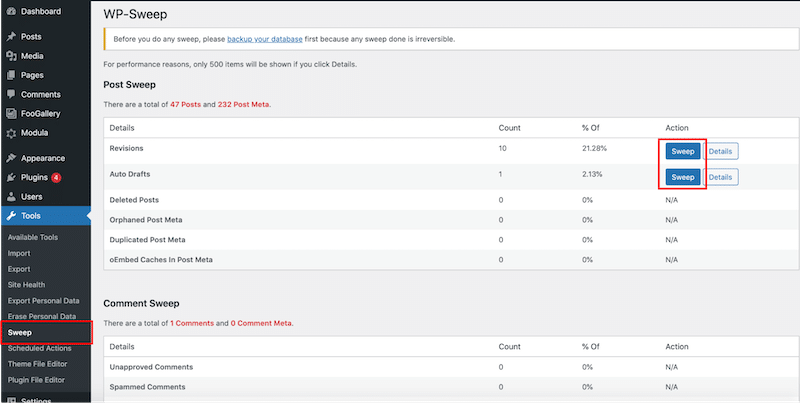
- WP Sweep – To clean up unused, orphaned, and duplicated data in your WordPress database, such as revisions, auto drafts, unapproved comments, spam comments, and more. It optimizes your database tables very quickly and efficiently.
| 📁 Go further in optimizing your WordPress database with our detailed guide. |
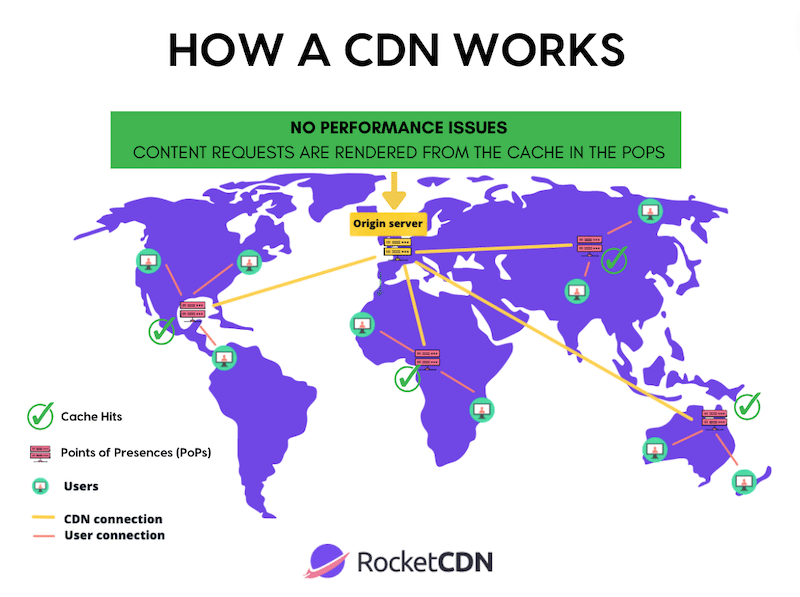
11. You’re Not Using a CDN
A Content Delivery Network (CDN) can accelerate the loading speed of a WordPress site by distributing its static content, such as images, CSS, and JavaScript, to multiple servers (Points of Presence) strategically placed around the world. This reduces latency and decreases the distance data travels, resulting in faster page loading times for users globally.
Here’s how a CDN operates: the data doesn’t have to travel directly from the origin servers. It is instead delivered from servers situated closer to the user in various parts of the world.
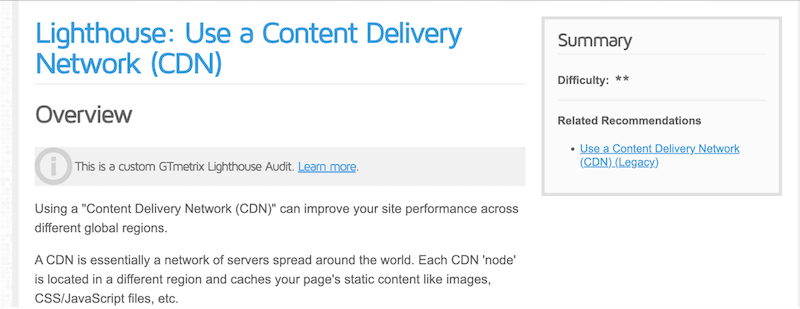
How to Check if a CDN is Being Used Properly
- With a performance test – You can run a performance test from multiple locations using GTmetrix (you’ll need to create an account). If you see that your site is running slow from Paris, with the origin server in Bangkok, there may be an issue with your CDN.
- Audit with GTmetrix – If you are not using a CDN, GTmetrix will give you the following recommendation:
- Use the Developer tools from Google Chrome and inspect the content. If you see any CDN data amongst the code, then a CDN is in use.
How to Use a CDN on WordPress
Select a user-friendly CDN with a high cache hits ratio to ensure performance. If you seek an affordable CDN with a WordPress plugin that streamlines the technical setup, consider exploring RocketCDN.
RocketCDN helps optimize website delivery, reduce data transfer times, and improve overall user experience by ensuring that content is served from servers closest to the requesting users. The best part is that it does all the heavy lifting for you and has a cache hit ratio superior to 90%!
Wrapping Up
We trust that this article has provided you with the correct answers to the question, “Why is my WordPress site slow?”. In conclusion, achieving a faster WordPress website involves essential strategies such as code optimization, caching, image optimization, CDN implementation, database cleanup, and limiting the total amount of plugins. Implementing these measures collectively can significantly enhance website speed and overall performance.
While it may initially appear daunting, using the appropriate tools, such as WP Rocket, simplifies the process. WP Rocket applies 80% of the performance best practices upon its activation, including GZIP compression, caching, database optimization, advanced JS and CSS optimization, lazy-loading, and more. WP Rocket is the ideal solution if you’re seeking to accelerate your WordPress site and streamline code and database management effortlessly. And with a 30-day money-back guarantee, you can explore its benefits risk-free.