
Table of Contents
Last update on
Do you want to add JavaScript to a WordPress page, but you think you are doing it wrong or don’t even know where to start? Or did you already do it and are seeing error messages and/or performance issues you don’t know how to troubleshoot?
Either way, you are in the right place.
This post is going to be a first-row, all-out education on all things JavaScript and WordPress. At the end of it, you’ll know everything you need about why using JavaScript in WordPress is a good idea, how to add it to your pages, and what to do when it’s not working properly or slows down your site.
| TL;DR Are you too busy to read the entire post and would like a quick summary? Ok, but only because it’s you. ✅ Adding JavaScript to WordPress pages can make your site more interactive and allows you to integrate it with many third-party tools. At the same time, it requires careful consideration to avoid breaking your site. ✅ Take safety precautions like using JavaScript from trusted sources, backing up your website, using a child theme, and testing changes in a staging or development environment first. In addition, keep an eye on the performance impact of any code you add to your site. ✅ There are several ways to add JavaScript to your site—through WordPress hooks, functions.php, separate files, the WordPress editor, or with plugins. ✅ Troubleshoot issues through browser development tools, investigating plugin and theme conflicts, and WordPress debug mode. ✅ Improve JavaScript performance by combining, minifying, deferring, or delaying scripts. You can also automate the process by using a plugin like WP Rocket. |
Why Add JavaScript to Your WordPress Pages?
JavaScript, often abbreviated to JS, is a popular programming language. It’s one of the three main technologies used to create web pages. The other two are HTML, which defines page structure and content, as well as CSS, which is responsible for styling.
JavaScript is a client-side language, meaning it runs in the browser, not on the server. Because of that, you can use it to modify and update existing CSS and HTML even after a page has finished loading.
That’s why one of its main uses is to make web pages more interactive. For example, JavaScript often powers page elements like:
- Slide-in menus
- Popups
- Animations
The WordPress block editor is also written mostly in JavaScript.
In addition to interactivity, JavaScript is also a common way to integrate third-party services into your site, such as tracking scripts for web analytics. Other examples include:
- Live chat
- Email opt-in and contact forms
- Embedded videos
- Interactive maps
- Social media feeds
Important Considerations
If done incorrectly, adding JavaScript to your WordPress pages can lead to errors and problems. Taking precautions from the start can save you time and frustration later:
- Only use JavaScript from trusted sources to keep your site safe and stable.
- Take a complete backup of your website files and database before making changes in case something goes wrong.
- When you add JavaScript directly to theme files, always use a child theme. If you modify the main theme , you will lose your changes when you update it.
- Test changes in a staging or development environment before applying them to your live site.
- JavaScript adds extra code to your WordPress pages, which can slow them down. Keep track of performance when introducing new features to your site.
6 Ways to Add JavaScript to a Page in WordPress
Enough with the theory. Below, we are showing you six ways to add JavaScript to WordPress, from most to least technical.
1. Use WordPress Hooks and Functions
Hooks are pieces of code placed inside the WordPress loading process where you can attach custom code (so-called “functions”) so that it executes at a particular time or location.
For example, wp_head() runs in the <head> section at the top of your site. If you want to use it to add JavaScript to a WordPress page, you have to do that in your (child) theme’s functions.php file, for example, like so:
function add_custom_script() {
    ?>
    <script>
        // Place your JavaScript code here
    </script>
    <?php
}
add_action('wp_head', 'add_custom_script');
Input your JavaScript code where it says, “Place your JavaScript code here.” You can also change the function name from ” add_custom_script” to something more descriptive.
This method is great for smaller scripts with very clearly defined purposes, such as simple analytics tracking code or basic interactive elements. It also works for loading JavaScript in the footer, which is a popular solution to improve page performance. Simply use wp_footer() instead of wp_head().
The page head and footer are popular locations to load scripts because they usually appear everywhere on a website. That makes them a great way to add JavaScript to all pages of a WordPress site.
If you only want to load JavaScript on specific pages, you can combine this method with a conditional statement:
function add_custom_script() {
    if (is_page(123)) {
        ?>
        <script>
            // Place your JavaScript code here
        </script>
        <?php
    }
}
add_action('wp_head', 'add_custom_script');
The part that limits this to a single page is is_page(123). The “123” is the page ID, which you need to update to your page’s ID if you want to use this code. It appears in the browser bar when you open your page in the WordPress editor. You can also use is_page() to target pages by name or URL slug.

| 💡 There are many other conditional tags available, such as is_single() for blog posts, is_home() for the blog page, is_archive() for archive pages, and is_category() for category archives. |
2. Load JavaScript in a Separate File
Another option is to put your JavaScript into its own file. This is a good idea especially for large scripts but also makes sense generally because it allows you to load your files with the wp_register_script() and wp_enqueue_script() functions.
That’s the preferred method because it helps avoid conflicts, load scripts in the correct order, and manage dependencies. Here is what it looks like:
function enqueue_custom_script() {
    wp_register_script(
        'my-custom-script',
        get_template_directory_uri() . '/js/custom-script.js',
        array('jquery'),
        '1.0.0',
        true
    );

    wp_enqueue_script('my-custom-script');
}
add_action('wp_enqueue_scripts', 'enqueue_custom_script');
In this example, the script is placed in the theme directory, which we target with get_template_directory_uri() (for child themes, use get_stylesheet_directory_uri() instead). The array(‘jquery’) indicates that this script depends on jQuery and should be loaded after it. The ‘1.0.0’ is the version number, and ‘true’ means WordPress should load the script in the footer.
This also works and is the correct way to load third-party JavaScript, like tracking codes. Be sure to update the code to your use case before putting it on your site.
3. Include Code in Theme Files
Hooks are a great way to enqueue all your JS scripts from a single place, but they’re not the only way to load them in your theme.
Instead of using wp_head() to load something in the head section, you can achieve the same by posting your script or a link to it directly to the theme file to your header theme file.
In classic themes, that’s usually header.php. Find it in your theme, make a copy and place it in your child theme, then include the script directly somewhere in the <head> section.
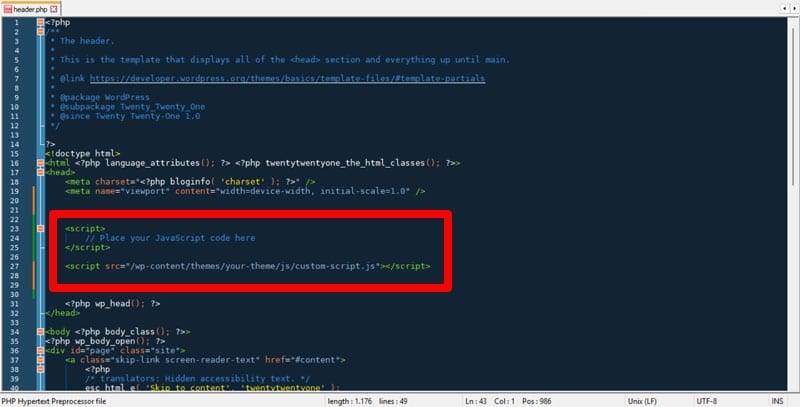
If you want to load it only on a certain page, you can use a conditional statement as before. Alternatively, thanks to template hierarchy, it’s also possible to create a custom file for only that page, e.g. page-contact.php.
| 💡 WordPress block themes no longer use these theme files. If your theme is a block theme, you are better advised to choose one of the other methods mentioned here. |
4. Create a Custom Plugin
The problem with adding JavaScript to WordPress pages using theme files is that it makes the code dependent on the theme. When you switch themes, your JavaScript goes away as well.
You can avoid that by using a custom plugin. This makes the code theme-independent and also allows you to activate and deactivate it in the WordPress Plugins menu.

Here’s the markup for a simple plugin to add JavaScript to your WordPress pages:
<?php
/*
Plugin Name: Custom JavaScript Loader
Plugin URI: https://yourwebsite.com
Description: A simple plugin to add custom JavaScript to WordPress pages.
Author: Your Name
Author URI: https://yourwebsite.com
Version: 1.0
*/

function add_custom_script() {
    ?>
    <script>
        // Place your JavaScript code here
    </script>
    <?php
}
add_action('wp_head', 'add_custom_script');
Place this code into a PHP file and be sure to adjust Plugin Name, Plugin URI, Description, Author, and Author URI to your own information as it shows up in the WordPress Plugins menu.
Name the file something meaningful, e.g. custom-tracking-code-plugin.php, then upload it into a directory of the same name inside wp-content/plugins in your WordPress installation. After that, it should appear in the Plugins menu.
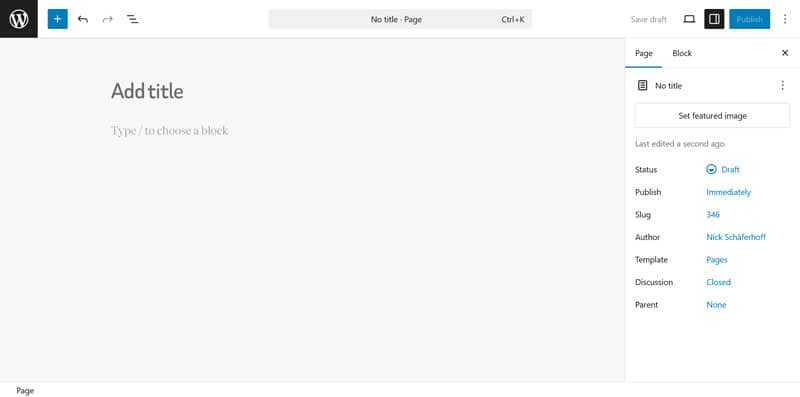
5. Add JavaScript in the WordPress Editor
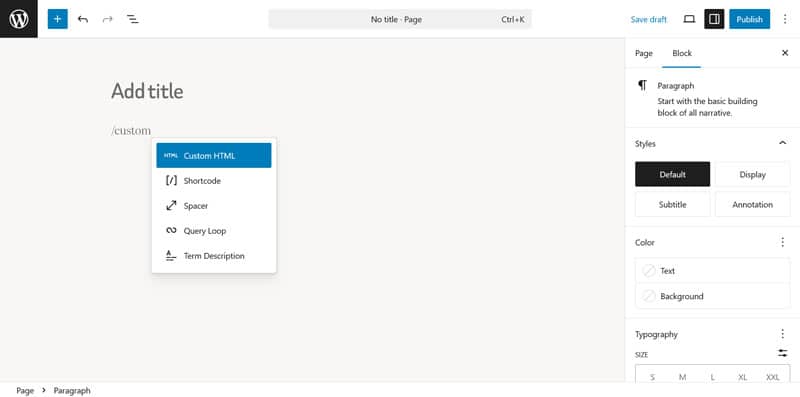
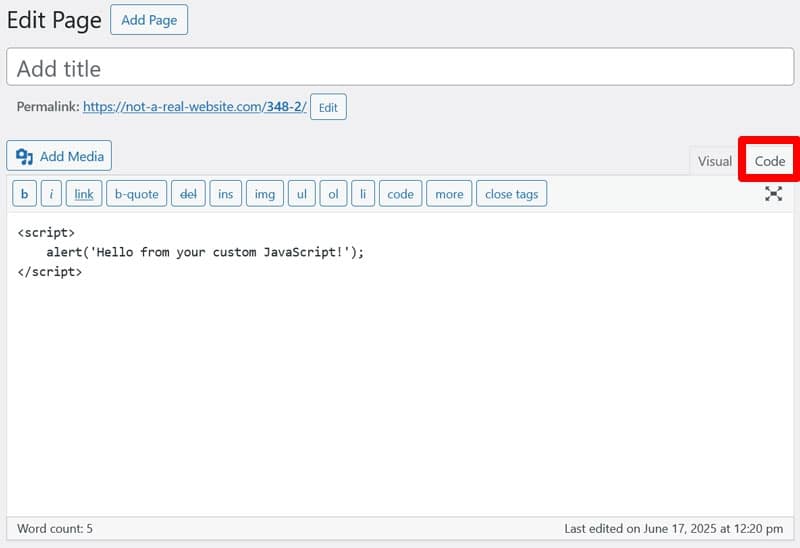
While this isn’t the most recommended method, it’s also possible to add JavaScript directly to a page using the WordPress editor. To do so, add a new block (click the plus button or use a forward slash) and choose the Custom HTML block.
Simply insert you JavaScript code so that it loads straight on the page.
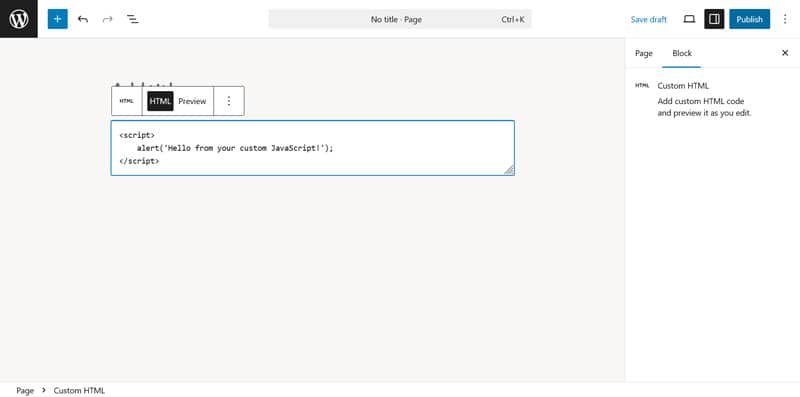
Just be sure to use the opening <script> and closing </script> tags and save your changes in the editor for them to take effect.
You can also add JavaScript to the Classic Editor by using the Code tab.
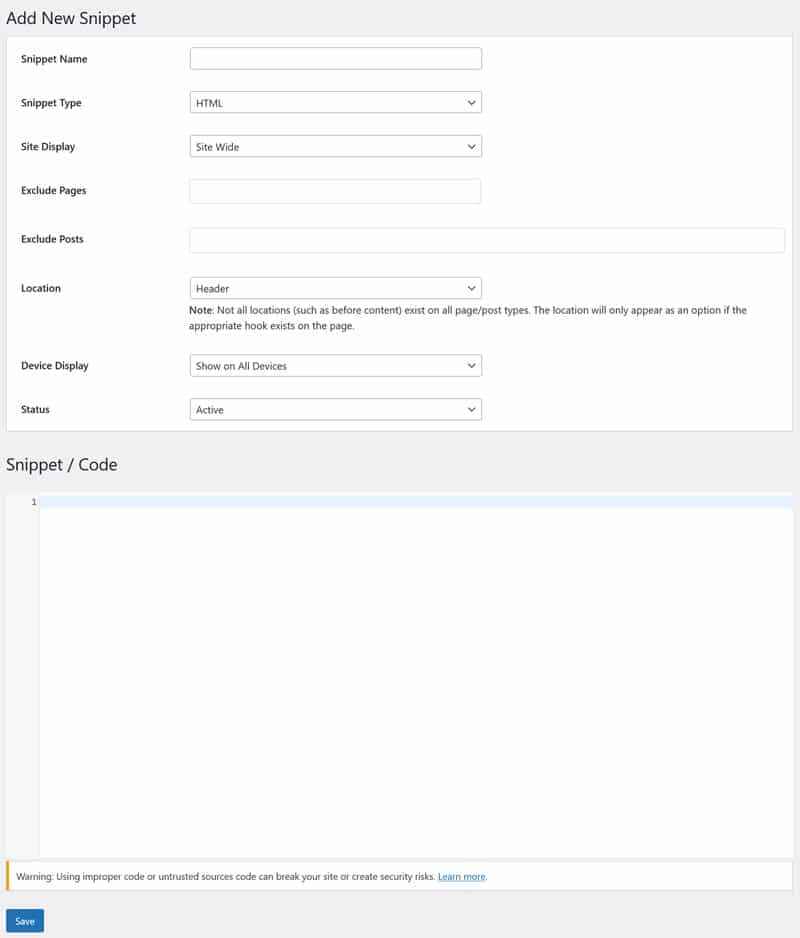
6. Use a Code Snippet Plugin
It wouldn’t be WordPress if there wasn’t also a plugin solution to add JavaScript to your site. In fact, there are several, including:
Plugins allow you to manage your JavaScript better. You can name your snippets, organize them into categories, selectively switch them on and off, and set up conditional rules. In addition, like the custom plugin solution, it makes your JavaScript independent from the theme.
Using these plugins is also simple. They usually add a new menu to your site where you can manage your JavaScript snippets.
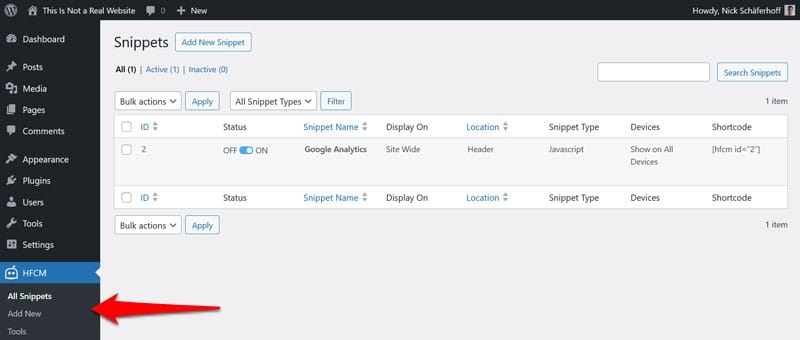
Just create a new snippet, insert your code, then configure where you want it to appear.
That’s pretty much it.
Troubleshooting JavaScript Issues in WordPress
Now you know how to add JavaScript to your WordPress website and pages. But what if something isn’t working as it’s supposed to? We’ll spend the final part of this article talking about how to identify and solve JavaScript issues you might run into.
1. Check Browser Developer Tools
One way to check for JavaScript errors is to use the developer tools of your browser. They allow you to inspect the underlying site code, including any scripts.
You can open them by right-clicking on any web page and choosing Inspect.
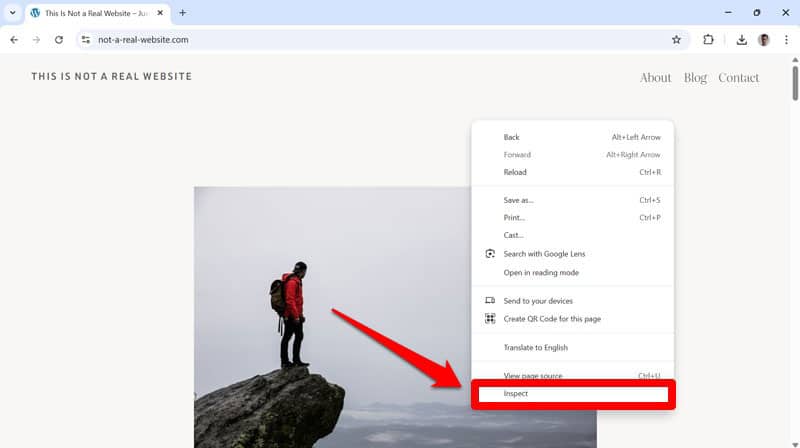
Alternatively, access them via the browser menu, e.g. in Chrome they are located under More tools > Developer tools.
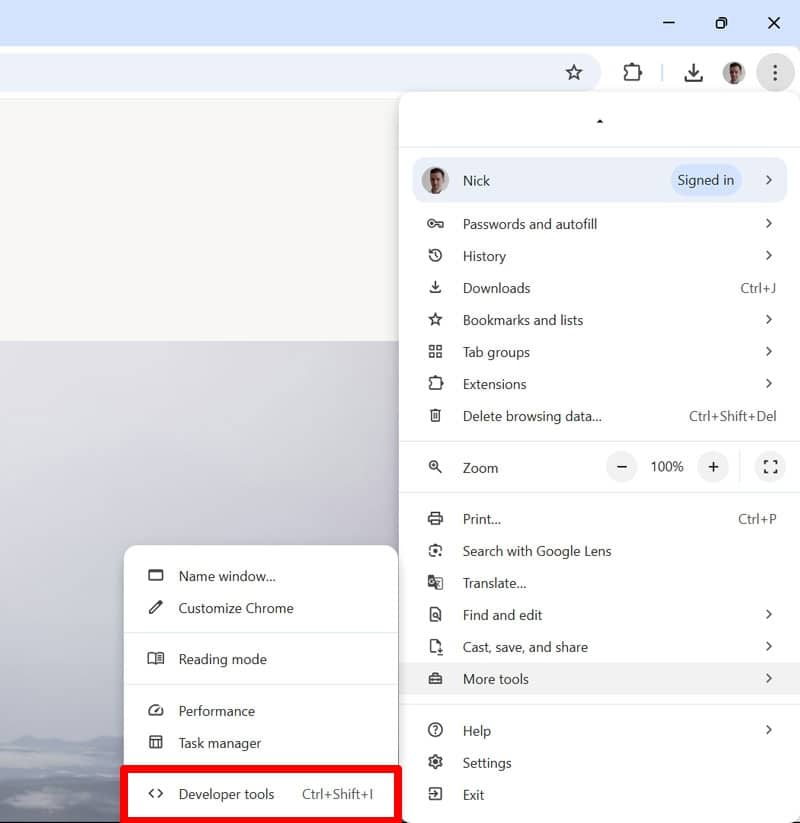
There are also keyboard shortcuts to open them, in Chrome, Edge, and Firefox it’s Ctrl/Cmd+Shift+I, in Safari Cmd+Opt+C.
Open the dev tools on your site then go to the Console tab. You should see any errors, including those caused by JavaScript here.
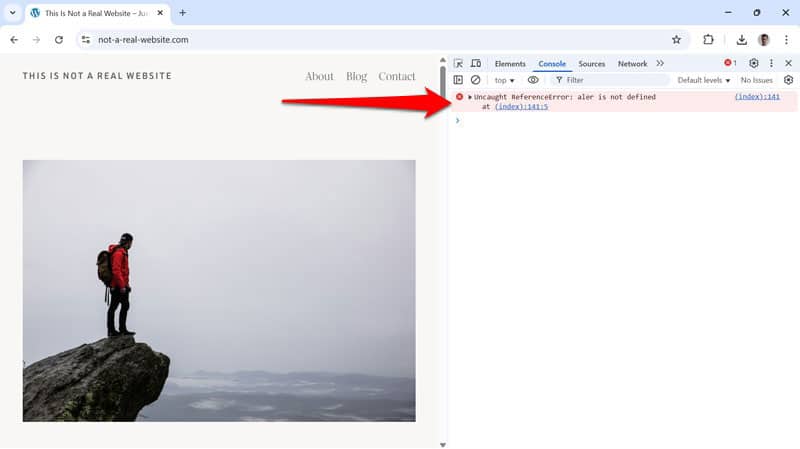
Note that you might have to reload the page for them to show up. The most common JavaScript errors are:
- ReferenceError: Indicates a missing or undefined variable or function.
- TypeError: Suggests that there is an issue with an operation, for example, trying to use a value of an inappropriate type.
- SyntaxError: Often occurs due to a typo or incorrect formatting in the code, like missing brackets, semicolons, or quotes.
You want to find out which script, file, or function is causing the error so you can correct it. It helps to use breakpoints in the Sources tab, which allows you to pause JavaScript execution and inspect what’s happening.
Use your favorite search engine or AI to find out more about any error message you find. In addition, you may also want to check the Network tab to see if your scripts are loading properly.
2. Resolve Theme and Plugin Conflicts
JavaScript errors can also happen because of theme and plugin conflicts, for example, when using incompatible libraries or duplicate functions.
Here’s how to troubleshoot these JavaScript issues:
- Update themes and plugins: Your theme or plugin developer might already know about the issue and have corrected them in the latest version.
- Temporarily switch to a default theme: Activate a WordPress default theme like Twenty Twenty-Five. If the issue disappears, your theme is likely to be at fault.
- Deactivate your plugins: Switch off all plugins on your site and turn them on one by one to see when the issue reappears. Update or replace the plugin that causes it.
The Health Check plugin allows you to simulate everything mentioned above from the WordPress dashboard (go to the Troubleshooting tab) and revert with a single click.
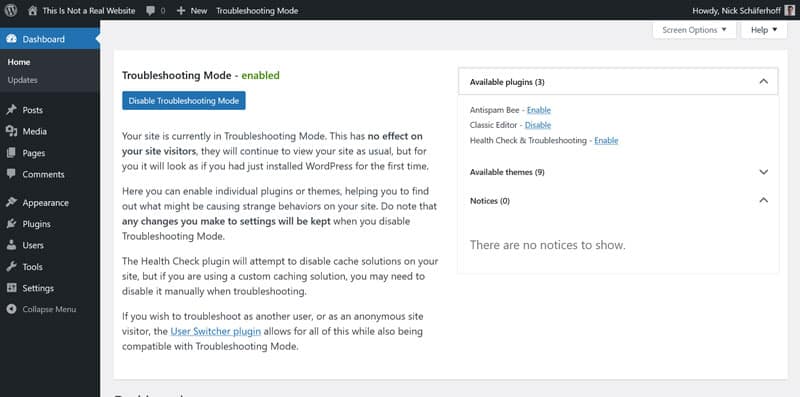
It also has a lot more additional information about the state of your website. It’s recommended that you do these tests on a development or staging website, not your live site.
3. Use Debug Mode
WordPress has a built-in debug mode to help you spot and resolve site problems. While it doesn’t directly show issues with JavaScript, it makes it easier to find PHP, plugin, and theme errors that could interfere with the scripts on your site.
To activate debug mode, open your wp-config.php file (via FTP or your hosting file manager) and add the following lines:
define('WP_DEBUG', true);

define('WP_DEBUG_LOG', true);

define('SCRIPT_DEBUG', true);
You may already find define(‘SCRIPT_DEBUG’, false); in the file. If so, simply change it to “true.” Save and re-upload the file.
The settings above enable debug mode, error logging (errors will appear in wp-content/debug.log), and load unminified versions of core CSS and JavaScript files to trace problems more easily.
Again, do this on a development site, away from the eyes of your visitors. Plus, don’t forget to remove this code to go back to normal afterwards.
| 💡 You can also use the WP Debugging plugin to enable WordPress debug mode. |
4. Address Performance Issues
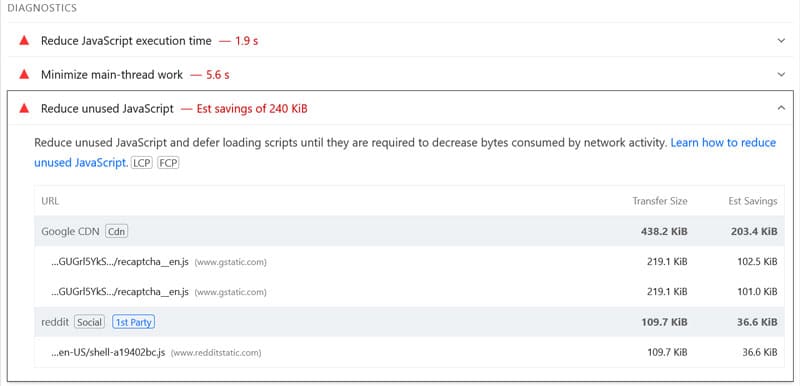
Like any other code, adding JavaScript to your WordPress pages can make your website slower. You’ll often notice that when you speed test your website and receive a warning that says “Reduce unused JavaScript.”
To avoid performance issues caused by JavaScript, follow these best practices:
- Remove scripts you don’t need: Regularly audit the JavaScript loading on your site to see if you actually need all of it, especially third-party services.
- Load scripts in the footer: Only place JavaScript files in the head section when it’s necessary that they load early.
- Combine scripts: Combine several scripts into a single file (this is called “concatenation”). A single large file often loads faster than several smaller ones.
- Minify JavaScript files: This removes unnecessary formatting and whitespace that’s great for legibility unnecessary to execute code.
- Load JavaScript asynchronously: Meaning the browser doesn’t stop processing the site while loading JavaScript files but loads them in the background and executes them once downloaded.
- Defer large scripts: Here, your files are downloaded in the background as well but only execute after the rest of the loading process is finished, so it doesn’t get interrupted.
- Delay JavaScript execution: This postpones the loading of all JavaScript files and inline scripts until there is a user interaction. It’s like lazy loading for images but for JavaScript files.
Simplify JavaScript Performance Optimization With WP Rocket
Instead of doing this by hand, you also have the option to implement it much more easily using WP Rocket. When active on your site, the plugin minifies JavaScript by default and you can combine, delay, defer, and asynchronously load any scripts on your WordPress site by simply checking a few boxes in the File Optimization menu.
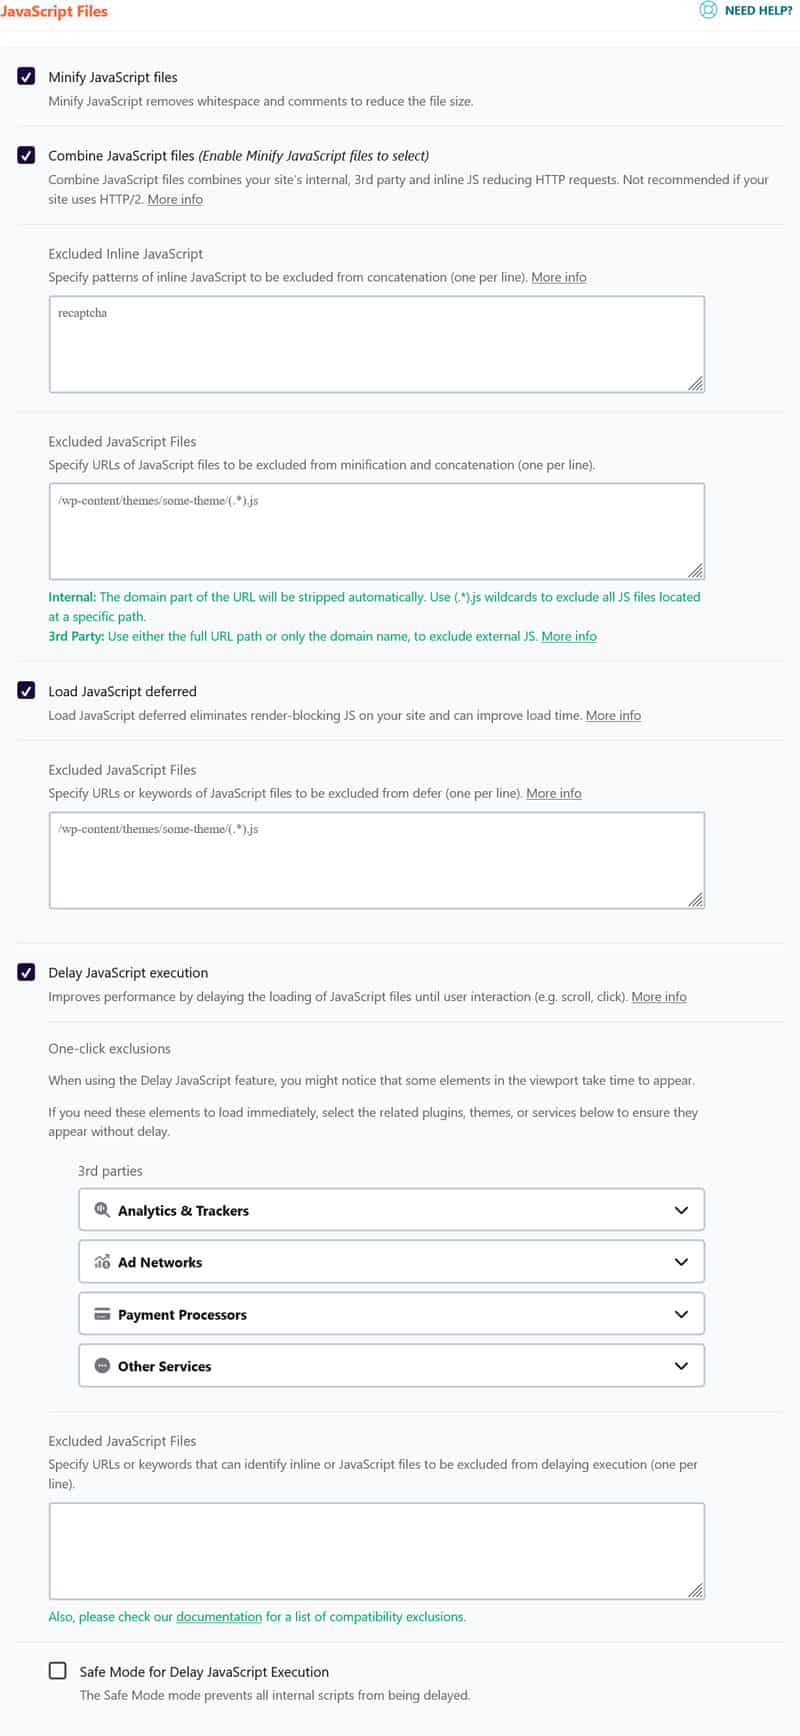
If necessary, you have the option to exclude individual scripts, plugins, and files from being optimized, in case it interferes with the responsiveness of your page elements.
Aside from that, WP Rocket automatically implements a number of performance improvements in the background, such as:
- Caching, including a separate mobile cache
- Preloading cache and links
- Critical Image optimization (to exclude images above the fold from lazy loading) to improve Largest Contentful Paint
- Automatic lazy rendering to load elements high up on the page faster
As a matter of fact, simply installing and activating the plugin implements 80% of performance best practices on your site and makes it faster immediately. And if that isn’t enough, there are many other features you can activate to increase your site speed, like:
- Lazy loading for images, including CSS backgrounds, videos, and iframes
- Preloading external files and fonts
- Database optimization
Ready to Add JavaScript to Your WordPress Pages?
JavaScript offers a lot of exciting possibilities for WordPress websites, whether for adding interactivity or integration with third-party software. There are many ways you can add it to your pages, depending on your skill level and preferences.
At the same time, JavaScript can introduce errors and be a big factor in page performance. For that reason, it’s imperative that you add JavaScript to your WordPress pages with care.
If you’re struggling with performance issues related to JavaScript, WP Rocket helps you address them easily and effectively. Plus, it offers a lot of other functionality to speed up your site. Get WP Rocket today and try it risk-free for 14 days!