Table of Contents
Last update on
WordPress relies on several core files to run your website and the powerful .htaccess configuration file is one of them.
Short for “hypertext access,” WordPress uses this file primarily to handle pretty permalinks. But its true power lies in its ability to override your server’s settings—enabling you to add your own rules to this file that can beef up your site’s performance and security.
Some of this additional functionality includes locking outside access to critical files, sending custom HTTP heads, forcing SSL, and restricting access to the WordPress dashboard.
In this post, we’ll take a look at how .htaccess works and how to edit it. Plus, we’ll look at some examples of what you can do with this file to improve your site’s performance.

What is the .htaccess File?
The .htaccess file is a configuration file that WordPress uses for Apache web servers. Since most WordPress web hosts use Apache, most WordPress websites also have a .htaccess file.
This file is usually located in the root directory of your site. But since it sets out how Apache should handle configuration for your site on a per-directory basis, you might also find versions of this file in other folders on your site.
It’s a hidden file—that’s why it starts with a period—and it has no extension. This means you won’t be able to see it when browsing your files unless you show all hidden files on your computer.
In WordPress, .htaccess has one important function: it controls how your site’s permalinks are displayed. The file is automatically generated the first time you customize your permalinks, and if you make any subsequent changes to your permalink structure the file is automatically updated with new rules.
For many small and basic WordPress sites, handling permalinks is all the .htaccess will ever do. But for more larger and more complex sites, .htaccess is often manipulated by plugins. This is especially common for security and caching plugins like WP Rocket, which edits .htaccess to enable GZIP compression for your site and adds the optimal browser caching rules.
It’s also possible to make your own changes to .htaccess to enable/disable advanced functionality on your site. In fact, there’s a lot you can do, such as prevent directory browsing, restrict access to PHP files, and even protect your site against script injections.
How to Find the .htaccess File in WordPress
The .htaccess file is located in the root directory of your site. But before you go hunting around for it and making changes, it’s important to understand that editing this file comes with risks—a single syntax error could mess with key functionality, or even break your site.
Getting Started: Create a Backup
So make sure you back up your site before editing this file. Alternatively, you could use a staging site to update .htaccess and test changes to your site’s functionality before pushing them live.
If you prefer to fly by the seat of your pants and edit your site live, it’s a good idea to download a copy of your .htaccess file to your computer so you at least have a backup. This way, if you do break your site, you can simply upload the original copy of the file to your server and pretend like nothing happened.
There are typically three ways you can access your .htaccess file:
1. Editing .htaccess Using cPanel
- Log into cPanel for your site and go to “File Manager.”
- File Manager will load and display a list of files on your web server. Look for “public_html” and click on that.
- You are now in the root directory for your website (unless you set up your site in a sub-directory). Scroll through your files and look for the .htaccess file:
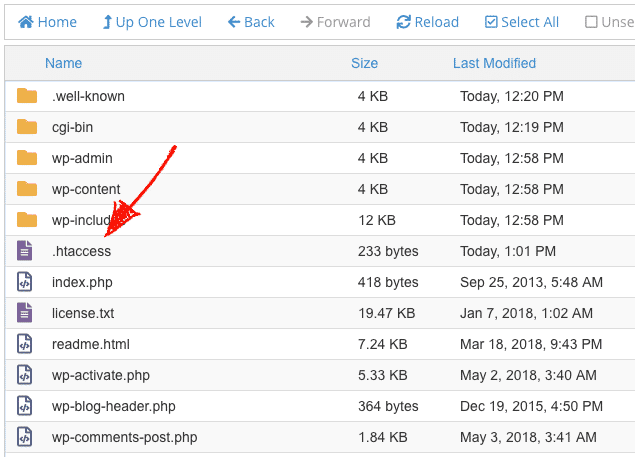
If you can’t see the file, you’ve either not got one or you need to change your settings for hidden files.
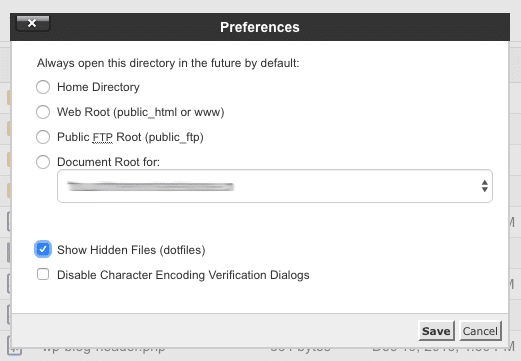
To update hidden files settings, click on “Settings” in the top-right corner of File Manager and in the modal that appears check “Show Hidden Files.”
2. Editing .htaccess Using FTP
1. Grab your FTP details and log in to your site using your favorite FTP app (I’m using FileZilla).
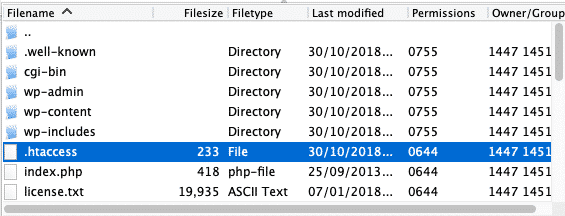
2. Once your FTP client is connected to your site, you should see your server’s root files in the bottom-right quadrant, like so:

3. Scroll through the list of files until you find “public_html” and then double-click it.
4. You’ll now be in your site’s root directory (unless, of course, you set up WordPress in a sub-directory). Scroll through the files listed and you should see your .htaccess file:
3. Editing .htaccess Using a Plugin
There are many free plugins that can enable you to edit the .htaccess file, but one of the most popular is Yoast SEO.
To access your .htaccess file in the WordPress dashboard:
1. Log in to your site and navigate to SEO > General.
2. In the tab at the top of the page, click on “Features” and then scroll down to “Security: no advanced settings for authors” and turn this option off. Save your changes.
3. Next, go to SEO > Tools and you should see a “File editor” option. This tool allows you to make changes to your .htaccess file.
Note: If file editing is disabled on your site, as it is on mine (hence the lack of imagery here), then you won’t see this option in your WordPress install. You’ll need to use another method for accessing your .htaccess file.
Creating a .htaccess File If You Don’t Already Have One
If you don’t have a .htaccess file in your root directory you may need to create one. But first, double-check that you definitely have hidden files showing so you don’t inadvertently create a second copy (and replace your original file by accident).
The easiest way to create one is to simply go to Settings > Permalinks in the WordPress dashboard and click “Save Changes.” WordPress will automatically generate a file, and you don’t actually have to switch to different permalink settings.
Alternatively, if you want to create and edit and contents of your file, here’s how to create one using cPanel:
1. In File Manager, go to your root directory (public_html).
2. Click “File” in the top-left and enter .htaccess. Click “Create New File”: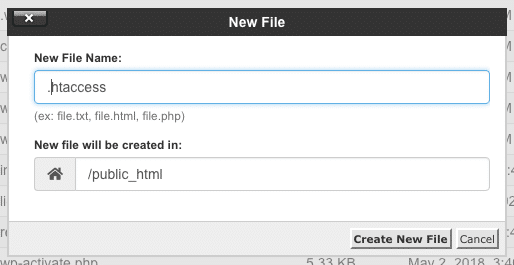
3. The root directory will refresh and you should see your newly created .htaccess file listed amongst your files.
Since all WordPress installs have pretty permalinks turned on by default (since WordPress 4.2), it’s a good idea to include the basic rules that are default for .htaccess files in newer versions of WordPress rather than having an empty file.
So you’ll need to edit your blank .htaccess file to enter these rules.
While still in your root directory, make sure .htaccess is selected and click the “Edit” option at the top of the page:
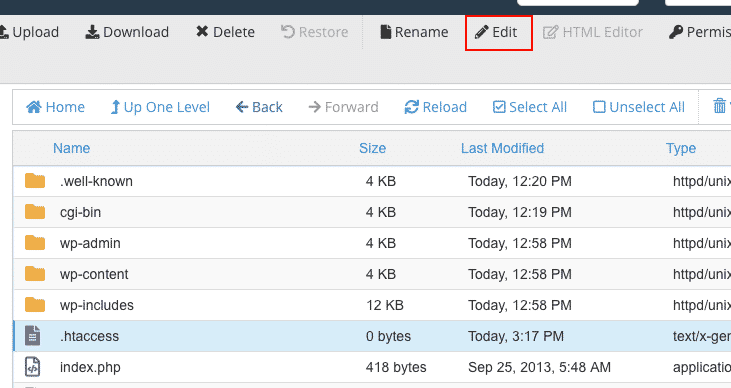
A new tab will open where you can add the following configuration rules:
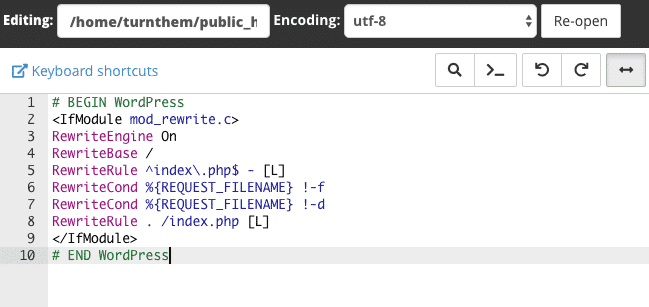
For Multisite networks and other versions of WordPress, you’ll need to enter different rules. You can find the full list of default .htaccess file rules in the WordPress Codex.
Editing the .htaccess File
There are a few important things to know when making changes to the .htaccess file.
Firstly, lines that begin with a hashtag are comments, not actual rules. So these lines don’t really do anything other than provide handy markers amongst the text to tell you where rules start and end.
Secondly, when adding new rules you should insert them either above or below the default WordPress rules. You shouldn’t add or edit anything between the lines that start with # BEGIN WordPress and # END WordPress.
Generally, the norm is to add any new rules below the default WordPress instructions. This way, you’ll always know that the WordPress rules are at the top of the file and any new rules are listed out below.
Nevertheless, WP Rocket represents an exception in this sense: its rules need to be placed right at the top of the .htaccess file; the plugin will automatically add them, so you don’t need to edit anything in this case.
You might also want to consider adding in your own comments, especially if you add lots of new rules around security and performance to your file as it could quickly get messy. Comments can help you quickly find rules, track what’s changed, and keep your file organized.
When adding new rules to .htaccess, it’s a good idea to save your changes and refresh your site to check that your site is still functioning properly. This will also tell if any particular rules break your site, and if they do you can simply remove the troublesome rule or upload a backup of your .htaccess to get your site working properly again.
Examples of .htaccess Rules for WordPress
Adding new rules to your .htaccess file lets you take back more control over your site and server and make changes that boost your site performance.
Before we dive in, though, make sure you duplicate your .htaccess file so you’ve got a backup. You may find that your web host doesn’t support some of the rules or you may inadvertently make a typo and break your site.
Whatever the case may be, the easiest thing is to simply make a copy of .htaccess and rename it something like .htaccess_original. This way, when you’re making changes to your file and discover that you need to roll back, all you need to do is rename the file and upload it to your root directory.
Enable HTTP Compression
All modern browsers support and automatically negotiate GZIP compression for all HTTP requests. Enabling GZIP, as I wrote about on this blog a couple of weeks back, can often achieve compression rates as high as 70-90%. This can significantly reduce the amount of time it takes to download resources, reduce data usage for site visitors, and improve the time to first render of your pages.
Now, it’s important to point out here that WP Rocket adds GZIP compression rules to your .htaccess file automatically using the mod_deflate module. So if you’re using WP Rocket, you don’t have to do anything—GZIP is already enabled and working on your site.
But to give you an idea of what the mod_deflate module looks like, here’s a simplified version:<ifmodule mod_deflate.c>
AddOutputFilterByType DEFLATE text/html text/plain text/xml application/xml application/xhtml+xml text/javascript text/css application/x-javascript application/javascript
</ifmodule>
Prevent Image Hotlinking
Every image on your pages sends a separate HTTP request to your server. So when someone uses the URL for one of your images and adds it to their site instead of uploading the image to their server, they’re stealing your bandwidth.
This technique is known as hotlinking. To stop this happening to your site, add the following to your .htaccess file:
RewriteEngine on

RewriteCond %{HTTP_REFERER} !^$

RewriteCond %{HTTP_REFERER} !^http://(www\.)?yourdomain.com/.*$ [NC]

RewriteRule \.(gif|jpg|png)$ - [F]
Make sure you replace “yourdomain.com” with your site’s URL.
For more examples of .htaccess rules to help you boost your site’s performance and security, check out the htaccess entry in the WordPress Codex.
Conclusion
Learning how to work with and edit your site’s .htaccess file can help you make powerful changes to your site’s server configuration, enabling you to improve your site’s performance and security.
You can find more examples of rules you can add to your .htaccess file in the WordPress Codex. There are also plenty of developer blogs and threads at StackExchange featuring tips and tricks for editing .htaccess.
Lastly, don’t forget to back up your site whenever you make changes to core WordPress files like .htaccess so you can quickly and easily restore your site if anything goes wrong.
Have you edited your .htaccess? Share your questions or tips for using .htaccess rules in the comments below.