
Table of Contents
Last update on
Are you sure Google and your visitors like your site? To find out, simply measure the experience using one of the best Core Web Vitals testing tools.
Today, great content isn’t enough. Google also expects your site to be fast, stable, and smooth. To evaluate this overall experience, Google relies on three Core Web Vitals, which are part of the official ranking algorithm.
When these Core Web Vitals scores are in the green, your site has a much better chance of ranking higher.
In this article, you’ll learn how to measure and monitor your Core Web Vitals performance. You’ll also see which optimization tools you can use when your scores are failing, so you can address performance issues and avoid negative impacts on your rankings.
| TL;DR Core Web Vitals measure real user experience on your website, focusing on loading speed, interactivity, and visual stability. Keeping these metrics in the green is essential for SEO because Google uses them to rank on your site. You can easily test your Core Web Vitals using tools like GTmetrix or PageSpeed Insights, identify what’s holding your site back, and apply targeted optimizations with plugins like WP Rocket or Imagify. |
Key takeaways
✅ Track Core Web Vitals regularly to maintain strong SEO and performance over time.
✅ Use both synthetic and real user data: lab tests help you debug issues, while field data shows how real visitors experience your site.
✅ If you want a general Core Web Vitals performance overview with simple recommendations and clear desktop/mobile scores, PageSpeed Insights may be enough.
✅ If you need to test Core Web Vitals across different locations, devices, and network conditions (throttling), use more advanced Core Web Vitals testing tools like GTmetrix.
✅ Use tools like GTmetrix or Rocket Insights (if you’re a WP Rocket customer) to monitor performance, detect Core Web Vitals issues early, and understand what needs fixing.
✅ WP Rocket is the easiest and most powerful way to improve Core Web Vitals and apply the performance optimizations identified by testing and monitoring tools.
✅ A simple and effective Core Web Vitals workflow: run a GTmetrix test, activate WP Rocket, re-test, and track the gains. Fast, measurable, and efficient.
What Core Web Vitals Tools Measure
Google introduced Core Web Vitals to measure user experience, not just raw loading speed. They are three metrics built into Google’s ranking systems that reflect how fast, responsive, and stable a page feels to real users. The metrics are the following:
- Largest Contentful Paint (LCP) measures how fast the main content loads.
- Interaction to Next Paint (INP) measures how quickly your site responds to user interactions (like a click, tap, or key press).
- Cumulative Layout Shift (CLS) measures how stable your layout is while loading.
Results are shown using a simple color system: green for good, orange for needs improvement, and red for poor performance, based on clear thresholds.

If your scores stay in the green, your site meets Google’s performance standards. If they fall into orange or red, some of the Core Web Vitals tools help you identify what needs fixing and where to start optimizing.
Most of them come with a detailed audit or “insights” section with recommendations that impact each Core Web Vital. For example, in order to improve LCP, Google PageSpeed Insights recommends implementing caching, optimizing images and render blocking requests.
Why Do Core Web Vitals Scores Vary Across Tools?
If you notice different Core Web Vitals scores across tools, that’s expected. Even though most Core Web Vitals testing tools rely on Google Lighthouse, they don’t all measure performance in the same way.
The difference comes from how Lighthouse is implemented. Each tool runs tests on different hardware, network conditions, geographic locations, screen resolutions, and testing environments. As a result, even with the same underlying technology, Core Web Vitals scores can vary from one tool to another.
One major factor is the difference between field data and lab data. Field data is based on real users visiting your site under real-world conditions, while lab data comes from simulated tests. Lab tests are ideal for debugging and comparing changes, but they can’t fully represent how users experience your site at scale.
Network conditions also matter. A site tested on fast Wi-Fi will behave very differently than one accessed on a slower 4G connection. Some testing tools allow you to simulate different connection speeds, devices, and locations, which further explains why scores can vary.
Device type and capabilities play a major role as well. Desktop tests usually produce better results than mobile tests, and tools that simulate specific devices, such as an iPhone or a Samsung model, may report noticeably different performance.
As Philip Walton from web.dev explains:
The performance of a site can substantially vary based on a user’s device capabilities, their network conditions, what other processes may be running on the device, and how they’re interacting with the page. In fact, each of the Core Web Vitals metrics can have its score affected by user interaction. Only field measurement can accurately capture the complete picture.
| 💡Hint: Some Core Web Vitals testing tools like GTmetrix are interesting because they allow you to simulate different connection speeds and different device and different location. |
Which Tools Should You Use to Measure Core Web Vitals?
Below is a selection of the 8 best website performance and Core Web Vitals testing tools to help you test speed, analyze Core Web Vitals, identify performance bottlenecks, and monitor performance over time. Each tool approaches Core Web Vitals differently, using lab data, real user data, or a combination of both. Understanding when and how to use them is key to getting reliable insights.
Before we start comparing the Core Web Vitals testing tools, take a moment to read the glossary to make sure you’re familiar with the key terms.
| 📌 Core Web Vitals Testing and Monitoring Glossary Lab data: Simulated performance data used to test and debug issues in controlled conditions. Field data: Real performance data collected from actual users. RUM (Real User Monitoring): Ongoing tracking performance based on real user interactions. Lighthouse: Google’s open-source technology used by most of the testing tools for running Core Web Vitals audits. |
1. GTmetrix
Overview
GTmetrix is a website performance analysis tool powered by Lighthouse. It runs speed tests and provides detailed diagnostics, Core Web Vitals metrics, and waterfall charts to help you understand what’s slowing your site down.
Lab vs field data
Synthetic (lab data) and field data (via Google CrUX API).
Monitoring support
Yes, with notifications via email.
Core Web Vitals supported
LCP, INP*, CLS.
*INP is based on real user data and may not appear for new or low-traffic sites.
Strengths
- Very detailed diagnostics
- Excellent for identifying bottlenecks using the waterfall chart
- Easy before/after comparisons and historical reports
- Alerts when Core Web Vitals or load times degrade
Limitations
- Advanced features require a paid plan.
Best use case
You need GTmetrix when you want to debug performance issues in depth and track Core Web Vitals over time. It’s perfect if you want both testing and monitoring with strong technical insights.
Pricing
Free plan available. Paid plans start at around $14.95/month.
2. Rocket Insights
Overview
Rocket Insights is WP Rocket’s built-in performance hub, powered by GTmetrix. It lets you track key pages, check your performance score and Core Web Vitals, understand what’s affecting your results, and get clear recommendations on which WP Rocket features to enable, all directly from your WordPress dashboard.
Lab vs field data
Synthetic (lab data) and field data (via Google CrUX API).
Monitoring support
Testing and monitoring.
Core Web Vitals supported
The Core Web Vitals metrics (LCP, INP*, CLS) are provided with a GTmetrix report.
*INP depends on real user data and may be unavailable for new sites.
Strengths
- Mobile-focused by default
- Beginner-friendly reports N
- o need to leave WordPress
- Clear recommendations tied to WP Rocket features
Limitations
- Requires an active WP Rocket subscription
Best use case
Ideal for monitoring performance and applying the right optimizations directly inside WordPress, without switching between tools.
Pricing
Included for free in any WP Rocket license.
3. Google PageSpeed Insights
Overview
PageSpeed Insights combines Lighthouse lab tests with real user data from the Chrome User Experience Report, giving you a Google-backed view of Core Web Vitals.
Lab vs field data
Synthetic (lab data) and field data (CrUX).
Monitoring support
Testing only.
Core Web Vitals supported
LCP, INP*, CLS.
*Field INP may be missing for new or low-traffic sites.
Strengths
- Uses real Google data
- Free and widely trusted
- Strong SEO focus
Limitations
- No monitoring or history tracking
- Limited customization (no location or connection simulation)
- Fewer performance KPIs
Best use case
Use it when you want a quick, SEO-focused Core Web Vitals check from Google’s perspective.
Pricing
Free.
4. Google Search Console
Overview
The Core Web Vitals report in Google Search Console shows how your pages perform based on real-world usage data, grouped by page type. The report is not designed to check the status of a single URL. Instead, it helps you understand your site’s Core Web Vitals performance as a whole and identify issues that affect groups of pages across your site.
Lab vs field data
Field data.
Monitoring support
Testing and monitoring.
Core Web Vitals supported
LCP, INP, CLS.
Strengths
- Very easy to use
- Fully integrated with Google tools (Chrome, GA, Search)
- Exportable and shareable reports
- Global approach on performance
Limitations
- Limited optimization guidance
- Only indexed URLs appear
- No lab testing
Best use case
Ideal for monitoring Core Web Vitals over time on established sites with consistent traffic.
Pricing
Free.
5. WebPageTest
Overview
WebPageTest is a powerful performance testing tool offering deep diagnostics across devices, browsers, and network conditions.
Lab vs field data
Synthetic (lab data) and field data.
Monitoring support
Testing and monitoring (Pro).
Core Web Vitals supported
LCP, INP*, CLS.
*INP relies on real user data when RUM is enabled.
Strengths
- Advanced network and device simulation
- Deep Core Web Vitals diagnostics
- Strong Lighthouse integration
Limitations
- Steeper learning curve
- Advanced features require a paid plan
Best use case
Best for developers and teams running deep Core Web Vitals audits and learning performance fundamentals.
Pricing
Free basic usage. Paid plans available.
6. Chrome DevTools
Overview
Chrome DevTools includes Lighthouse audits directly in the browser, making it easy to test Core Web Vitals during development.
Lab vs field data
Synthetic (lab data).
Monitoring support
Testing only.
Core Web Vitals supported
LCP, INP, CLS (field data).
Strengths
- Free and reliable
- Runs locally in Chrome
- Ideal for development and debugging
Limitations
- No real user data
- Requires technical knowledge
Best use case
Perfect if you’re optimizing Core Web Vitals before launching or testing changes during development.
Pricing
Free.
7. Contentsquare
Overview
Contentsquare connects Core Web Vitals data with real user behavior across the entire customer journey.
Lab vs field data
RUM (real user monitoring).
Monitoring support
Testing and monitoring.
Core Web Vitals supported
LCP, INP, CLS (field data).
Strengths
- Strong UX and business insights
- Real-world performance data
- Enterprise-grade analytics
Limitations
- Not a pure speed testing tool
- Expensive for small sites
Best use case
Ideal for large websites focused on UX, CRO, and conversion funnel optimization.
Pricing
Custom enterprise pricing.
8. BrowserStack
Overview
BrowserStack lets you test websites on real devices and browsers to identify UX and compatibility issues.
Lab vs field data
Real device testing
Monitoring support
Testing and monitoring
Core Web Vitals supported
LCP, INP, CLS, via the BrowserStack Website Scanner.
Strengths
- Real devices and environments
- Excellent for QA and UX testing
Limitations
- No Core Web Vitals monitoring
- Not a performance-focused tool
Best use case
Perfect for QA teams validating real-device behavior and cross-browser compatibility.
Pricing
Paid plans only.
Core Web Vitals Tools Comparison
This comparison table highlights how each Core Web Vitals testing tool differs in data source, testing and monitoring capabilities, best use case, and pricing, helping you choose the right one for your needs.
| Tool | Lab vs Field Data | Key Features | Best Use Case | Pros & Cons | Integration Support | Pricing |
|---|---|---|---|---|---|---|
| GTmetrix | Lab (LCP, CLS) + Field via CrUX (INP*) | ✓ Multidevice testing ✓ Multilocation testing ✓ Monitoring ✓ Waterfall charts ✓ Historical reports | In-depth diagnostics and tracking performance over time | Pros: Detailed diagnostics, strong bottleneck analysis, easy before/after comparisons Cons: Advanced monitoring requires paid plan | Lighthouse, CrUX, WordPress, API integrations | Free plan availablePaid from $14.95/month |
| Rocket Insights | Lab (LCP, CLS) + Field via CrUX (INP*) | ✓ Testing and monitoring ✓ WordPress integration ✓ Mobile-focused by default ✓ Beginner-friendly reports ✓ WP Rocket recommendations | Simple performance monitoring directly inside WordPress | Pros: No need to leave WordPress, actionable recommendations, beginner-friendly Cons: Requires WP Rocket license | WordPress, WP Rocket, GTmetrix | Free with any WP Rocket license |
| PageSpeed Insights | Lab + Field (LCP, CLS, INP) | ✓ Desktop and mobile testing ✓ Real Google field data ✓ Lighthouse integration ✗ No monitoring ✗ No historical tracking | Quick Core Web Vitals and SEO analysis | Pros: Free, trusted Google data, strong SEO relevance Cons: No monitoring or alerts, limited diagnostics depth | CrUX, Lighthouse, Search Console | Free |
| Google Search Console | Field (LCP, CLS, INP) | ✓ Core Web Vitals monitoring ✓ Real-world usage data ✓ URL grouping ✓ Exportable reports ✗ No lab testing | Monitoring Core Web Vitals trends across indexed pages | Pros: Easy to use, fully integrated with Google ecosystem, trend monitoring Cons: Limited debugging insights, only indexed URLs included | Google Search, Chrome, Analytics | Free |
| WebPageTest | Lab + Field (LCP, CLS, INP*) | ✓ Multidevice testing ✓ Multilocation testing ✓ Advanced network simulation ✓ Deep diagnostics ✓ Lighthouse integration | Advanced performance audits and network simulation | Pros: Powerful diagnostics, advanced testing flexibility, strong technical insights Cons: Steeper learning curve for beginners | Lighthouse, Chromium, APIs | Free basicsPaid for advanced features |
| Chrome DevTools | Lab testing + INP proxy data | ✓ Local performance audits ✓ Lighthouse reports ✓ Rendering diagnostics ✗ No monitoring ✗ No real-user data | Local debugging during development | Pros: Free, reliable, built directly into Chrome Cons: Technical learning curve, no field data monitoring | Chrome browser, Lighthouse | Free |
| Contentsquare | Field / RUM (LCP, CLS, INP) | ✓ Real user monitoring ✓ UX analytics ✓ Customer journey tracking ✓ Session insights ✓ Enterprise reporting | Enterprise UX and performance analysis | Pros: Strong UX insights tied to business impact Cons: Expensive and more enterprise-oriented | Analytics platforms, CRM, enterprise stack integrations | Custom enterprise pricing |
| BrowserStack | Field testing on real devices | ✓ Real device testing ✓ Cross-browser testing ✓ Mobile testing ✗ No CWV monitoring ✗ No performance tracking | Cross-device QA and compatibility testing | Pros: Excellent real-device testing coverage Cons: Not focused on Core Web Vitals or monitoring | BrowserStack Website Scanner, CI/CD integrations | Paid plans only |
7 Tips to Monitor Core Web Vitals Correctly
Tracking and regular monitoring help you catch issues early and fix them before they impact user experience or search rankings. To get reliable and actionable Core Web Vitals data, keep these seven best practices in mind:
1. Understand How Google Evaluates Core Web Vitals
Google doesn’t evaluate Core Web Vitals page by page in isolation. Instead, it often groups similar pages together, such as blog posts, product pages, or category pages. This means a single slow template can affect the performance signal of an entire page group, not just one URL.
2. Don’t Test Only Your Homepage, Monitor Your Key Templates
Many performance issues happen deeper in the user journey, such as on product pages, checkout flows, or conversion steps. A fast homepage won’t help if key pages that drive revenue perform poorly. Focus on the pages that matter most, including product pages, category pages, and checkout pages. Monitoring these templates gives you a clearer picture of how real users experience your entire site, not just the homepage.
3. Test Multiple URLs, Not Just One
Checking several URLs within the same page type improves the accuracy of your Core Web Vitals analysis. It helps you identify whether an issue is isolated or systemic across a whole section of your site.
4. Use Incognito Mode for Cleaner Tests
When running manual tests, use incognito mode or a clean browser profile. This avoids interference from browser extensions, cached assets, or logged-in sessions that could skew results.
5. Choose One Main Tool and Use Others for Context
Don’t try to match scores across every tool. There’s no true one-to-one comparison, as each tool implements Lighthouse differently and applies its own scoring logic.
Instead, pick one primary tool for ongoing monitoring and trend analysis. Use other tools for spot checks and deeper insights. For example, track long-term performance in PageSpeed Insights or Google Search Console, then use GTmetrix to simulate a slow mobile connection and understand why a score drops.
6. If You Don’t See INP Yet, Use TBT as an Alternative
If the Core Web Vital Interaction to Next Paint (INP) is missing, it’s often because your site is new and Google doesn’t have enough real user interaction data yet. That’s completely normal. In the meantime, focus on Total Blocking Time (TBT), which is the closest lab metric to INP. Optimizing TBT early by reducing heavy JavaScript and main-thread blocking helps prepare your site for good INP scores later. Monitor performance regularly, and as your traffic grows, INP will start appearing automatically.
7. Focus on Trends, Not Perfect Scores
The goal isn’t to chase perfect numbers in every tool. What matters is understanding why scores change, spotting regressions early, and taking action when performance degrades. Consistent monitoring over time gives you a much more accurate picture than isolated tests.
From Testing to Green Core Web Vitals: A Practical Workflow
To show how Core Web Vitals testing tools translate into real improvements, let’s walk through a simple WordPress example. To make things concrete, we’ll run a simple before-and-after test using PageSpeed Insights to show how easy it is to move Core Web Vitals from orange to green with the right optimizations (and the right plugins).
The Test Setup
We’re using a basic WordPress site built with the Twenty Twenty-Two theme and the WordPress Block Editor. The page includes a few common sections you’ll find on many sites:
- A hero banner
- A services section
- A testimonials block
This setup keeps things realistic and easy to reproduce. We’ll use Google PageSpeed Insights to run all performance tests.
Step 1: Core Web Vitals Testing (No Optimization)
To start, let’s add our URL to Google PageSpeed Insights and click on the Analyze button.

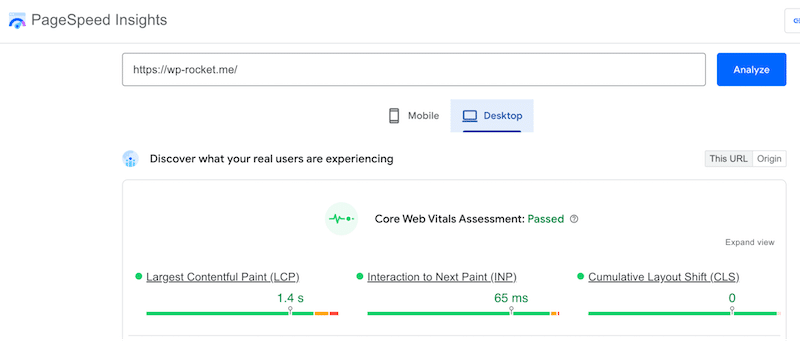
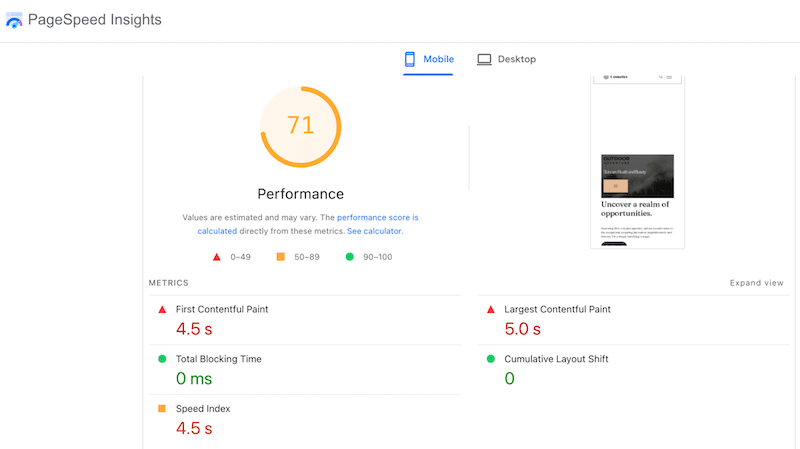
At the top, PageSpeed Insights shows performance scores for Mobile (or Desktop), along with your Core Web Vitals scores. This gives you a quick snapshot of whether your metrics are in the green, orange, or red. These scores are useful for a high-level view, but they don’t tell you why your site is slow.
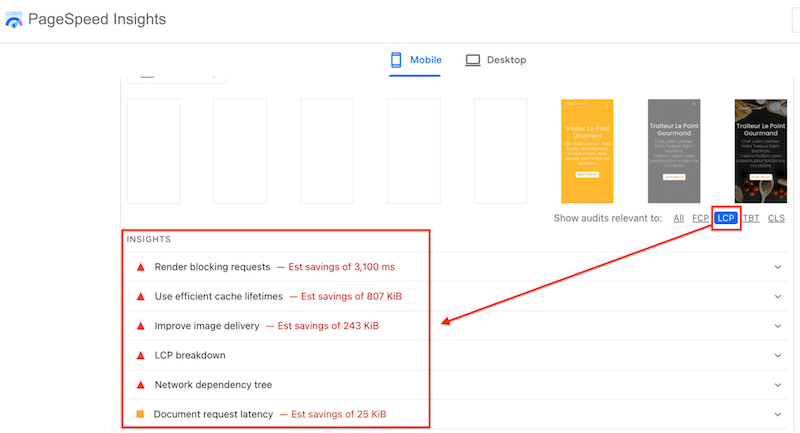
Let’s scroll to the Insights and Diagnostics sections because this is where PageSpeed Insights becomes actionable. The Insights section highlights the main issues affecting Core Web Vitals.
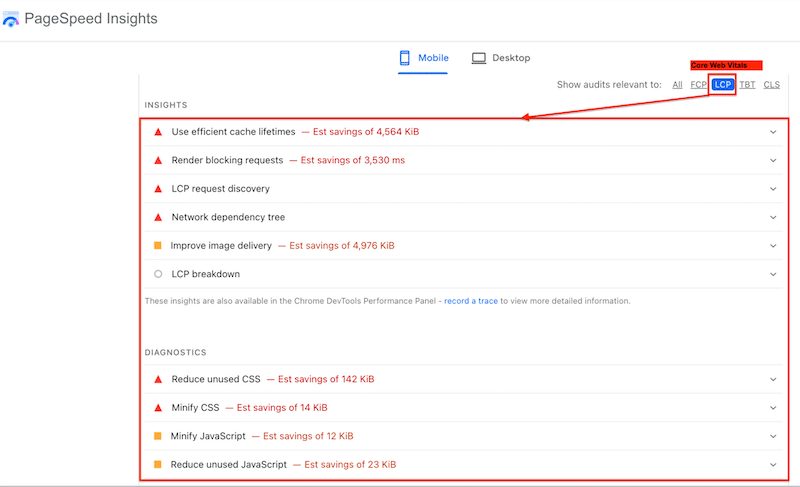
You can see common LCP-related warnings such as:
- Use efficient cache lifetimes
- Render-blocking requests
- LCP request discovery
- Network dependency tree
- Improve image delivery
Below that, the Diagnostics section provides more direct technical hints, such as:
- Reduce unused CSS
- Minify CSS
- Reduce unused JavaScript
All these audits point directly to what’s delaying the loading of our largest element on the page.
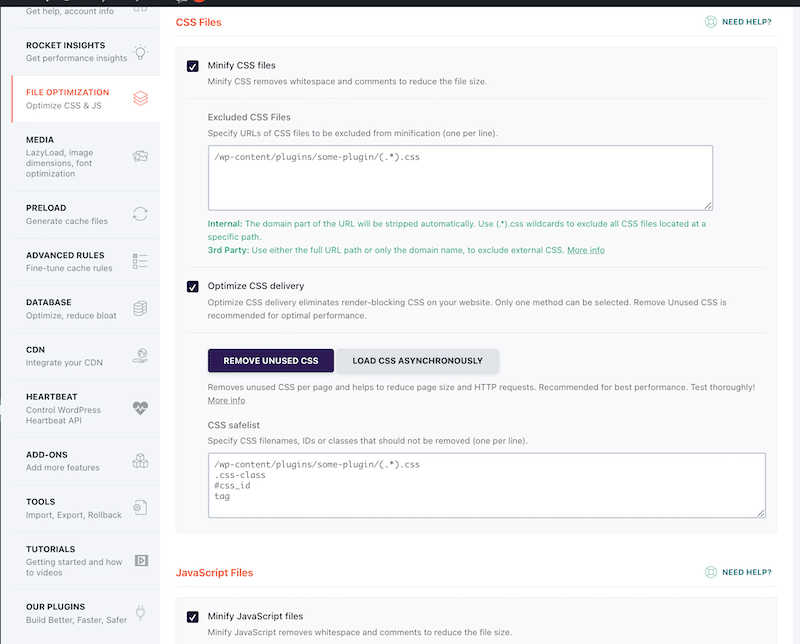
Step 2: Applying Performance Optimizations
Once you have your audit results, you know exactly which direction to take to improve your Core Web Vitals. The Insights section from PageSpeed Insights clearly highlights what needs attention and helps you prioritize the most impactful fixes.
In our example, the audit shows that we need to focus on caching, code optimization (CSS and JavaScript), render-blocking requests, and image optimization.
The easiest way to improve Core Web Vitals quickly by applying all these optimizations is to use WP Rocket 🚀and Imagify (for the image optimization tasks).
WP Rocket is the simplest and most powerful performance plugin that handles 80% of the performance best practice upon its activation, including caching, GZIP compression, CSS and JS minification, the optimization of the critical images and automatic lazy rendering.
The intuitive interface allows you to also enable powerful features such as lazy loading, removing unused CSS, loading JavaScript deferred, and delaying JavaScript execution in a few clicks – without touching any code and directly from WordPress. We activated all of them for our test.
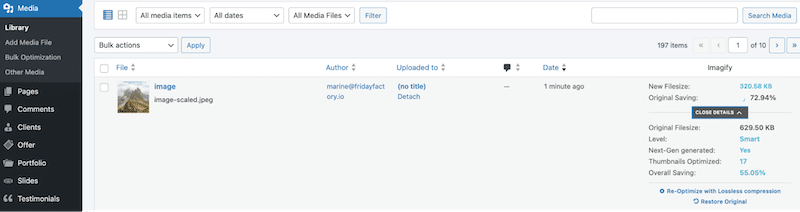
Now let’s tackle the last optimization flagged by PSI: improving image delivery. This means preparing images properly for the web by serving the correct sizes, compressing them efficiently, and converting them to modern formats such as WebP or AVIF. These formats are favored by Google because they significantly reduce file size and improve Core Web Vitals’ score.
To improve image delivery (and Core Web Vitals), you can use Imagify. It’s the easiest image optimization plugin for WordPress that automatically compresses images without quality loss thanks to the Smart compression. It also lets you convert them to WebP or AVIF in a few clicks directly from your WordPress dashboard. Image compression and conversion to AVIF should fix the last issue easily with Imagify’s help:
Let’s get to the results!
Step 3: Core Web Vitals Testing (After WP Rocket’s + Imagify Optimization)
📌 We used WP Rocket to implement several key optimizations, including browser and page caching (on mobile as well), cache and font preloading, CSS and JS optimization, and lazy loading. All of these features help reduce render-blocking requests and improve overall page loading performance. All those features contribute to eliminating render blocking resources.
📌 We used Imagify to improve image delivery meaning, optimize images with compression and AVIF conversion.
Let’s see the results on Core Web Vitals, mainly our LCP, because the score was in the red!
- Thanks to WP Rocket and Imagify, our Core Web Vitals LCP is now at 0.5 s, in the green (it was 5.0 s in the red).
- The overall score is 100/100 (it was 71/100in the orange)
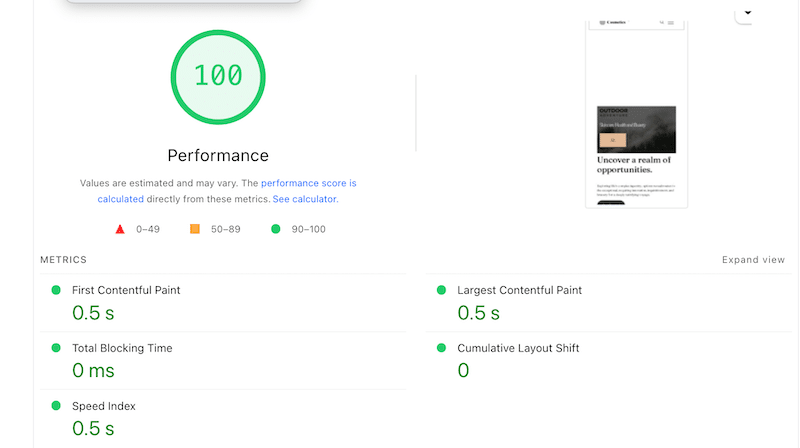
Things also look better in the Insights section and almost everything went to the passed audit thanks to WP Rocket and Imagify:

Wrapping Up
As you can see, the process is always the same. You run a test, check your Core Web Vitals scores, review the list of issues, apply the right fixes with tools like WP Rocket or Imagify, and test again. Each round of optimization brings measurable improvements.
In our example, this approach moved everything into the green, with a much lower LCP (from 3.6 in the red to 0.6 in the green) and a perfect 100/100 performance score. Every issue had a clear solution, and no coding skills were required at any stage.
This simple test–fix–retest workflow makes it easier for site owners and developers to maintain and monitor healthy performance all year long, without guesswork.
Try WP Rocket with confidence! It comes with a 14-day money-back guarantee, so there’s no risk, except improving your Core Web Vitals and your site’s performance.
FAQ: Core Web Vitals Testing and Optimization
What are Core Web Vitals?
Core Web Vitals are three performance signals created by Google to measure real user experience on a page. They are part of Google’s ranking algorithm and focus on loading speed (LCP), interactivity (INP), and visual stability (CLS). Keeping these metrics in the green helps improve usability and search visibility.
Which tools are best for Core Web Vitals testing and monitoring?
The best tools for Core Web Vitals testing and monitoring are those powered by Google Lighthouse or real user data. Popular options include Google PageSpeed Insights, GTmetrix, and Google Search Console, each offering different perspectives on performance.
What’s the difference between lab data and field data?
Lab data comes from simulated tests run in controlled environments and is ideal for debugging and testing performance changes. Field data reflects more the real user experience collected from actual visitors and is best for understanding how your site performs in real-world conditions.
How often should I test and monitor Core Web Vitals?
At a minimum, you should monitor Core Web Vitals weekly. If you run a WooCommerce site or frequently update content, daily checks are recommended. You should also run a test after any key event, such as a WordPress core update, a plugin or theme update, a new product launch, or the publication of a new blog post, to ensure performance hasn’t been impacted.
Do Core Web Vitals tools fix performance issues?
Most Core Web Vitals tools focus on identifying performance issues and explaining what needs to be improved, but they don’t apply fixes themselves. This is where WP Rocket adds real value: it combines performance monitoring through Rocket Insights with advanced optimizations features that automatically address many of the issues flagged by testing tools. Instead of just pointing out problems, it helps you act on them and improve Core Web Vitals in one place.
How can I optimize Core Web Vitals on WordPress?
The easiest way to optimize Core Web Vitals on WordPress is to use a powerful performance plugin like WP Rocket, which applies 80% of the performance practices automatically. Features such as caching, preload cache, critical image optimization, automatic lazy rendering, JavaScript and CSS optimization help improve loading speed, responsiveness, and visual stability, and you’ll get all of that out of the box right upon activation.