Table of Contents
Last update on
In this guide, we’ll help you migrate your website from Squarespace to WordPress. While Squarespace is a great platform for beginners, it’s very common for site owners to outgrow it when they start looking for more features and flexibility. And WordPress is often the logical next step.
If you find yourself in a position where you want to switch, this post aims to make the process as easy and painless as possible. Below, we’ll discuss how to pull it off step by step, and you’ll learn the reasons why moving from Squarespace to WordPress is a good idea.
1. Get a Hosting Provider
The first thing you’ll need is a hosting provider. With WordPress, you are free to choose, since the software runs on almost any server setup. Many providers also specialize in running WordPress websites now.
Which hosting makes the most sense for you depends on your site, the amount of traffic, your budget, experience, needs and more. To help you make a choice, use these resources:
- 7 Questions to Ask When Choosing Web Hosting
- Best WordPress Hosting Services for Small Businesses and Blogs
- Shared vs VPS vs Dedicated vs Cloud Hosting
Be aware that, if you are using your own domain for your Squarespace site and want to keep it, you’ll probably need to get a temporary domain for your new website first. That way, you can work on it and also access the old website before making the switch. Many providers will offer staging sites for just this purpose. A local development environment is also an option.
2. Install WordPress
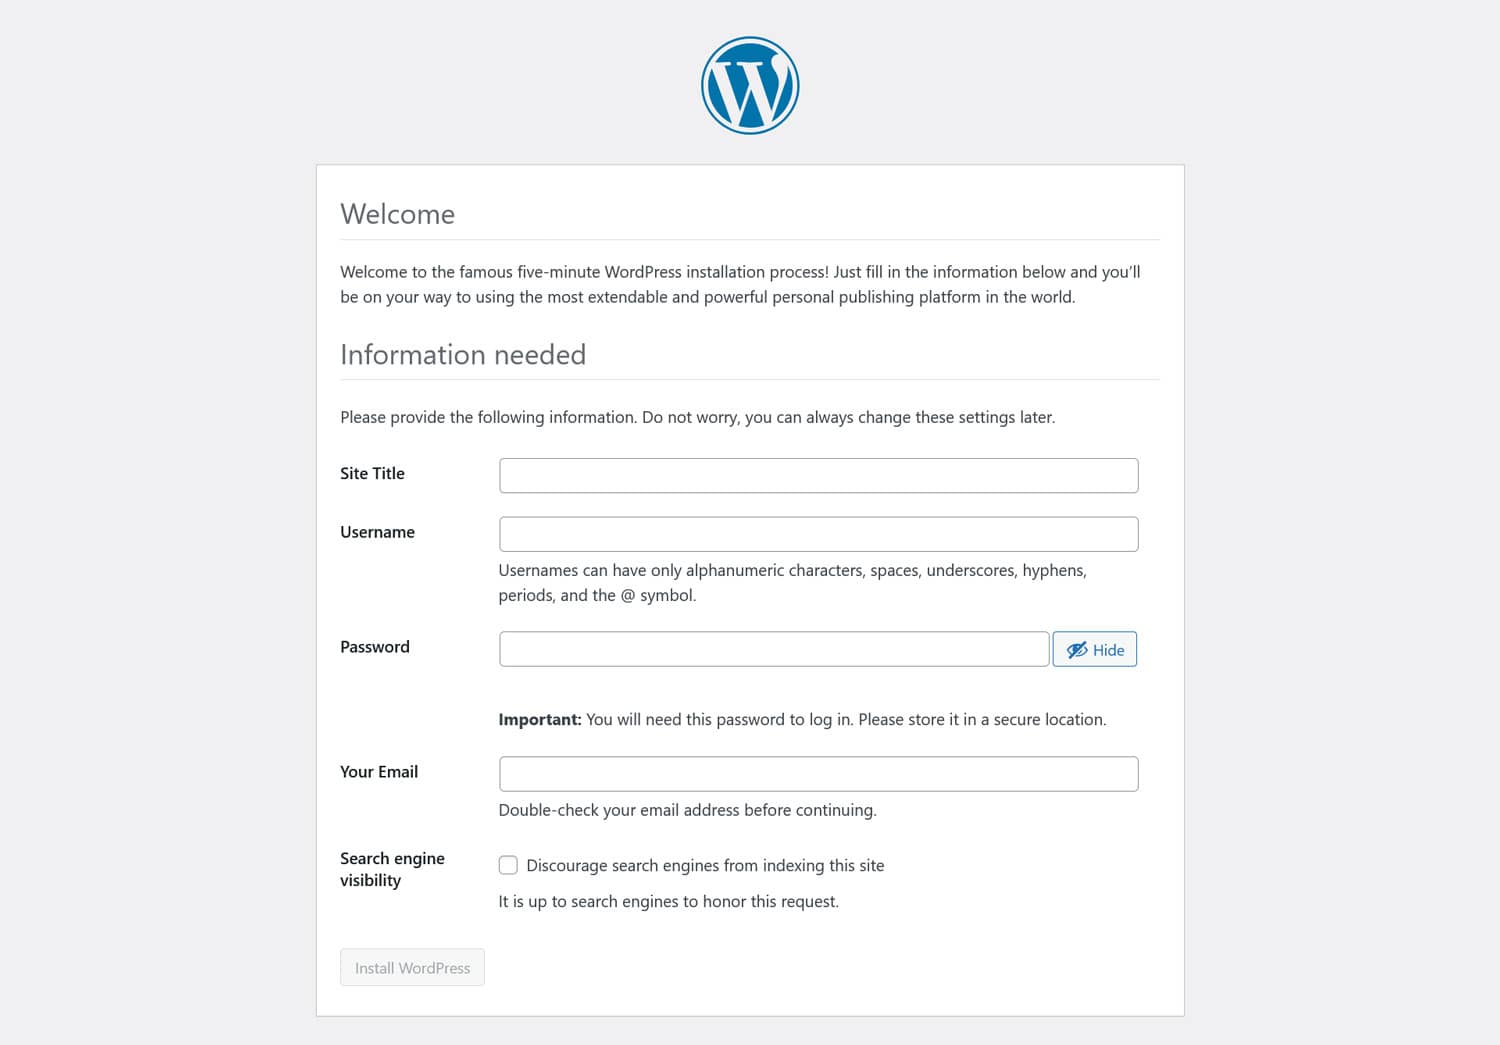
Next, in order to migrate your Squarespace site, you need to install WordPress. Doing it manually isn’t too complicated, you basically have to:
- Download WordPress and unzip it
- Upload the files to your server via FTP
- Create a database and credentials
- Run the WordPress installer
It really isn’t hard – but there is an even easier option. Because WordPress is so popular, most hosting providers now let you install it with one click.
That means, you can skip all of the above. How exactly it works is different from provider to provider, so talk to yours if you can’t find the right option.
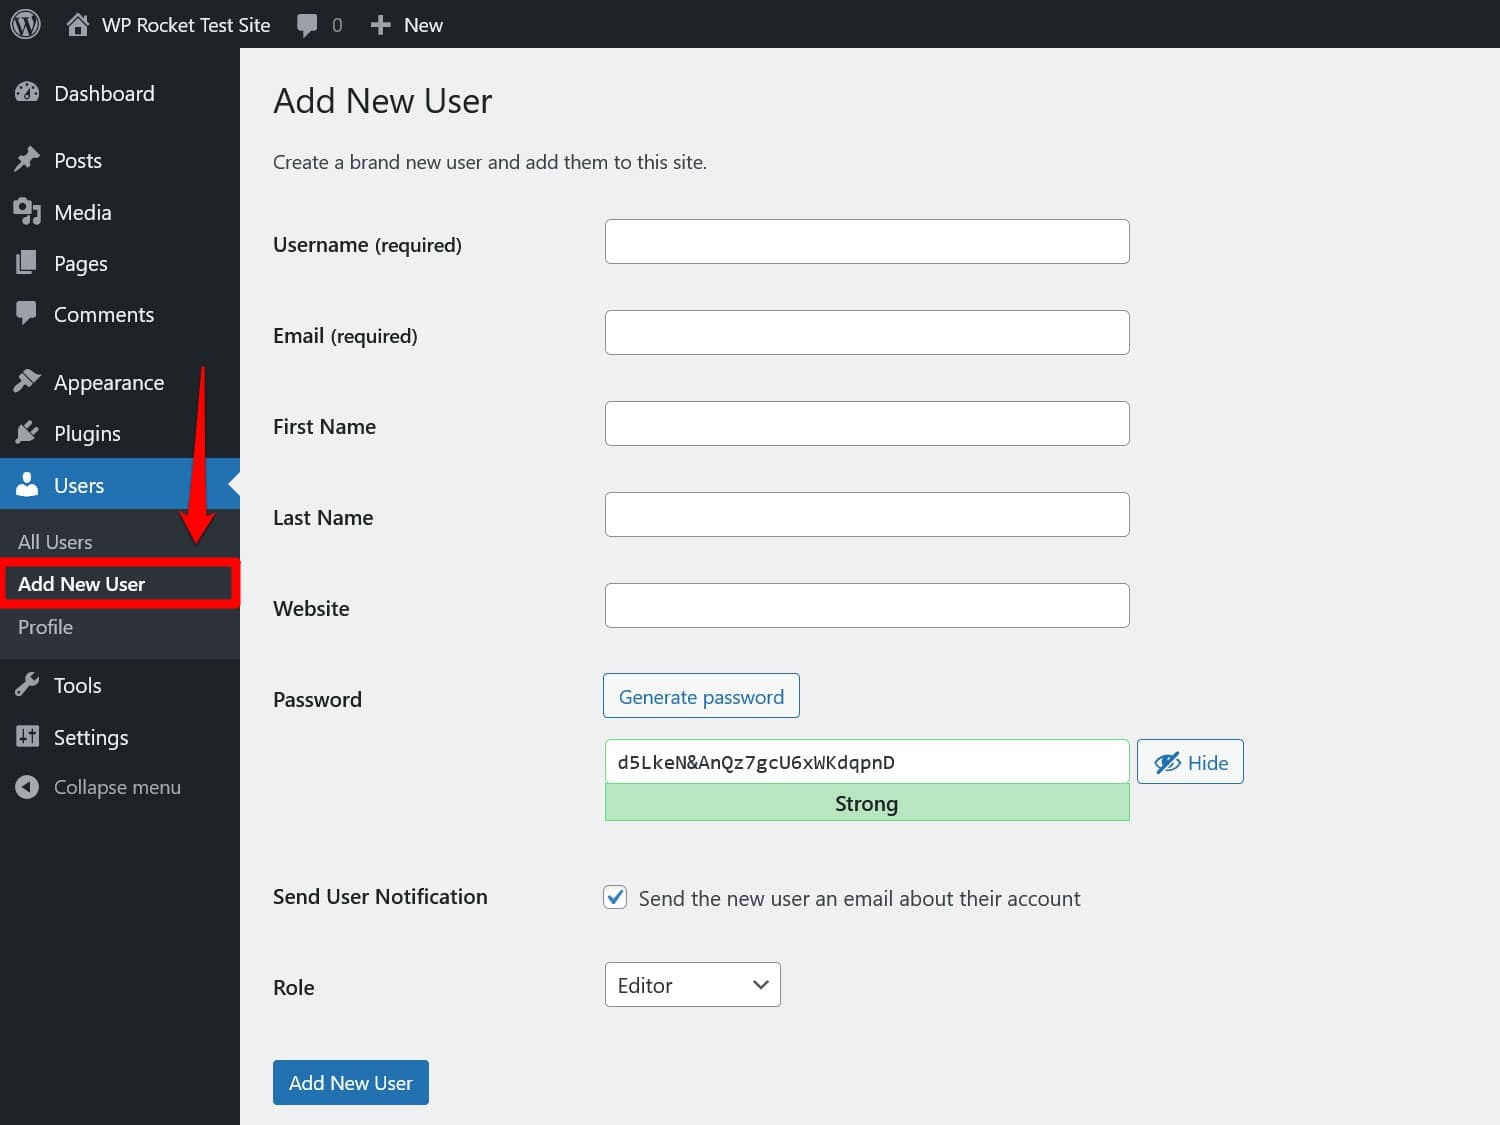
Once done, be sure to log in to your WordPress dashboard. You’ll do some work there soon and you might already consider creating a user (under Users > Add New User) that you can assign your Squarespace content to when you import it.
3. Export Your Squarespace Content
After this, turn to your Squarespace website, it’s time to start exporting your existing content. Unfortunately, the platform doesn’t offer a lot of assistance for this. By default, it only lets you automatically export:
- Pages, including the homepage
- Blog posts, so long as they are under one blog
- Gallery pages
- Text and embed blocks
On the other hand, here’s what Squarespace exports, unfortunately, don’t include:
- Event, product, album, and index pages
- Audio, video, or product blocks
- Folders, drafts, and custom CSS
- Additional blogs you might have
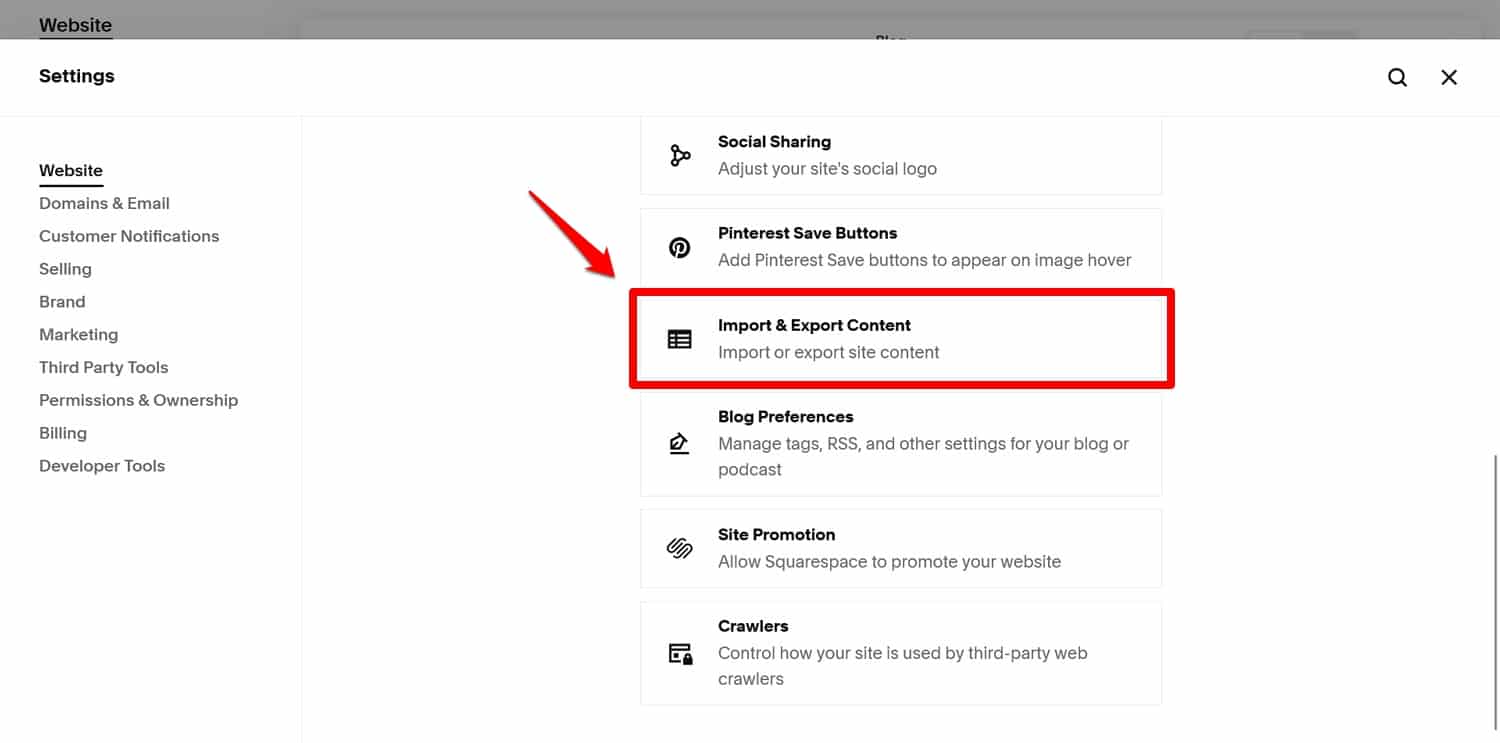
We’ll talk about how to deal with these further below. For now, in your Squarespace dashboard, go to Settings > Import & Export Content.
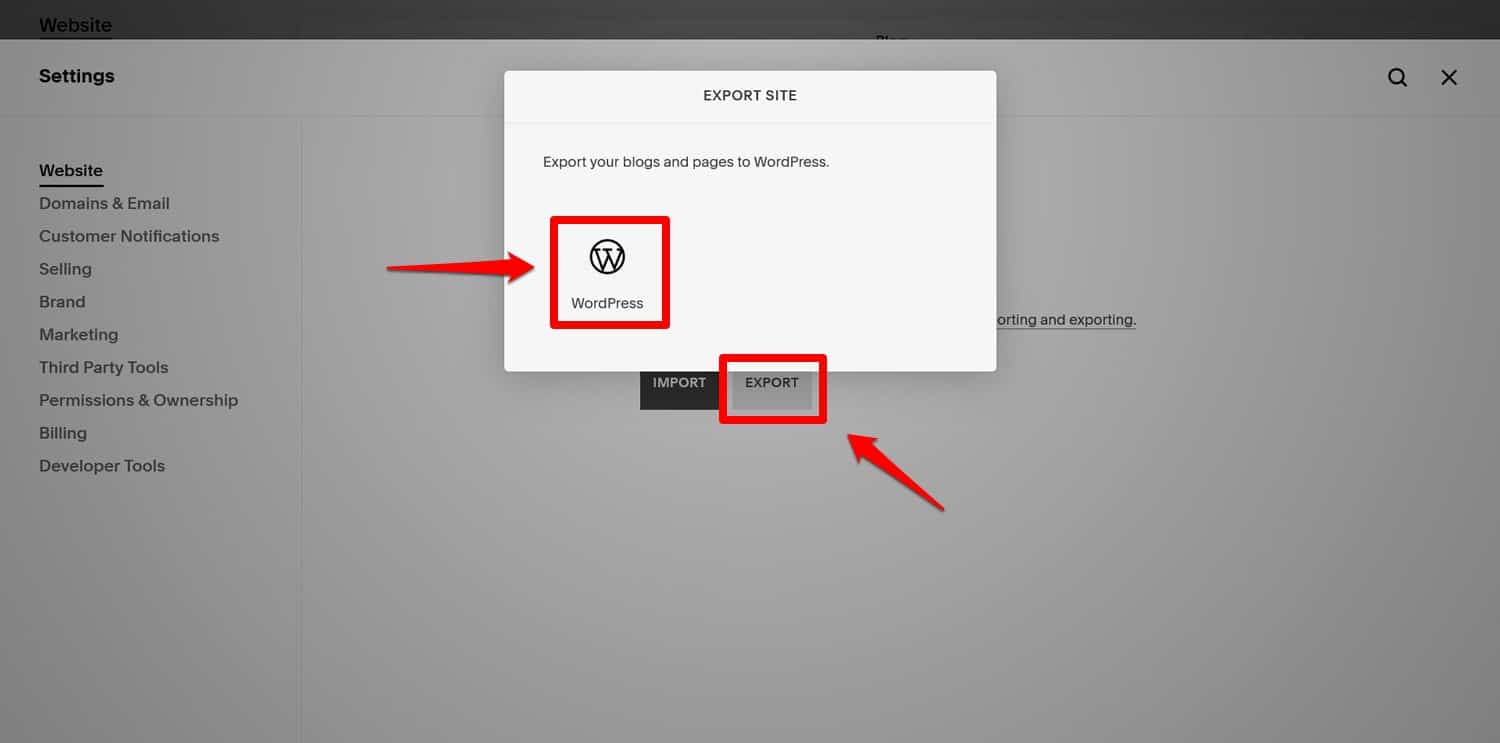
In the following screen, choose the Export option, then click on the WordPress logo in the panel that appears.
If you have more than one blog, you’ll also have to choose which one you want to take with you.
Continue to start the export (it will take a minute to gather all the data). Once ready, a button to download the XML file appears.
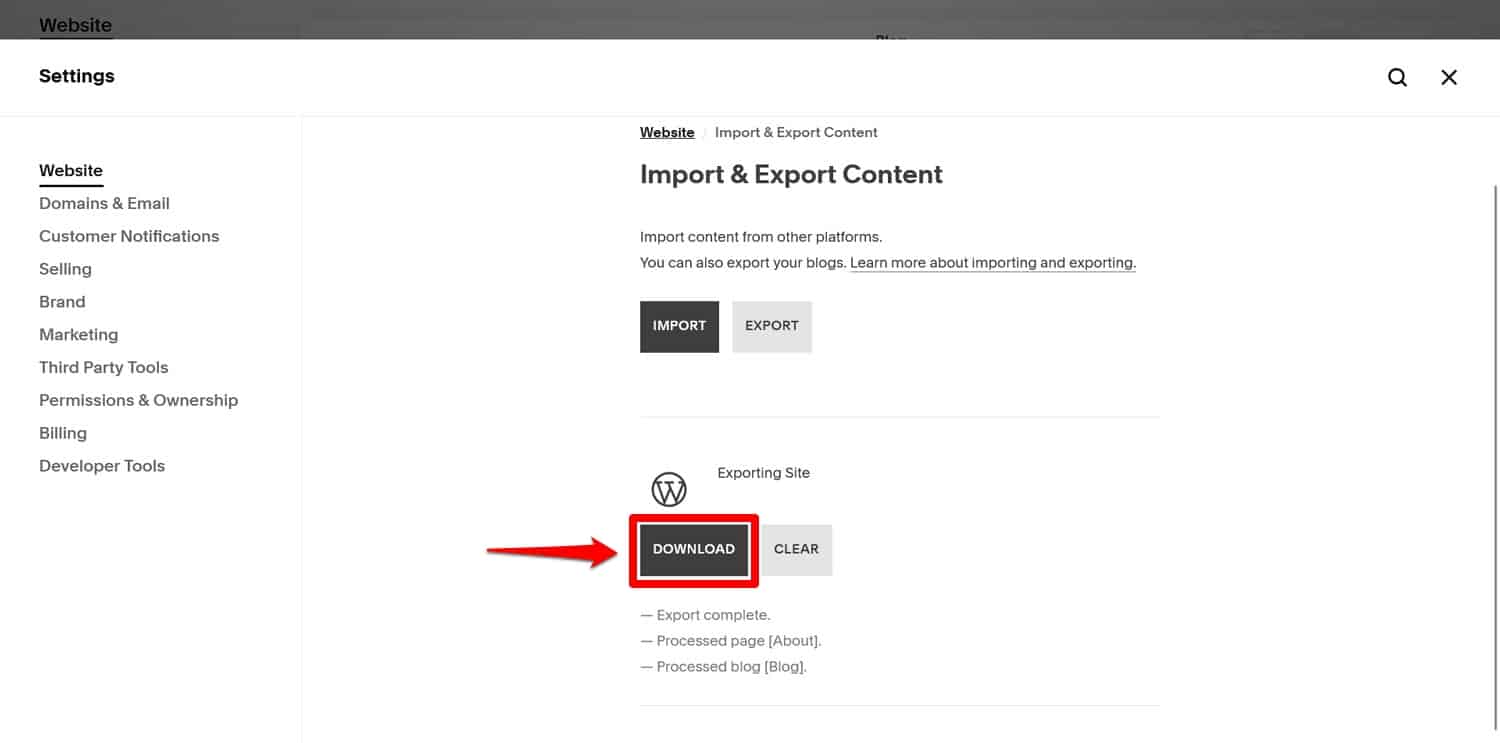
Click it and wait until it’s on your hard drive.
4. Import Your Content Into WordPress
The next step is to migrate your Squarespace content into WordPress. For that, you first need to install the respective tool.
To do so, in the WordPress dashboard, go to Tools > Import. There is no option specifically for Squarespace, however, you can use the WordPress importer for XML files. So, look for that and click Install Now.
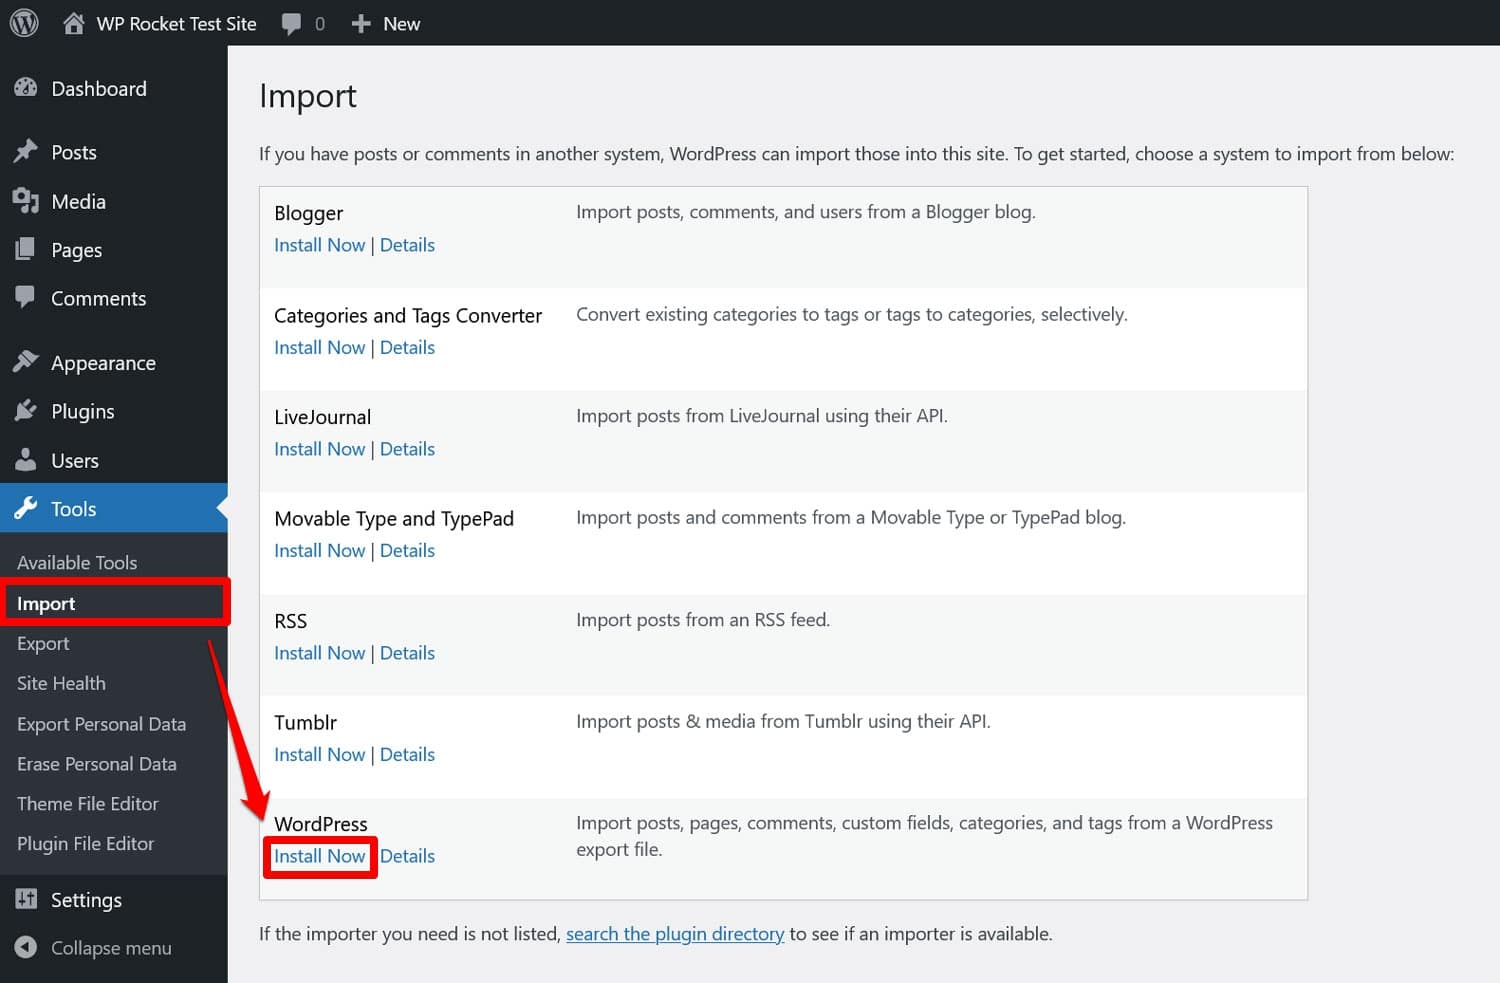
Once ready, click Run Importer. WordPress will then ask you to specify which file to import.

Pick the one you just downloaded from Squarespace and hit Upload and import. A prompt will ask you which website user the imported content should be assigned to.
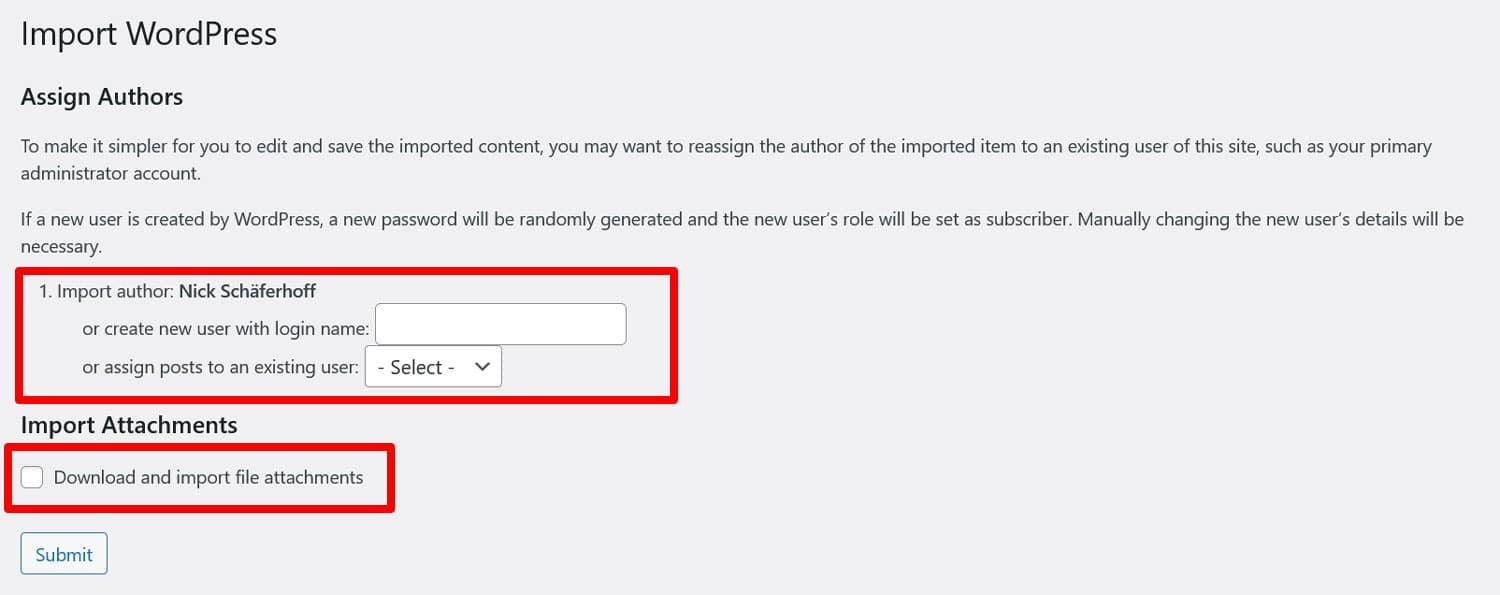
Either use the proposed one, create a new user, or pick an existing one. The last option is recommended since the other methods resulted in errors during our test.
Tick the checkbox where it says Download and import file attachments. It will import your blog posts’ featured images. We’ll talk about how to import other images below.
When you are ready, click Submit. You probably have to wait a while, especially for lots of content. Eventually, you should see a success message.

You should now be able to see your imported content in the Posts and Pages menus of WordPress.
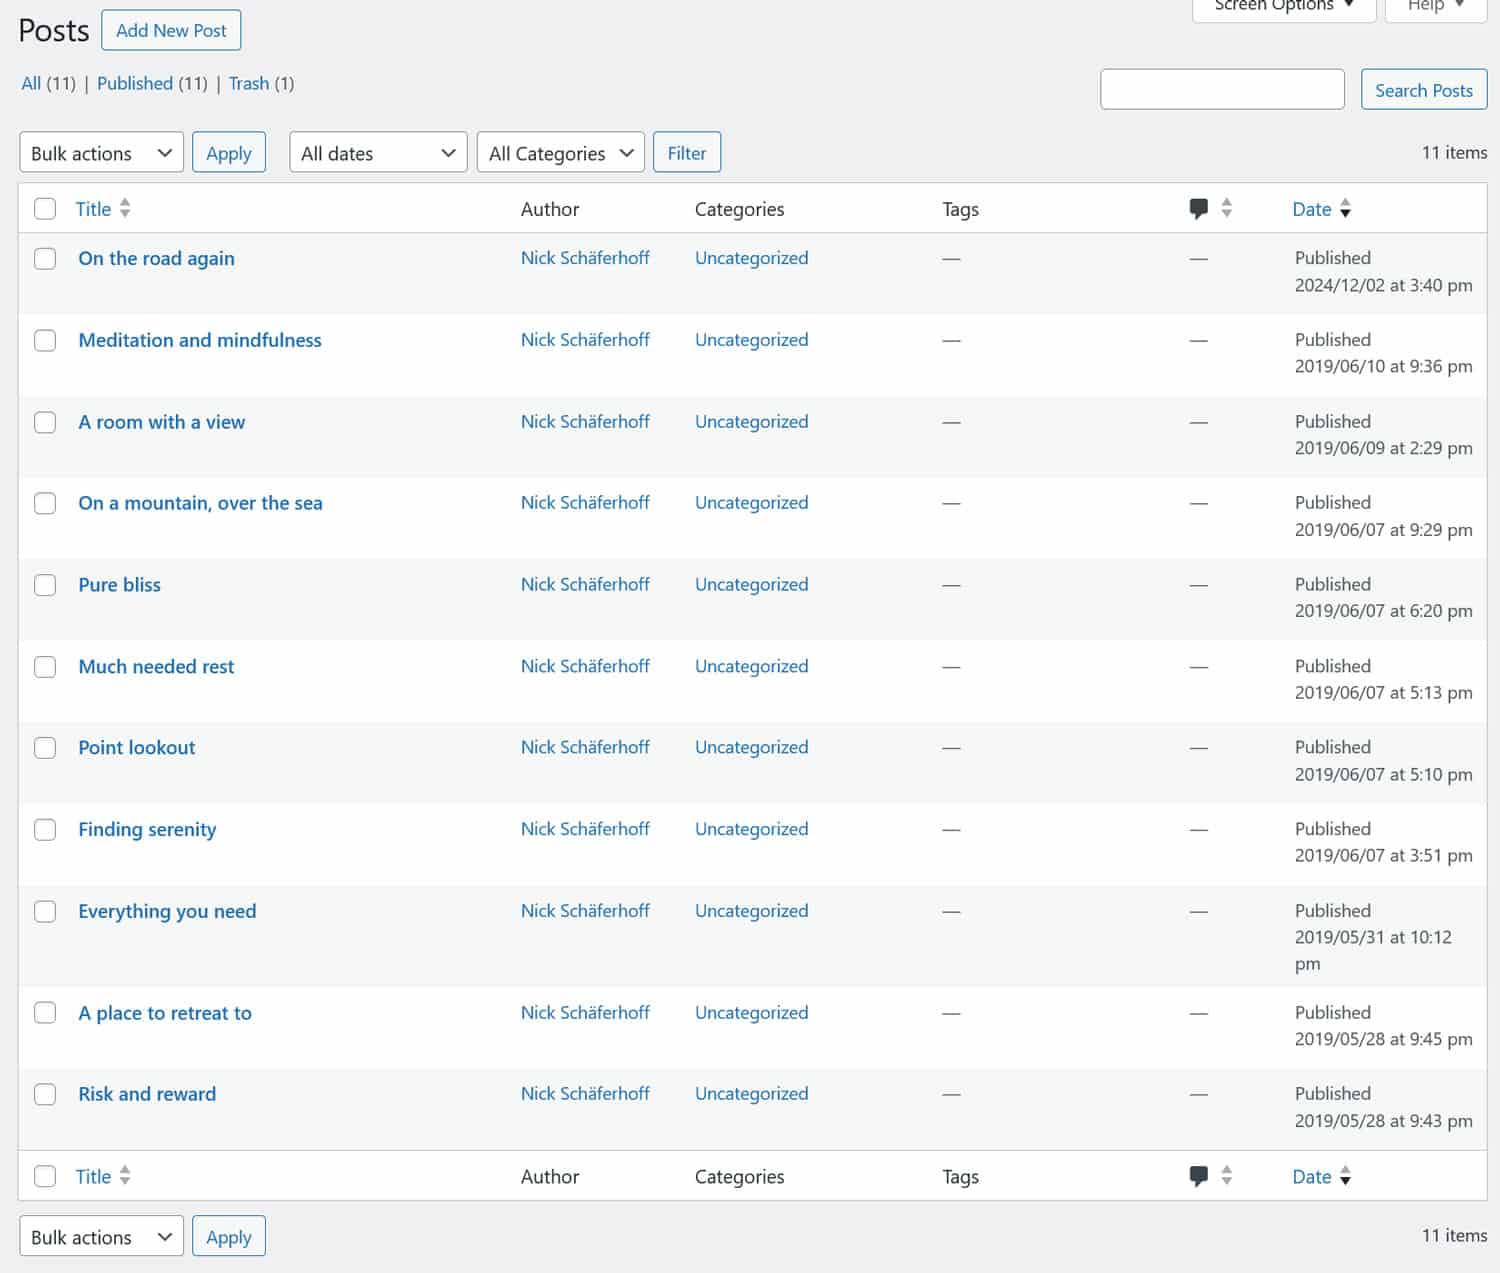
When you open them, you’ll see that the WordPress editor imports them as Classic blocks.
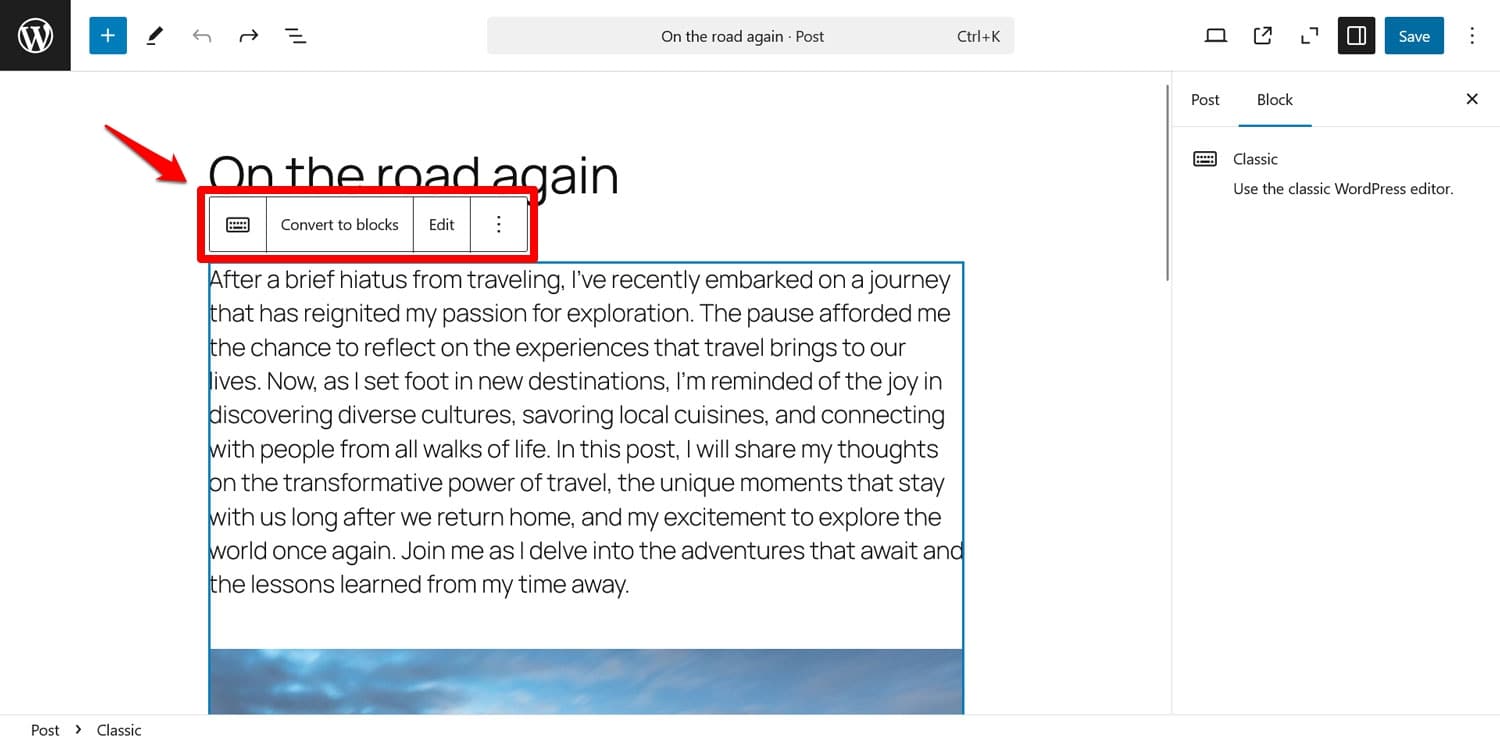
That is, unfortunately, because Squarespace also exports a bunch of HTML markup. You can see that when you choose to convert your content to blocks.
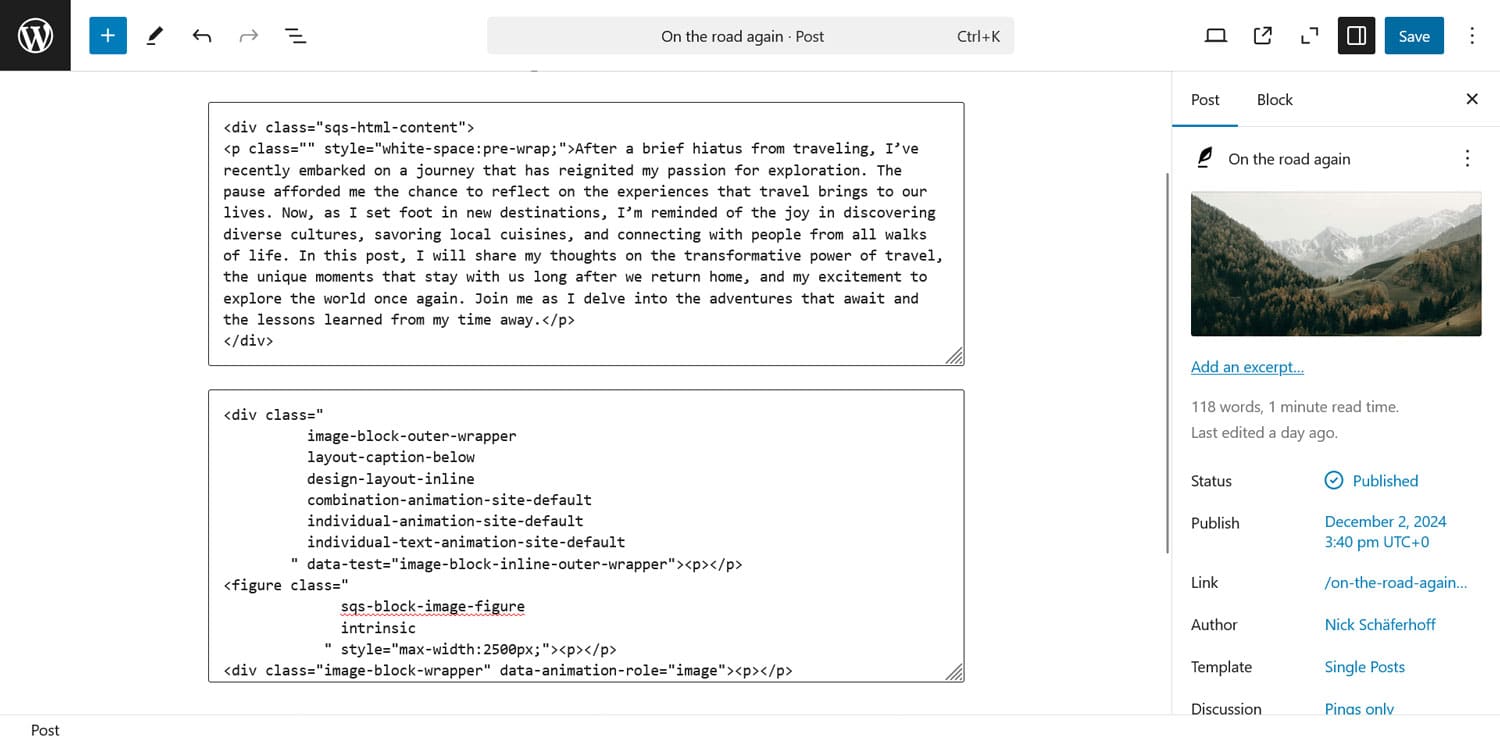
Regrettably, you need to turn this to clean markup by hand. There is not automation for it.
5. Fetch Images
So far, you’ve mostly imported text content, now you need to do the same for images. Right now, if you look at your content, they are likely either missing or linked and shown from Squarespace.
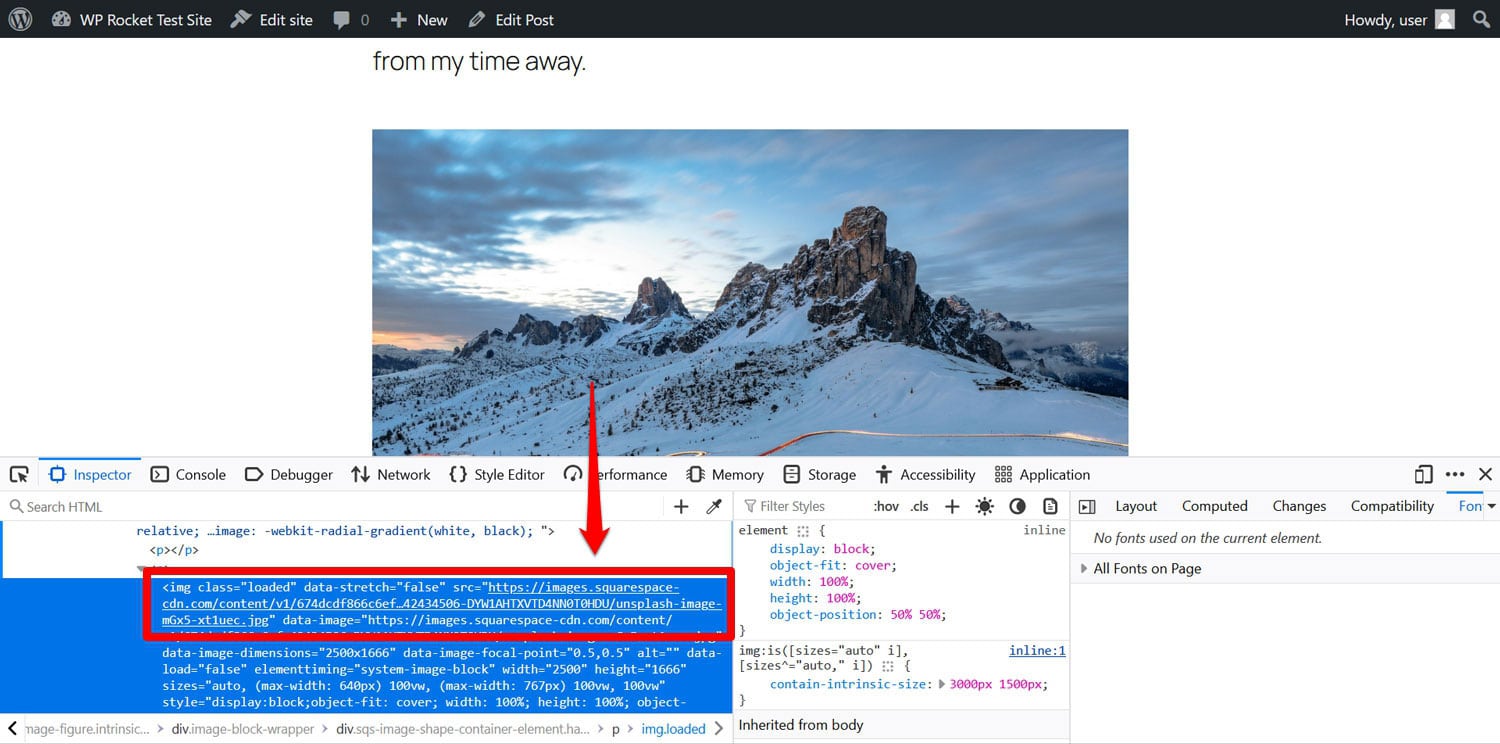
Time to bring them onto your own site. Squarespace has no built-in functionality to do so but, thankfully, someone has built a WordPress plugin for it called Auto Upload Images. It’s a bit outdated but still works.

The plugin looks for image URLs in your posts and pages and automatically imports external images to the WordPress media library. It also updates their links to use the local version.
To take advantage of it, first go to Plugins > Add New and install the plugin from there (note: it might not appear on the first page of the search results).

Once on your site and activated, go to Posts > All Posts, open the screen options at the top of the screen, and set the Number of items per page to 999. This allows you to process all of your content at once.
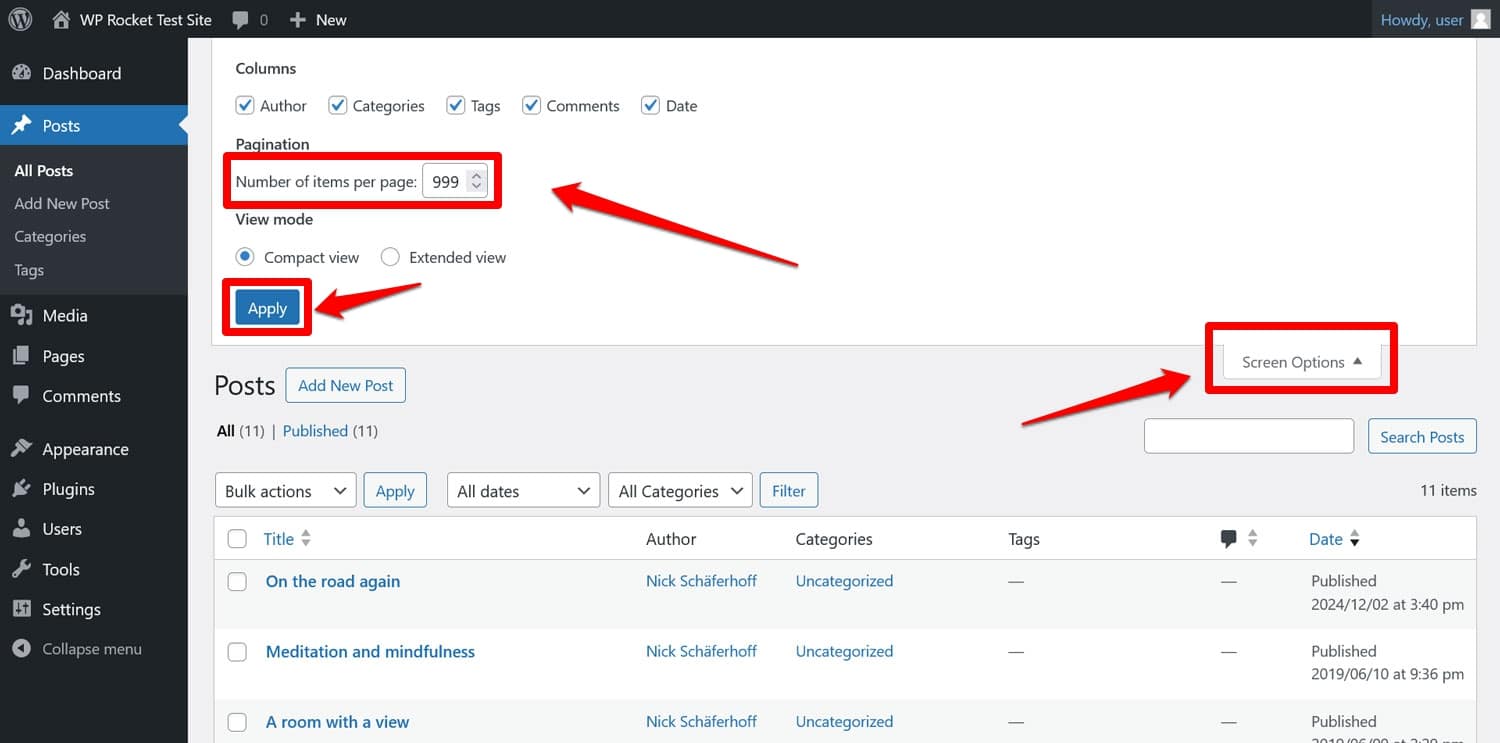
Click Apply when ready. Then, select all of your posts by ticking the box at the top, click on Bulk actions, and choose Edit, then click Apply.
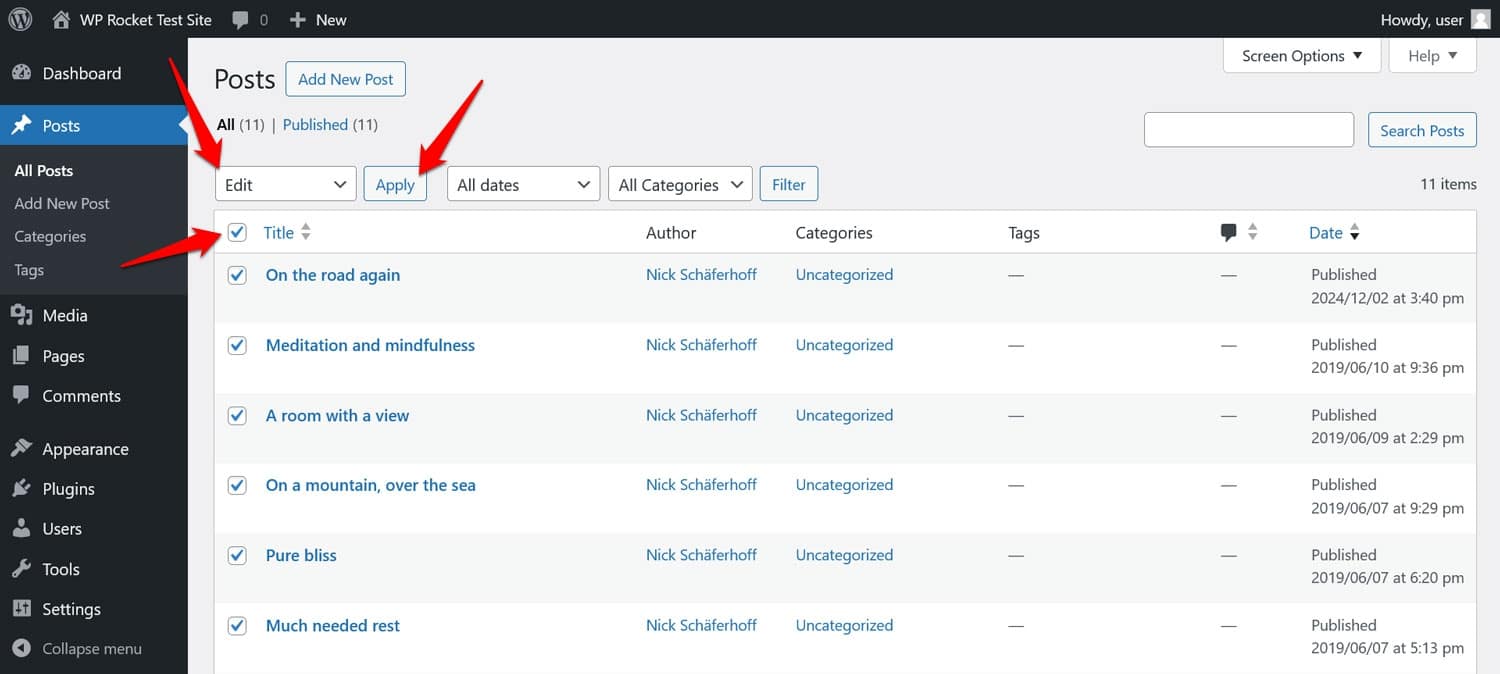
Next, simply choose Update without any other changes.
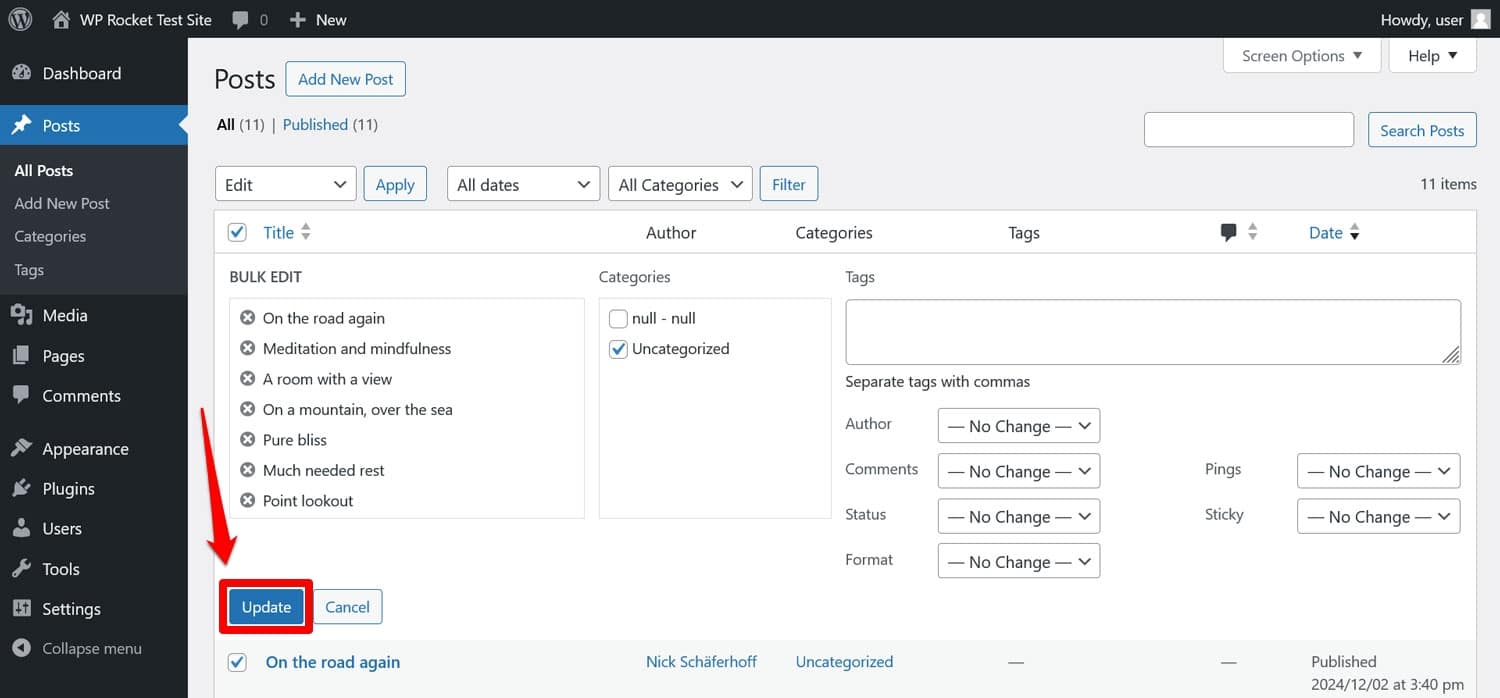
Wait again until the page reloads. After that, your images should have successfully migrated from Squarespace to your WordPress website.
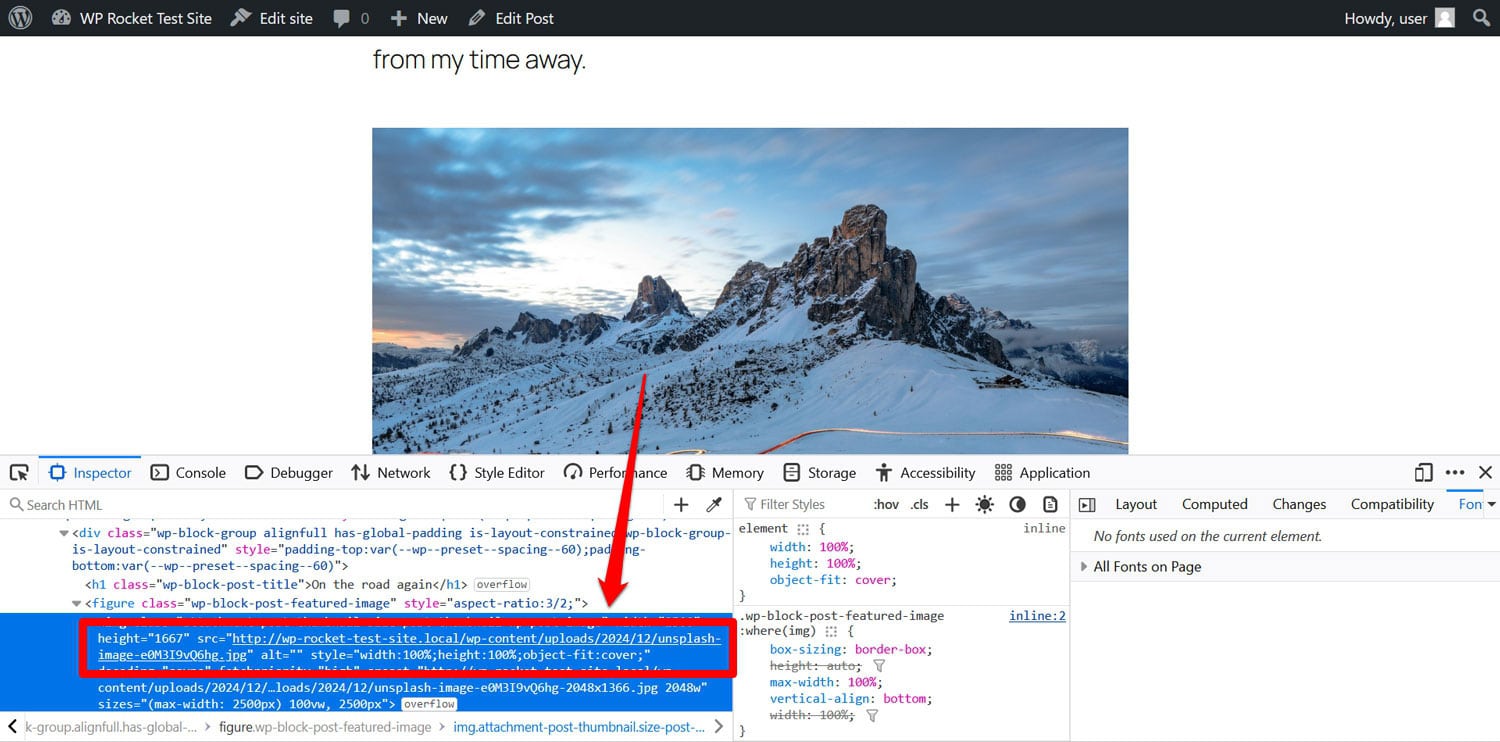
Now all you need to do is repeat the process for your pages.
Note: If you have a lot of images to load, the process might time out before finishing. In that case, repeat the process or do it in batches instead of for all of your posts or pages at the same time.
6. Transfer Other Content
Depending on your website, there might be a bunch of other Squarespace content that hasn’t made it across. If you want to move it to your new site as well, there are different possibilities.
For example, if you are using Squarespace’s ecommerce functionality, you can export products as a CSV file (Products & Services > Products > Export all) and then import that into a plugin like WooCommerce.
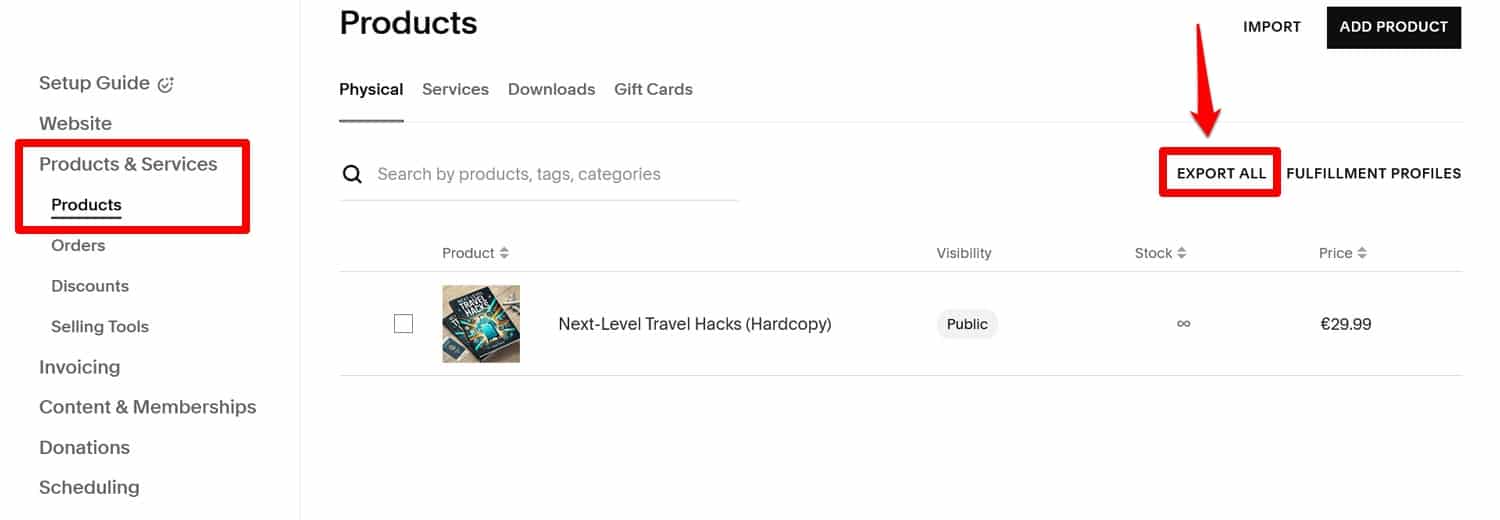
If you have a lot of products, you can also consider a paid service like Cart2Cart.
For video files, it helps if you host them on a third-party website like YouTube. That way, you only have to embed their links in WordPress.
For all other content, you simply have to migrate it by copying it from Squarespace and pasting it into WordPress posts and pages by hand. It’s not the greatest solution but, unfortunately, Squarespace is not very helpful in this regard.
7. Update Your Permalinks
With the content finished, it’s time to take care of your URLs or permalinks. Here, you have a decision to make whether you want to keep the same URL structure as on Squarespace or create a different one. Both solutions have upsides and downsides.
First of all, Squarespace’s default URL structure is not always the best. For example, it can include the year/month/day/ when a blog post was published and other prefixes.

You can mimic this in WordPress but it isn’t necessarily user- and SEO-friendly.
On the other hand, if you change the structure, especially if your Squarespace website is already getting a good amount of traffic, you could lose visitors and your established search rankings. To avoid that, you
have to redirect traffic, for example, with a plugin like Redirection.
In addition, changing permalinks will almost certainly break internal links as well. You can find and correct those using Screaming Frog, Sitebulb, or a plugin like Broken Link Checker.
It’s up to you to decide which way you want to go. In either case, your first port of call in WordPress is Settings > Permalinks.
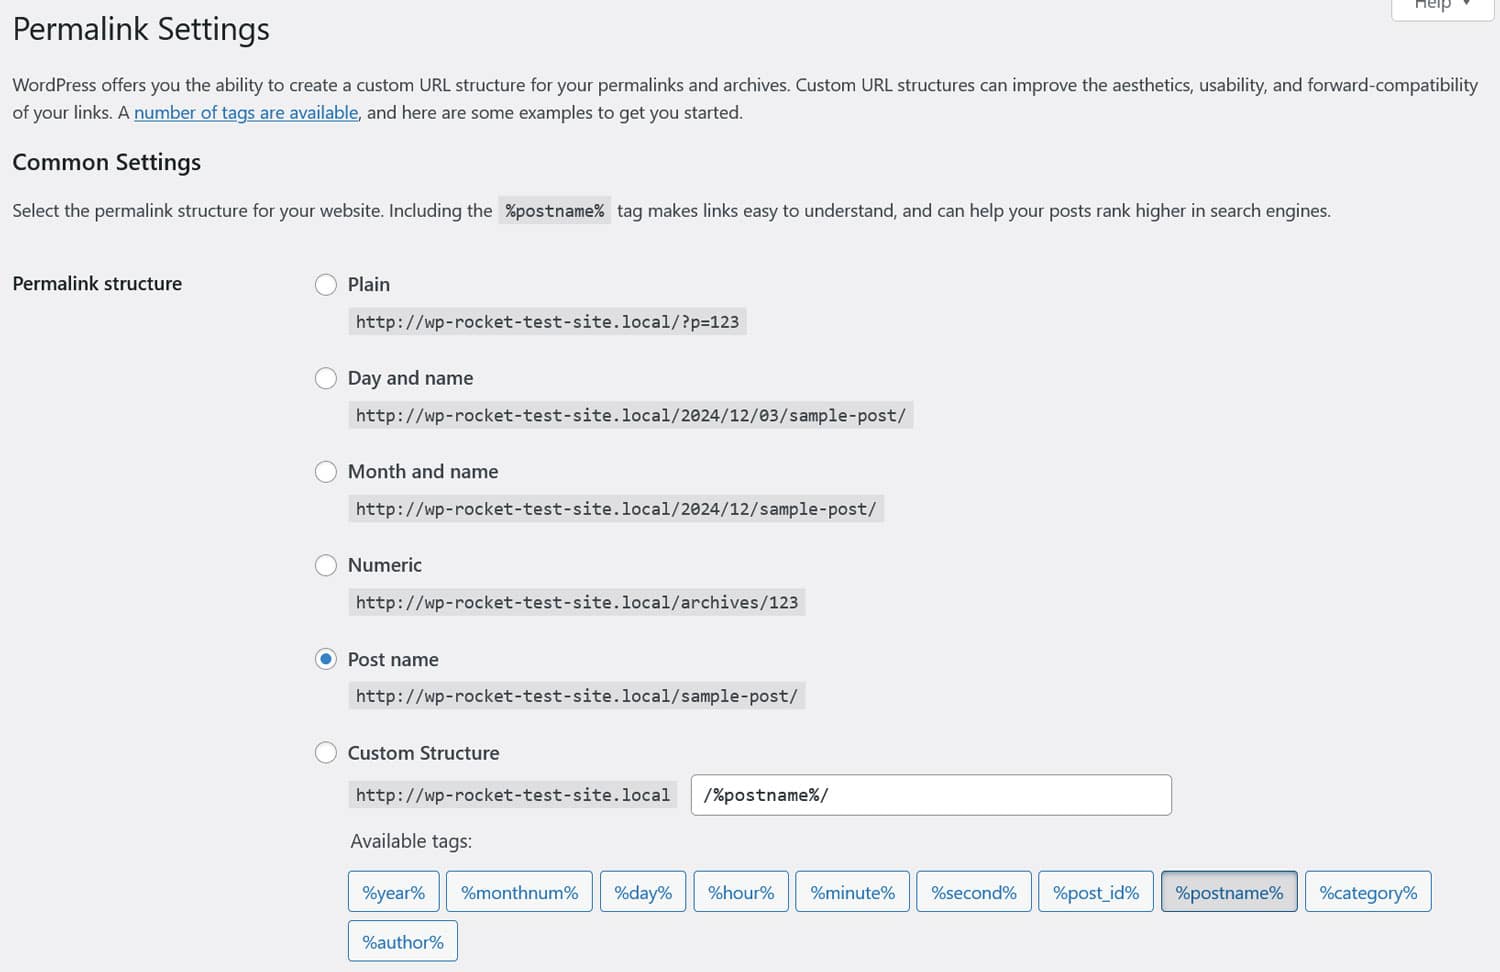
Here, you can configure your overall URL structure. The most common choice is simply Post name but you can also create a custom structure, for example, to recreate your existing Squarespace permalinks.

Save any changes you make.
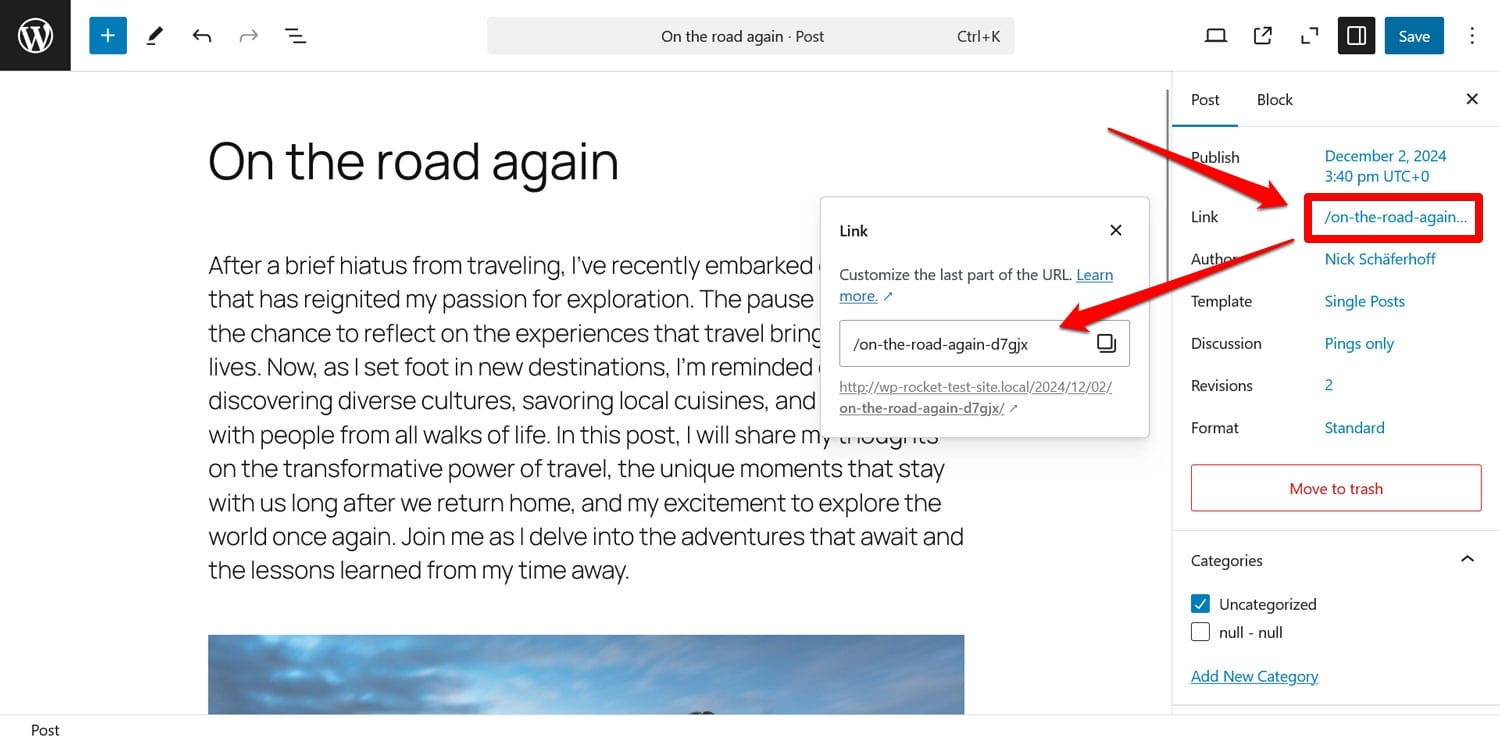
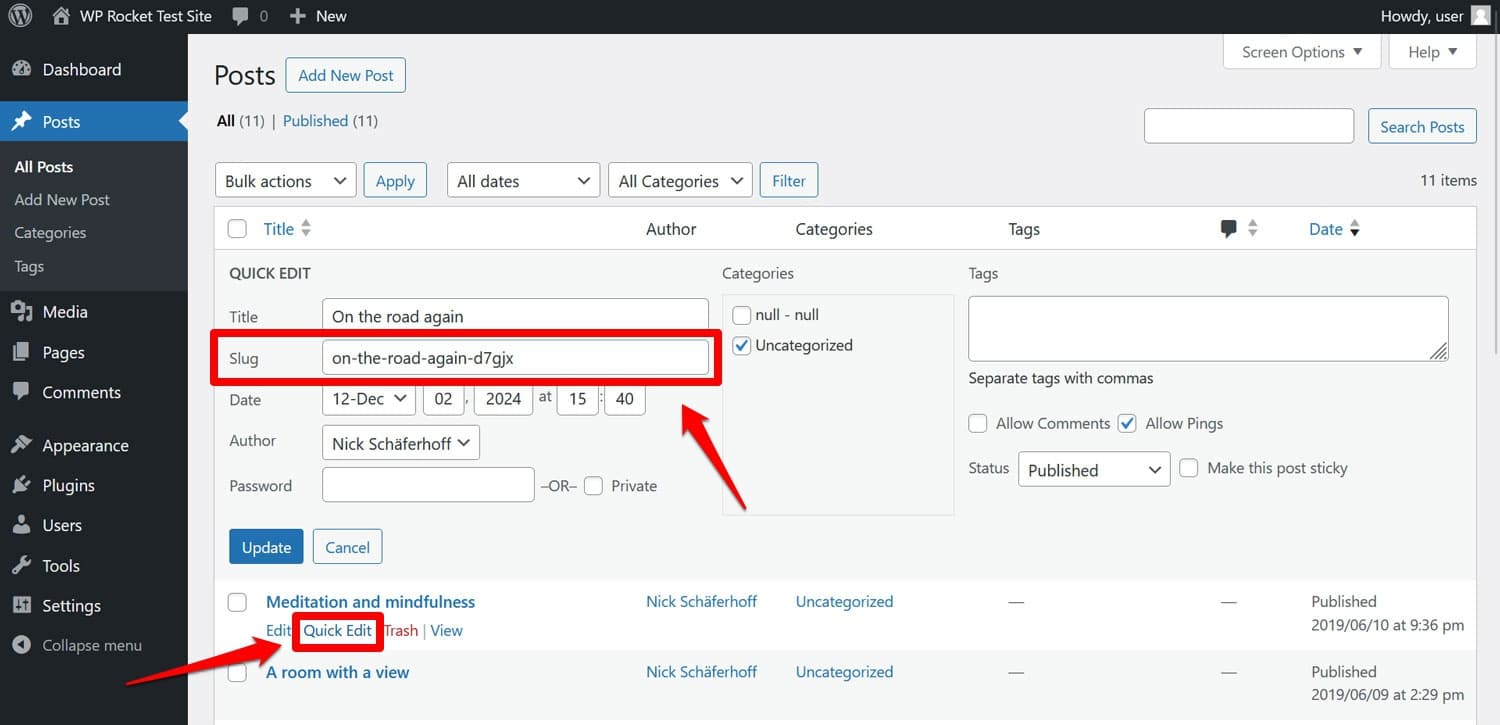
After that, you still need to make sure your posts and pages have correct slugs, meaning the endings of the URLs. Here, too, you can run into problems that Squarespace adds its own parameters.
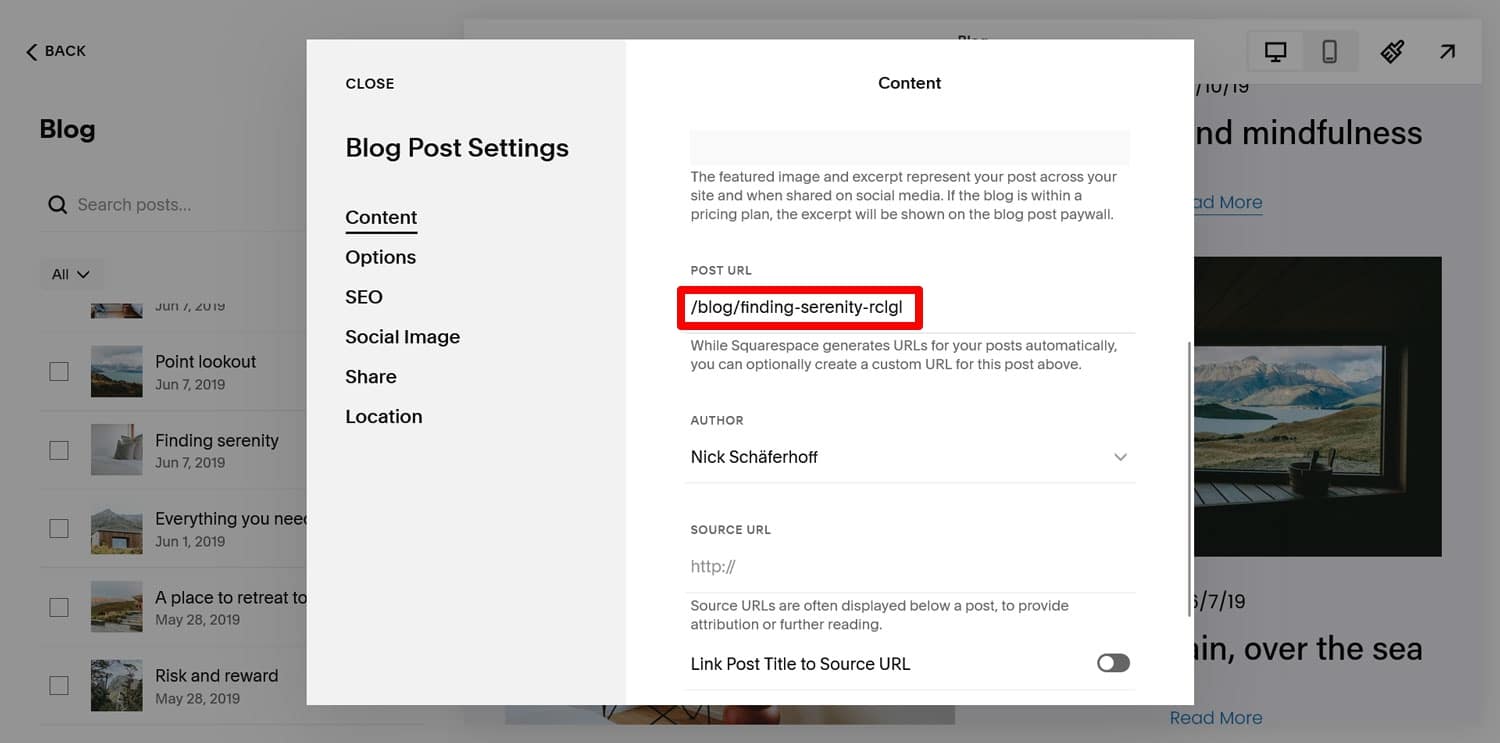
You can edit slugs in the sidebar of the WordPress content editor.
Another way to customize them is via Quick Edit from the Posts or Pages screen.
8. Choose a Theme
The next step is to deal with site design. When you first import content from Squarespace into WordPress, you might be concerned that it looks completely different. But don’t be alarmed, that’s something you can change.
Here, too, you have to decide how close you want to stay to what you had on Squarespace. While it is possible to replicate your design in WordPress one-to-one with enough time, skills, and budget, it’s likely more economical to go for something that’s close enough instead. A second option is to use your move from Squarespace to WordPress as a chance to completely overhaul and change your website’s look.
In WordPress, the part that controls the design is called a “theme” and there are thousands of free ones in the WordPress.org theme directory and hundreds more paid themes elsewhere.

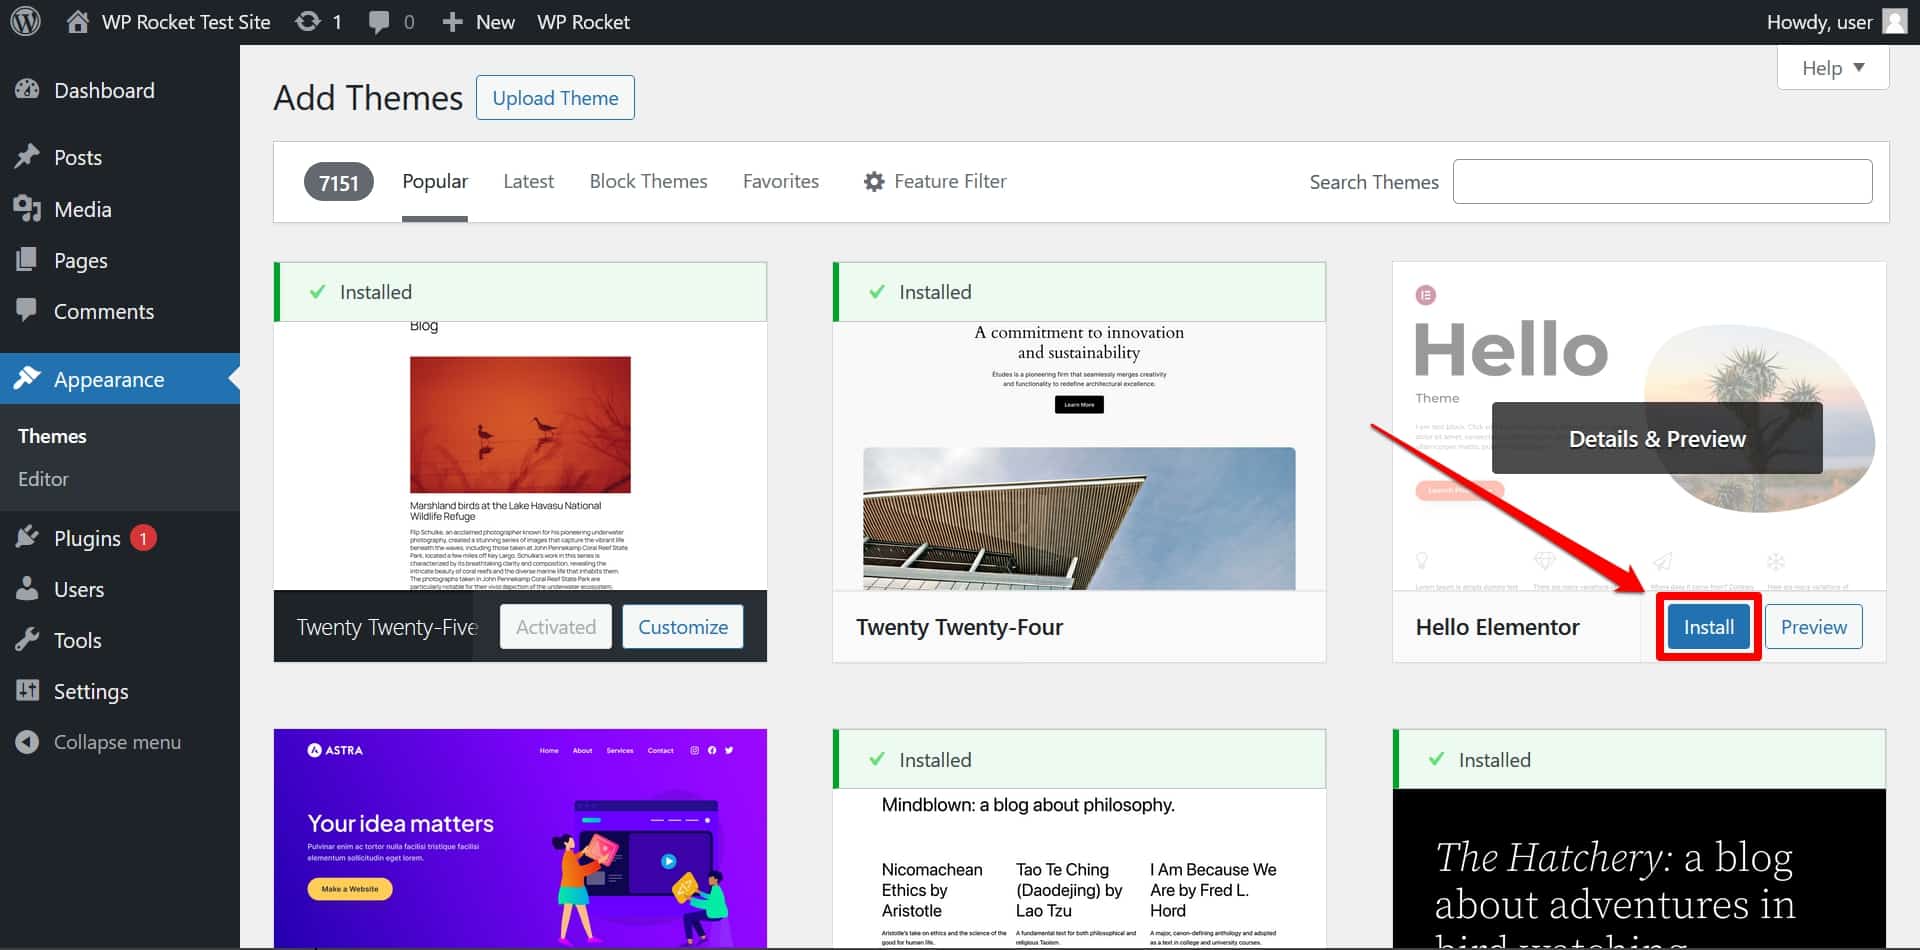
You install them under Appearance > Themes > Add New Theme. Search for the theme by name, then click Install Now and activate it when done.
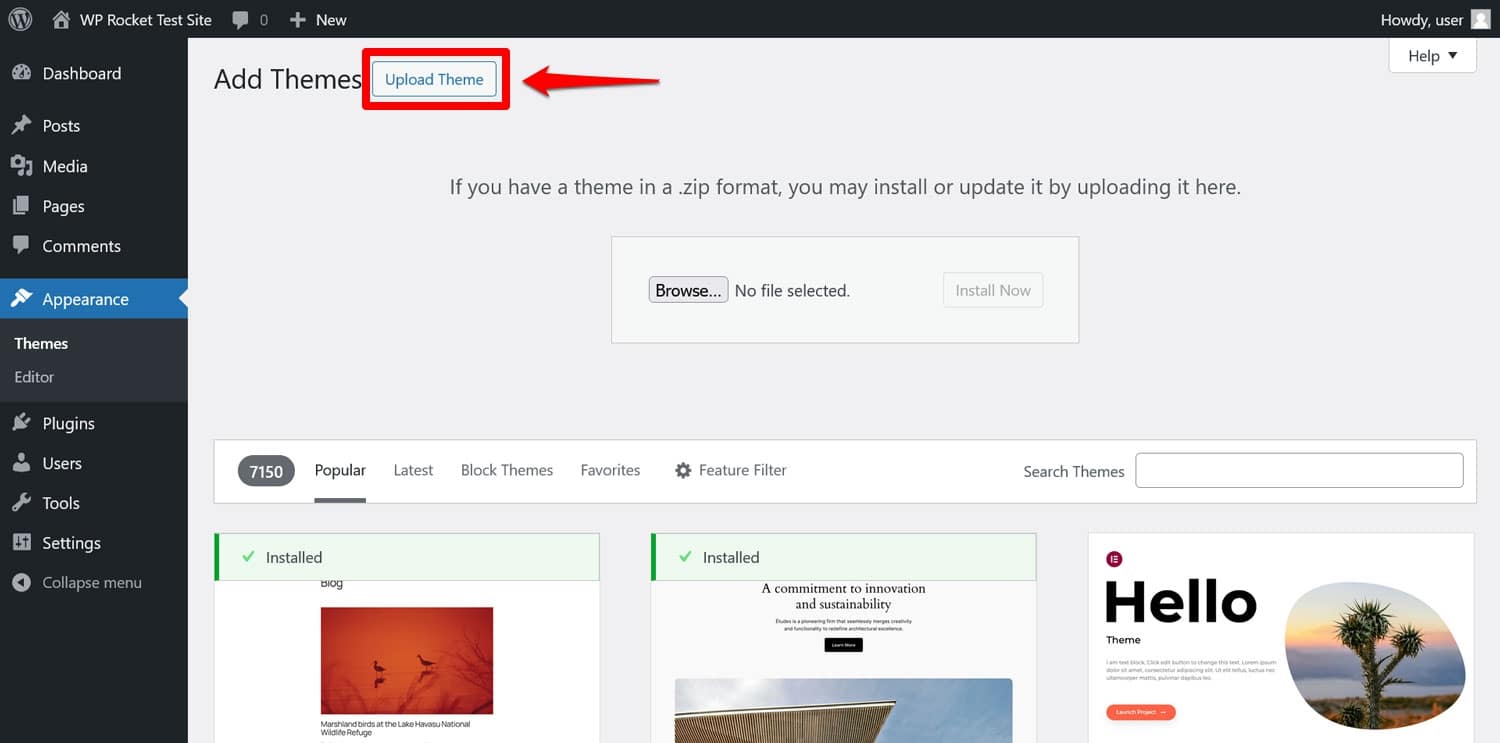
If you have downloaded a paid theme, you have to use the Upload Theme option instead.
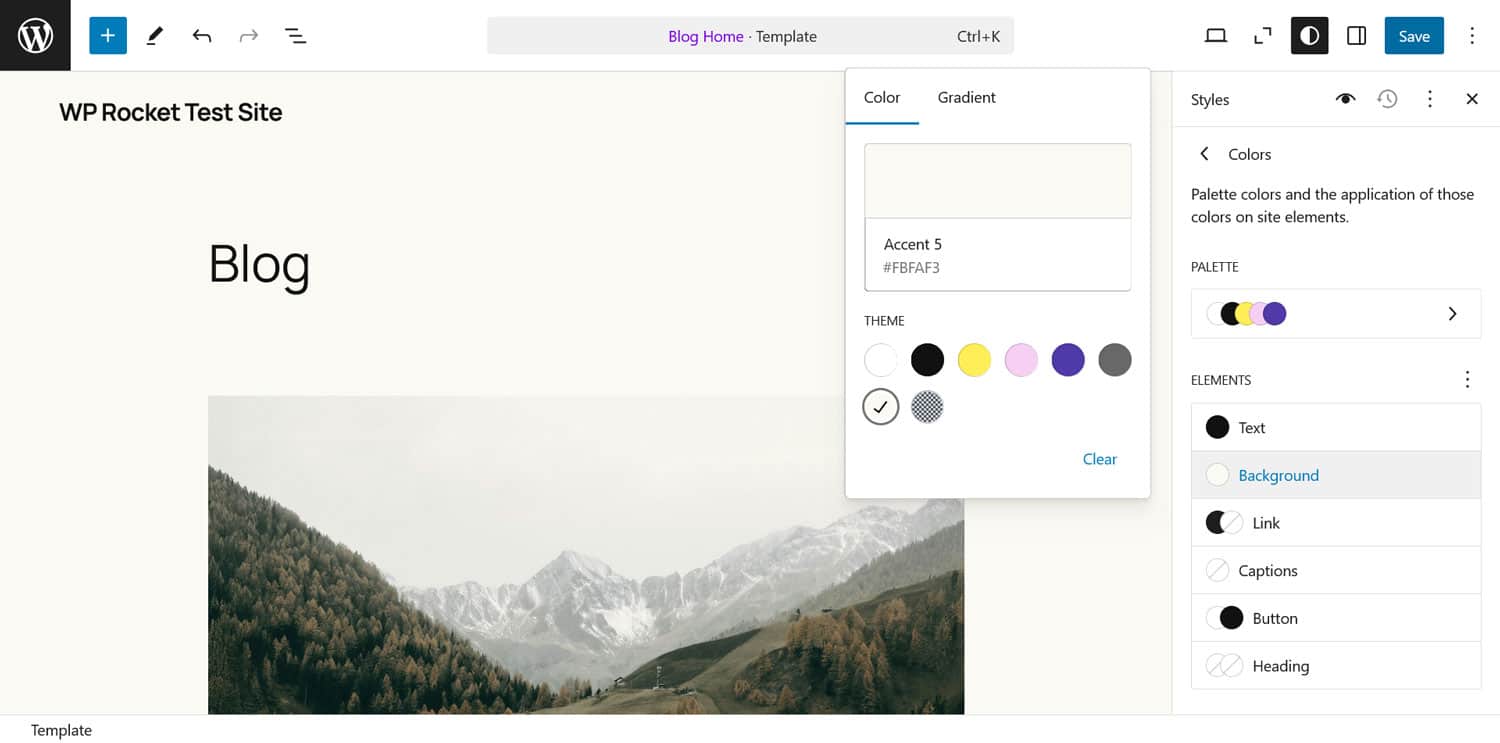
After that, the powerful Site Editor allows you to adapt the layout and design further by changing colors, fonts, dimensions, and much more.
If you don’t know where to start, check out our list of the fastest WordPress themes.
9. Redirect And/Or Transfer Your Domain
Your WordPress site should now be mostly ready. But your website domain still points towards Squarespace. Time to change that.
To do so, you need to switch your domain’s nameservers to that of your new website. The exact process for that differs depending on where you manage your domain, however, the general steps are:
- Find out the DNS settings for your new host
- Log into the management panel of your domain registrar
- Change the current DNS settings to that of your new website
- Wait for the changes to propagate (it can take up to 48 hours)
You might also consider transferring your domain, for example, if you bought it together with your Squarespace account and are planning to close it. Squarespace has instructions for that. But they also allow you to simply redirect your domain.
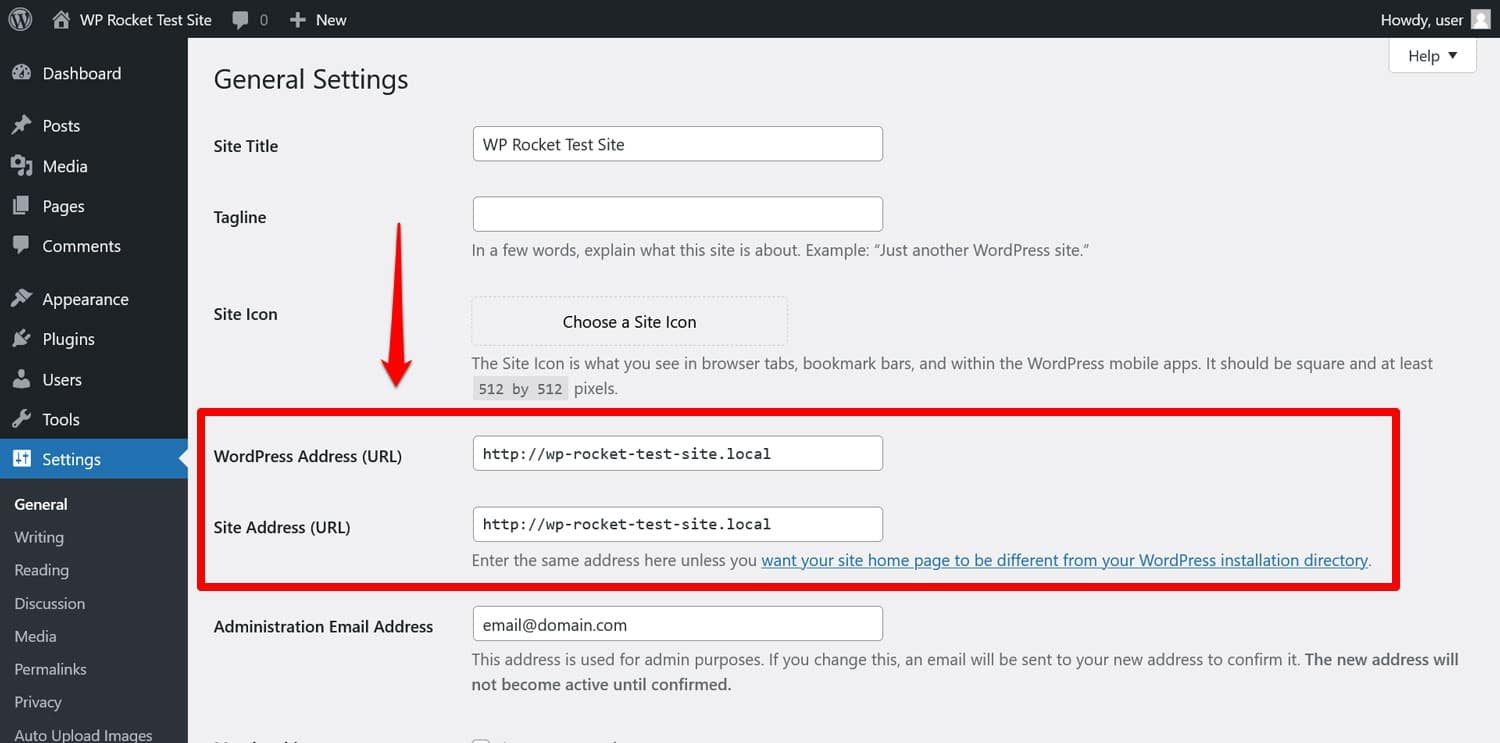
If you are currently using a temporary domain for your new WordPress site, you also have to update your WordPress Address and Site Address under Settings > General to your real domain.
10. Next Steps: Improve Website Performance and Functionality
At this point, you finished the basics. Your main content has migrated from Squarespace to WordPress and you have a functioning website. Congratulations! But it doesn’t stop here. A website needs ongoing care and work if you want it to be successful.
One of the most important factors here is performance. How quickly your web pages load has a huge impact on your site’s user experience and SEO and is, therefore, something you should definitely pay attention to.
This usually means you need to learn to speed test your website and implement performance-enhancing techniques like caching or minifying code files.
If you don’t feel comfortable with that, an alternative is to use a performance plugin like WP Rocket. It automatically applies a wide array of performance best practices the moment you activate it on your site, including:
- Browser and server caching (including a dedicated mobile cache)
- GZIP compression
- Optimizing critical images above the fold, to improve Largest Contentful Paint
- Automatic lazy rendering (helps with Interaction to Next Paint)
- And additional features.
As a consequence, your site usually gets noticeably faster without having to take any other action. If that isn’t enough for you, you can activate additional speed improvements via the easy-to-use interface.
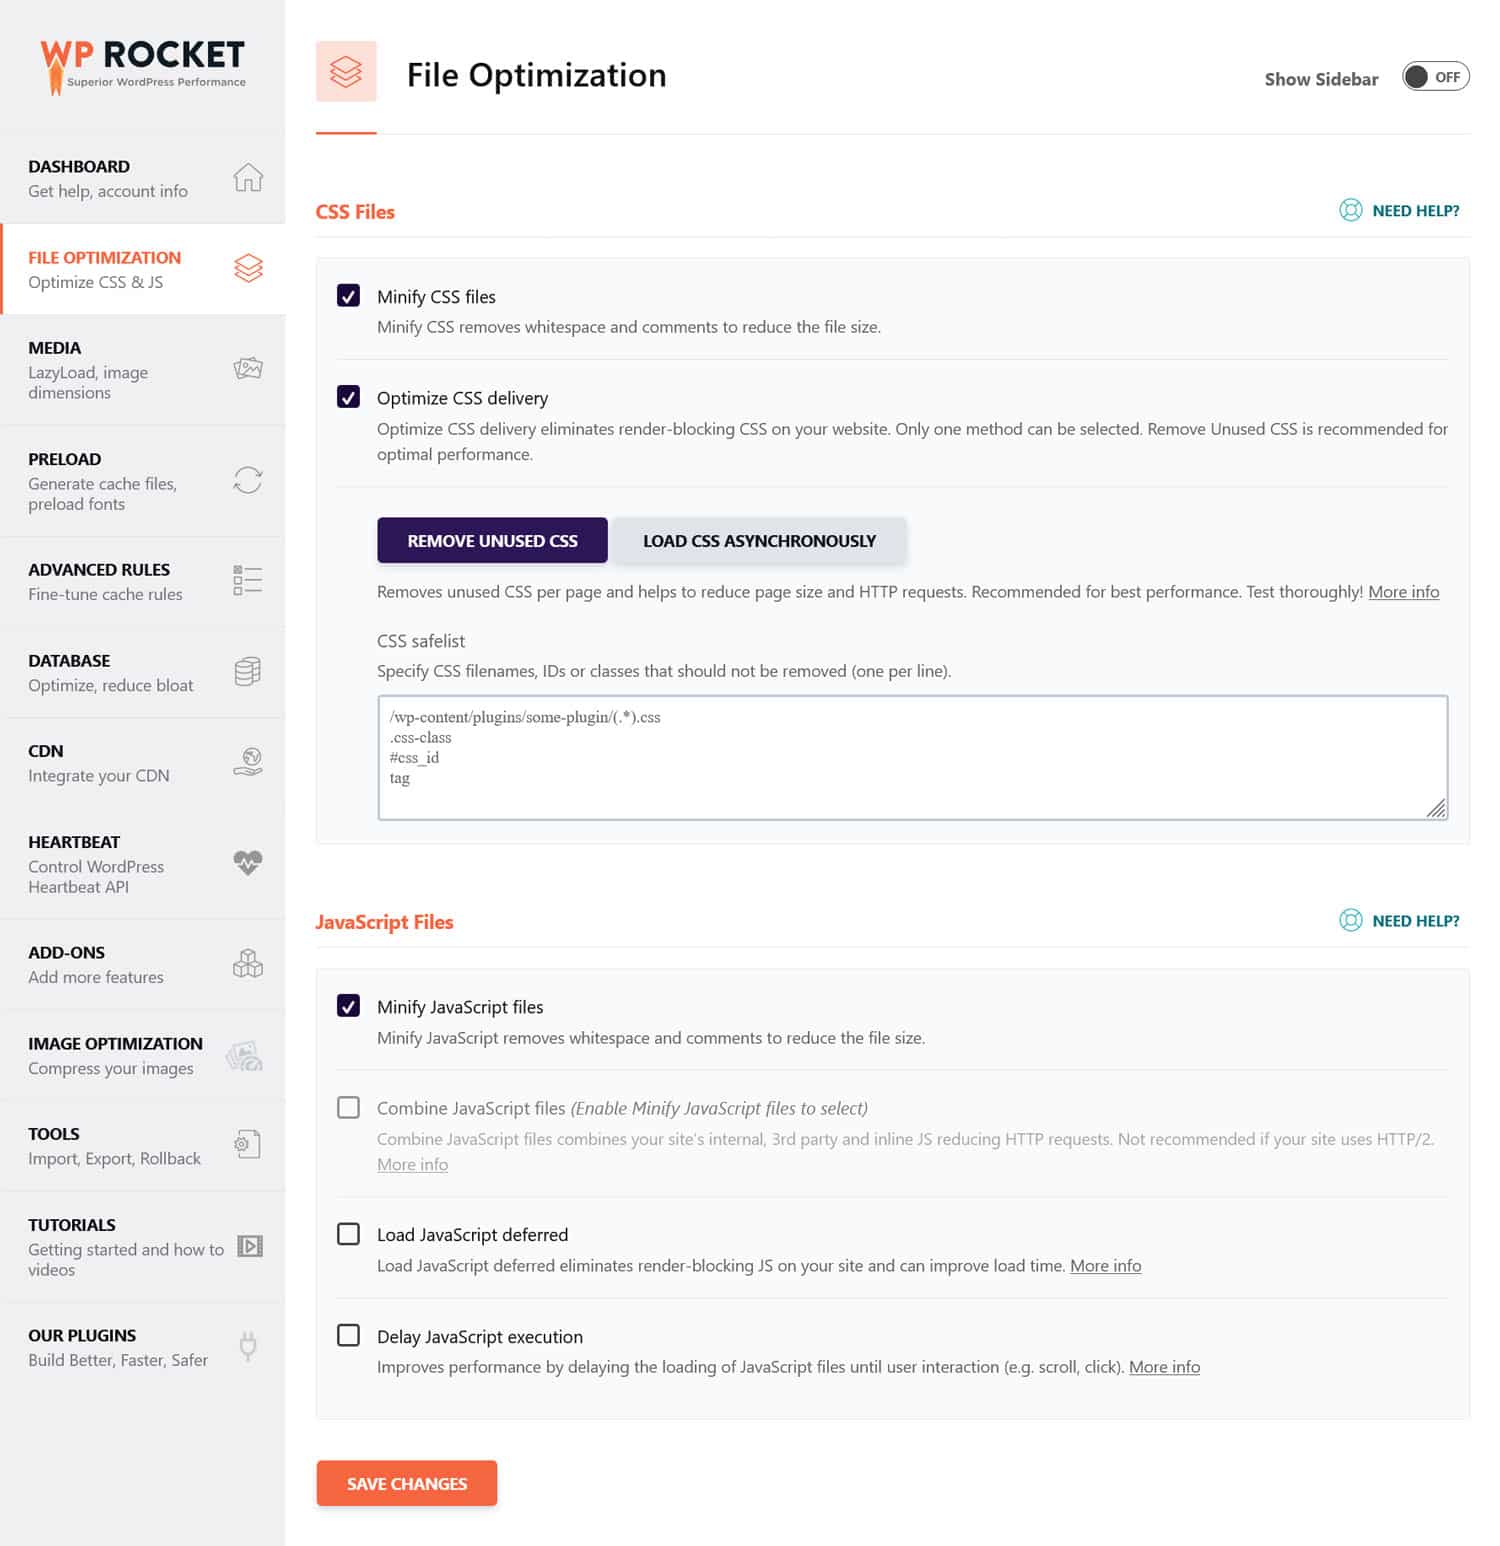
Examples include removing unused CSS and JavaScript, implementing lazy loading for images, optimizing the database, and using a Content Delivery Network (CDN).
The WordPress plugin directory is full of extensions to enhance almost every aspect of your site. You can implement site backups, strengthen your security, improve your SEO with a plugin like Rank Math, or automatically make your images lighter and faster with Imagify. Whatever you need, in most cases a solution already exists.
Top Reasons to Migrate From Squarespace to WordPress
If you’re unsure about proceeding with the switch, we understand: when you build a website for the first time, Squarespace is very helpful. It has all the features needed for beginners to create a web presence, including hosting, page-builder capabilities, ecommerce options, and marketing tools.

So, why would you move away from that?
Because WordPress offers a number of benefits that often make it a more attractive option:
- Fewer costs – WordPress is open source and, therefore, free to use. You can have a website for the price of hosting (starting at $3/month) and a domain (about 15$/year) without any limit on its size and functionality. In contrast to that, Squarespace charges $16 to $52 per month (if you pay annually) and certain features, like selling products, are reserved for higher plans.
- Full site ownership – Having a Squarespace website is more like renting than owning it. As we will see below, there is no way to simply pack it up and take it with you. That’s completely different in WordPress where you can do whatever you want with your website. You can move it from one hosting provider to another and take all of your design, content, and data with you.
- Increased flexibility – Another benefit of migrating from Squarespace to WordPress is that the latter lets you freely customize your website. You can change the design and functionality with themes, plugins, and even custom code. There are virtually no limits.
Factors like the above are the reason WordPress powers 43% of all websites and why you should consider joining them.
Migrating From Squarespace to WordPress Doesn’t Have to Be Intimidating
Squarespace is a beginner-friendly option to get into the world of website building. However, it’s easy to outgrow the service when you want more control and flexibility for your website – both things WordPress offers for a lower price tag.
If you find yourself wanting to migrate your site from Squarespace to WordPress, simply follow the steps above. With your content moved to its new home and all the basics in place, you have a great foundation to further enhance and grow your site from.
And if you want to ace the important area of website performance, WP Rocket is to make it as easy and hassle-free as possible.


