
Table of Contents
Last update on
Does your WordPress website use a lot of images? It wouldn’t be a surprise, since they are the most popular media format on the web. However, at the same time, images can seriously slow down your site, which is why you need to know how to use lazy loading in WordPress.
We have talked about optimizing images before, to make them as small as possible so they load quickly. However, there is a limit to how much you can shrink your image size without compromising quality. In addition, if you have lots of images on the same page, their size adds up, even if they have been optimized.
Adame Dahmani, Product Manager at WP Rocket, explains:
Lazy loading defers offscreen images, videos, and iframes until needed, reducing unnecessary requests. This eases pressure on bandwidth and processing, helping the browser manage the main thread and critical rendering path more efficiently. When implemented properly, it improves First Contentful Paint and often Largest Contentful Paint by prioritizing above-the-fold content.
Reason enough to put together a detailed guide on lazy loading in WordPress, don’t you agree? That’s why, in the following article, you’ll learn how it works and how you can apply lazy loading to your site for the best results.
What Is Lazy Loading?
Usually, when you open a web page, your browser loads all its data at once. Every image, text, link, etc. on it.
Especially with images, if there are a lot of them, this can take a long time. Images are much larger than other website elements. In addition, while the browser is busy with them, they often block other assets from loading, preventing your page from finishing the rendering process.
The result: Your visitors have to wait a long time to see the webpage they requested. And many won’t stick around for that, which racks up your bounce rate.
Lazy loading prevents this by keeping images and other assets that are not initially visible on the screen from loading, and it’s an effective way to optimize your website loading time.
Instead, images further down the page only load successively when visitors scroll towards them. That way, they don’t clog up the browser, so it can load other parts of the website more quickly. As a consequence, pages appear faster for visitors, leading to a better experience.
By the way, that’s exactly what speed testing tools mean when they tell you to defer offscreen images.
How Lazy Loading Works
There are several ways to implement lazy loading. In the past, you needed some fancy JavaScript to do it. However, by now it has become a standard feature of browsers.
Consequently, you can simply mark images you want to load in this fashion with an HTML attribute, and your visitor browsers will do the rest.
This is great because it makes it easy to implement, requires no extra code on your website, and standardizes the approach. Because it has become the de-facto standard, this is now also called “native lazy loading”.
Benefits of Lazy Loading
Now that you know how it works, what are the advantages of lazy loading images on your site?
- Improved page loading times – We already discussed this. By preventing images and other media from initially loading, you can greatly speed up the time it takes for a web page to appear.
- Reduced browser work – If images are lazy-loaded, your browser won’t need to parse them until a visitor scrolls down the page.
- Fewer HTTP requests – You’ll also reduce the number of HTTP requests and improve the Largest Contentful Paint grade.
- Better user experience – Website visitors love fast-loading pages, so lazy loading can help with conversions and other engagement metrics.
- Reduced server and CDN costs – Your server or CDN will have to download less data, resulting in cheaper bills if you have limited bandwidth.
- Faster mobile performance – Images have greater impact on slower mobile connections. If you reduce them as a factor, your mobile users will especially benefit.
- SEO benefits – Lazy loading improves Core Web Vitals, which are a Google ranking factor.
Potential Drawbacks
At the same time, lazy loading can also come with problems:
- Performance issues – Using lazy load above the fold (logos, hero images, etc.) can actually have a negative effect on performance. That’s because the Largest Contentful Paint element is likely an above-the-fold image, so it should load as quickly as possible. We’ll talk about how to exclude images from lazy loading later.
- SEO issues – If implemented incorrectly, you can prevent search engines from indexing lazy-loaded images. However, if you follow the instructions here, that should not be a problem.
- Layout shifts – When you don’t define the size of images that are lazy loaded, it can lead to shifting website layout, which is bad for Cumulative Layout Shift.
- Potential conflicts – The functionality can clash with some plugins.
- Impact on user experience – Lazy loading is visible when someone scrolls down the page really quickly.
When to Use Lazy Loading
So, when does it make sense to use this technique?
For the most part, it’s most effective if you have a lot of images on your website, e.g. long blog articles with lots of screenshots. However, this can also apply to product or portfolio pages.

As for which images exactly to lazy load, it should be those below the fold. This will reduce page loading time without affecting user experience. We already mentioned above that you should not apply lazy load to images above the fold, as this can negatively impact page loading time.
| 💡 Did you know? WP Rocket now includes Rocket Insights, the built-in performance hub powered by GTmetrix. It brings performance monitoring right where you already optimize your website, so you can monitor your key pages, understand your results, get clear recommendations tied to WP Rocket features, and re-test anytime, all without juggling multiple tools. 🚀 Update WP Rocket to the latest version to start using Rocket Insights right from your dashboard: it’s included for free in your plan! |
How to Lazy Load Images With Native Lazy Loading
Enough with the theory, let’s get to practical applications. As a first step, let’s see how to implement lazy loading if you want to use the native browser solution.
The HTML Loading Attribute
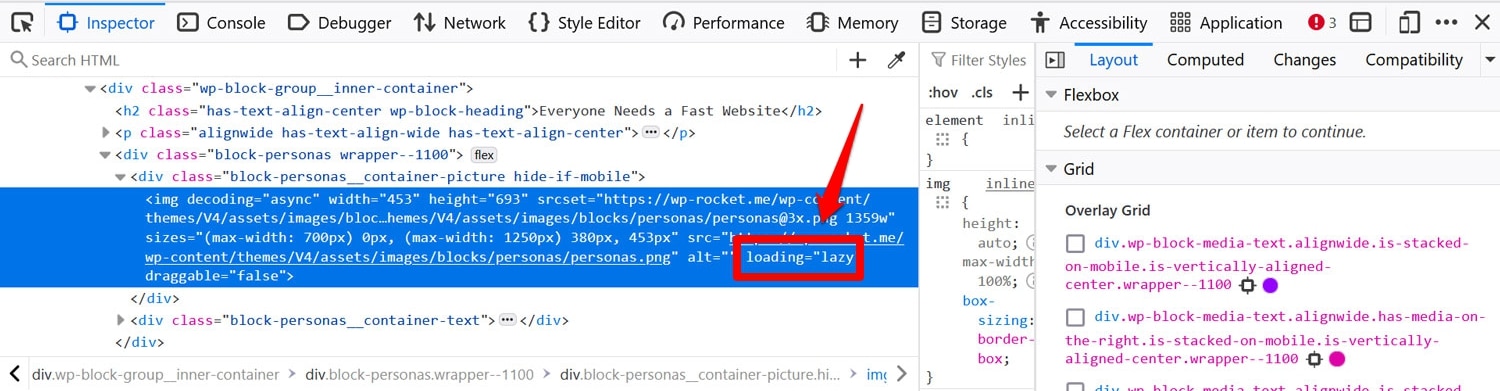
In order for browsers to apply lazy loading, website elements that should be delayed need to be marked with the <loading=“lazy”> HTML attribute. Here’s what it looks like in action:
<img src="wp-rocket-is-awesome.jpg" loading="lazy" alt="WP Rocket" />
<iframe src="WP-Cache-Basics.html" loading="lazy"></iframe>
The attribute takes two values:
- lazy – Defers the loading of image or iframe elements.
- eager – This is the standard loading behavior. The resource is requested immediately, regardless of its location.
Currently, the loading attribute only supports <img> and <iframe> tags. For instance, you cannot use it to lazy-load CSS background images. We’ll talk about options for that below.
In addition, since it has been adopted by pretty much every browser (see below), this methodology is also the safest in terms of indexing lazy loaded images for SEO. As long as there is a src attribute in the img tag, at least Google should not have any problems indexing your images.
Only if you implement lazy loading with JavaScript might it be a good idea to specify the src inside a <noscript> tag. That’s for search engines whose crawlers can’t handle JavaScript (again, Google can do it just fine).
In either case, additionally providing an image sitemap is a good idea.
Browser Support
Lazy loading has become a de-facto web standard. According to Can I Use, it should work for more than 95% of global browser users.
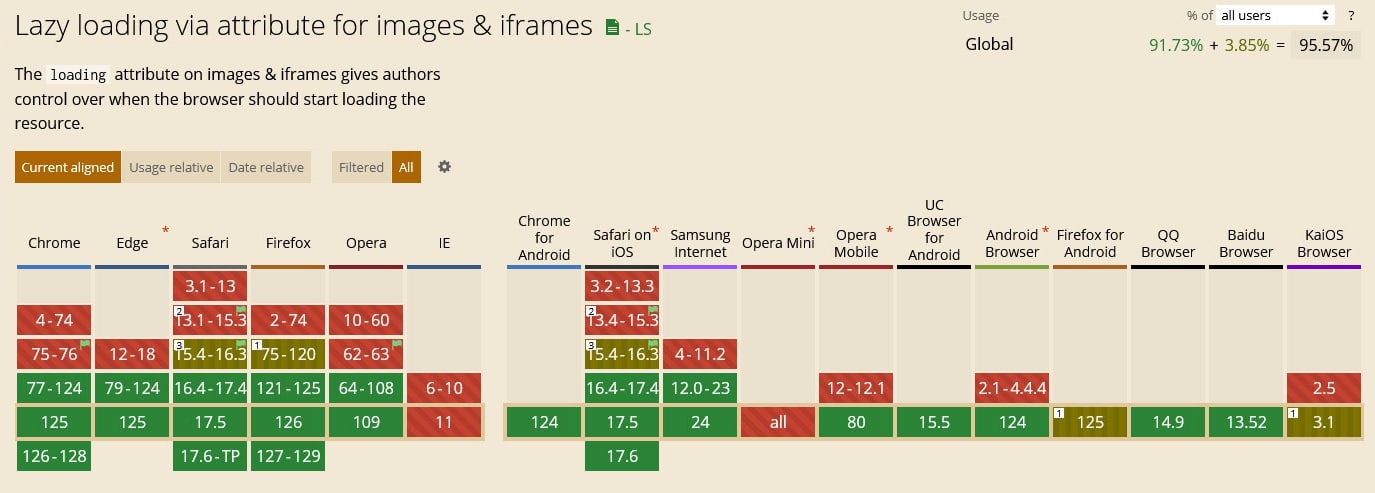
Besides that, even if you have implemented lazy loading on your site, it will not hurt the experience in a browser that doesn’t support it.
Lazy Loading in WordPress: Built-In Options
Since WordPress 5.5, the CMS lazy-loads images by default. The functionality was extended to iframes in version 5.7 and fine-tuned in WordPress 5.9.
So, if you migrated your website from a CMS like Squarespace to WordPress, and if your WordPress site is running on the latest version, any image or iframe that has a width and height attribute assigned to it, will automatically receive the <loading=”lazy”> attribute. This condition has been included to avoid the aforementioned Cumulative Layout Shift issues.
In addition, from WordPress 5.9 on, lazy loading will not apply to the first iframe or image on a page. This is to avoid LCP problems discussed earlier.
Aside from that, WordPress applies the attribute to images in the following places:
- Post content
- Post excerpts
- Text widgets
- Avatar images
- Images added as attachments
Customization Options
There are currently no no-code options to selectively switch off native lazy loading in WordPress for certain pages or images. If you want to do that, you need to use a plugin or some of the filters and functions below.
- wp_lazy_loading_enabled – You can use this to completely switch on and off lazy loading for images in certain contexts.
- wp_filter_content_tags() – Add srcset, sizes, and loading attributes to img HTML tags, as well as loading attributes to iframes.
- wp_img_tag_add_width_and_height_attr() – Used to apply width and height attributes to img tags which don’t have them so lazy loading can apply to them.
- wp_img_tag_add_srcset_and_sizes_attr() – Include srcset and sizes attributes to existing img tags for similar purposes as above.
- wp_img_tag_add_loading_attr() – Adds the loading attribute to img tags. For iframes, use wp_iframe_tag_add_loading_attr().
- wp_omit_loading_attr_threshold() – Set a threshold for how many of the first images and iframes should be lazy loaded. Useful if your website shows several media elements above the fold and you want to disable lazy load for all of them.
For examples on how to use the above to modify lazy loading in WordPress, check the announcements for WordPress 5.5, 5.7, and 5.9.
Troubleshooting Tips
If native lazy loading is not working on your WordPress site, it’s likely because you are targeting elements without the <img> or <iframe> tags attached. Those are the only tags that WordPress natively lazy-loads. For other options, check the next section.
How to Enable WordPress Lazy Loading for Images and Videos via Plugin
There are many plugin options for adding lazy loading to your site. But, by far, the easiest way is WP Rocket. It takes less than a minute.
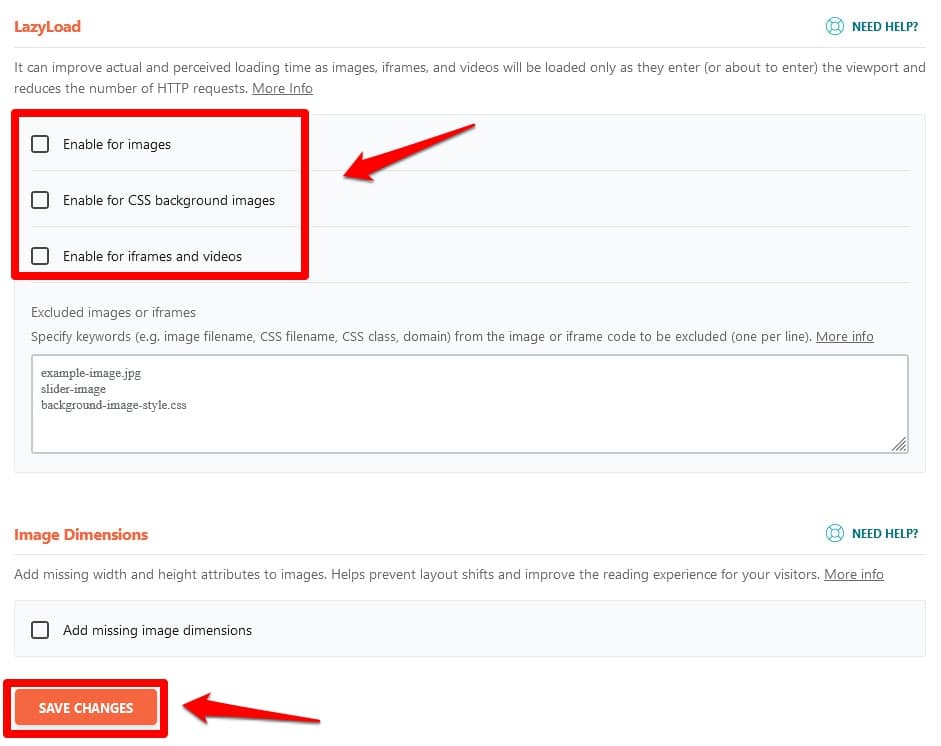
All you have to do is go to Settings > WP Rocket > Media in your WordPress admin dashboard.

Check the boxes of the media types you want to enable lazy loading for:
- Images
- CSS background images
- iframes and videos
In addition, you can have WP Rocket replace any embedded YouTube videos with a preview image. Finally, there is an option to add width and height attributes to images that are missing them, so they, too, can benefit from lazy loading.
Make your choices and click Save Changes at the bottom. Done.
Differences to Native Lazy Loading
As you can already see from the above, WP Rocket’s options go beyond native WordPress lazy loading. One of the main differences is that it also applies lazy loading to background images, both inline and those defined in CSS files. For example, here is markup compatible with this feature:
<div style="background-image: url(image.jpg)">
You can read more on lazy loading background images with WP Rocket in our technical documentation.
How to Check If Lazy Loading Is Working
To see if lazy loading is successfully applied to your website, you can use the browser developer tools. Go to the Network tab and use the Img filter. Reload the page, and you should only see images above the fold in the list.
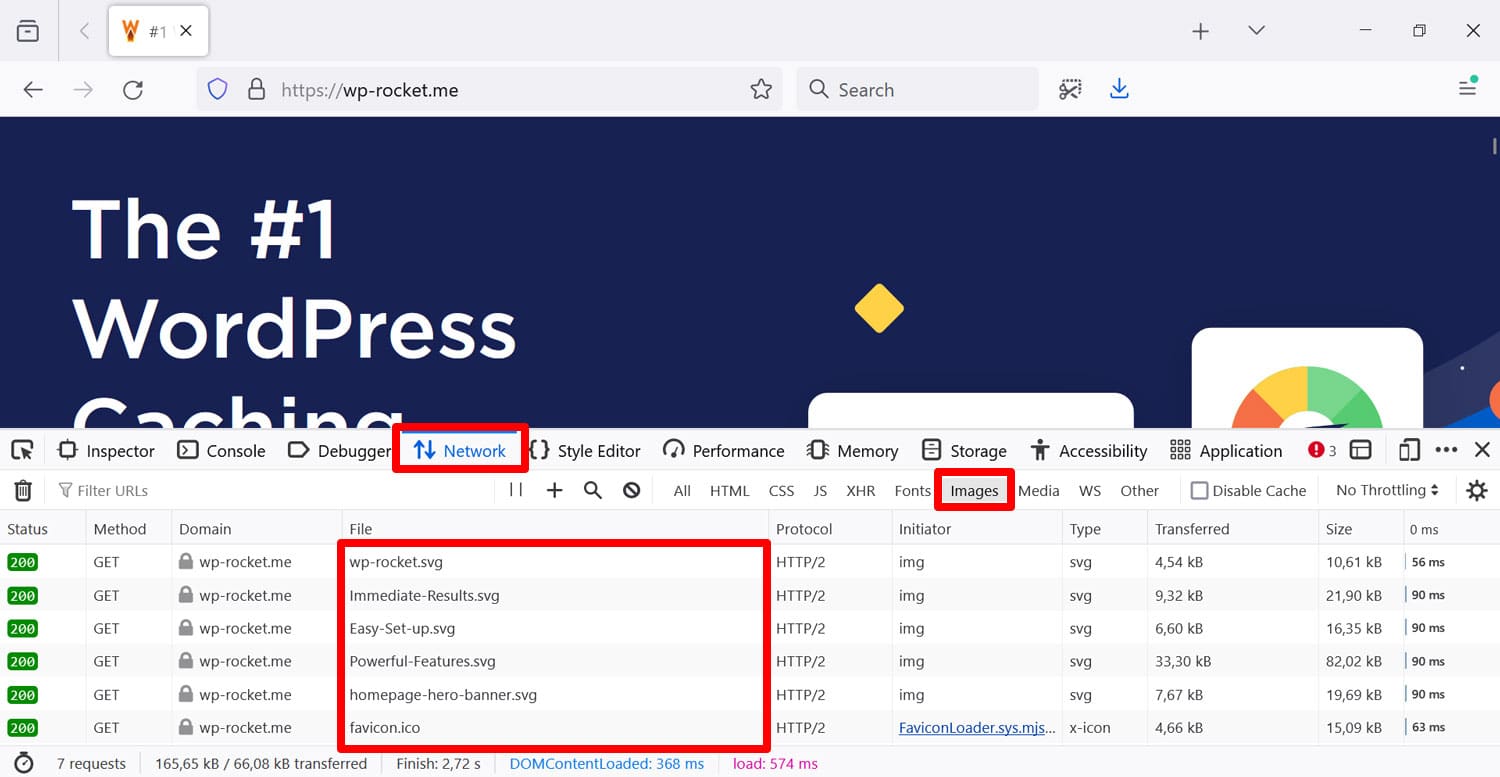
When you start scrolling down, more and more images should appear. In addition, you should see the lazyload value under the Initiator column.

Troubleshooting Tips
If you find that some of images are not lazy loaded even though you have activated the option, there are several possible reasons:
- Some types of images are excluded on purpose, such as WooCommerce product galleries
- The images contain one of a number of excluded attributes, such as data-src and data-no-lazy
- The image has been added dynamically with JavaScript
- There is a conflict with another plugin that adds lazy loading, or your theme has its own lazy-loading functionality
For more information, read our documentation on why some images are not lazyloaded, common issues with lazyload, and compatible plugins.
How to Disable Lazy Loading in WordPress
There are cases in which you want to disable lazy loading, either site wide, on an entire page, or for specific images. Here are different ways to do that.
Disable Native WordPress Lazy Loading Completely
If you want to disable the built-in lazy loading on your WordPress website, you can do so with this code snippet:
add_filter( 'wp_lazy_loading_enabled', '__return_false' );
Put it in the functions.php file of your (child!) theme. Alternatively, add it with a plugin like Insert Headers and Footers or create your own MU-plugin.
To disable native WordPress lazy loading in specific contexts or for certain images only, refer to the functions and filters in the Customization Options section above.
Switch Off Lazy Loading in WP Rocket
You can disable the LazyLoad feature in WP Rocket just as easily as you enabled it. Go to the Media panel, uncheck the boxes, and save.
Exclude Lazy Loading for Specific Posts and Pages
If you want to disable this feature only on a particular post or page, you can also do that with WP Rocket very easily. Open the page or post in the editor and find the WP Rocket Options in the sidebar (note, the content has to be published for it to be available).
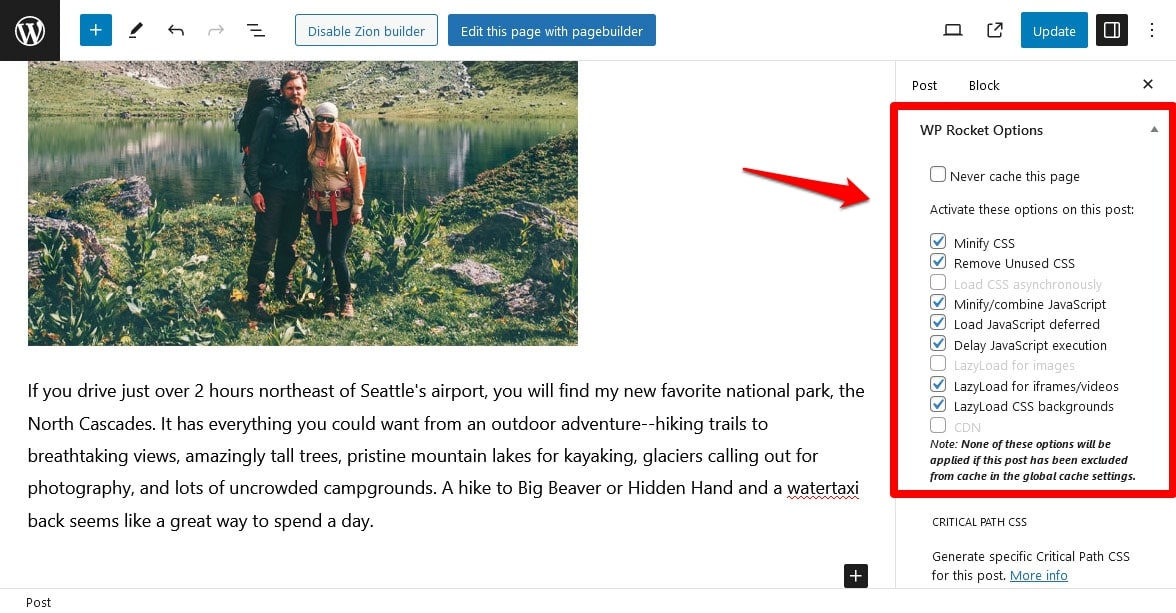
Just uncheck the option you don’t want to use and update the content. If any option is grayed out, you need to globally activate it in the WP Rocket settings first.
Remove Lazy Loading for Specific Images or iframes
You can also disable lazy loading for particular media elements. You find that option in the Media panel of the WP Rocket settings.

Input the file name, CSS class, img attribute, domain name (for external images), or CSS file name of the image you don’t want to load lazily in the box and save. More information and examples in the documentation.
Be aware, however, that you don’t need to use this feature to exclude images above the fold from using lazy load. Because failing to do so can have such an impact on Largest Contentful Pain and the overall PageSpeed Insights score, WP Rocket does it automatically without you having to lift a finger. If you have any other reasons to exclude images or iframes from lazy loading, you can still use the method described above.
Modify WP Rocket Lazy Loading Via Code
If you want more control over how lazy loading works in WP Rocket, you can also modify it with markup. The snippets below go into your functions.php or a plugin for this purpose.
Conditionally Disable Lazy Loading
We’ll start off with a general function structure you can use to switch off lazy loading in different circumstances:
add_action('wp', function () {

   	 // Declare condition set to false as a default
   	 $condition = false;

   	 // Build your condition logic to turn ‘$condition’ to ‘true’ when applicable

   	 if ($condition) {

   	  // Disable Rocket Lazy Load if condition is met
   	  add_filter('do_rocket_lazyload', '__return_false');

   	 }
    }
);
Next are some examples of how to use this approach.
Disable Lazy Loading on All Pages
Use this if you want to lazy load images in your posts but not pages:
add_filter( 'wp', function () {
   	 if ( is_page() ) {
   		 add_filter('do_rocket_lazyload', '__return_false');
   	 }
    }
);
Switch Off Lazy Load on the Homepage
Disable lazy loading for the front page of your site (the page you set in Settings > Reading > Front page):
add_filter( 'wp', function () {
   	 if ( is_front_page() ) {
   		 add_filter('do_rocket_lazyload', '__return_false');
   	 }
    }
);
Deactivate Lazy Load on Your Blog Page
Same thing as above but for when you set your homepage to be a blog:
add_filter( 'wp', function () {
   	 if ( is_home() ) {
   		 add_filter('do_rocket_lazyload', '__return_false');
   	 }
    }
);
Remove Lazy Load on Single Posts
To disable lazy loading on all single posts, but keep it for pages and your blog home page, use this snippet:
add_filter( 'wp', function () {
   	 if ( is_single() ) {
   		 add_filter('do_rocket_lazyload', '__return_false');
   	 }
    }
);
Disable LazyLoad on Specific Images
You can tell WP Rocket not to use lazy loading on specific images with the data-no-lazy attribute:
<img src="my-image.jpg" data-no-lazy="1" alt="" width="100" height="100" />
Add a Fade-In Effect for Lazy-Loaded Images
It can be a bit jarring for visitors when your lazy-loaded images appear out of nowhere on the page. Gradually showing images is a popular effect to improve that experience.
The following CSS snippet will add a fade-in effect to your site. Note that it goes to your style.css, not functions.php:
img[data-lazy-src] {
    opacity: 0;
}

img.lazyloaded {
    -webkit-transition: opacity .5s linear 0.2s;
    -moz-transition: opacity .5s linear 0.2s;
    transition: opacity .5s linear 0.2s;
    opacity: 1;
}
Adjust the LazyLoad Threshold
By default, WP Rocket will load lazy-loaded images that are within 300 pixels of the browser window. You can adjust this threshold like so:
add_filter( 'rocket_lazyload_threshold', function ( $threshold ) {
    return 100;
});
Note: In the above example, the threshold is set to 100px. Adjust the number to your liking.
Start Using Lazy Loading in WordPress Now
Lazy loading is a great way to improve the performance of your website. It is most effective for sites that have a lot of images by preventing them and other media elements from being loaded until they actually appear on screen.
While WordPress now has native lazy loading by default, it doesn’t come with a lot of controls for non-developers and only applies to images and iframe elements. If you want a more granular approach and also apply lazy loading to things like CSS backgrounds, going with a plugin solution like WP Rocket is the way to go. It gives you the ability to switch lazy loading off for certain parts of your site and even singular files.
Give it a try now. If you are not convinced, you can always count on our 100% money-back guarantee.