
Table of Contents
Last update on
Is your website safe from hackers? If not, anyone visiting your website will soon know.
On February 2018, Google announced that from July 2018 when Chrome 68 is released, every website that is not running HTTPS will be labeled as “not secure” in the address bar.
What does this mean? Well, anyone attempting to access a website without HTTPS will receive a warning that the site isn’t safe.
Here’s an example from Google of what the warning will look like in browsers:
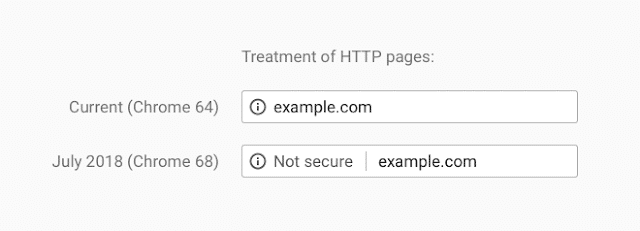
Image: Google.
Should I Care About HTTPS Warnings?
In a word: yes.
According to Cloudflare, over half of web visitors will see these warnings. That’s 50% of your web traffic.
So if your website is not integrated with HTTPS, your customers will see that your site is vulnerable to cyber attacks and any personal information they enter into your site isn’t secure and might decide to go elsewhere for your product or services.
Why Is Google Forcing HTTPS on Site Owners?
HTTPS is the safer version of the HTTP protocol, which enables web users to connect to websites.
Secure connections are an important step in protecting users from a type of cyber attack called content injection, or content spoofing. Content spoofing is when a hacker creates a fake website and passes it off as if it were legitimate. The intent is, typically, to defraud victims via phishing. Sometimes, though, the purpose is simply to misrepresent an organization or person.
Content spoofing often works because it exploits an established trust relationship between a user and organization or user, whether it’s a famous company or a celebrity.
And it’s not just hackers – disgruntled employees, angry customers, and anyone else who wants to hurt a company or person could carry out a content spoofing attack, sharing false information and messages with customers and driving them to their competition.
Common forms of content injection include eavesdropping, data modification and man-in-the-middle attacks. Hackers can also perform SEO injections, spreading additional false messages through search engine spiders that index and craft URLs.
With HTTPS, Google hopes to make this kind of malicious attack a thing of the past.
How Does Google Know HTTPS Works?
Because security is Google’s middle name. Plus, it’s been making gradual steps towards pushing users – and the world – towards HTTPS.
Google commissioned security engineering firms X41 D-Sec GmbH and Cure53 to examine the relative security strengths of the three most popular enterprise browsers: Google Chrome, Microsoft Edge, and Microsoft Internet Explorer (IE).
The two studies found that in 2017, Google Chrome was the most secure browser on the web due in large part to its high rates of detecting suspicious websites and fast vulnerability patching.
Also, Google has been playing with HTTPS for years. The company started testing in 2014, examining which websites were secure and used connections that were encrypted in its search engine algorithm.
The tests were a rousing success and in response, the search giant began using HTTPS as a ranking signal.
Though it was only a slight change, HTTPS impacted less than 1% of global searches, and factors like high-quality content still mattered a great deal more.
Still, back then Google saw the potential and important of HTTPS and wanted to see it become more fully realized.
Here’s what Google had to say about the future of HTTPS on its security blog in 2014:
“… over time, we may decide to strengthen it (HTTPS), because we’d like to encourage all website owners to switch from HTTP to HTTPS to keep everyone safe on the web.”
A year later, Google released another update on its security blog, announcing a slight adjustment in its indexing system. The plan was to crawl just as many, if not more, HTTPS over HTTP pages even when HTTPS web pages were not linked to any other websites.
This meant Google had decided it was going to start playing favorites. In other words, goodbye HTTP. HTTPS was going to get a leg-up in search engine ranking and indexing simply because it was HTTPS and not for any of the usual ranking requirements.
And if two URLs with the same domain and the same content possessed different protocol schemes, Google would index the HTTPS URL with these rules in mind:
- It doesn’t contain insecure dependencies
- It isn’t blocked from crawling by robots.txt
- It doesn’t redirect users to or through an insecure HTTP page
- It doesn’t have a rel=”canonical” link to the HTTP page
- It doesn’t contain a noindex robots meta tag
- It doesn’t have on-host outlinks to HTTP URLs
- The sitemap lists the HTTPS URL, or doesn’t list the HTTP version of the URL
- The server has a valid TLS certificate
In 2016, Adrienne Porter Felt and Emily Schechter from the Chrome security team released another update on Google’s security blog to share their success with HTTPS.
Their HTTPS report card documented the increased security of the web thanks to HTTPS. It included data on how HTTPS implementation increased from 2014 to 2016, that more than 50% of web pages loaded with HTTPS, and that two-thirds of time spent on the Chrome Browser was with HTTPS.
This graph from the Google Security Blog offers a more complete picture of just how many websites made the shift to using HTTPS:
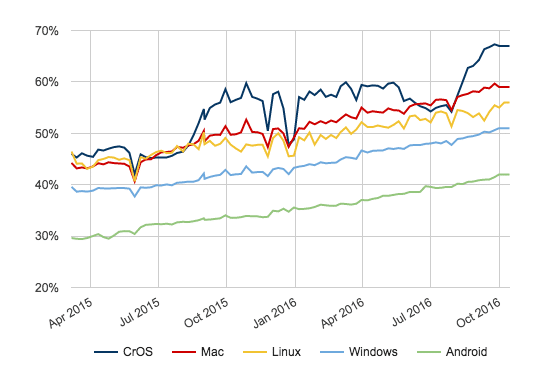
Image: Google.
In 2017, Google started applying even more pressure. It announced that from January, HTTP web pages that collected passwords and/or credit card information would be labeled as “not secure.” This shift would be part of Chrome version 56.
Then in April 2017, the search engine giant took things a step further, announcing that from October that year, Chrome 62 would show the “Not secure” warning in two additional situations: when users entered data on an HTTP page, and on all HTTP pages visited in Incognito mode.
Google highlighted that since the change in Chrome 56, there had been a 23% reduction in the number of visits to HTTP pages with password or credit card forms on desktop.
In February, Google made its latest HTTP, announcing “A secure web is here to stay.” With the release of Chrome 68, all web pages that aren’t using HTTPS will be marked as “not secure.”
Quick Guide: Securing Your Site with HTTPS
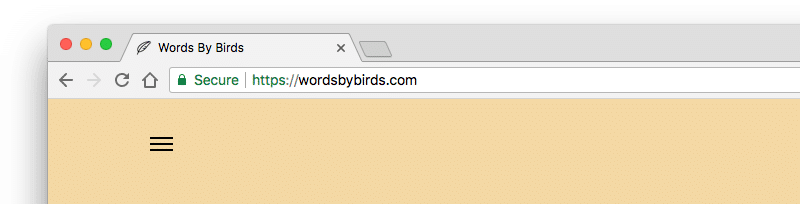
If you’re not sure if your site is using HTTPS, check your URL. If you see “https” in front of your domain name then your site is secure.
Installing an SSL certificate was one of the first things I did when setting up my site.
If your URL starts with “http” then it’s insecure and will look something like this, depending on your browser:
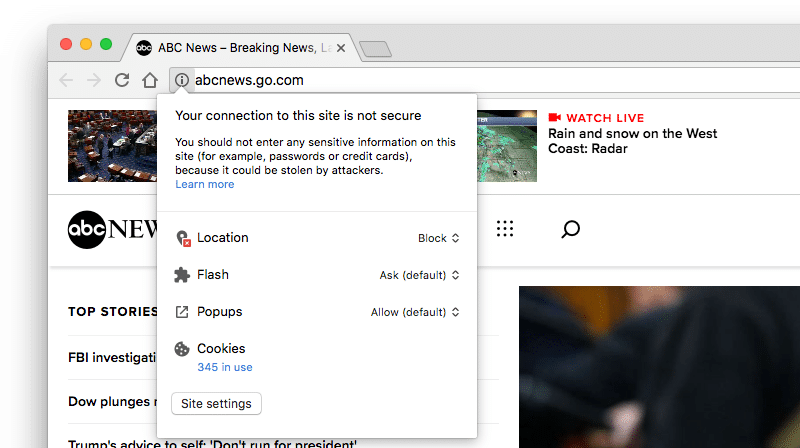
ABC News still hasn’t set up HTTPS as of March 2018!
Hopefully, the internet fairies have blessed you with a secure HTTPS site and you can go about your day and stop reading this guide.
Fortunately, the best thing about installing an SSL (Secure Socket Layer) certificate – which you need to enable HTTPS on your site – is that it’s simple to set up. Once it’s done, all you have to do is route visitors to use HTTPS instead of HTTP.
But if you don’t have HTTPS on your site, here’s how to get started.
Note: I’m working on a more in-depth guide to HTTPS for WP Rocket, so watch this space!
Do I Need a Dedicated IP Address?
Until recent years, it was only possible to install an SSL Certificate if you had a dedicated IP address for your website. However, a technology called SNI (Server Name Indication), which is now standard on web servers, solved this problem by allowing multiple certificates to be installed on a single shared IP address.
The only issue is with older web browsers that might not offer support for SNI. This is where having a Dedicated IP address can help by covering all bases.
1. Buy a Certificate
Some hosting providers offer free SSL with their plans. Siteground is one WordPress managed host that offers free Let’s Encrypt SSL certificates with every account.
Kinsta also supports Let’s Encrypt and provides free SSL support for customers at no extra cost.
If your hosting provider doesn’t offer a free SSL certificate, you may have to purchase one from a third party through your web host. Some hosting providers like Bluehost on-sell them for around $50.
For more information about SSL certificates, check out Let’s Encrypt. It’s a free and open Certificate Authority run for the public’s benefit by the Internet Security Research Group.
The Let’s Encrypt website.
2. Generate a Certificate Signing Request (CSR)
Once you have an SSL Certificate, you either ask your web host to install it on your server for you, or set it up yourself.
In order to set it up yourself, you’ll need to generate a Certificate Signing Request. Basically, this identifies the server and domains you’ll use your certificate with.
The instructions for doing this will be different depending on your server, but generally, you’ll need to:
- Connect to your server via Secure Shell (SSH)
- Run a console command
- Enter your URL and business details
- Copy and paste the text into your account’s SSL request area
You’ll need to check with your web host for what will work with your server. As an example, here are the instructions for GoDaddy users.
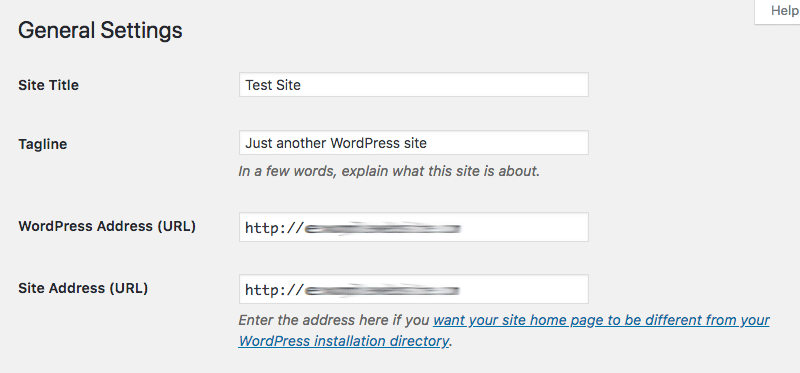
3. Tell WordPress to use SSL and HTTPS
The final step is to make sure WordPress know you’re now using SSL and HTTPS.
Head to your WordPress dashboard and go to Settings > General. Scroll down to the “WordPress Address (URL)” and “Site Address (URL)” fields and replace “http://” with “https://”
Save your changes and you’re done if you’re setting up SSL for a new website.
If you’re setting it up for an existing website, however, there are a couple more steps to go.
You need to tell WordPress to redirect from HTTP to the more secure HTTPS version of your site. To do this, use FTP, cPanel or whatever other method your host provides and open the .htaccess file (or create one) in the root directory of your site.
Paste in the following code above anything that might already be in the file:
https://gist.github.com/raewrites/5760b23cb3000778d97ea8e7159f123a
Now, visit your site to make sure it works. If “https://” appears in your URL with a green padlock next to it, then you’re all good to go.
Extra Steps for WordPress Multisite
If you want to add HTTPS to your Multisite admin area or login pages, you’ll need to also configure SSL in your wp-config.php file.
Add the following code above the “That’s all, stop editing!” line:
https://gist.github.com/raewrites/dc6a5c3dc162c3964dd7dec0e7bf378d
The Future of HTTPS
Google is intent on making the web safer for everyone, hence its years-long push to force HTTPS on Chrome users. Because when it comes to your website, your users’ security should be a top priority.
With the release of Chrome 68 fast approaching in July, if you haven’t already got an SSL certificate and HTTPS set up on your site, you need to make the change right away.
For more on how to use SSL with WP Rocket, check out the documentation here.
To keep on top of Google’s latest security updates, follow the security blog.