Table of Contents
Last update on
Animated GIFs, more than any other digital file format, have captured the hearts and minds of online users. But man, they’re so damn hard to optimize!
I once spent an hour trying to tweak the quality, frame rate, and length of a GIF, ultimately giving up because I couldn’t get the file below 2 MB without the GIF looking like a hot mess.
It’s no wonder services like Giphy don’t even use the GIF file format themselves. Instead, they use HTML5 videos that are often as much as 90% smaller in size. (And in my case, as you’ll see below, 94% smaller in size.)
It might seem like a cop-out to use video in place of GIF on a website that promotes all things GIF, but when you compare a cat GIF that’s 7 MB in size to the exact same animation in video format that’s only 147 KB, well…
In this post, I’ll show you just how easy it is to convert GIFs to HTML5 video and achieve incredibly small file sizes for your site.
How GIFs Became Pseudo Videos in the First Place
The GIF file format was never intended to be used for animation or video. In fact, it says so right there, in black and white, in the GIF89a specification published in 1990:
“The Graphics Interchange Format is not intended as a platform for animation, even though it can be done in a limited way.”
So how did we end up here, in this online world, where GIFs are the go-to format for animations?
GIFs were actually designed to hold multiple images in a single file, kind of like a ZIP file for images. And that’s how they were used until Netscape 2.0 came along in 1995 and introduced the looping extension that set GIF animations free, bringing them to life.
Back in those days, the internet was under construction, and so was the GIF. There were dancing babies and dancing hamsters. GIFs were harmless fun because they were simple animations, often with few colors and frames, limiting their file size.
Fast forward to today—30 years after GIFs were invented—and they’ve have become an art form unto themselves. Reddit, Twitter and Tumblr helped popularized GIFs, making it easy for anyone to quickly share an animated GIF. And services like Giphy and Imgur have made it easier than ever to quickly find a GIF and share a reaction.
Reaction GIFs are now a form of expression. If you’re like me, you’ve probably replied to a comment on Slack using a GIF rather than words because often a GIF can convey a feeling—or help carry an inside joke—more so than words.
Besides being fun to use, GIFs have several benefits:
- Universally supported by browsers
- Universally understood. Everyone knows what GIF is
- Easy-to-use and widely available tools for creating them
- No patent or licensing concerns that apply to common video codecs
- Easy to insert in sites using
img - Easy to share on social platforms
GIF != Video
GIFs in 2018 are no longer just a collection of simple images, as they were back in 1995. Often, animated GIFs are clips ripped from TV and movies—basically, video saved in the wrong format.
Unlike actual, video formats, GIFs don’t use any kind of video encoding or compression techniques. So a GIF that’s only a few seconds long can quickly blow out to several megabytes in size, depending on the frame rate and quality.
On top of that GIFs lack the quality of video and have color limitations and slower frame rates.
But the biggest problem of all with GIFs is their file size. While JPEG and PNG files can be easily compressed, GIF animations are a nightmare to optimize because the more you compress them, the worse they look, making them less than ideal for use on modern websites.
The Case for Using HTML5 Video Instead of GIF
Before HTML5, videos could only be played in browsers using plug-ins, like Flash. HTML5 turned video on its head, providing a standard way to show video on the web using the <video> tag.
While video can take more time to encode, HTML5 does offer a number of advantages compared to GIF:
- Easy to insert videos in sites using <video>
- Small file size
- Better performance
- More colors and detail
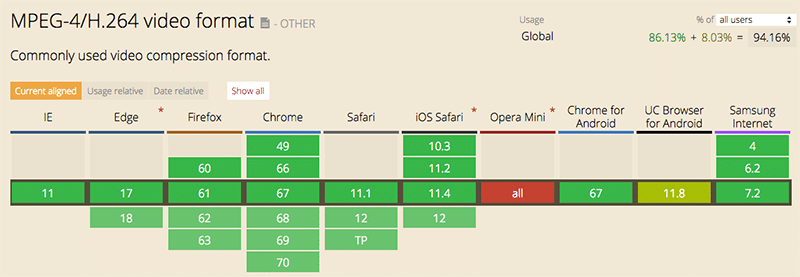
There are three supported HTML5 video formats: MP4, WebM, and Ogg. Of these three formats, MP4 is the most widely, with 94% of browsers using this video compression format.
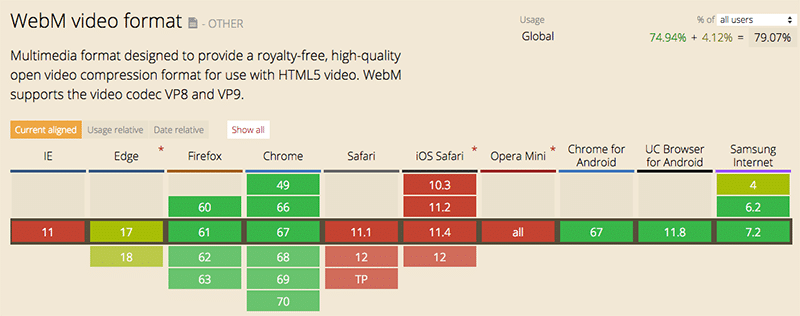
WebM, a video and audio format that Google has developed as a royalty-free codec, isn’t far behind on 79% (see below). However, Apple doesn’t support WebM and is unlikely to do so any time soon.
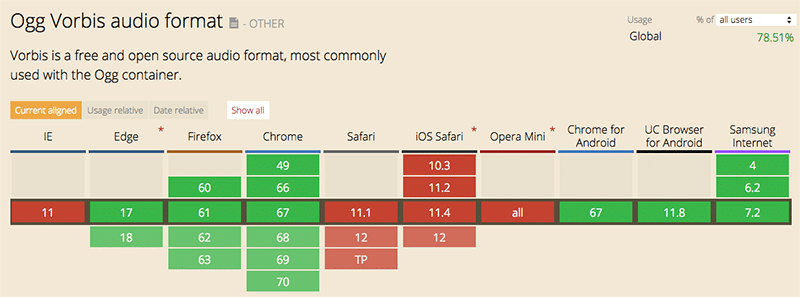
Lastly, OGG is supported on 78% of browsers. But it, too, isn’t available on Apple browsers.
HTML5 vs GIF
So how does the quality of HTML5 video compare to GIF? As we’ve explored so far, video formats are actually designed for video. So, obviously, they’re going to handle moving images—i.e. video and animation—a heck of a lot better than GIF.
Check out this example of an animated GIF from Game of Thrones:
It comes in as a whopping 2 MB in size. It’s huge for an animation that’s barely 3 seconds in length.
Now, here’s an MP4 video that I’ve converted from the above GIF file:
Converting Animated GIFs to HTML5 Video
There are lots of ways you can convert GIF to video, including free online tools like ezgif.com, but in this tutorial, I want to show you how to use FFmpeg. This free open-source command-line tool handles video, audio, and other multimedia files and streams, and can also be used to convert animated GIFs into video formats, including MP4, WebM, and OGG.
If you already have FFmpeg installed, simply fire up the Terminal and run the ffmpeg command. It’s it’s installed, you’ll see some diagnostic information. If it’s not installed and you see an error message, you’ll need to install it:
- For MacOS, you can install it via Homebrew.
- For Windows, use Chocolatey
Once installed, find a GIF you’d like to convert into a video. For this example, I’m going to convert a GIF into MP4, since MP4 is the most widely supported video format.
Open a Terminal window, change to the directory containing your GIF, and enter the following command:
ffmpeg -i input.gif output.mp4
This is the most basic syntax for converting a GIF to MP4. The -i specifies the input (in this case, input.gif), and the output file is named afterward (in this case, output.mp4).
If you’re following along with this guide, when you enter this command you should see a new file, output.mp4, magically appear in your directory.
FFmpeg comes with a ton of options, which you can use to finetune the video output. One such option is employing an encoding mode called Constant Rate Factor (CRF) when video quality is a high priority:
ffmpeg -i input.gif -b:v 0 -crf 25 output.mp4
This command uses the -b:v flag, which would normally limit the output bitrate, but when used with CRF mode it must be set to 0. The -crf accepts a value between 0 and 51; the lower the value, the higher the quality and the larger file size.
Using this command, I ran the Game of Thrones GIF for a third time, and it output an MP4 file 111 KB in size with no noticeable drop in quality. That’s a 94% reduction in size or 6% of the original file size.
Another option worth experimenting with is movflags, which optimizes the structures of the MP4 file. Usually, MP4 files have all the metadata stored at the end of the file, and using -movflags faststart you can move it to the start for faster loading:
ffmpeg -i input.gif -movflags faststart output.mp4
There are loads more options for optimizing video output. Check out the FFmpeg formats documentation for more details.
Replacing GIFs with HTML5 Video
Inserting a GIF into a webpage is super easy—all you have to do is upload it as you would any image file. Fortunately, using the <video> tag is also straightforward. You just need to keep three things in mind:
- GIFs play automatically
- GIFs loop continuously
- GIFs don’t have sound
When you’re adding a GIF to your site, you don’t have to worry about these traits because. GIFs just… work. But when you’re adding a video to your site that you want to behave like a GIF, you need to account for these behaviors.
In order to add a GIF to your site you would use HTML markup similar to this:
< img src="cat.gif" alt="" width="400" height="300" />
To insert a video, you would replace the above with this:
< video autoplay loop muted playsinline >

< source src="cat.mp4" type="video/mp4" >

</video>
You’ll notice a few attributes: autoplay tells the video to automatically plays, while loop ensures the videos loop continuously. The muted attribute turns off any sound but must also be present for videos to autoplay, even if they don’t have audio. On iOS devices, playsinline is also required for autoplay to work.
Conclusion
GIFs are super easy to add to any web page—just upload and treat them like any other image. But they’re a terrible format for displaying animation and video and are typically huge in size. When you’re trying to optimize your site and improve its performance, GIFs will only drag down your page speed.
HTML5 video provides a streamlined way to add GIF-like animations to your site without bloat. Using the snippets above, you can convert GIFs to MP4 and output files that are just 6% of the original! And with no noticeable loss in quality.
If you want to know more about improving your web performance, check out our guide to Core Web Vitals for WordPress and learn how to optimize them!


