Table of Contents
Last update on
Confused by what Facebook Pixel is and whether or not you need to add it to your WordPress site?
In this post, we’ll demystify the issue by telling you exactly what Facebook Pixel does and if it will help you.
Then, if you do need it, you’ll learn how to add Facebook Pixel to WordPress in two different ways:
- Manually
- With a free plugin
Finally, to finish things out, you’ll learn how to test whether Facebook Pixel is working on your site.
That’s a lot to cover, so let’s dive in!
What Is Facebook Pixel (And Do You Need It On Your WordPress Site?)
Facebook Pixel is an official analytics tool from Facebook. It’s not a general analytics tool like Google Analytics. Instead, Facebook Pixel specifically helps you measure, target, and enhance your Facebook ad campaigns.
After adding a single script to your WordPress site, Facebook Pixel can help you:
- Track the conversion rate from your Facebook ad campaigns, like how many people make a purchase after clicking a Facebook ad.
- Create targeted audiences for Facebook ads (custom audiences), including the ability to “retarget” people who’ve visited your site on Facebook.
- Optimize your ad campaign spend, like setting up automatic bidding to target the people who are most likely to make a purchase at your site.
If you are not running Facebook ads (and never plan to in the future), then you do not need to add Facebook Pixel to WordPress.
However, if you do promote your WordPress site on Facebook in any way, you should definitely add Facebook Pixel to your site because it will help you optimize and analyze your Facebook advertising efforts.
Below, we’ll show you two different ways to add Facebook Pixel to WordPress:
- Manually (without plugin) – you’ll need to generate the Facebook Pixel tracking code and then add the script to your site’s header.
- With the free Pixel Caffeine plugin – beyond ease of use, the main benefits of using this plugin are that it will help you pass additional tracking information to Facebook, set up conversion tracking, and take advantage of new functionality, like custom audiences.
How To Add Facebook Pixel To WordPress Without Plugin
If you don’t want to the extra functionality offered by the plugin, here’s how to add Facebook Pixel to WordPress without a plugin.
Step 1: Create Your Facebook Pixel
To get started, you’ll need to create your Facebook Pixel via Facebook’s interface. Each Facebook Ads account can only have one pixel, so you’ll just reuse this same pixel across all your sites.
To create your Pixel, go to the Pixels tab in Facebook Events Manager (this link will take you straight there). Then, click on the Create a Pixel button:
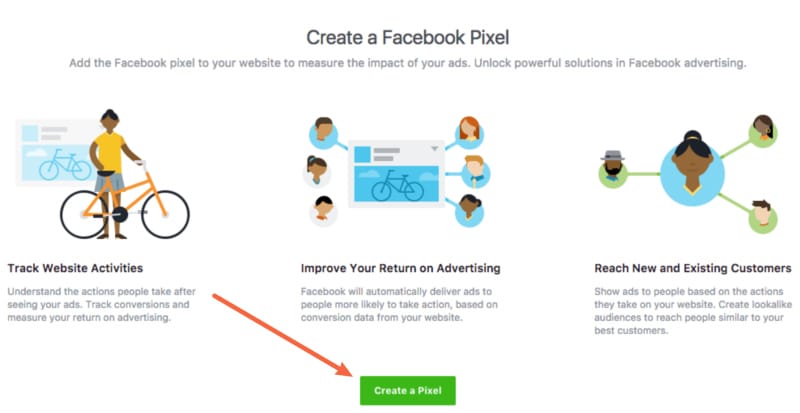
That should open a popup box. All you need to do is click Create on that popup.
Step 2: Get Facebook Pixel Tracking Code
Once you’ve created your Facebook Pixel, you should see a list of options in a Install Your Pixel Code box (if you don’t, head to the Pixel tab and click Set up Pixel).
From these options, choose “Manually Install the Code Yourself”:
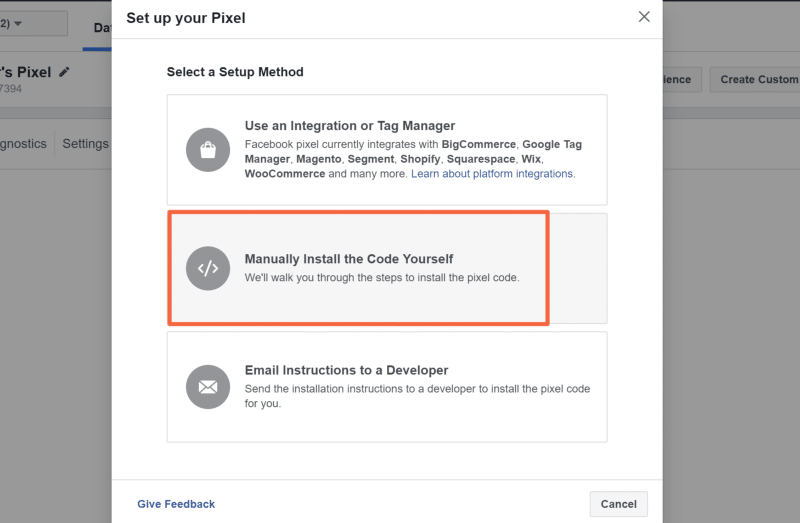
On the next page, scroll down to the Facebook Pixel tracking code section and copy it:
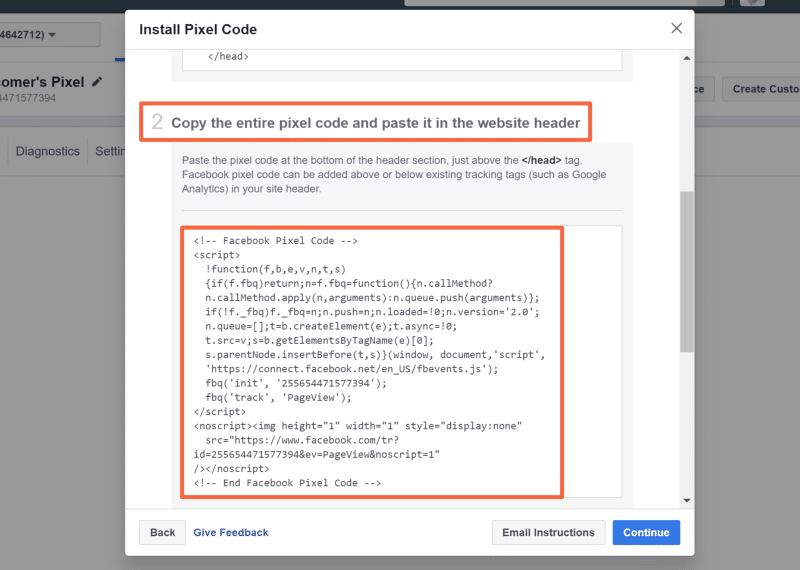
Step 3: Add Tracking Code To WordPress
Next, you need to add the tracking code that you just generated right above the closing </head> tag on your WordPress site.
There are a couple ways that you can do this. You can:
- Add it directly to the header.php file in your child theme.
- Use the free (and lightweight) Insert Headers and Footers plugin
To use a child theme, find your header.php file and paste the Facebook Pixel script immediately before the </head> tag:
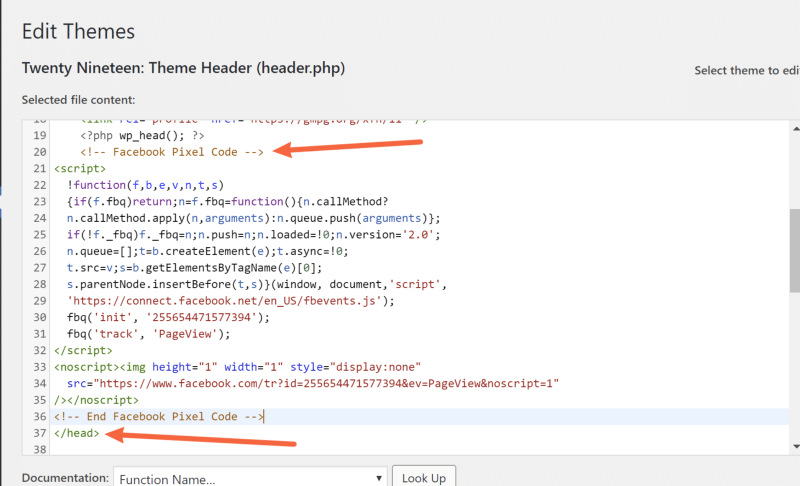
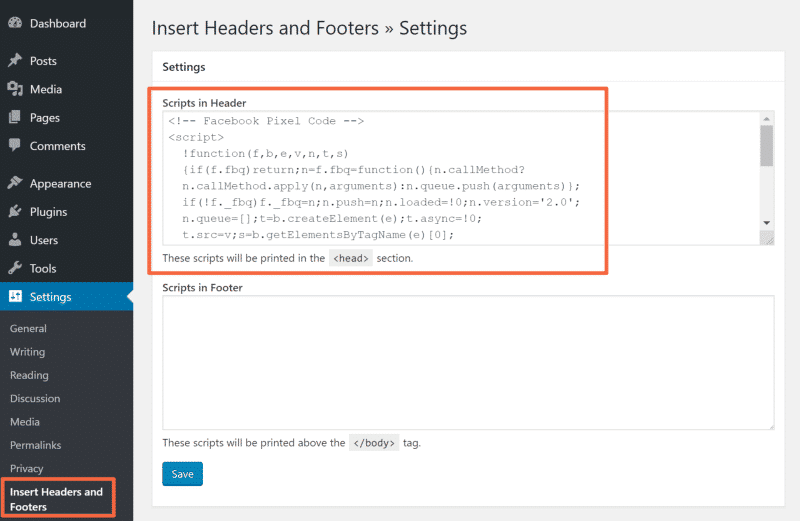
Or, if you want to use the Insert Headers and Footers plugin instead, go to Settings → Insert Headers and Footers and paste the code into the Scripts in Header box:
And that’s it!
How To Add Facebook Pixel To WordPress Using A Free Plugin
As an alternative to the manual route, you can also use the free Pixel Caffeine plugin from AdEspresso (a popular digital advertising tool owned by Hootsuite).
This plugin lets you add the Facebook Pixel tracking code with a few clicks and also helps you:
- Pass additional information to Facebook, like the content people look at or whether they’re a registered WordPress user.
- Create custom conversion events, like viewing a specific URL or clicking a link.
- Create custom audiences from your WordPress dashboard.
So if you want those extra abilities, that’s the real reason to choose this plugin over the manual route.
To get started, install and activate the free plugin from WordPress.org. Then, here’s how to set it up…
Step 1: Add Facebook Pixel Tracking
To add the Facebook Pixel tracking code, you’ll need to connect your Facebook account to Pixel Caffeine (giving Pixel Caffeine access also lets it help you create custom audiences later on).
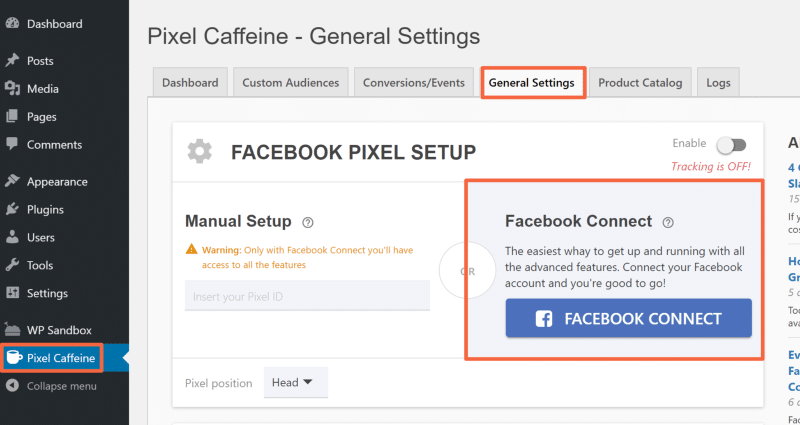
To do this, go to Pixel Caffeine → General Settings in your WordPress dashboard and then click the big Facebook Connect button:
Then, after giving Pixel Caffeine the proper permissions, you can use the drop-downs to select which ad account and Pixel to use:
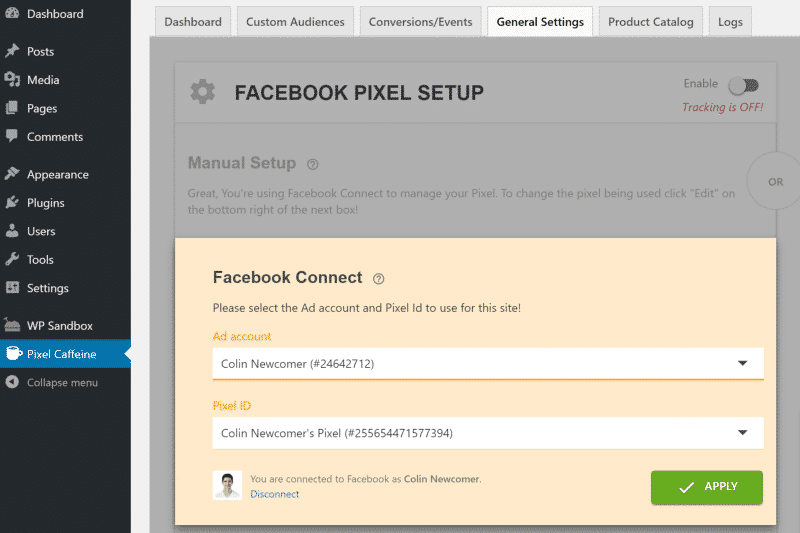
Once you’re finished, click Apply.
Step 2: Configure Plugin Tracking Options
Once you’ve set up Facebook Connect, you can configure the plugin’s other tracking options.
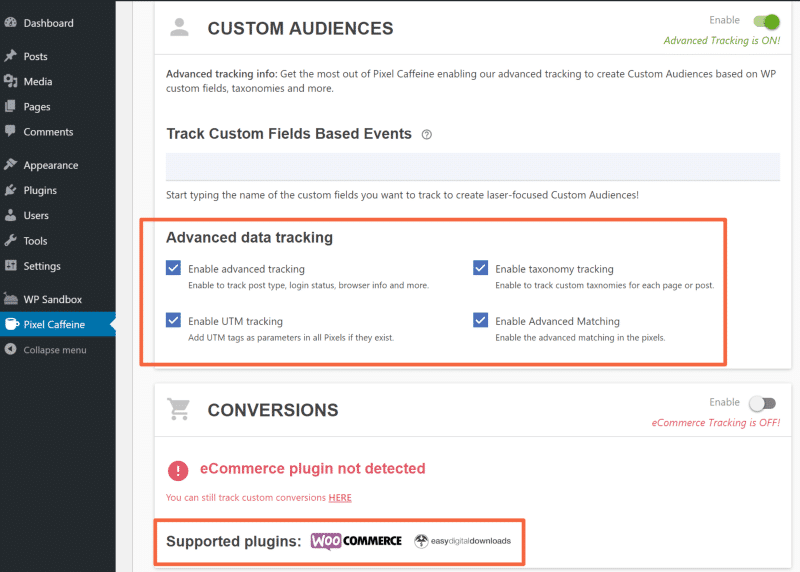
First, you can scroll down to the Custom Audiences area in the General Settings tab to configure things like:
- Tracking for post types
- User logged-in status
- Taxonomies
- Etc.
If you’re running a WooCommerce or Easy Digital Downloads store, you can also set up conversion tracking in the Conversions area:
Step 3: Set Up Conversion Tracking (Optional)
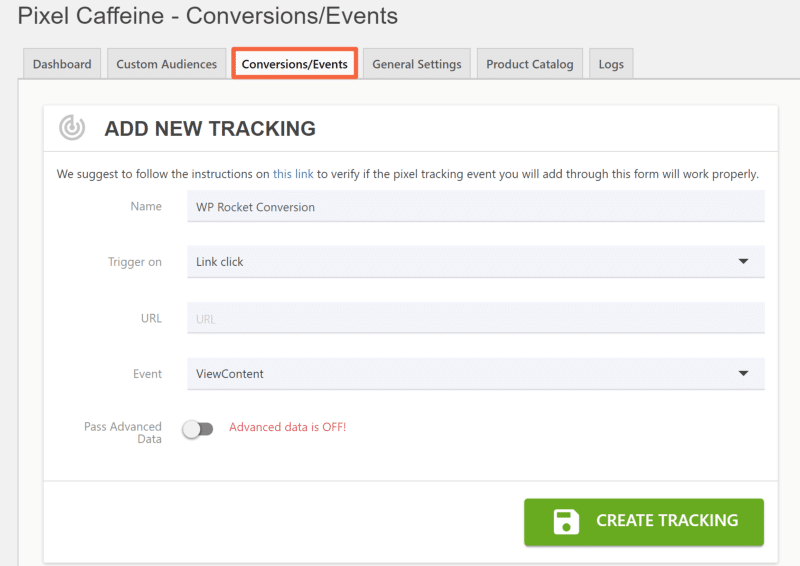
If you want to track your own conversions – like when a user visits a certain page or clicks a link – you can do that from the Conversion/Events tab:
Step 4: Create Custom Audiences (Optional)
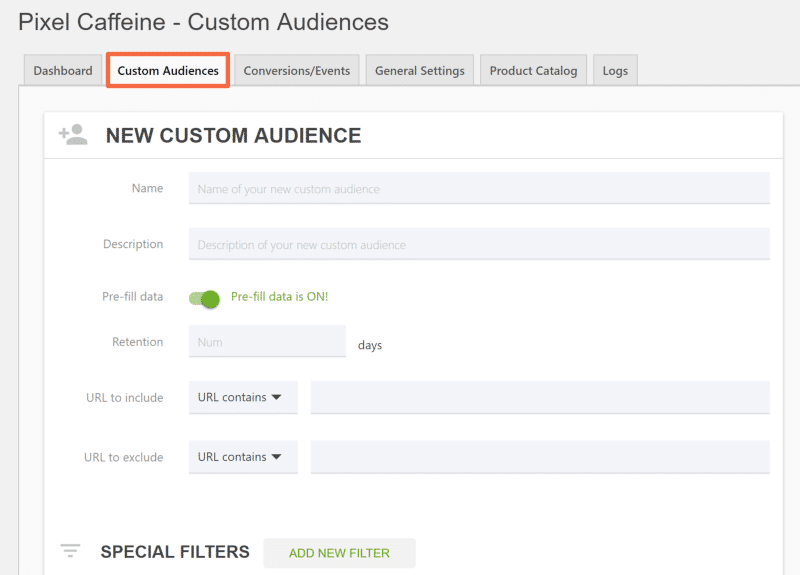
To create a custom audience for ad targeting, you can use the Custom Audiences tab:
And that’s it!
How To Test If Facebook Pixel Is Working
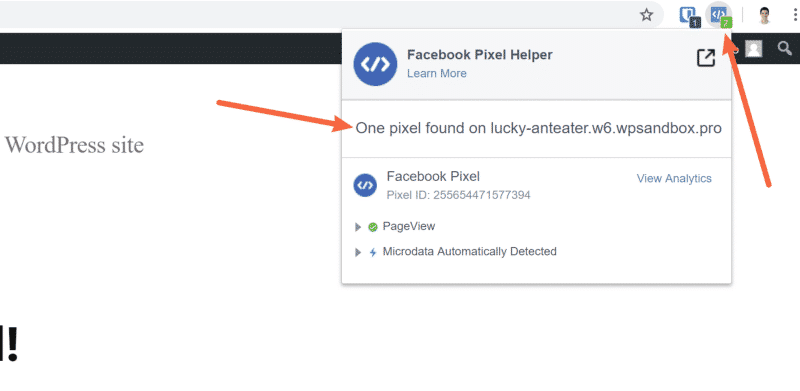
To make sure that your newly-added Facebook Pixel snippet is working, you can use the official Facebook Pixel Helper browser extension for Chrome.
Once you install the extension, navigate to the website to which you added the Facebook Pixel code and click on the extension’s icon.
If Facebook Pixel is active, you should see a success message, as well as more information about what’s being tracked (like any conversion events):
Wrapping Up
If you promote your WordPress site on Facebook, you should add Facebook Pixel to analyze the effectiveness of your Facebook Ads and get access to new functionality, like custom audiences and retargeting.
To add Facebook Pixel to WordPress, you can either manually add the tracking code before the closing</head> tag or you can use a free plugin like Pixel Caffeine.
Once you’ve added the tracking code, make sure to test whether it’s working with the free Facebook Pixel Helper extension.
Do you have any other questions about using Facebook Pixel on WordPress? Let us know in the comments!
