Table of Contents
Last update on
Did you know that you can undo changes on WordPress? If you have changed your mind or want to revert your content to an older version, you can do it in a few clicks. In fact, it’s a core feature within WordPress, and there is a dedicated revisions interface where you can easily undo changes and restore previous versions. Convenient, isn’t it?
In this article, you’ll learn everything about:
- What WordPress revisions and autosaves are.
- How to undo changes easily with WordPress revisions, including page builders.
- The reasons why you may need to roll your content back to anterior versions.
- The best practices for managing WordPress revisions and maintaining a great site speed.
- How to optimize performance while maintaining revision history (including a before/after database size test).
Can You Undo Edits in WordPress? Understanding WordPress Revisions
Yes, you can easily undo edits in WordPress directly from the WordPress editor. WordPress saves your work and stores a revision history for each page, post, and custom post type. It’s essential to understand the two ways WordPress saves your content:
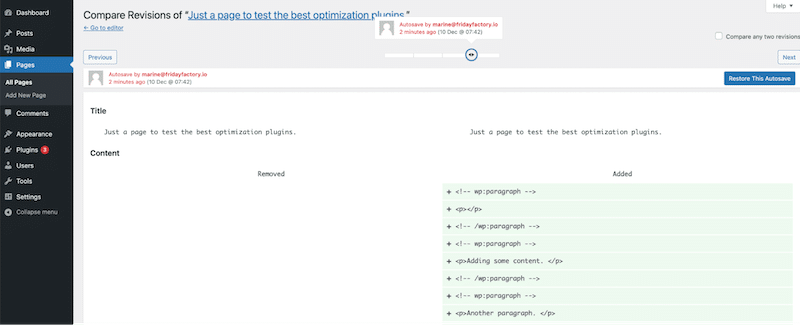
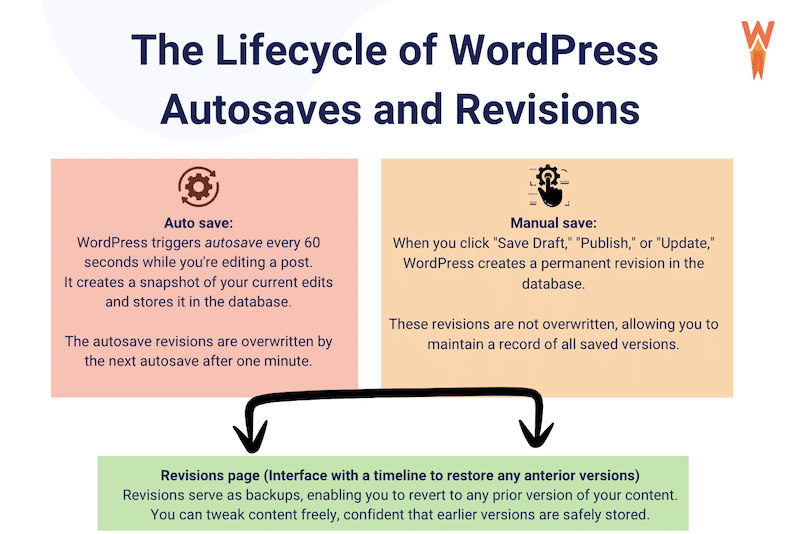
- Automatically—with the autosave feature that saves your work at regular intervals even if you don’t do any manual saving (Save, Publish, or Update buttons). By default, WordPress stores revisions of your content every 60 seconds. That’s what an autosave looks like:

- Manually—whenever you click the Save, Publish, or Update buttons, a revision is saved in the WordPress editor.
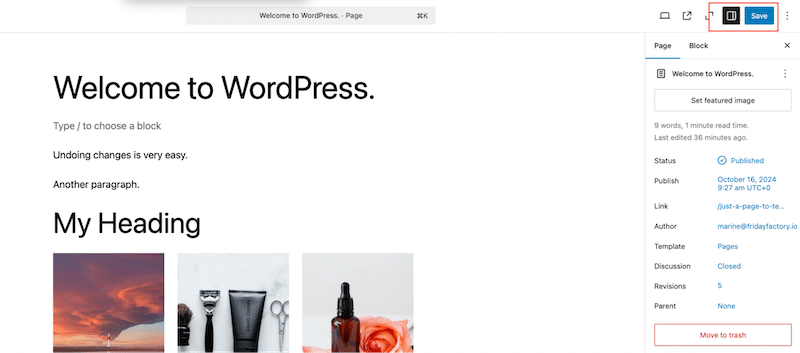
How Revisions Work to Track Changes
Both manual revisions and autosaves go to the revisions interface, accessible from your WordPress pages or posts. This interface keeps a detailed history of changes made to your content. It allows you to track the changes, compare the versions, and restore them, giving you complete control over your content.
Here’s a recap diagram summarizing the concepts of autosave, manual save, and the revisions page. It shows how these features work together and how WordPress can help you restore your content very quickly.
| 💡Hint: The revisions interface includes both autosaves and manual saves, referred to as revisions. |
WordPress Revisions Behind the Scenes
Revisions and autosaves are stored in the posts table (wp-posts), which takes up space in your database. By default, WordPress tracks changes to the title, author, content, and excerpt.
They are stored as child posts of their associated post, similar to attachments. As you can see below, in the last “post_name” column, you also see the revision part added to it:

WordPress revisions are shown like this in the database:
[post ID of original post]_revision_v1| 💡Hint: We recommend limiting the number of revisions stored in the database to maintain high performance. The best practices section later in this article explains how to do this. |
How to Undo Changes in WordPress Using Revisions: Step-by-Step Guide
The WordPress editor allows you to easily undo changes from the admin, thanks to a powerful revisions system that stores a record of your content.
To restore a previous version of your content and undo changes using the revisions interface, follow those three simple steps:
Step 1. Launch the Revisions Interface
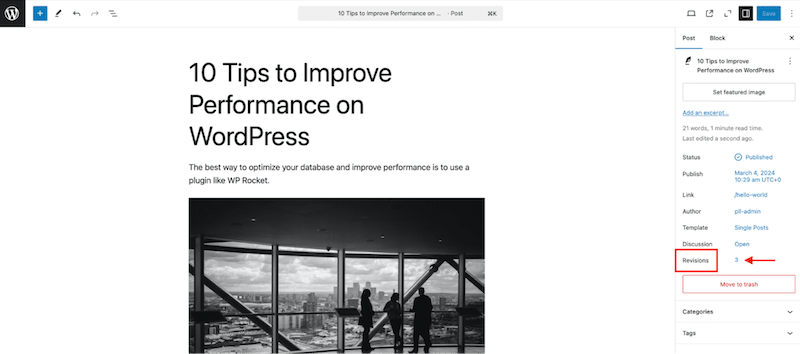
Go to the post or page you want to edit and look for the Revisions field in the sidebar of the WordPress editor.
Click on the number (3 in our case), which is a link that opens the revisions interface.
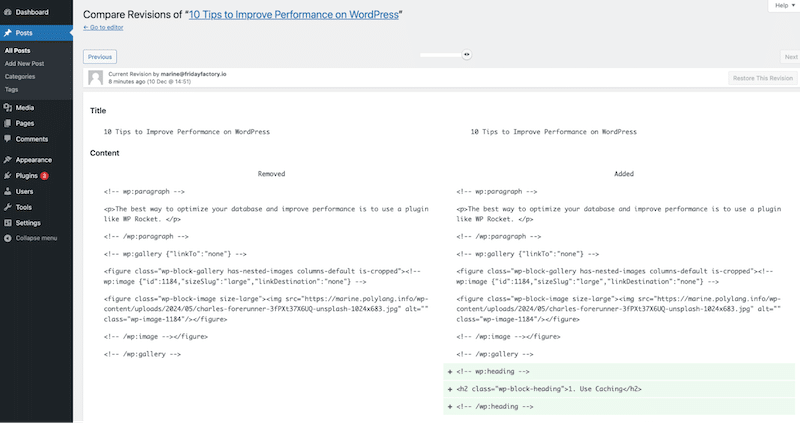
That’s what the WordPress revisions interface looks like. You can see that all the post content is there:
Step 2. Decide Which Version to Restore
The interface makes it easy to see the changes made in each revision and even compare them side by side. Plus, you can navigate through the different versions in two simple ways:
- By dragging the slider:

- By using the Previous/Next buttons:

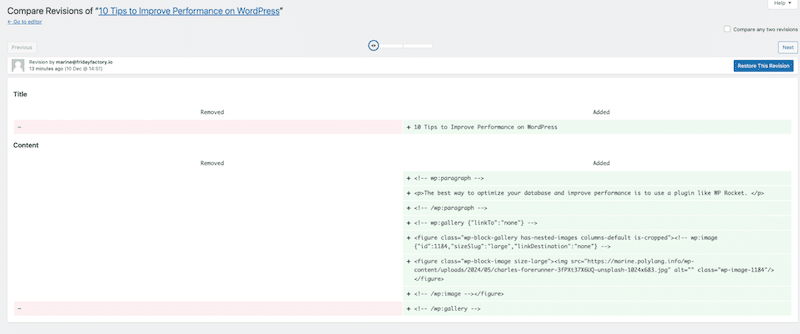
WordPress highlights your content in red and green colors when you go through the different versions. A red background means something was deleted, and a green one shows the new content added.
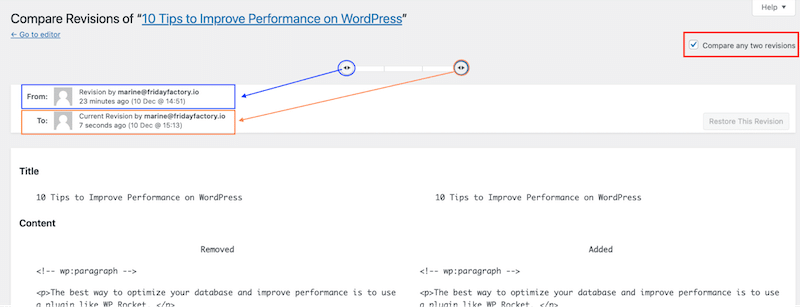
Another interesting feature is comparing an older version with a more recent one. To do so, check the Compare any two revisions box and select the dates you want to compare.
Step 3. Restore Versions
To restore an older revision and undo changes in WordPress, you can either fully restore or revert only some part of it.
1. How to Restore an Entire Revision
If you want to restore an entire version, simply click on the Restore This Revision button:

2. How to Restore Only Some Parts of a Revision
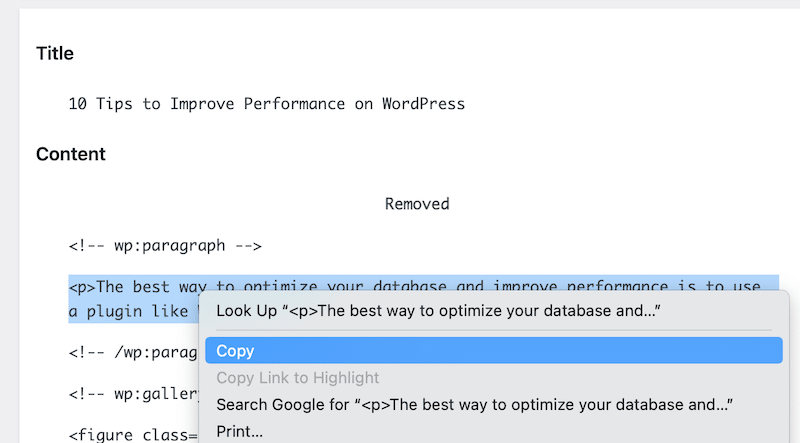
You can use the good old copy/paste method to restore a specific part of a revision (e.g., just a paragraph).
Open the revision interface, locate the content you want to restore, copy it, and paste it back into your post or page in the WordPress editor.
Is There a Quick Undo Button on WordPress?
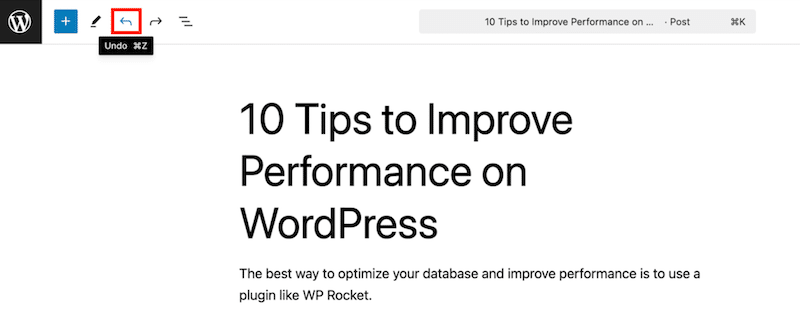
During the same session and if you don’t leave your post or page, you can use the Undo command from WordPress. Simply click on the editor’s top left bar editor.
You can also use your keyboard to quickly undo a change using cmd+z (on Mac) or ctrl+z (on Windows) to undo any changes on your WordPress page or post.
All the previous instructions work well for the WordPress editor and traditional posts and pages, but what if you use a page builder? You will probably need to undo some changes, too. In the next section, you’ll learn how to use revisions and undo changes using page builders.
How to Undo Changes in WordPress When Using Page Builders
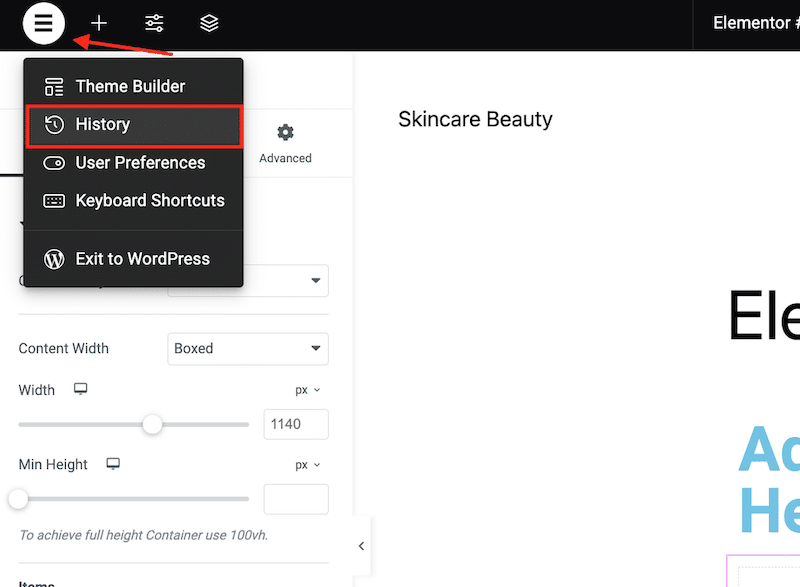
Most page builders let you undo changes with an undo arrow or using the keyboard (cmd+z or ctrl+z). They also come with a revision or history interface to quickly restore any anterior version. Let’s see an example with Elementor.
Step 1. Open Elementor’s History Interface
While editing your page or post, click on the top left Elementor logo to open the History interface. This is the exact equivalent of the WordPress revisions interface.
Step 2. Decide Which Revisions You Want to Restore
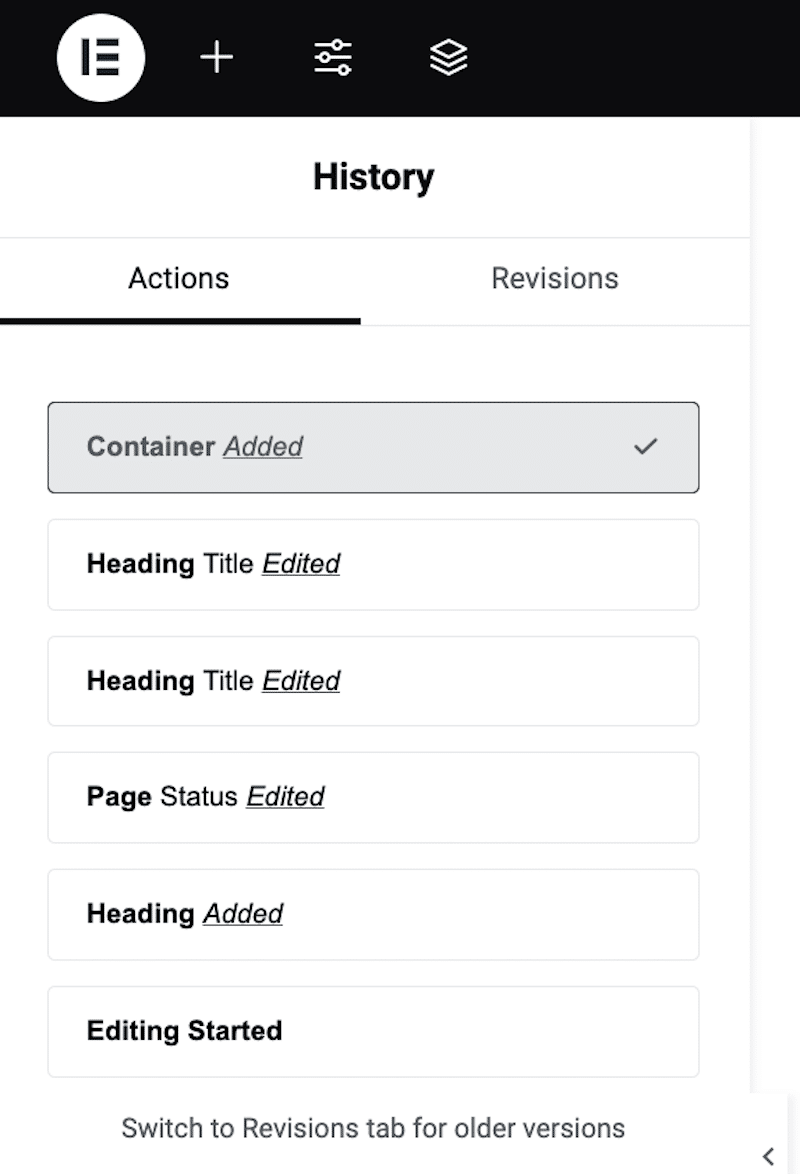
Elementor gives you two tabs: Actions and Revisions. Actions are the recent changes on your page, while revisions are the older versions.
Step 3. Undo Changes
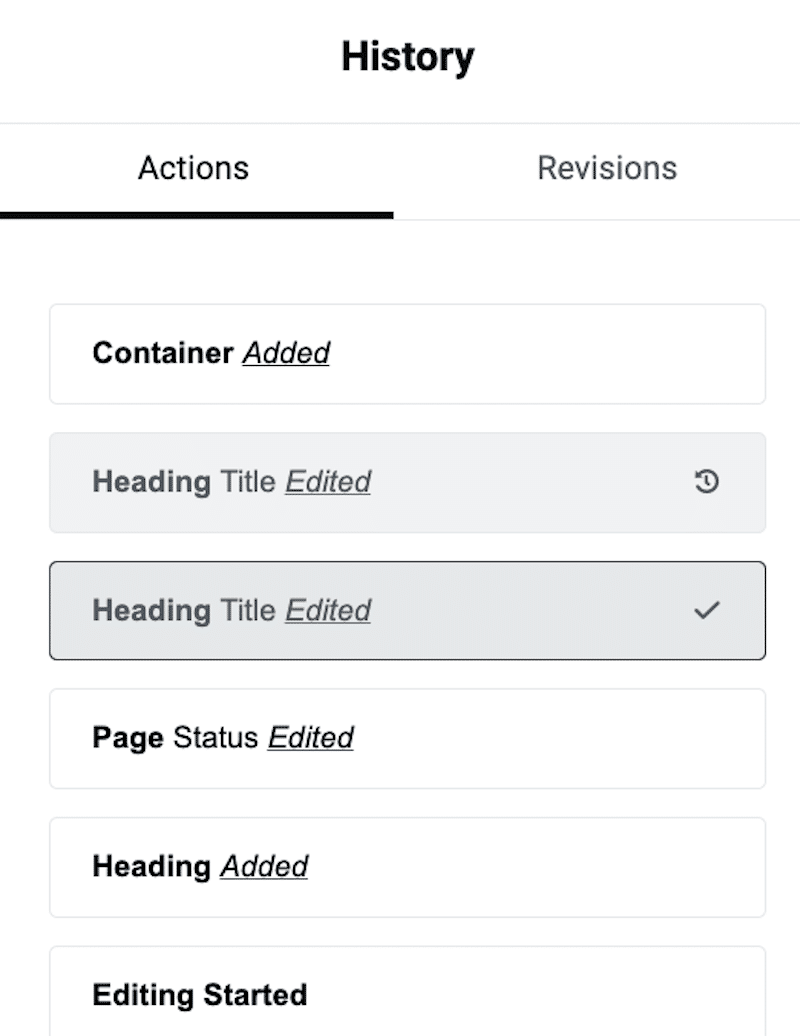
Click on one of the timeline sections to undo a change and roll back to an older version.
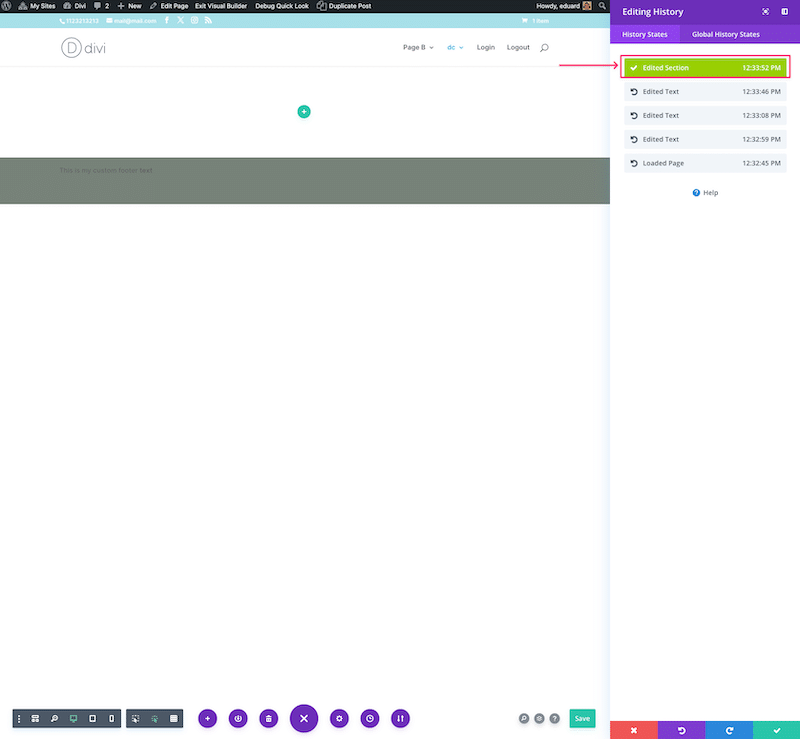
The process is similar to undoing changes on a page or a post built with other page builders like The Fusion Builder or Divi. They all offer a History page where you can decide which revisions you want to restore very easily. That’s how the History interface looks like on Divi:
Top 4 WordPress Changes Users Frequently Undo
Who has never made a mistake while working on a site? You may even recognize yourself in the following scenarios! Here are four common changes WordPress users often want to undo, and that’s where the WordPress revisions interface comes in handy.
1. Restoring a Favorite Paragraph
If you’re a writer, you might consider rewriting an older, more impactful or well-written paragraph than your current version.
2. Reverting Unintended Edits
Accidental deletions or formatting changes, such as removing a section or a form or tweaking heading styles, are common issues you’ll likely want to fix.
3. Undoing Bulk Design Edits
Sometimes, after bulk updates to multiple sections of a page or post, you might regret the changes and want to revert to a previous version. You can simply use the revisions interface to cancel this bulk update and roll it back to an older design.
4. Recovering After a Plugin or Theme Conflict
If a plugin update or theme change negatively impacts your content, you may need to roll back to a previous version to resolve the issue. Remember that the revisions interface cannot handle this—you’ll need to restore an older backup instead.
4 Common Pitfalls When Managing WordPress Revisions
Managing WordPress revisions can help optimize your site’s performance and keep your database clutter-free. It’s easy to make serious mistakes that affect your website and make it unavailable. Here are some common pitfalls to watch out for and how to avoid them.
1. Making a Mistake in the PHP Code
If you manually edit your PHP file, ensure your syntax is flawless. Even a tiny error can cause your website to break.
2. Adding Code in the Wrong Place
When adding code to deactivate revisions or to limit them, make sure you place the code snippet above the line: /* That’s all, stop editing! Happy publishing. */
3. Overlooking the Rest of Your Database
Don’t stop at cleaning up WordPress revisions—remember to remove unnecessary data, like unused plugins, spam comments, or unused tables.
| 📖 Here’s a helpful guide on How to Clean Your Entire WordPress Database. |
4. Cleaning the Database and Revisions Only Once
Regular and ongoing maintenance is key. Cleaning up your database and revisions should be part of a routine performance optimization plan and not a one-time event. For a bloat-free database, it is recommended that you schedule this at least once a week.
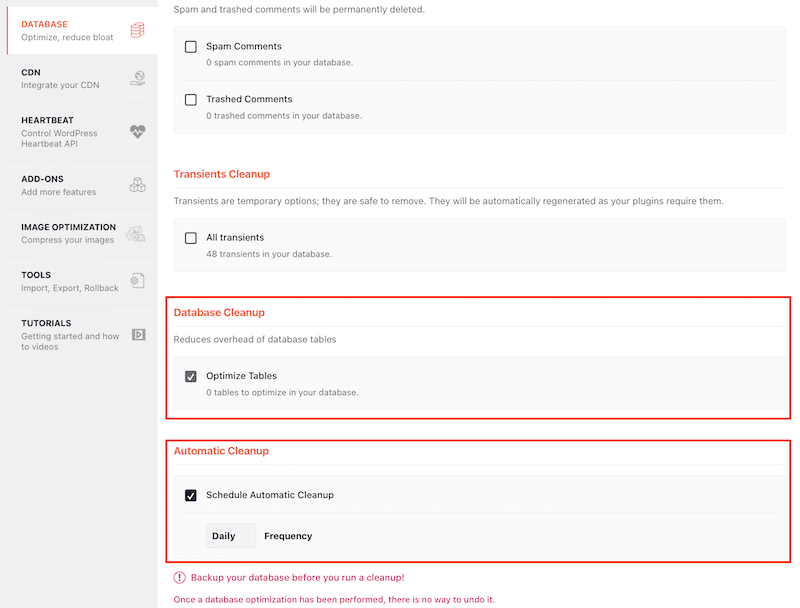
For example, with the WP Rocket plugin, you can optimize your database in one click and schedule a regular clean-up directly from your WordPress admin:
| 🚀 Performance tip: WP Rocket doesn’t just optimize your database—it’s much more powerful than that! It’s an easy-to-use yet robust plugin that applies 80% of performance best practices as soon as it’s activated, including caching, GZIP compression, and advanced code optimization. With WP Rocket, you’ll improve your site speed, boost your Core Web Vitals, provide a better user experience, and maintain a leaner database. |
Optimizing WordPress Performance While Maintaining Revision History
Having unlimited access to revisions and autosaves in WordPress is incredibly convenient but can significantly increase database storage. If your database grows bigger because of the revisions, it will result in unnecessary bloating over time.
So, how to find the perfect balance between the safe and the performance side?
In this section, you’ll learn about the best practices recommended for optimizing WordPress performance while maintaining revision history.
Best Practices for Managing WordPress Revisions and Maintaining Site Speed
Here are some best practices (along with tools) you can follow to manage WordPress revisions and still have a lightweight database:
- Limit the number of revisions saved by WordPress
- Delete old and obsolete revisions
- Disable the revisions feature
- Perform a database cleanup and schedule some upcoming optimizations
Let’s review each one. Remember to back up your site before implementing any of the following tips.
1. Limit the Number of Revisions Saved by WordPress
Saving unlimited revisions can clutter your database, slowing down your website’s performance. To avoid database bloat, you should try to limit the number of revisions WordPress saves for each post or page.
Example:
You’re editing a blog post and making 50 minor updates over time. By default, WordPress will save all 50 revisions in the database. The question is, do you need to keep all of them? If you limit revisions to 10, only the latest 10 revisions will be kept. That’s a perfect balance because you still have the flexibility to restore recent changes if needed, but you don’t supercharge your database unnecessarily.
How to Limit the Number of WordPress Revisions Manually
First, do a backup of your site because you are about to edit your wp-config file.
Then, open your wp-config.php file and add the following code snippet to set a limit on revisions:
define('WP_POST_REVISIONS', 10);In our example, we limited the revisions to 10, but you can put the number of your choice. So, if you want to limit them to 5, the code snippet will look like this:
define('WP_POST_REVISIONS', 5);How to Limit the Number of WordPress Revisions With a Plugin
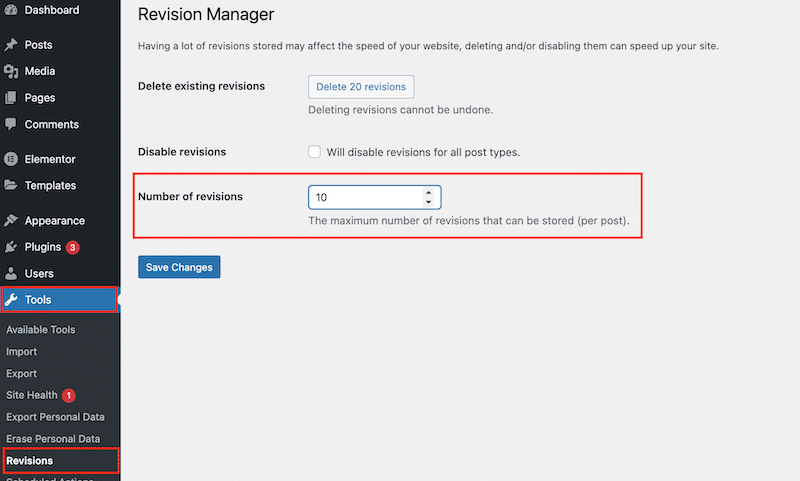
If you don’t feel comfortable editing any code, you can use a WordPress plugin like Companion Revision Manager. This plugin shows how many revisions are stored and lets you set a limit easily. Go to Tools > Revisions and set the number of revisions.
2. Delete Old and Obsolete Revisions
Deleting existing revisions will definitively remove the data. Use this feature cautiously and only if you are 100% sure you will not need to restore the content one day.
Example:
Let’s say you have an old how-to guide with features, screenshots, and instructions based on an outdated interface. The product has been updated with a new graphical user interface (GUI) and different settings. The old guide is no longer relevant and won’t be in the future, so it looks safe to delete the older versions.
| ⚠️ Important: Always backup your site before making any changes to your database. Database mistakes can affect your website’s functionality and make it inaccessible. |
Delete Old and Obsolete WordPress Revisions Manually
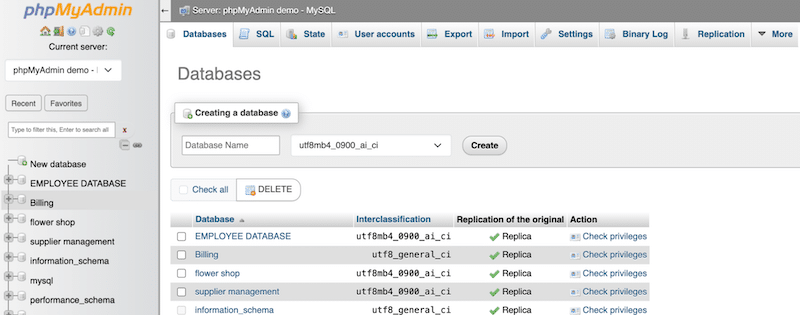
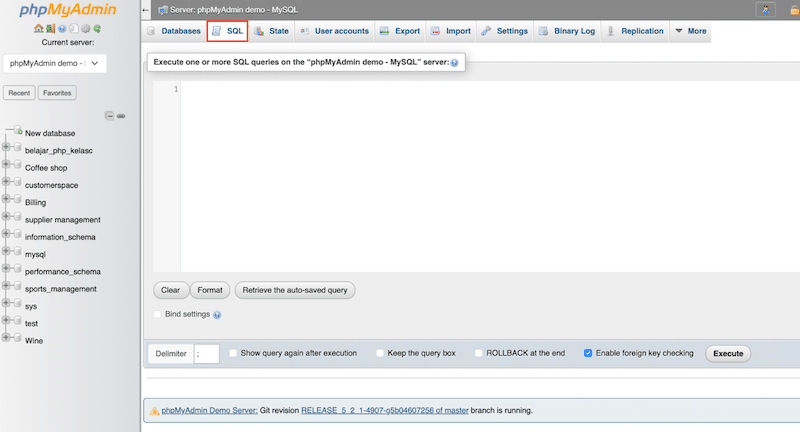
1. You can access your WordPress database via phpMyAdmin and open the SQL tab. The phpMyAdmin panel is accessible from your hosting dashboard.
On the left of phpMyAdmin, you may see a list of databases. Locate the one used by your WordPress site and select it.
2. Once inside your database, click on the SQL tab. This allows you to run custom commands directly on your database.
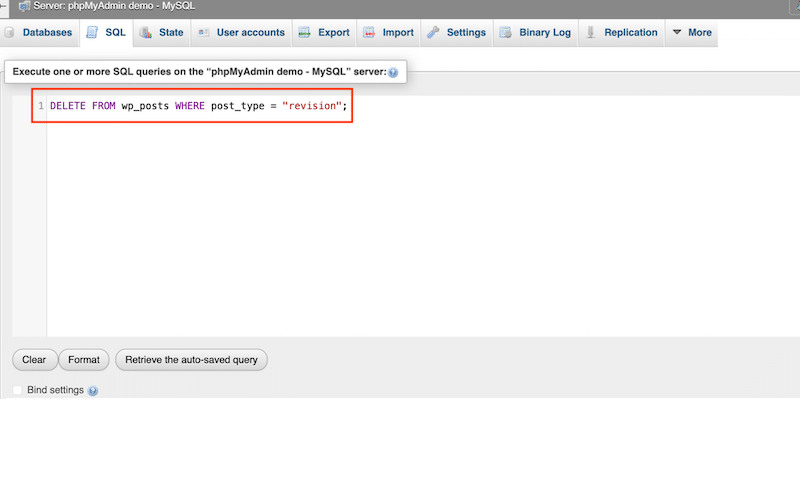
3. Copy and paste the following command into the SQL query box.
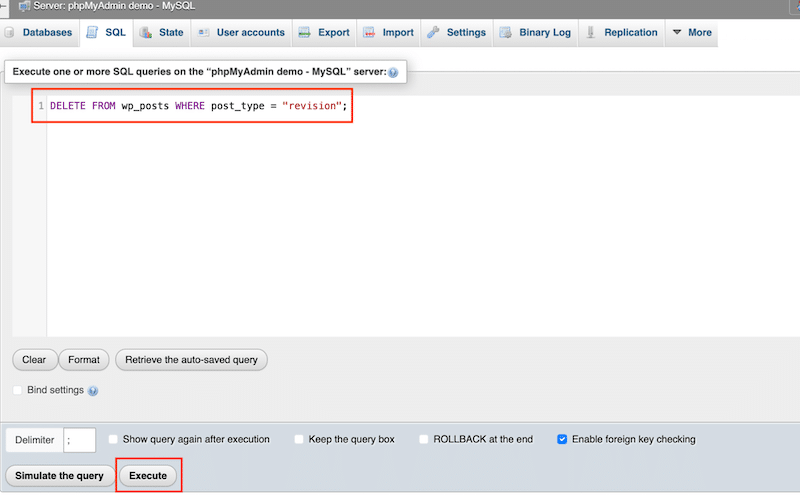
DELETE FROM wp_posts WHERE post_type = "revision";This command is designed to find and delete all revisions saved in your database. Click on the Execute button to activate the command.
4. Click the Execute button to run the query. phpMyAdmin will process the command and remove all revisions from your database.
Delete Old and Obsolete WordPress Revisions With Plugins
- WP Rocket – The easiest way to clean post revisions and keep a healthy database is to use a powerful performance plugin like WP Rocket.
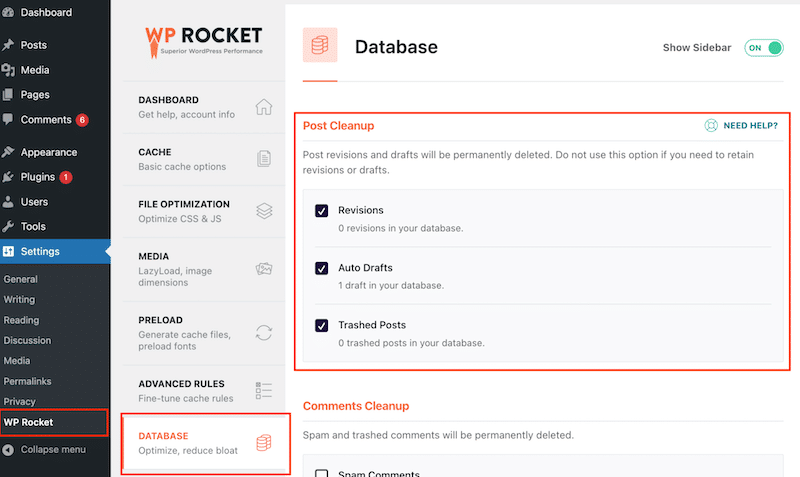
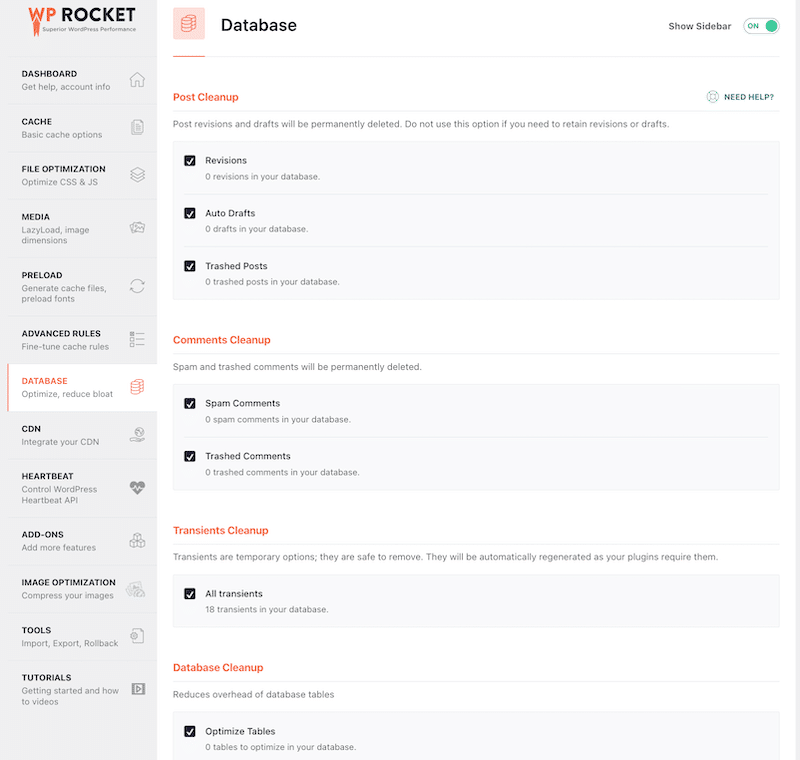
To delete older post revisions, auto drafts, and trashed posts, go to Settings > WP Rocket > Database > Post Cleanup and select which type of content you want to delete.
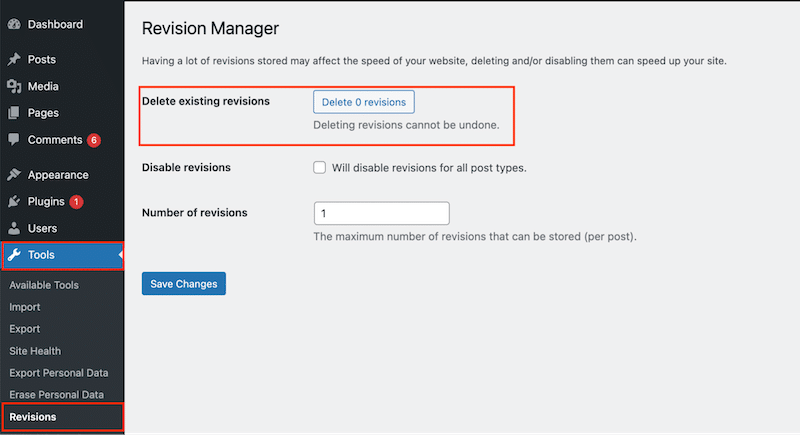
- Companion Revision Manager – This plugin can also help you delete any revisions with just one click. Go to Tools > Revisions > Revisions Manager and click the Delete X revisions button.
3. Disable the Revisions Feature
Do this only if you are sure you want to avoid any safety net when writing your content. It’s worth mentioning that disabling the revisions feature will work for future posts but will not delete the current revisions.
Example:
You are a blogger who prepares all your drafts using Google Docs. You only use the WordPress interface as a publishing tool. In that case, you are already saving a copy of the document on your cloud (or Google Drive) and won’t need to activate the WordPress revisions for your blog.
Disable the WordPress Revisions Feature Manually
If you are tech-savvy, open the WordPress wp-config.php file and add the following code snippet above the “/* That’s all, stop editing! Happy publishing. */” line:
define('WP_POST_REVISIONS', false );Disable the WordPress Revisions Feature with Plugins
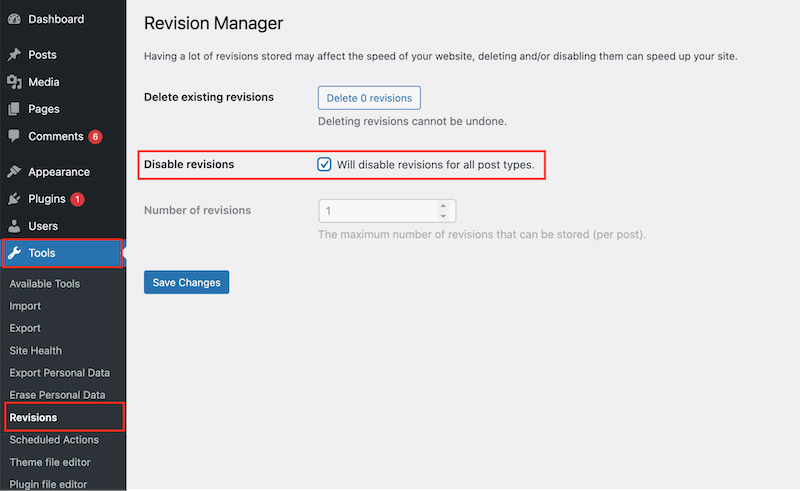
- Companion Revision Manager – This plugin can help disable WordPress revisions with one click. Go to Tools > Revisions > Revisions Manager and check the “Will disable revisions for all post types” box.
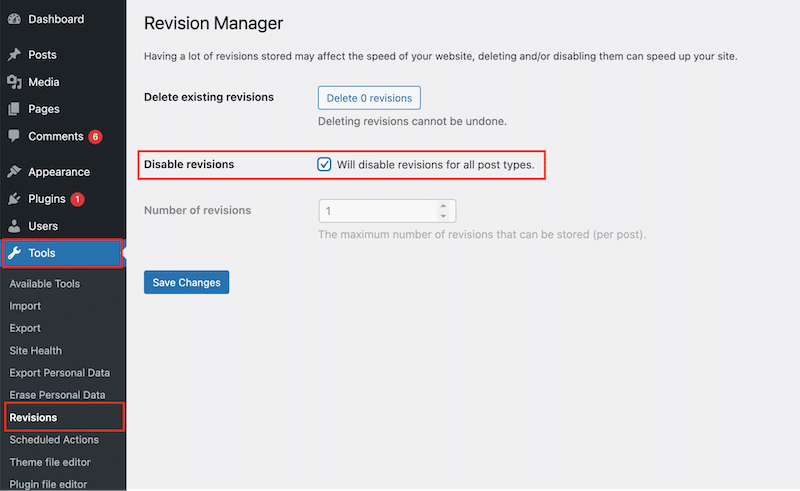
- Disable Post Revision – This plugin allows you to disable unnecessary post-revision data. Go to Settings > Writing > Writing Settings > Disable Post Revisions. Select the post type for which you want to turn off the revision.
4. Perform a Database Cleanup and Schedule Some Upcoming Optimizations
Since revisions are stored in the database, it is important to periodically clean it. Optimizing the database is the final technique for maintaining performance while keeping revisions enabled.
Database optimization can be done with the following techniques:
- Delete all revisions, auto drafts, and trashed pots.
- Clean up all the spam and trash comments.
- Clean up the transients.
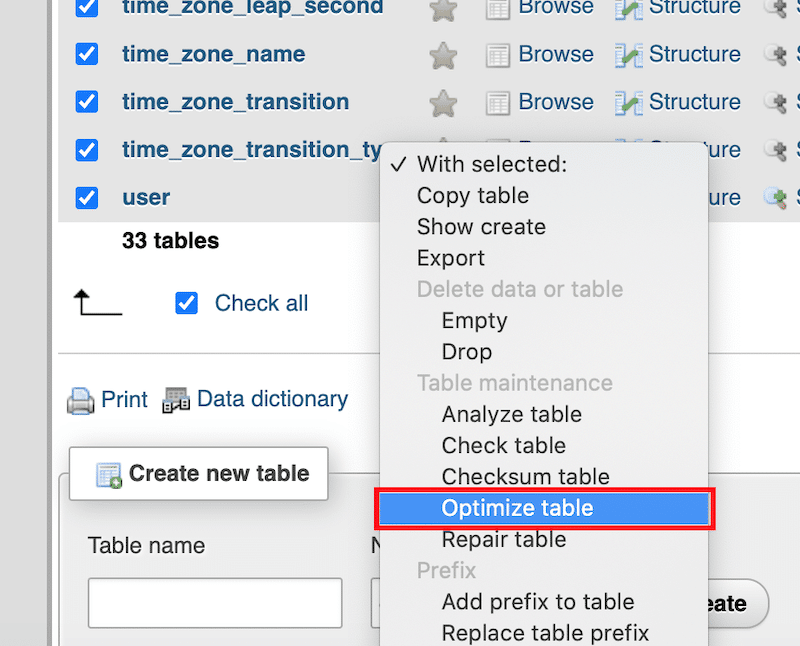
- Optimize all the tables of the database.
- Remove unused plugins.
Perform a Database Cleanup Manually
You can optimize your database and delete some old tables using SQL via phpMyAdmin.
Perform a Database Cleanup with Plugins
If you don’t feel comfortable editing your database manually, some interesting WordPress plugins can do the job for you.
- WP Rocket – It lets you clean up revisions, auto drafts, trashed posts, spammy comments, trashed comments, and transients. You can also launch a database optimization and schedule your next one.
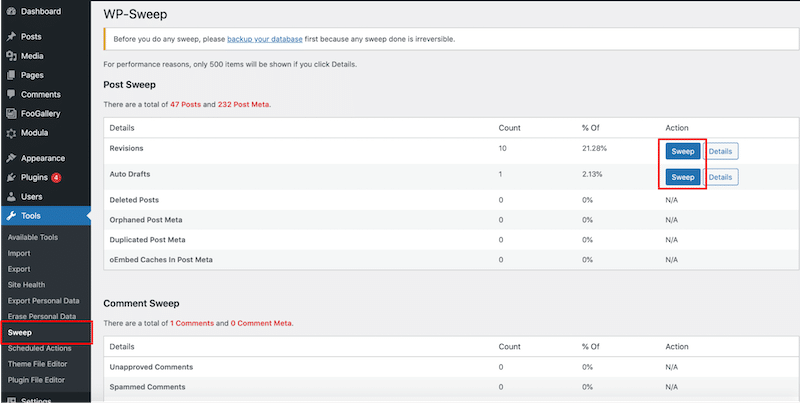
- WP Sweep – It lets you clean up unused, orphaned, and duplicated data in your WordPress database.
| 📖 You can read more about WordPress database optimization in our in-depth guide. |
5. Compare Your Database Size Before and After Doing the Optimizations
The final step in your revisions and database cleanup process is to monitor its size before and after running all the optimizations with the right tool. Note that we’ve taken WP Rocket for this optimization test. This comparison shows how cleaning a database can significantly reduce bloat and improve overall performance.
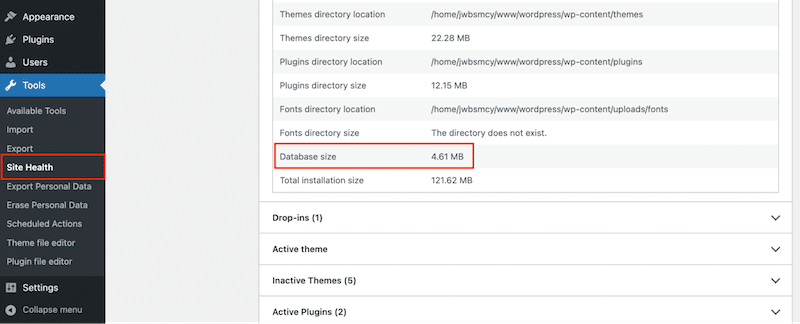
| 💡 Hint: You can check your database size directly from the WordPress admin. Go to Tools > Site Health > Directories and Size > Database size. |
- Database size before optimization (no WP Rocket)
In our example, the database weighs 4.61 MB. No optimizations have been made.
- Database size after optimization using WP Rocket
After optimization, the size of the database is down to 3.05 MB.
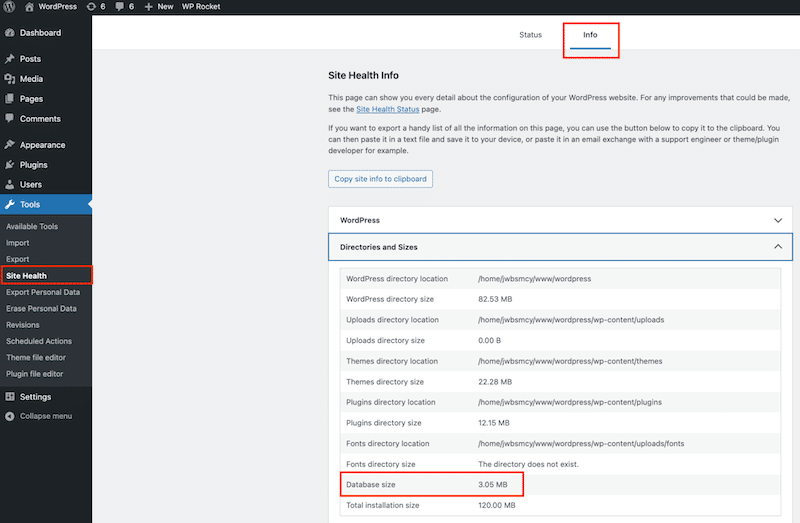
The size reduction happened after removing all the unnecessary plugins and activating the following WP Rocket features:
- Delete all revisions, auto drafts, and trashed pots.
- Clean up all the spam and trash comments.
- Clean up the transients.
- Optimize all the tables of the database.
WP Rocket is the easiest way to optimize your database, delete revisions and autosaves, and remove spammy comments. WP Rocket goes beyond “just” database optimization. Upon activation, it implements 80% of the most effective performance best practices, including caching and GZIP compression, without requiring advanced configuration.
Wrapping Up
You learned how to undo changes in WordPress using its built-in revisions feature and the handy autosave functionality.
Limiting the number of revisions saved allows you to keep your database lean and efficient without losing the benefits of the Revisions feature. If you are concerned about performance and want to ensure your database is never bloated and always optimized, you can use a plugin like WP Rocket. It will optimize your database, remove old WordPress revisions, and give your website an extra speed boost thanks to powerful performance features such as caching, GZIP compression, and code optimization.
No risks are taken with the 14-day money-back guarantee. It’s time to manage your WordPress revisions more efficiently and apply our tips to speed up your site!


