
Table of Contents
Last update on
Looking to speed up your WordPress site? Enabling Gzip compression via .htaccess is a simple and effective way to improve page load times.
In this article, you’ll discover Gzip compression, how it works, and how to enable it through your .htaccess file. Plus, we’ll cover some helpful tips for troubleshooting common issues.
What is Gzip and How Does It Work?
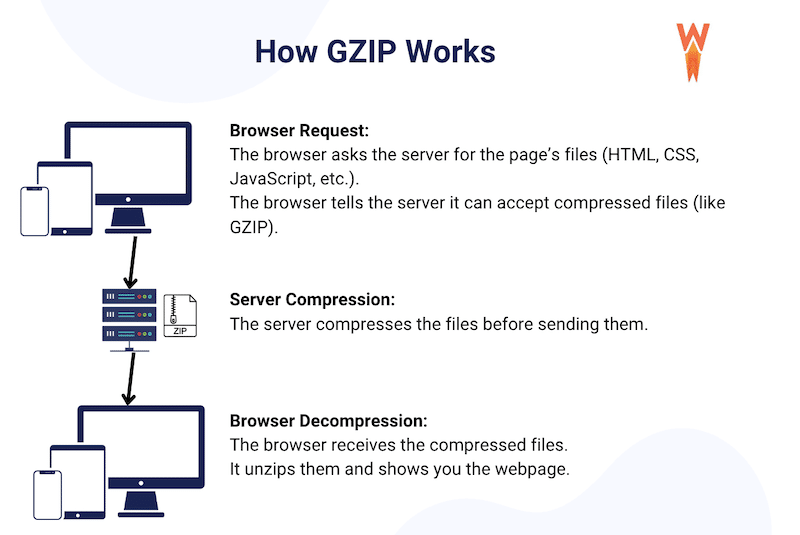
Gzip is a compression method that shrinks website files (such as HTML, CSS, and JavaScript) so they load faster. It works by finding repeated patterns in text and replacing them with shorter codes.
It’s like when you zip up a file with images and text to send by email. The file becomes much smaller, so it sends and downloads faster. Similarly, when your website files are compressed with Gzip, the browser “unzips” them quickly, allowing the content of your page to appear sooner. It can reduce file sizes by 70-80%, making your website load faster.
Here’s how it works:
- The server compresses the files into a smaller size.
- The compressed files are sent to the visitor’s browser instead of the large originals.
- The browser automatically unpacks them and displays the website as usual.
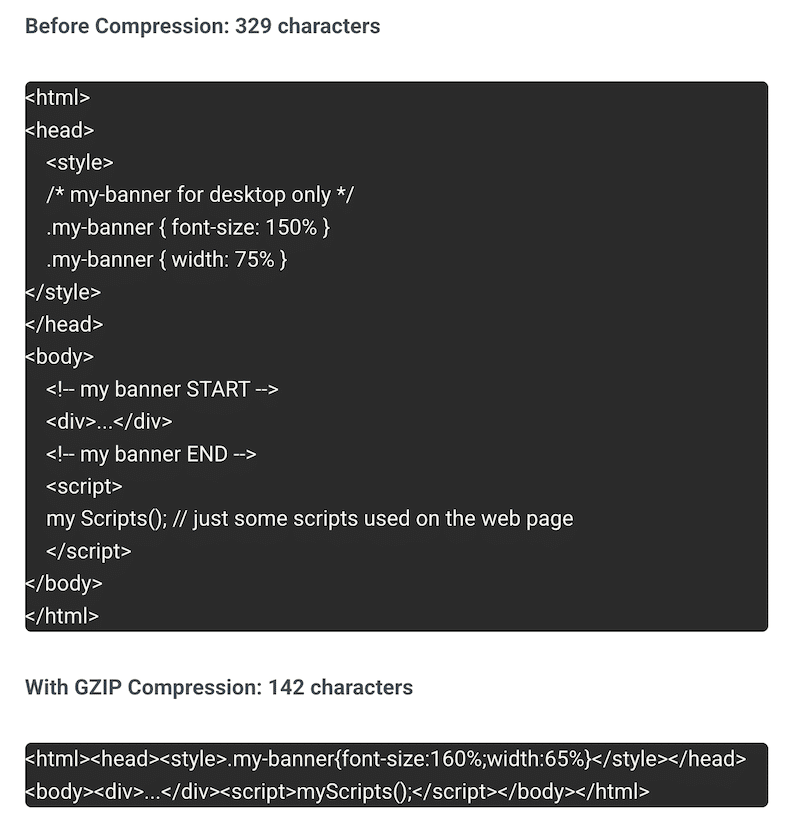
In the example below, we have a code snippet of 329 characters before Gzip compression; after compression, it’s just 142 characters.
The Benefits of Using Gzip on Website Performance
✅ Faster loading times
Gzip reduces the size of your HTML, CSS, and JavaScript files by up to 70-90. This means the browser downloads smaller files, loading your page much faster.
- Without Gzip: The browser downloads a large, uncompressed file, which takes longer.
- With Gzip: The file is smaller and faster to transfer so that it can be rendered faster on your visitor’s screen.
✅ Lower bandwidth usage
Smaller files mean less data transfer between the server and browser, which is especially helpful for mobile users or those on slower connections.
✅ Improved Largest Contentful Paint
Largest Contentful Paint (LCP) is one of the three Core Web Vitals created by Google to measure the performance of your web page. Largest Contentful Paint measures how long the largest visible element (like a hero image or headline) takes to load. This is the moment users feel like the page is ready — even if more minor elements are still loading.
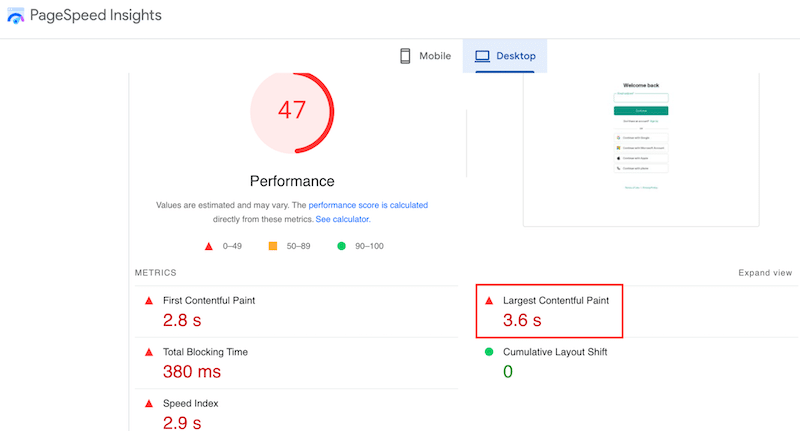
To improve LCP, Google recommends you implement Gzip or Brotli compression. In fact, when you run a performance test with PageSpeed Insights, you might see a recommendation to “Use text compression,” which often refers to Gzip or Brotli.
The reason? Gzip reduces the size of your website files, and smaller files load faster, helping the largest visible part of your page (LCP) appear more quickly.
✅ Improved SEO
Finally, Google uses LCP as a ranking factor; a green LCP score improves your chances of ranking higher, bringing in more organic traffic. If the LCP loads quickly, users are more likely to stay on the page, engage with it, and trust your site. Additionally, Google rewards fast websites, so your site’s search engine ranking can benefit by improving load times with Gzip.
Setting up Gzip in .htaccess
Before implementing Gzip compression in your .htaccess file, do a few checkups.
Check if Gzip Is Already Enabled on Your Site
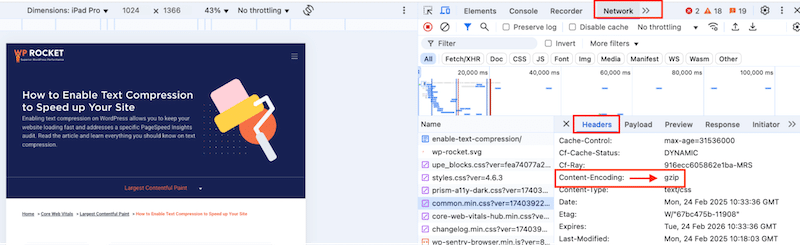
The quickest way to check if Gzip is already enabled on your site is to use your browser dev tools. You can access it from View > Developer > Developer Tools. Then open the Network tab and select Headers. Seeing “gzip” next to the Content-Encoding row means that Gzip is activated on your site.
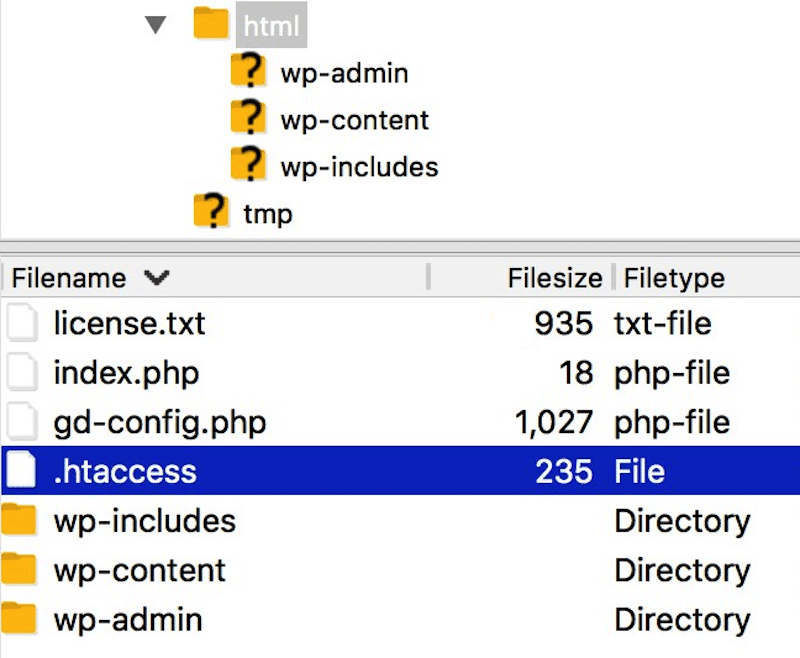
Locate and Back Up Your .htaccess File
The .htaccess file is located in the root directory of your WordPress installation (same folder as wp-config.php and wp-admin). Enable “Show Hidden Files” in your FTP client or file manager if you don’t see it.
The .htaccess file is an important configuration file on your WordPress site, and making incorrect changes can break your website. It’s essential to proceed with caution and make a backup of your site and your file.
Why .htaccess Is Important for Gzip Setup
The .htaccess file is an Apache server configuration file that allows you to set various directives for your website. One option is to enable Gzip to compress resources like HTML, CSS, and JavaScript files.
Adding specific Gzip rules to the .htaccess file lets the server compress files before sending them to the user’s browser. In plain English, the .htaccess file “communicates” with your browser and server to compress the specified file types (like HTML, CSS, JavaScript, etc.).
Advantages of Using .htaccess for Gzip Compression
Using .htaccess to enable Gzip means applying various settings for GZIP compression without modifying the main server configuration. This helps lower bandwidth usage without changing the server’s core settings.
Step-by-Step Guide to Enabling Gzip Compression via .htaccess
Here’s a step-by-step guide to enable Gzip compression on your website using the .htaccess file. As a precaution, we recommend you back up your site before editing the code of your WordPress site.
Step 1: Access Your .htaccess File
- Connect to your site using an FTP client (like FileZilla).
- Look for the .htaccess file in the root directory (same folder as wp-config.php and wp-admin).
Step 2: Edit the .htaccess File
- Right-click on .htaccess and choose Edit.
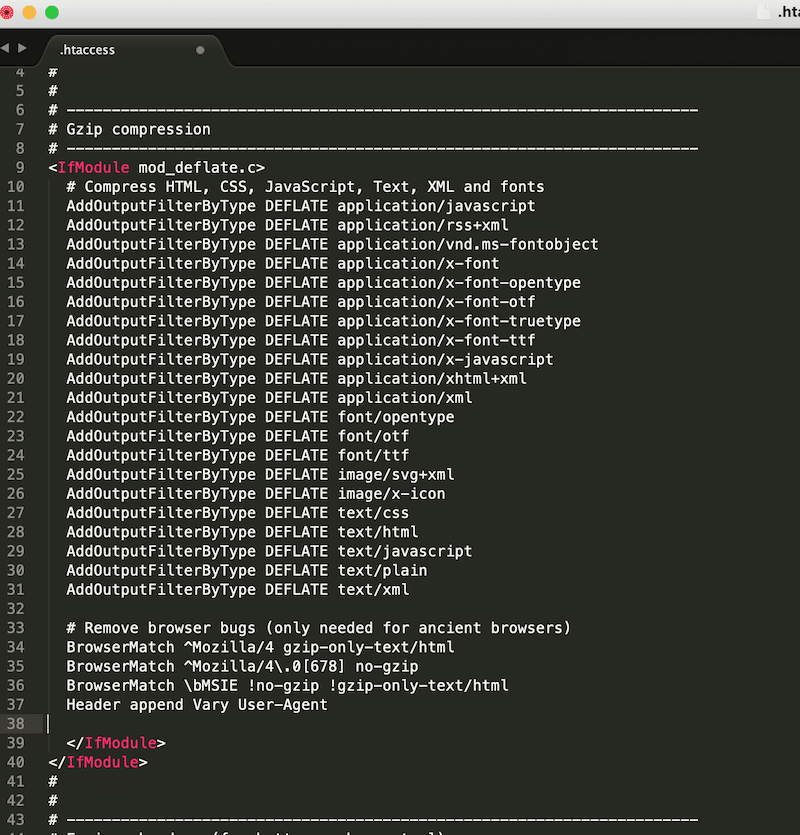
- Add the following lines of code at the top of the file. This code will tell the server which file types to compress.
<IfModule mod_deflate.c>

  # Compress HTML, CSS, JavaScript, Text, XML, and fonts

  AddOutputFilterByType DEFLATE application/javascript

  AddOutputFilterByType DEFLATE application/rss+xml

  AddOutputFilterByType DEFLATE application/vnd.ms-fontobject

  AddOutputFilterByType DEFLATE application/x-font

  AddOutputFilterByType DEFLATE application/x-font-opentype

  AddOutputFilterByType DEFLATE application/x-font-otf

  AddOutputFilterByType DEFLATE application/x-font-truetype

  AddOutputFilterByType DEFLATE application/x-font-ttf

  AddOutputFilterByType DEFLATE application/x-javascript

  AddOutputFilterByType DEFLATE application/xhtml+xml

  AddOutputFilterByType DEFLATE application/xml

  AddOutputFilterByType DEFLATE font/opentype

  AddOutputFilterByType DEFLATE font/otf

  AddOutputFilterByType DEFLATE font/ttf

  AddOutputFilterByType DEFLATE image/svg+xml

  AddOutputFilterByType DEFLATE image/x-icon

  AddOutputFilterByType DEFLATE text/css

  AddOutputFilterByType DEFLATE text/html

  AddOutputFilterByType DEFLATE text/javascript

  AddOutputFilterByType DEFLATE text/plain

  AddOutputFilterByType DEFLATE text/xml

# Remove browser bugs (only needed for ancient browsers)

  BrowserMatch ^Mozilla/4 gzip-only-text/html

  BrowserMatch ^Mozilla/4\.0[678] no-gzip

  BrowserMatch \bMSIE !no-gzip !gzip-only-text/html

  Header append Vary User-Agent

</IfModule>
Step 3: Save and Re-Upload the .htaccess File
- Your new .htaccess file should look like this:
- Save the changes.
How to Check if Gzip Compression Is Working (3 Ways)
Three easy methods exist to check if Gzip compression works on your site.
Method 1: Check Browser Dev Tools
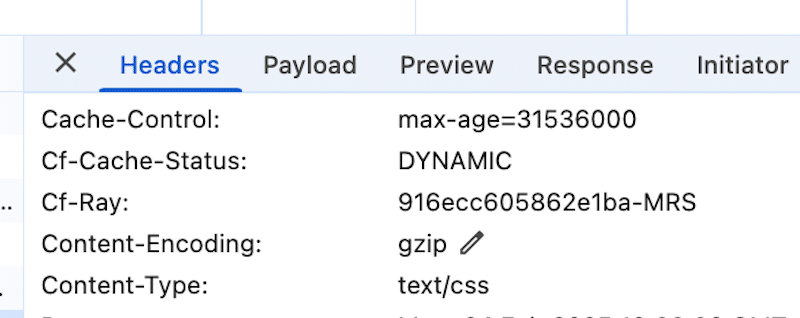
- Open your browser’s Developer Tools (F12 or Ctrl + Shift + I in Chrome).
- Go to the Network tab and select a file
- Check the Headers section. If you see “Content-Encoding: gzip“, then Gzip is active.
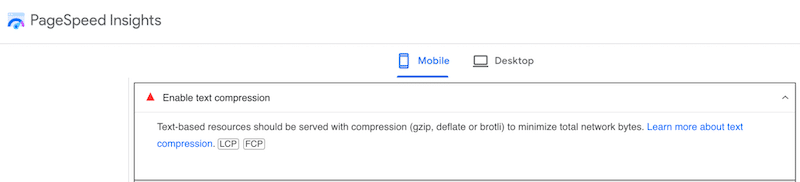
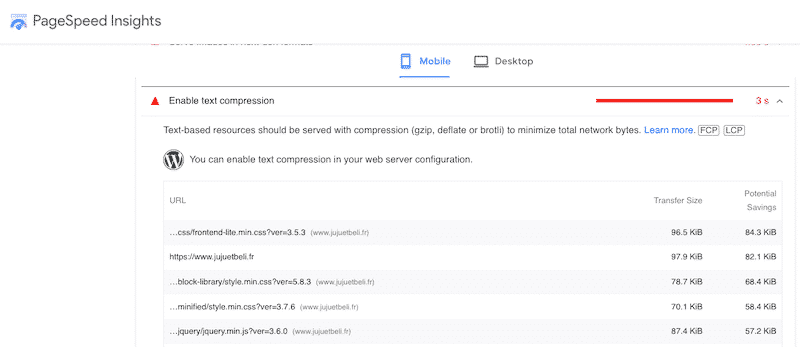
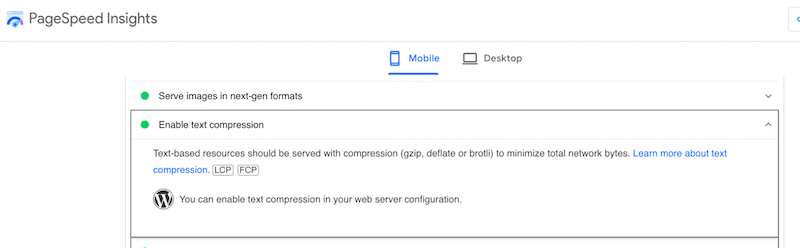
Method 2: Use PageSpeed Insights or GTmetrix
PageSpeed Insights and GTmetrix analyze website performance and Core Web Vitals using the Lighthouse technology. They include performance scores, recommendations, and actionable tips to improve your site speed. Here’s how to check if Gzip is activated on your site:
- Open PageSpeed Insights (you can follow the same steps with GTmetrix).
- Run a test and check the audit results.
- If you see a warning like “Enable text compression”, Gzip is not enabled.
- If Gzip is active, this audit should appear in the passed audits section.
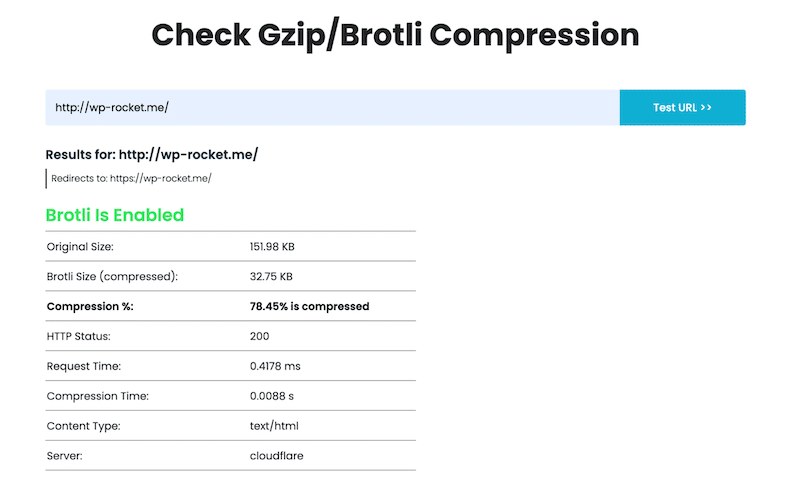
Method 3: Use an Online Gzip Test
An online Gzip test tool checks whether Gzip compression is active on your website. You enter your website’s URL, and the tool analyzes if your server is compressing files before sending them to visitors’ browsers.
- Go to the Gift of Speed Gzip Test.
- Enter your website URL.
- Run the test by clicking the Test URL >> button.
- Read the results: it will tell you if Gzip is enabled and how much compression is applied.
Troubleshooting Common Issues
Gzip compression usually works well, but it’s good to be aware of potential issues. Here are some common problems you might face with Gzip compression and how to fix them.
1. Not Seeing All Your Content Compressed
❌ Problem: After enabling Gzip, some content may not be compressed.
✅ Fix: Make sure you’ve listed the correct file types (HTML, CSS, JS) in your .htaccess file for compression.
2. Server Compatibility Issue
❌ Problem: Gzip compression with .htaccess works mainly on Apache servers. If you use a different server like Nginx or IIS, the .htaccess settings might not work.
✅ Fix: Contact your hosting provider or server admin to check if Gzip is supported and ask about any unique setup for your server.
3. Testing Tools
❌ Problem: When testing Gzip, some tools show it’s working, but others don’t.
✅ Fix: Use reliable testing tools, like browser developer tools or trusted online testers, to confirm Gzip is active and working.
4. Compatibility with CDN or Proxy Servers
❌ Problem: If you use a CDN or proxy server, Gzip might not work right if they have their own compression settings enabled.
✅ Fix: Check with your CDN or proxy provider to ensure Gzip settings are set up properly. You should adjust the settings on both your web server and the CDN/proxy server.
Bonus: How to Make Gzip Compression Easier on WordPress
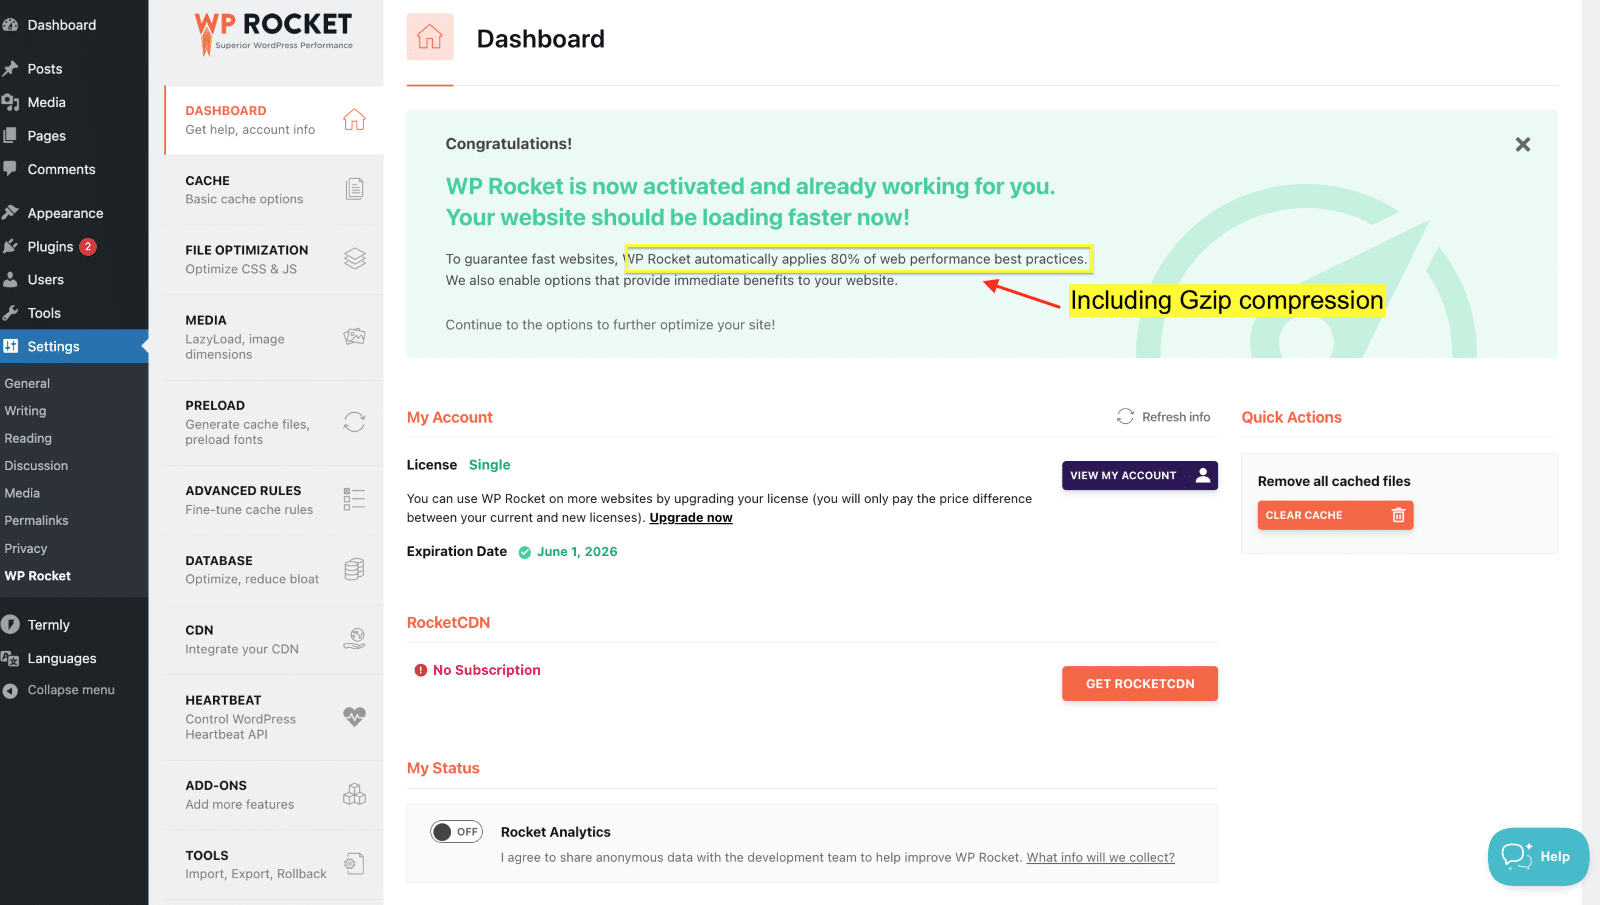
The easiest and safest way to enable Gzip compression on WordPress is to use a performance plugin like WP Rocket. The tool automatically applies over 80% of performance best practices when activated, and no technical skills are required.
As soon as it’s activated, WP Rocket automatically applies essential optimizations, such as page caching, browser caching, Gzip compression, preloading, critical image optimization and automatic lazy rendering.
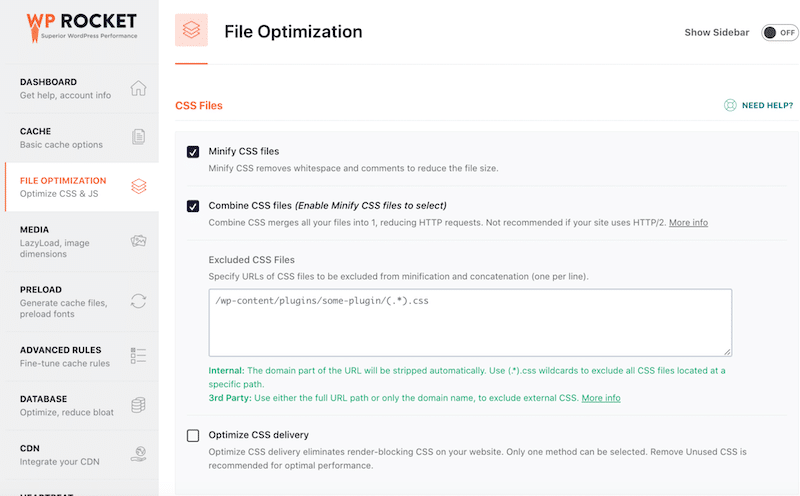
Upon activation, WP Rocket also minifies CSS and JavaScript files to reduce their size, preloads the cache and links to accelerate content delivery and reduce server load. On top, you can easily enable one-click features to further improve your website speed. Here’s how the CSS optimization tab looks like:
🚀 Manually tweaking server settings, editing the .htaccess file, or adding extra lines of code can be risky. One small mistake could break your site or take time to fix. WP Rocket handles the heavy lifting, making it a faster and safer solution for optimizing your site’s performance and enabling Gzip compression.
Wrapping Up
You can speed up your site instantly by enabling Gzip compression! Why wait? It’s a simple process that makes your files smaller, improving your loading speed and overall performance. You can do it manually with code via the .htaccess file or use a plugin like WP Rocket.
With WP Rocket, you don’t take any risks of breaking the code, and you can try it worry-free with the 14-day money-back guarantee.