Table of Contents
Last update on
If you run a WordPress website, there’s a good chance that you probably use at least one of Google’s many services. You might use Google Analytics and/or Search Console for stats, AdSense for monetization, PageSpeed Insights for performance analysis…you get the idea.
Google recognizes that 35% of the web is powered by WordPress and a lot of those WordPress webmasters are using Google services. So, to make lives easier for those webmasters, Google created an official plugin called Site Kit.
Site Kit can help you analyze your WordPress site’s performance with PageSpeed Insights, which ties in with what we do here at WP Rocket. But it also can help you do a lot more than that…
In this post, I will start off with an introduction to what Site Kit does, discuss its pros and cons, and then show you exactly how to set up the Google Site Kit plugin on your site.
What Does the Google Site Kit Plugin Do?
The Google Site Kit WordPress plugin helps you connect to six different Google services. For most of those services, it also helps you view data from that service inside your WordPress dashboard.
The six services that the Site Kit plugin helps you connect to are:
- Analytics
- Search Console
- AdSense
- PageSpeed Insights
- Optimize
- Tag Manager
For the first four, you will be able to view data from those services inside your WordPress dashboard. For example, you can:
- See your site’s performance in PageSpeed Insights.
- View Google Analytics and Search Console data for your entire website or specific pages.
- See your AdSense earnings (the plugin can also help you insert ads on your site in the first place).
For the last two, Optimize and Tag Manager, the Google Site Kit plugin helps you add the integration scripts to your site, but you will still need to use the external website to create/manage A/B tests and tags.
How to Set Up and Use the Google Site Kit WordPress Plugin
Before I show you how to install the Google Site Kit plugin on your site, I think it’s important to note that the plugin has mixed reviews at WordPress.org, with some people complaining about encountering issues setting up the plugin.
Personally, I’ve configured the Google Site Kit plugin twice at this point and the setup worked flawlessly both times, so I haven’t experienced any of those issues, though I did experience an issue with a specific feature both times, which I’ll mention below.
So with that out of the way, here’s how to set it up…
1. Install and Authorize Google Site Kit Plugin
To get started, install and activate the Site Kit plugin. It’s listed at WordPress.org, so you can install it right from your WordPress dashboard.
Next, you need to authorize your WordPress site with your Google account. After activating the plugin, you should see a prompt to start the setup:
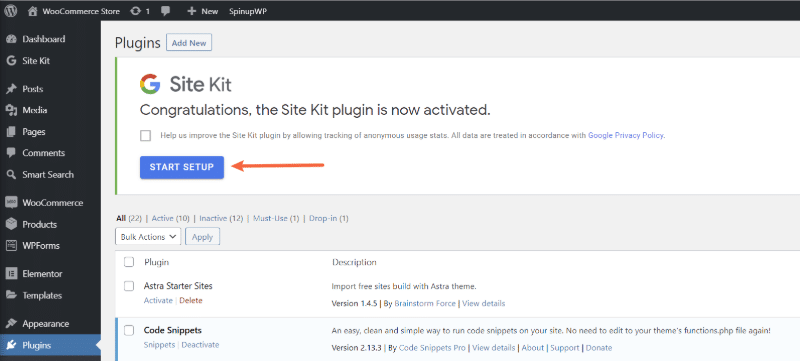
Clicking that button will take you outside your WordPress site to the Google Site Kit website. Click the Sign in with Google button to start the authorization process:
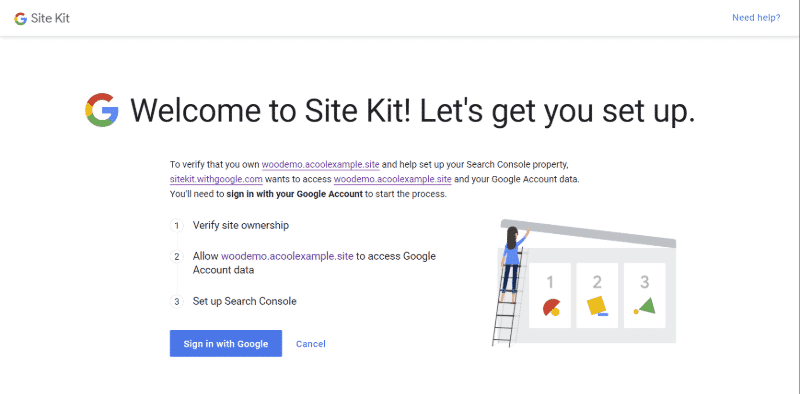
At this point, you will need to go through the normal Google authorization interface. This mainly involves selecting your Google account and clicking buttons that say Allow:
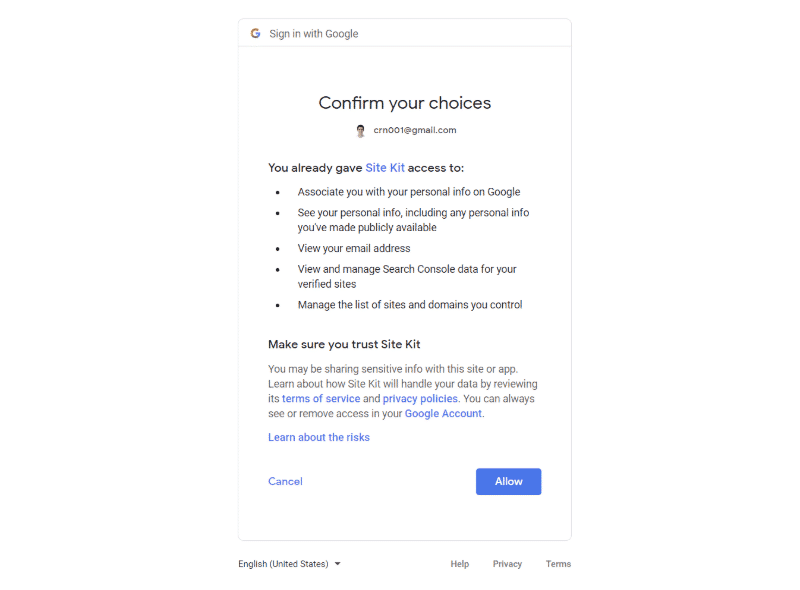
Then, you will need to authorize your WordPress site with Site Kit, which you can have the plugin do for you by clicking the Proceed button:
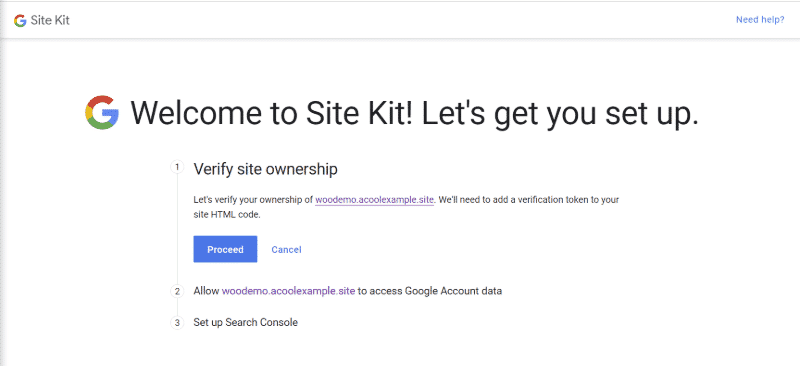
If you haven’t already set up Google Search Console for your website, you can also have Google automatically add your site to Search Console as part of this process:
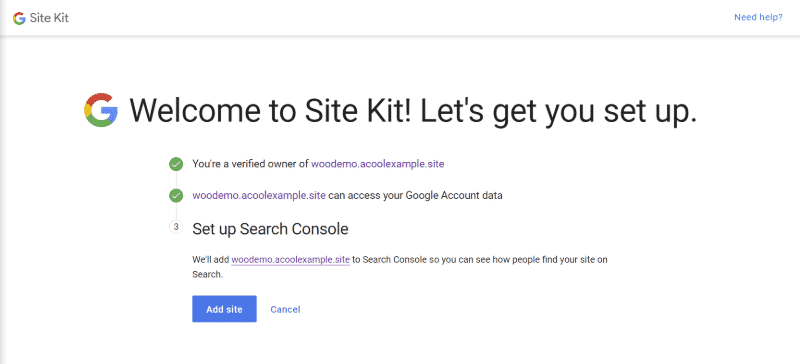
Once you finish the basic Site Kit setup process, you will see a prompt to go back to your WordPress dashboard.
2. Connect to Additional Services
At this point, your WordPress site is only connected to Google Search Console.
To connect to additional services, open the Google Site Kit plugin settings by going to Site Kit → Settings.
Then, click on the Connect More Services tab to access additional services.
To connect a service, click on the Set up…X button for that service. For example, Set up PageSpeed Insights:
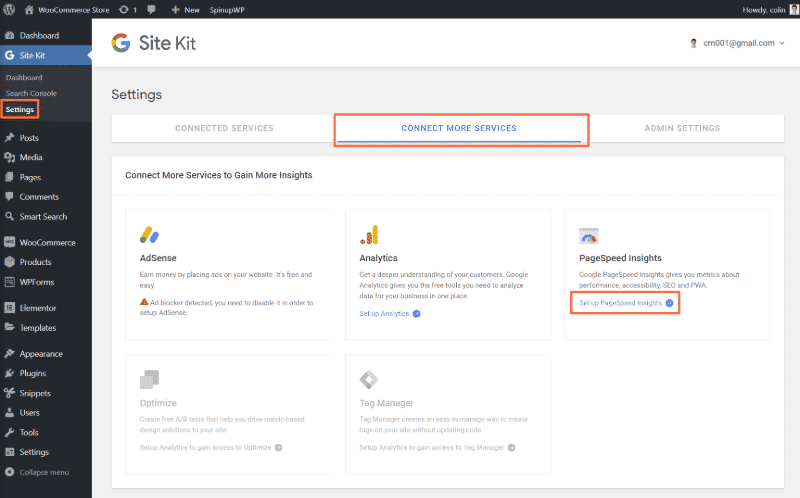
For some products, you might need to go through another authorization process to set things up. But like before, all you need to do is click a few buttons.
And that’s pretty much all there is to setting up the Google Site Kit WordPress plugin. Now, let’s check out how to use your new powers…
How to Use the Google Site Kit WordPress Plugin
To view data from all of the services that you’ve connected to, you will use the new Site Kit tab in your WordPress dashboard.
Dashboard
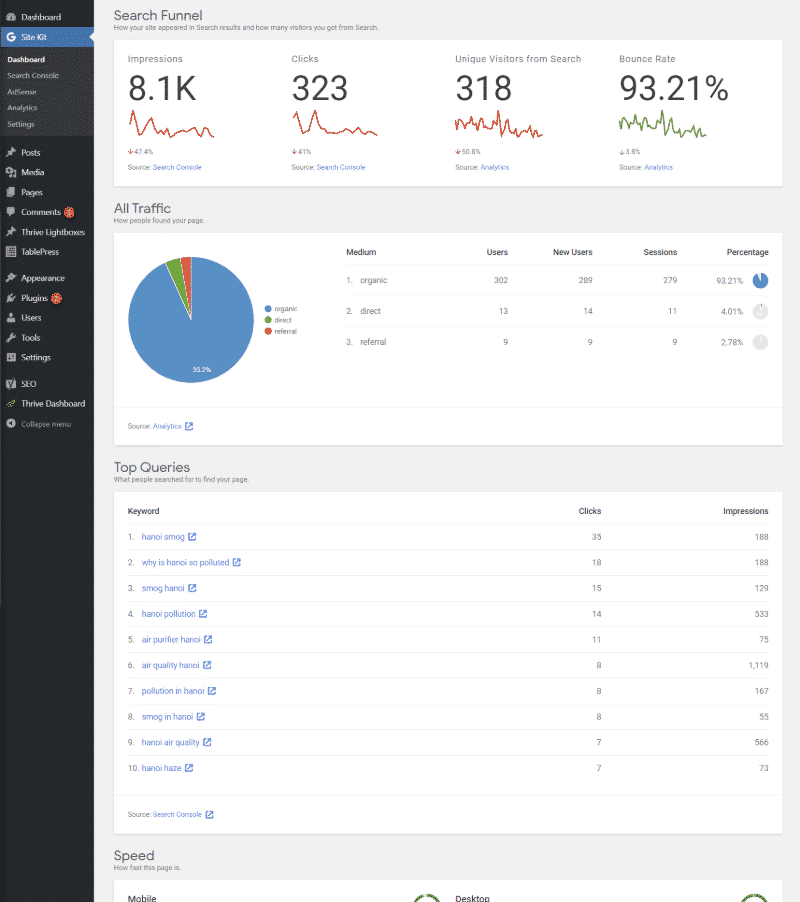
The main Dashboard shows you a sampling of high-level data from all of the services that you’ve connected to. For example, you will see:
- Overall traffic sources for your website
- Search funnel data
- Your most popular search queries and content:
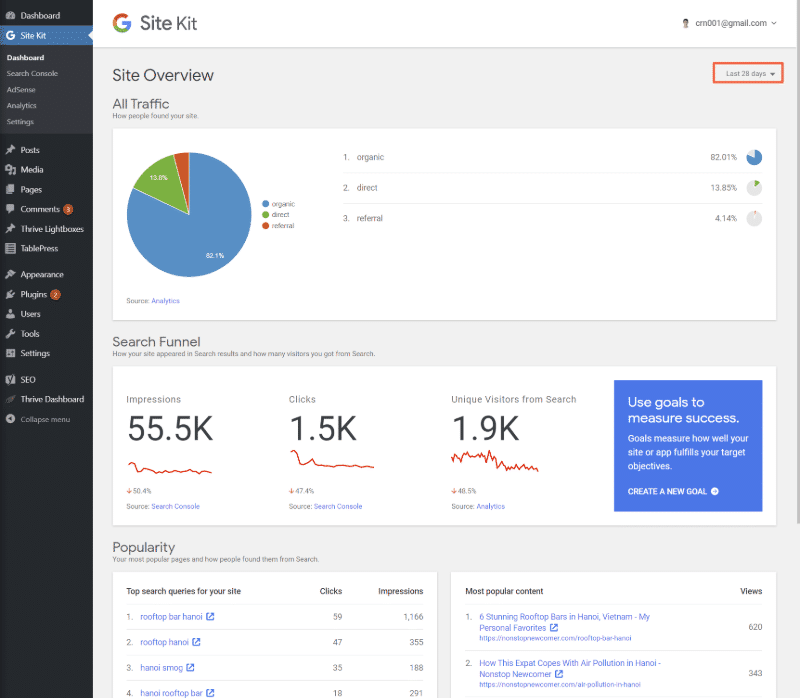
You can also use the toggle to change the time period that you’re looking at.
If you’re using AdSense, you will also see your earnings data here. And if you scroll all the way to the bottom, you will see performance data from PageSpeed Insights for your homepage:
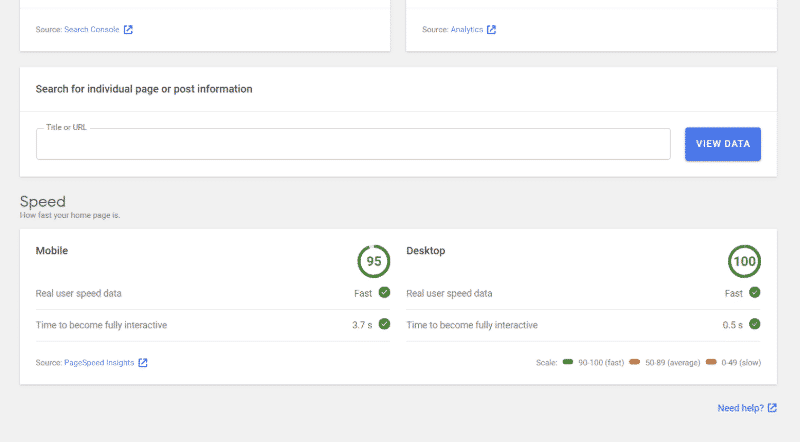
For more on how to interpret this data, check out our guide to PageSpeed Insights.
If you want to view information for a specific piece of content on your site, you can use the Search for individual page or post information box to search for a piece of content by name:
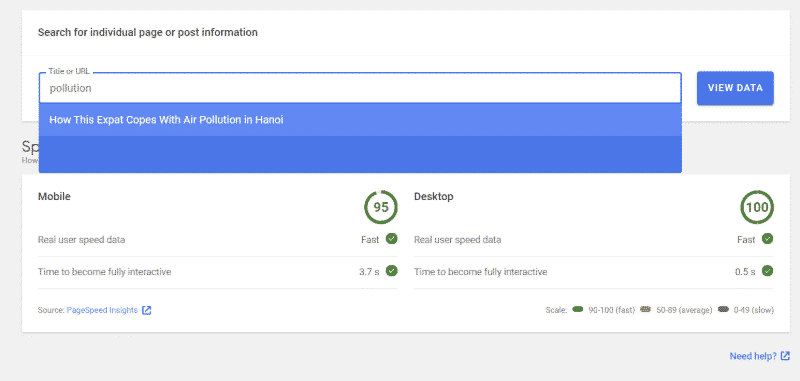
Then, you will be able to view detailed information for just that page, including its:
- Search funnel
- Traffic sources
- Top queries
- Performance (that is, the PageSpeed Insights report for this specific page, rather than your homepage)
Dedicated Tabs
Some of the services that you connect to also get their own dedicated tabs under the Site Kit menu.
You don’t get access to a lot of new information here – for example, the only new data in the Analytics tab is your audience overview.
But there is one helpful addition here that you might not notice right away:
The Site Kit plugin gives you direct links to open more information in the relevant service. For example, you can click to open a specific report in the full Google Analytics interface:
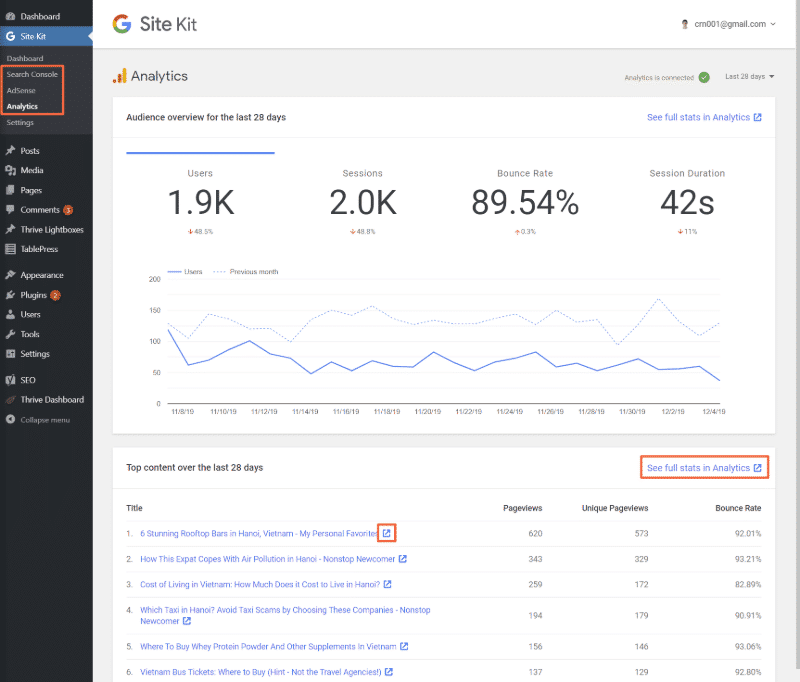
If you’re eagle-eyed, you might’ve noticed the same type of links in the main Dashboard. The links in the main dashboard are not the same though – those links just open your WordPress content on the front-end of your site.
Stats from the WordPress Toolbar
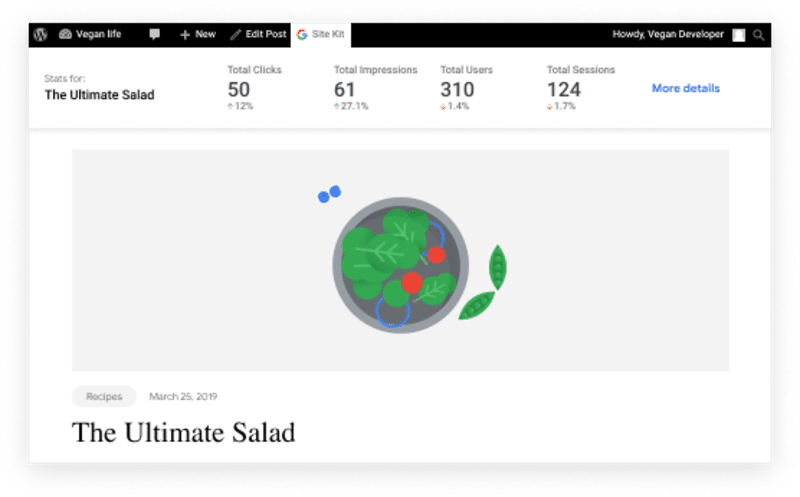
In addition to the backend dashboards, you can also view stats for a specific page from the front-end of your website via the WordPress toolbar.
However, I’ve tried the plugin on multiple sites and I couldn’t get the stats to load on any of them – the loading animation just kept going indefinitely:
Google does seem to be aware of issues with the toolbar button, so hopefully this will be fixed soon.
Here’s what this interface is supposed to look:
Pros and Cons of the Google Site Kit Plugin
Pros
- Combines many popular Google products into one interface in your WordPress dashboard.
- Very convenient to be able to view unified stats without leaving WordPress. For example, you can see both search queries from Search Console and analytics from Google Analytics.
- You can easily assess performance for different pages on your site thanks to the built-in PageSpeed Insights integration.
- Code-free setup process – all you do is click some buttons.
- 100% free and officially supported by Google.
Cons
- Not as detailed as some plugins built for specific services. For example, it can’t help you set up Google Analytics event tracking, which is something the popular Google Analytics plugins allow for.
- Google still seems to be working out some kinks, as evidenced by the WordPress.org reviews and my experience with stats in the WordPress toolbar. Hopefully this improves in the future.
Conclusion
Overall, the Google Site Kit WordPress plugin is a great new option for WordPress webmasters, as evidenced by the fact that it’s quickly grown to be used on over 200,000 WordPress sites.
While Google does seem to still be working out a few kinks, the core dashboard areas worked perfectly in my experience and I had no problem setting up the plugin on multiple sites.
It’s tough to beat the level of convenience that Site Kit offers, so this is definitely one that you should check out for your WordPress site.


