





How to Connect WP Rocket MCP to Codex
Table of Contents
By Valentina Orlandi - Last update on
We’re excited to introduce WP Rocket MCP, coming with our major release, WP Rocket 3.23: a secure connection that lets your AI assistant manage your entire site portfolio, all from one conversation.
If you manage multiple WordPress sites, checking performance means logging into one dashboard after another, after another. With WP Rocket MCP, it becomes easy and fast to ask Codex to check speed scores, get recommendations, apply changes, or generate performance reports across all your sites at once, without switching tabs, copy-pasting data, or logging in one site at a time.
🔒 Nothing changes on your site without your approval.
Let’s set it up: it only takes a few minutes.
You can watch the video or keep reading and discover all the steps.
What You’ll Need to Connect WP Rocket MCP to Codex
Before you start, make sure you have:
- Codex Desktop installed on your machine
- WP Rocket installed and active on your site
- Your website URL, WordPress username, and an application password (we’ll create this in Step 1)
- Node.js installed, since the connection runs on the `npx` command. This applies on both Mac and Windows. If you don’t have installed, we’ll explain how to do it in Step 2.
Your Step-by-Step Setup Guide
Step 1: Create an application password
- Log in to your WordPress dashboard and go to Users → Profile.
- Scroll down to Application Passwords.
- Give it a name, something like WP Rocket MCP, and click Add New.
- WordPress will generate a password. Copy it now and store it somewhere safe: it’s only shown once.
This password is what lets Codex connect securely to your site. You can revoke it at any time from the same screen.
Step 2: Check Node.js
5. Open Terminal (Mac) or Command Prompt (Windows).
6. Type:
npx If it returns a file path, you’re ready. If nothing comes back, install Node.js from nodejs.org and try again.
Step 3: Configure Codex
This is the main setup step. Take it slowly and double-check each part before saving.
- Open Codex, go to Settings, and select MCP Servers.
Note: If you’re on the new ChatGPT Desktop app, go to Settings, then to Plugins, on the menu right after the page title, and click on the MCPs tab.
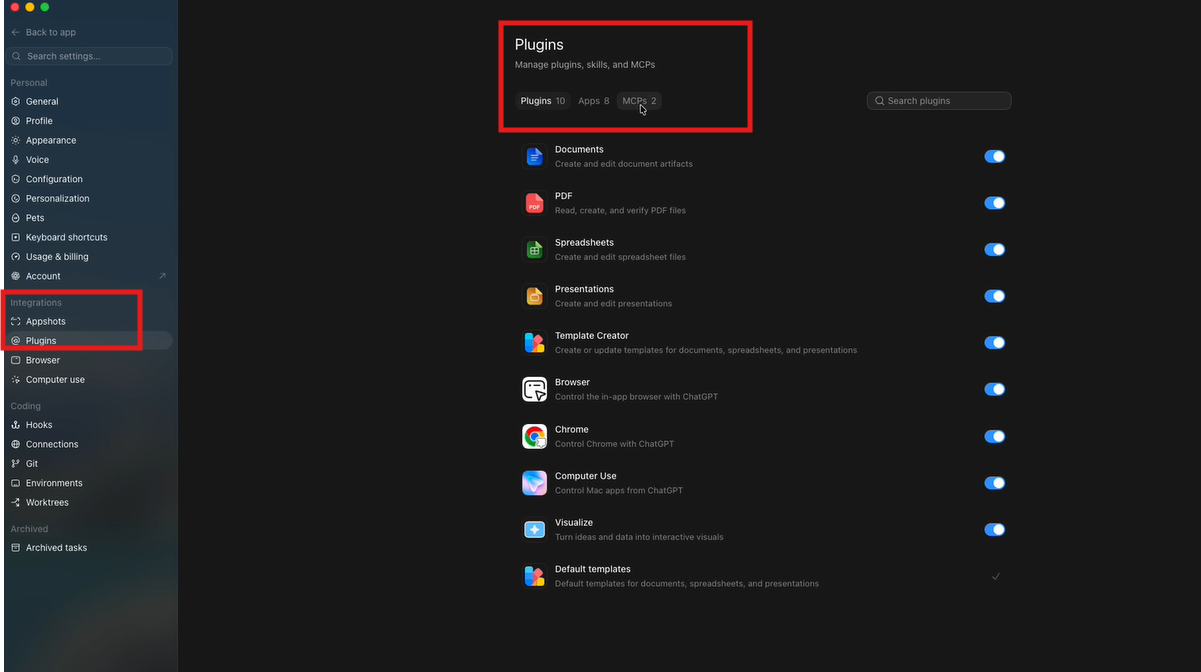
- Codex supports multiple MCP connection types. For WordPress MCP integrations, choose STDIO.
- In the form, give your connection a Name. We recommend using your website domain, so it’s easy to identify later.
- For Command to launch, enter `npx`.
- Add the Arguments and Environment Variables below:
Command to launch: npx
Arguments:
-y
@automattic/mcp-wordpress-remote@latest

Environment Variables:
   WP_API_URL: https://YOUR_SITE_URL/wp-json/mcp/mcp-adapter-default-server
   WP_API_USERNAME: YOUR_WORDPRESS_USERNAME
   WP_API_PASSWORD: YOUR_APPLICATION_PASSWORD
6. Replace the placeholders with your own details:
| Placeholder | Replace with |
| YOUR_SITE_URL | Your website’s full URL |
| YOUR_WORDPRESS_USERNAME | Your WordPress username |
| YOUR_APPLICATION_PASSWORD | The password you generated in Step 1 |
- Take a moment to review your configuration and double-check every value, then click Save.
- Go back to the MCP Servers page, find your new server in the list, and click Restart. Codex reloads its MCP servers automatically, so this only takes a few seconds.
⚠️ Common mistakes to avoid: choosing the wrong connection type instead of STDIO, leaving a placeholder in one of the Environment Variables, or forgetting to click Restart after saving. Any of these will stop the connection from working.
Step 4: Verify the connection
- Click Back to app to leave the Settings screen, then start a New Chat.
- Ask Codex: “What MCP tools are available from my WordPress site?”
If it’s working, Codex will list the WP Rocket MCP abilities available to it, such as reading your Rocket Insights scores, adjusting settings, measuring the impact of changes, and more.
Now try your first real prompt
Now for the payoff. Ask Codex something like:
"What is my speed score?" Codex will pull your real performance data straight from Rocket Insights and give you an actual answer: no dashboard, no copy-pasting, just a conversation.
From here, you can ask Codex to:
- Summarize your latest performance report
- Identify which recommendations to apply first
- Enable a specific WP Rocket feature
- Generate a full performance report for a client.
Managing multiple sites
If you manage multiple sites, just repeat Step 3 to add another server entry for each client site, using a different Name and WP_API_URL each time. Codex will be able to work across all of them in the same conversation. Check on a client portfolio, compare scores, or create tailored reports without switching between dashboards.
What’s Next?
That’s it! One setup, and Codex can help you monitor, troubleshoot, and report on your sites, all grounded in your real Rocket Insights data. Nothing changes without your approval.
Want to see it in action? Check out our blog post on all ways to use WP Rocket MCP, from automated client reports to getting performance checks on a daily basis. 🚀
