Table of Contents
Last update on
Are you getting the HTTP error 500 on your WordPress site? It can be frustrating and alarming, but don’t worry—this article is here to assist you in troubleshooting it easily.
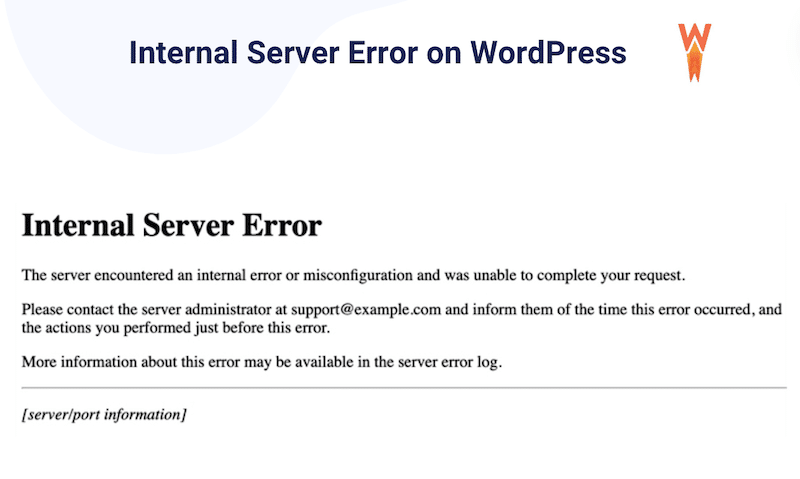
We’ll help you identify the cause of this 500 Internal Server Error and explain some of the typical reasons behind it. Additionally, we’ll provide you with valuable tips to fix the HTTP error 500, enabling you to restore your WordPress site to smooth operation quickly.
Let’s troubleshoot together!
What is a 500 Internal Server Error on WordPress?
An HTTP 500 Internal Server Error on WordPress is a generic error message that indicates something unexpected has happened on the server side. It is a common issue that prevents the server from fulfilling the request made by your WordPress site.
Given its lack of specificity regarding the underlying problem, it falls upon you to identify the root cause of the error. Most of the time, this error can occur due to one of these 6 reasons:
6 Common Reasons for the HTTP 500 Internal Server Error
- Plugin or Theme Conflict
Internal server errors (error 500) often result from conflicts among plugins or themes. This means that certain plugins or functions within your WordPress theme may be incompatible with each other or with the server environment, causing the server to encounter errors while processing requests.
- Corrupted or Broken .htaccess File
An internal error 500 can occur if the .htaccess file, which is crucial for configuring server settings and URL rewriting, becomes corrupted or contains incorrect directives. Problems in the .htaccess file can disrupt the server’s ability to process requests properly, resulting in the error 500.
- Insufficient PHP Memory Limit
Insufficient PHP memory allocation can lead to an internal server error 500, especially when running resource-intensive scripts or plugins. When PHP scripts require more memory than the allocated limit, the server will fail to execute them.
- Server Configuration Issues
Misconfigurations in the server environment, such as conflicting directives in the Apache or Nginx configuration files, can trigger internal server errors.
- Permissions Errors
Permissions errors occur when the server can’t access or execute certain files required by the WordPress installation. Incorrect file permissions or ownership settings can result in the server being unable to serve content properly; causing the error 500.
- Database Connection Problems
A breakdown in the connection between WordPress and its database can result in internal server errors. Issues such as incorrect database credentials, server downtime, or database corruption can disrupt communication between WordPress and the database, leading to the error 500 when attempting to access the site’s content.
Why You Should Fix the 500 Internal Server Error
Permanent 500 errors not only prevent users from accessing your site but can also significantly impact performance and SEO, potentially affecting your site’s ranking in search engine results.
Impact on Performance
Resolving the 500 Internal Server Error is crucial as the underlying causes may significantly impact the website’s performance. If the error stems from resource-related issues, such as inadequate PHP memory allocation or server configuration problems, the website will not be able to handle incoming requests efficiently.
Impact on SEO
500 Internal Server Errors can have negative effects on the website’s search engine optimization (SEO) efforts. When pages on the website are temporarily or permanently unavailable due to these errors, improper headers may be returned to search engine crawlers. This will impact how search engines index and rank the site’s content: search engines like Google could remove affected pages or even the entire site from their index.
How to Check and Identify What’s Causing the 500 Error on WordPress
Now that you understand the potential causes and the importance of resolving a 500 error, there are two effective methods to check and identify what’s causing this error:
| ⚠️ We recommend you do a backup of your WordPress site before initiating any of the actions below. |
Use WP Debugging to Investigate the Issue
- Log into your server via FTP.
- Edit the wp-config.php.
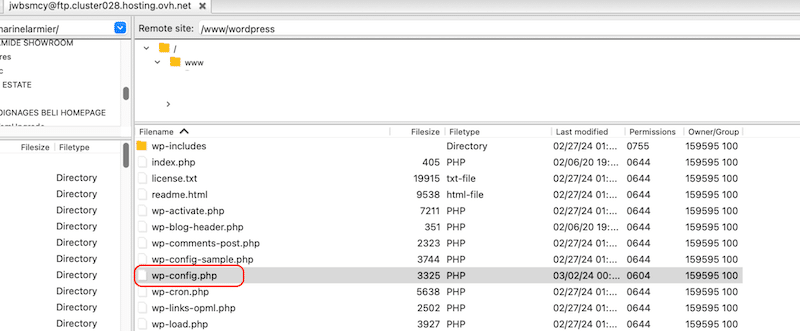
- Near the bottom of the file, you’ll see the following:
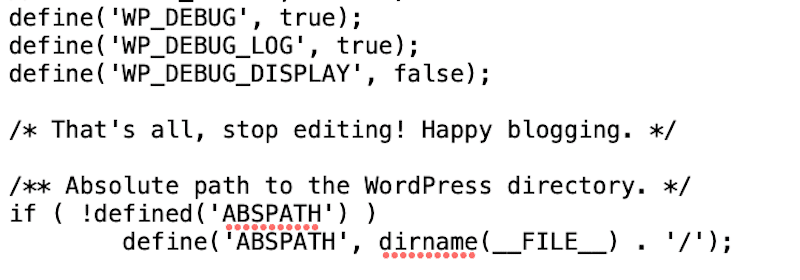
define('WP_DEBUG', false);- Adjust that line to these three lines:
define('WP_DEBUG', true);
define('WP_DEBUG_LOG', true);
define('WP_DEBUG_DISPLAY', false);
Examine the Server’s Error Log
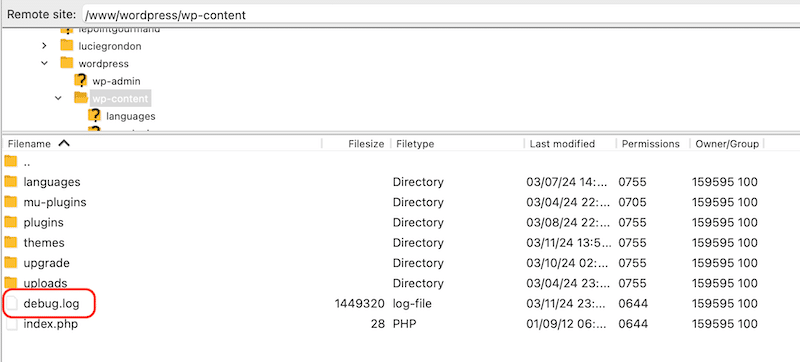
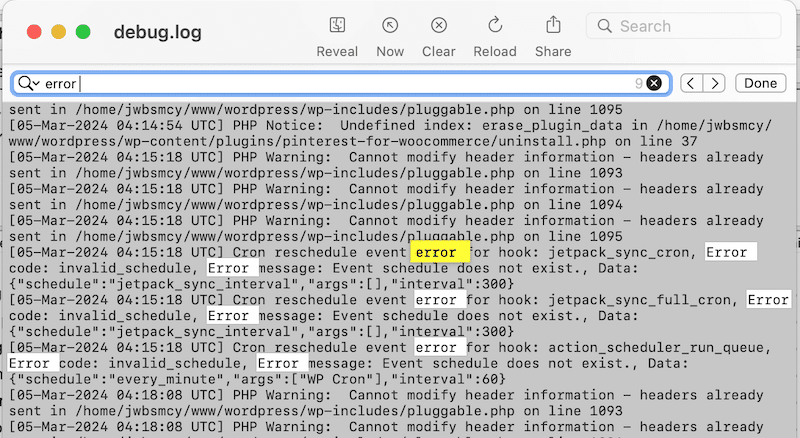
When you are done with the steps below, you will find the results in the server error logs – named debug.log.
- From FTP, Locate the debug.log folder in the /wp-content/directory.
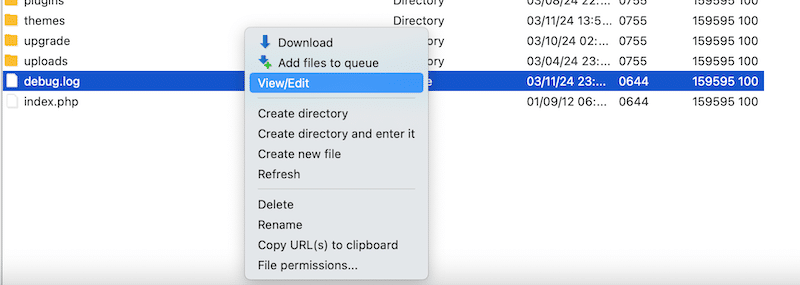
- Do a right-click on the file and choose View/Edit to see what’s causing the error. Alternatively, you can also download it and send it to the developers.
- Look for any recent errors.
8 Effective Ways to Fix the HTTP 500 Error on Your WordPress Website
Here are 8 proven methods to resolve the HTTP 500 error on your WordPress website.
- Clear Browser Cache and Cookies
- Clear WordPress Cache
- Check Your Themes and Plugins
- Check If Your .Htaccess File Is Corrupted or Broken
- Check PHP and Increase the Memory Limit
- Check File Permissions
- Reinstall WordPress Core Files
- Contact Your Web Host
First things first: Do a backup
Before implementing any of the solutions mentioned below, we strongly advise you to perform a backup of your WordPress website. Some solutions may require adding code to PHP files, which can potentially affect your site’s functionality. To ensure that you can revert to a previous state if needed, it’s crucial to have a recent backup available.
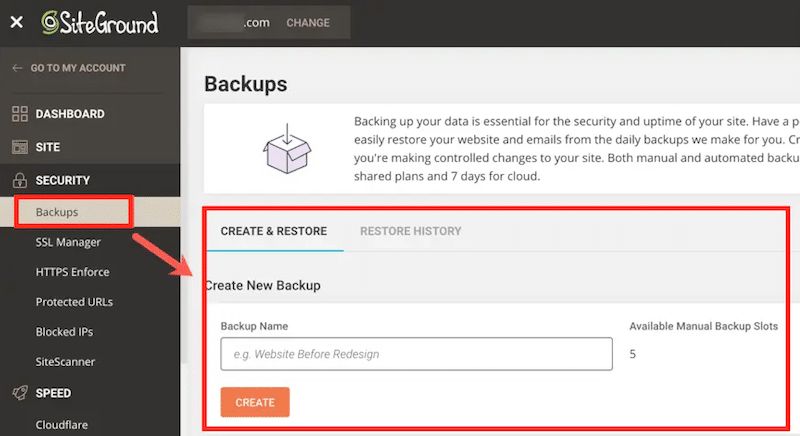
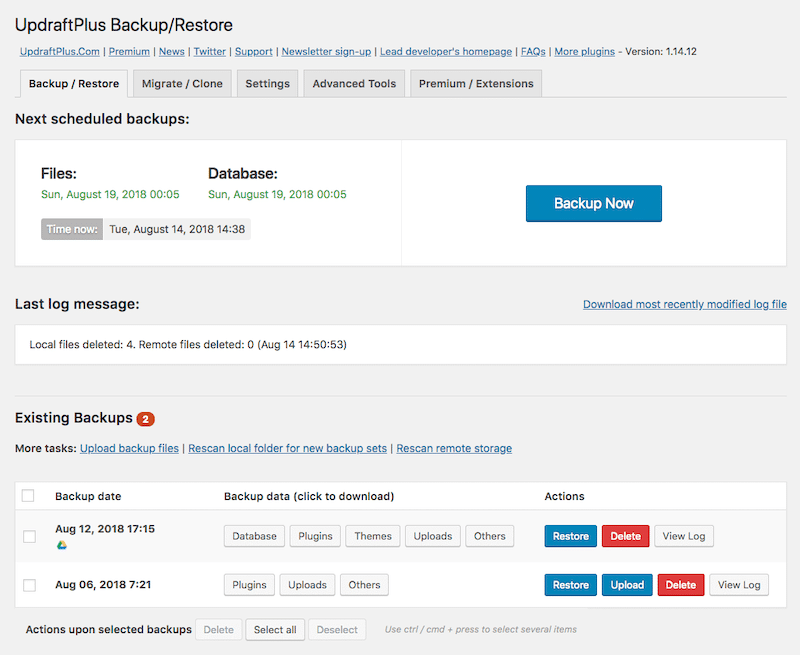
Here are two easy ways to create a backup:
- From your hosting panel (cPanel). On Siteground, for example, you can go to your cPanel > Security > Backups > Create new.
- Using a WordPress plugin like Updraftplus that allows you to back up and restore your site in a few clicks directly from your WordPress admin:
1. Clear Browser Cache and Cookies
Browser caching speeds up your website for visitors who browse multiple pages or return frequently by storing files locally in their browser. Clearing your browser’s cache and cookies can sometimes help resolve the 500 internal server error.
| 🚀 If you are looking to give an extra speed boost to your WordPress site, consider using WP Rocket: it automatically enables browser caching. |
Here’s how to clear the browser cache on Chrome:
- Open Google Chrome options (the 3 dots on the top right corner of your Chrome page).
- Click on Clear Browsing Data.
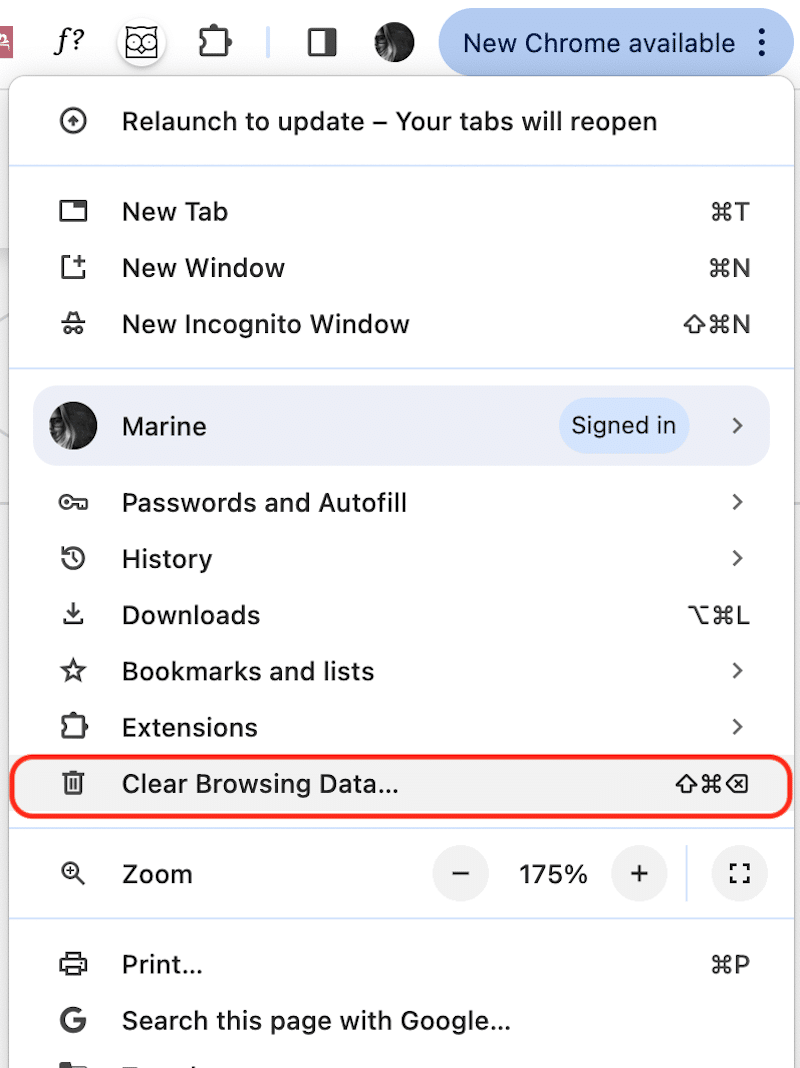
- Check the three boxes to clear the cookies and other site data and clear the cache.
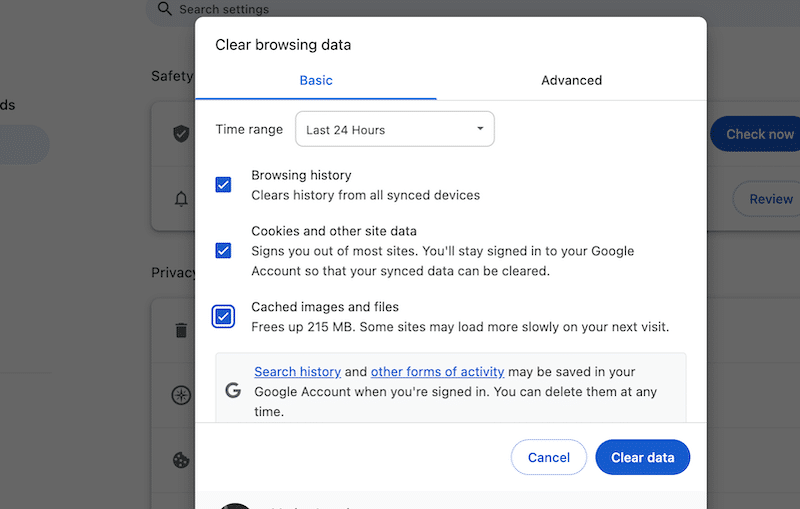
- Press the Clear data button.
| 📖 If you are using another browser check our full guide about how to clear the browser cache. |
2. Clear WordPress Cache
To fix the WordPress 500 internal server error, you can clear your WordPress cache using a plugin like WP Rocket. Here’s why it helps:
WP Rocket and similar caching plugins store temporary copies of your website’s pages. These copies speed up your site’s loading time by showing pre-made pages instead of creating them each time someone visits your site. However, these cached versions can sometimes become corrupted or outdated, leading to errors like the 500 Internal Server Error.
Clearing the WordPress cache refreshes these cached versions and ensures that your website displays the latest and error-free content to visitors.
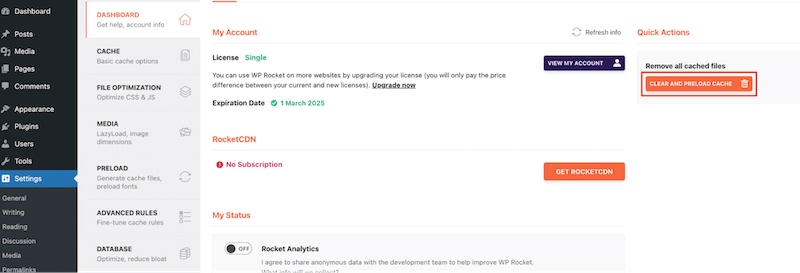
Here’s how to clear the cache on WordPress with WP Rocket:
- Go to Settings > WP Rocket.
- Stay on the Dashboard section.
- In the Quick Actions section click on the Clear and preload cache button.
3. Deactivate Your Plugins One by One and Check Your Theme
Deactivating your plugins one by one and checking your current theme is another effective way to fix the 500 Internal Server Error.
Plugins and themes can sometimes conflict with each other or with WordPress itself, causing errors like the 500 Internal Server Error. By deactivating your plugins one by one, you can identify which plugin is causing the issue.
| 💡 As a golden rule, it’s essential to avoid using an excessive number of plugins to prevent any negative impact on the performance of your WordPress site. |
Once the problematic plugin or theme is identified, you can either update it, replace it, or seek support from the plugin developers to resolve the conflict.
If you can access your admin panel:
To diagnose whether a plugin or theme conflict triggers the 500 Server Error, deactivate all plugins and reactivate them one by one while checking the site’s front end after each activation. (Go to Plugins > Installed Plugins > Deactivate).
In addition, you can switch to a default WordPress theme like 2022 or 2023 and observe if the error persists (Go to Appearance > Themes > Deactivate).
If you can’t access your admin panel:
You can manually reset your plugins without dashboard access from PHPmyAdmin or FTP.
Disable a WordPress Plugin Via phpMyAdmin
- Go to your phpMyAdmin and open the wp_options directory.
- Find the plugins.
- Double-click the field active_plugins.

- Uncheck the plugins you wish to deactivate one by one.
- Remove all content and press enter to save, this will deactivate the plugin.
Disable a WordPress Plugin Via FTP
To temporarily deactivate a WordPress plugin during troubleshooting, you may utilize FTP. If accessing WordPress becomes challenging, disabling plugins via FTP is an effective alternative. Although various FTP applications are available, the following steps outline how to disable plugins using FileZilla:
- Establish an FTP connection to your hosting server.
- Navigate to the /wp-content/plugins directory.

- Choose the folder corresponding to the plugin you wish to deactivate and either select and hold or right-click on it.
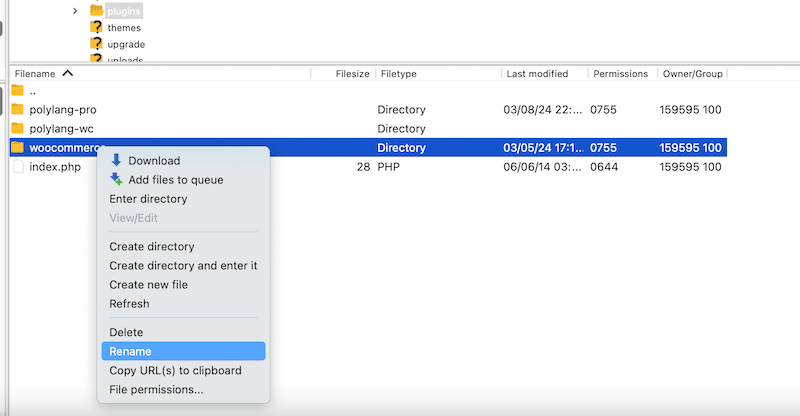
- Rename it with the suffix .renamed to the folder name.
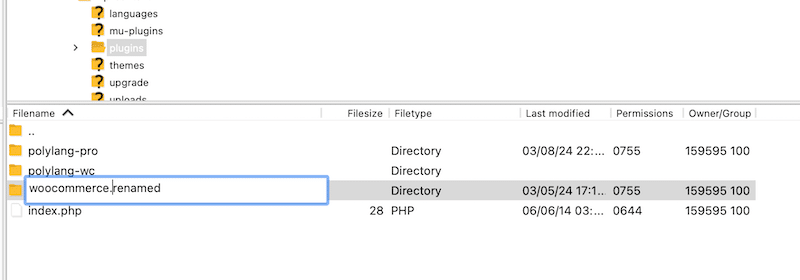
- This action effectively deactivates the plugin.
Disable a WordPress Theme via FTP
- Head to your themes directory folder.
- Choose the theme you want to delete.
- Right-click on it and rename it with the .renamed extension.
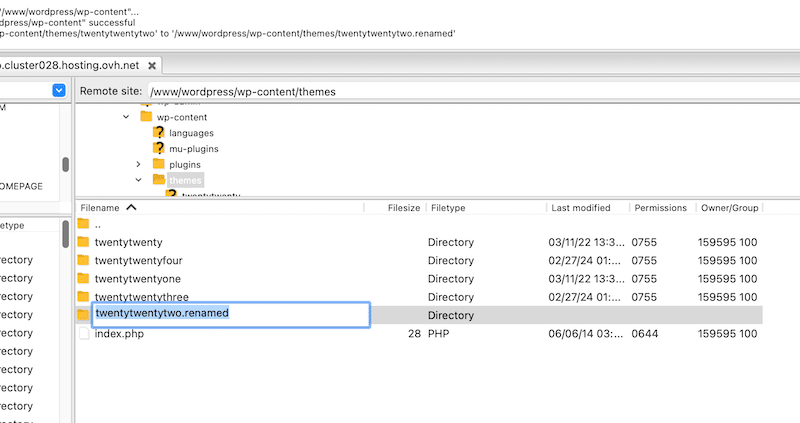
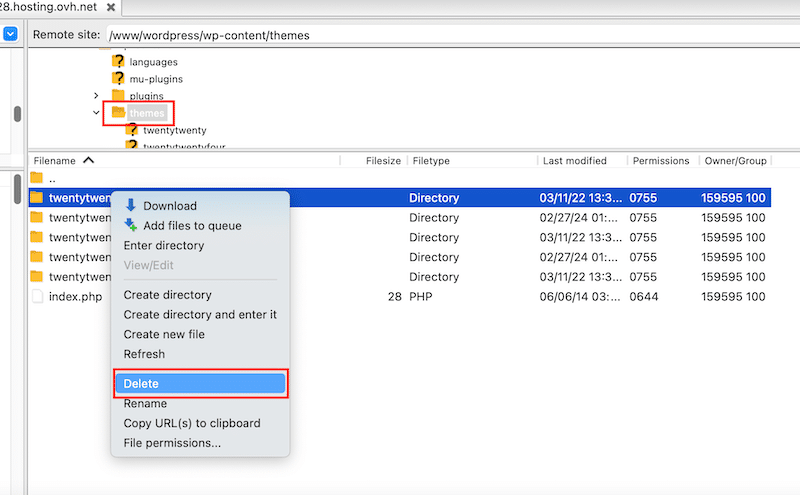
Note: If you find out that your theme is the culprit, you can delete it by clicking on the Delete button. Always do a backup before doing such an action.
4. Check If Your .Htaccess File Is Corrupted or Broken
To check if your .htaccess file is responsible for the 500 Internal Server Error, follow these steps:
- Access Your WordPress Files using FTP or access your hosting account’s file manager to navigate to the root directory of your WordPress installation.
- Locate the .htaccess file in the root directory.
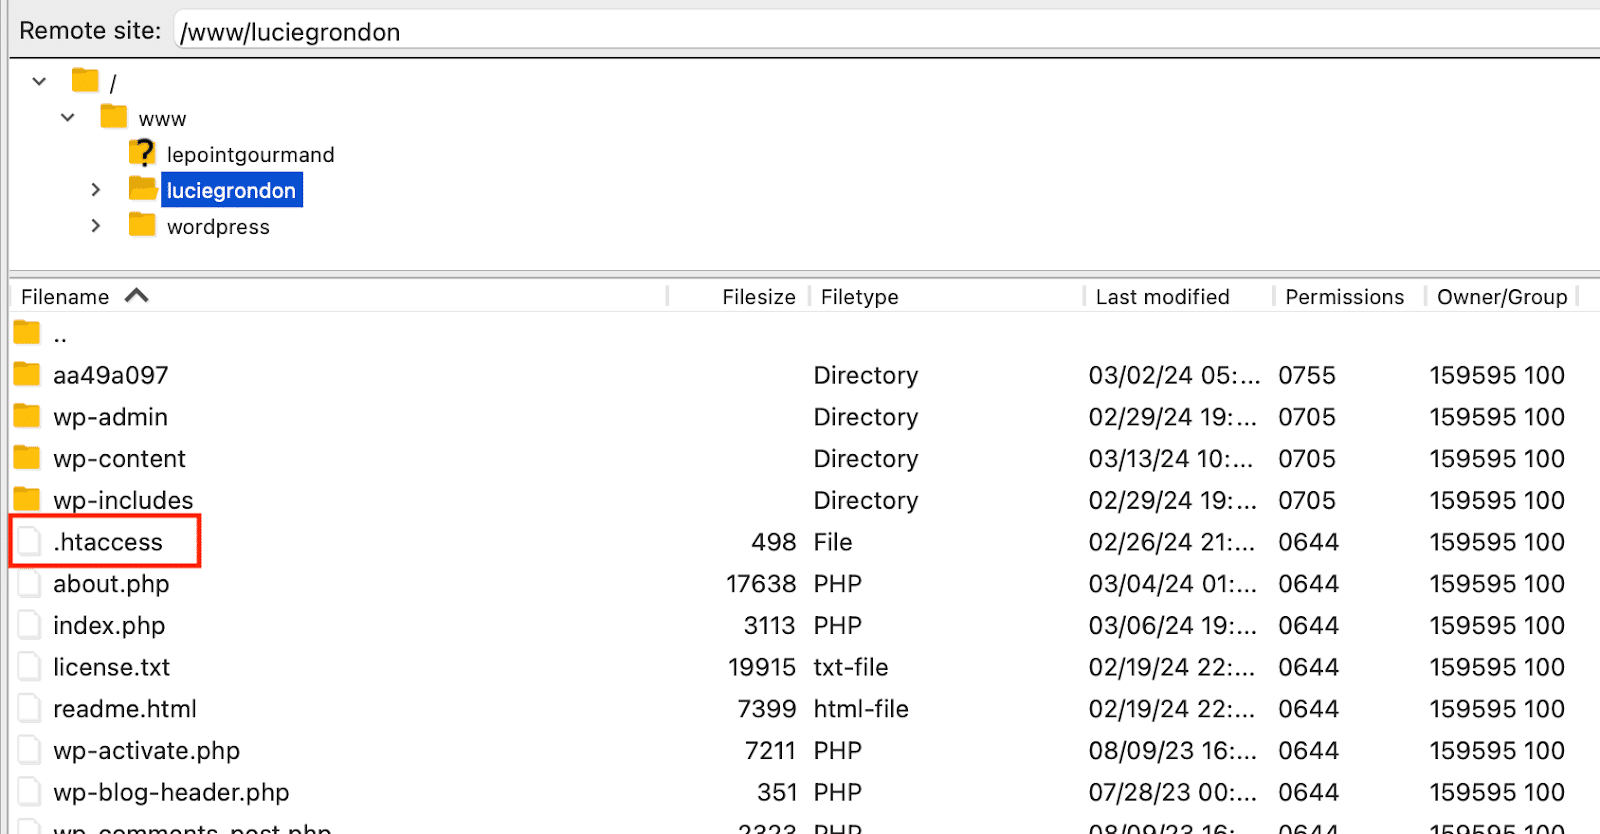
- Download it and save it from the live server to your computer.
- Use any text editor, such as Sublime Text, to open this file.
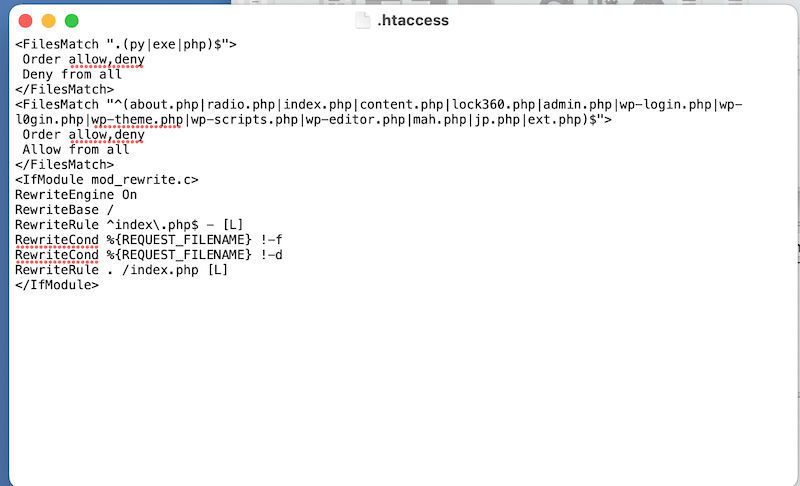
- Visit .htaccess on WordPress.org and choose the appropriate version of the code for your website, as shown below.
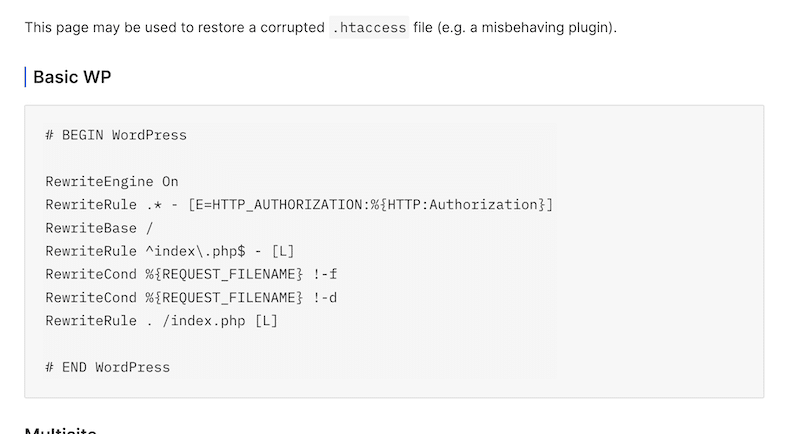
- Copy/paste this code and save it on your .htaccess file.
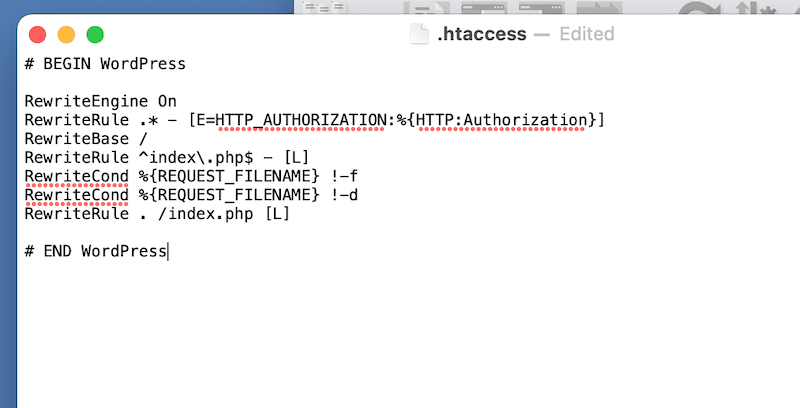
- Re-upload it to your web server.
Reload your site to see if the 500 Internal Server Error is fixed or if you need to continue the troubleshooting process.
5. Check PHP and Increase the Memory Limit
Follow these two recommendations to address the 500 Internal Server Error issue related to PHP: increase the PHP memory limit and ensure compatibility with the PHP version.
Increase PHP Memory Limit
Adjust the PHP memory limit to accommodate your WordPress site needs. This can be done by editing the functions.php or the wp-config.php file.
Increase PHP Memory Limit via FTP With the Functions.php File
- Open your FTP and locate your functions.php file.
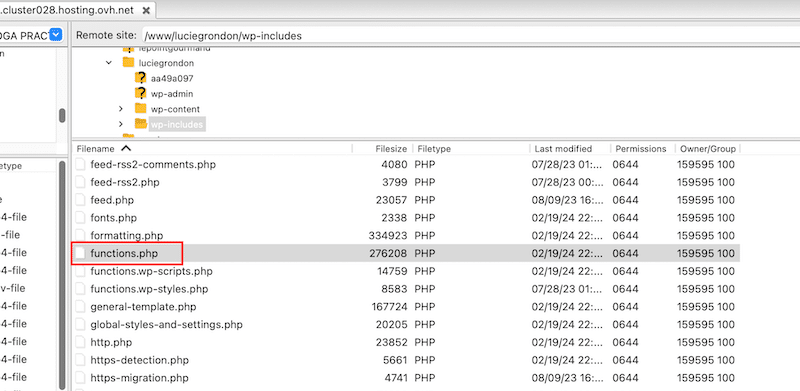
- Right-click the file and click Download. Open it in your text editor and add the following code when the PHP tag starts.
Increase PHP Memory Limit via FTP With the Config File
- Open your FTP and locate your wp-config.php file.
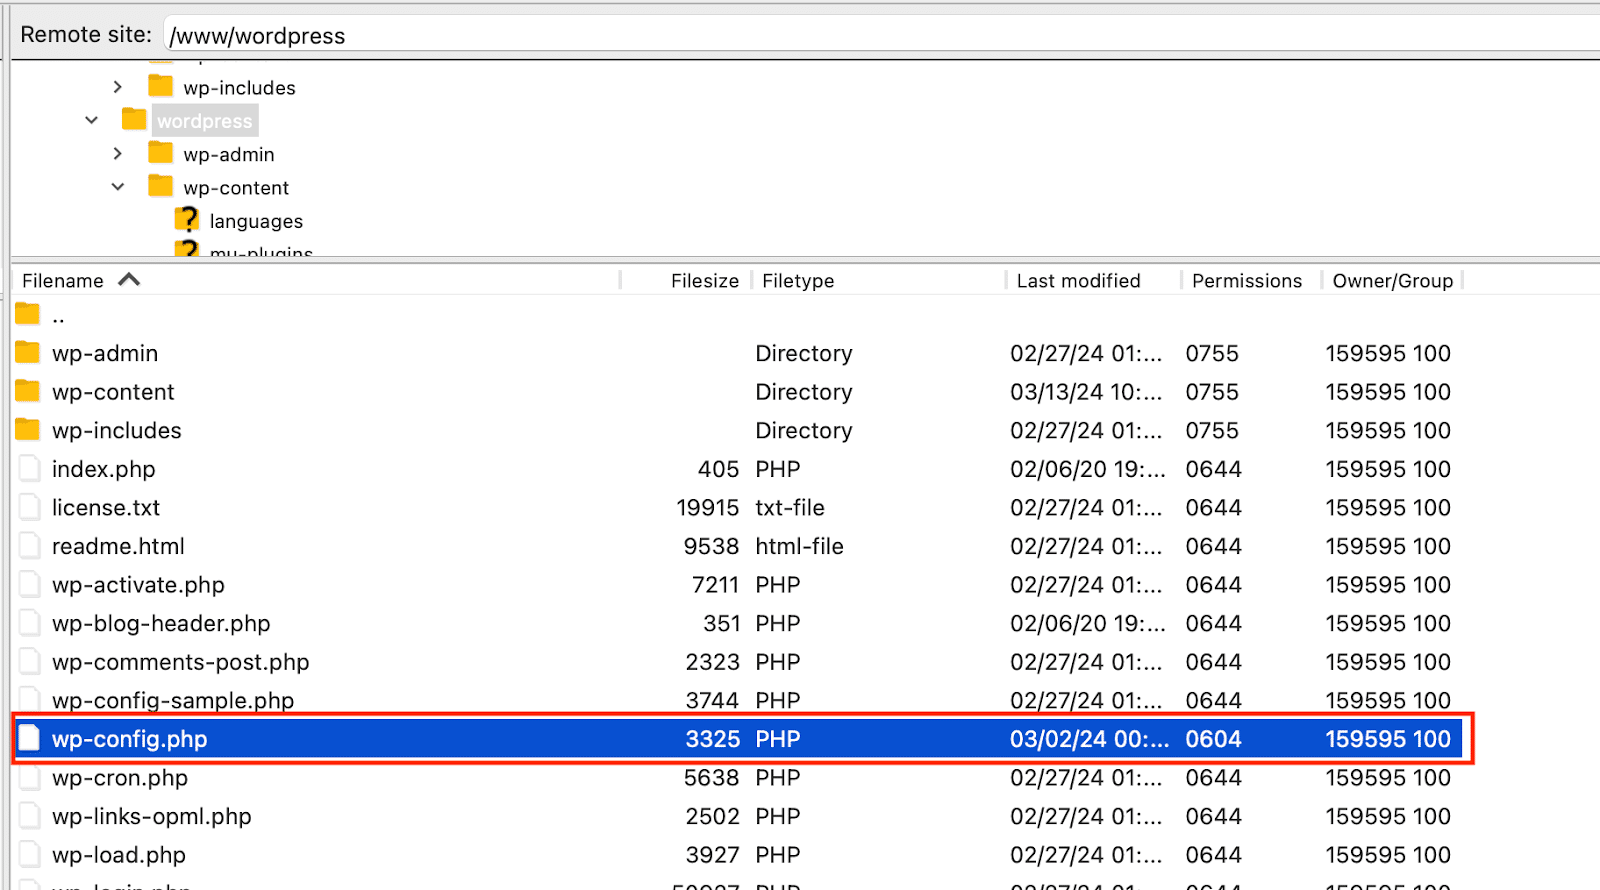
- Open the wp-config.php file in your text editor and add the following code at the opening PHP tag:
ini_set(‘post_max_size’,’64M’);Ensure Compatibility With the PHP Version
Verify that your WordPress site is compatible with the PHP version you’re using and upgrade to a compatible PHP version if necessary.
Additionally, updating PHP to version 7 is essential for enhancing your website’s performance. PHP 7 offers significant improvements in terms of speed, efficiency, and overall performance compared to earlier versions.
Getting an Error 500 After the PHP Upgrade
If you encounter the 500 error after upgrading PHP, several common causes may be at play. Here’s how to troubleshoot errors post-PHP upgrade:
- Check plugin or theme compatibility issues by deactivating them one by one.
- Increase your PHP memory limit.
6. Check File Permissions
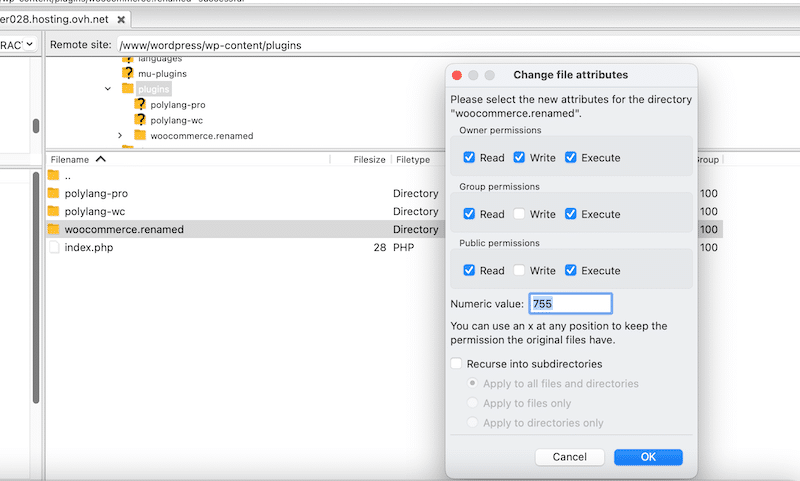
Are you still encountering the 500 Internal Server Error? It could be due to file permission issues. The files in your WordPress directory should have permissions set to either 755 or 644. If they’re mistakenly set to anything else, it can trigger a 500 error. Here’s how to check your file permissions:
- Access your server via FTP and navigate to your site’s directory.
- Right-click on the file and select the File permissions options.
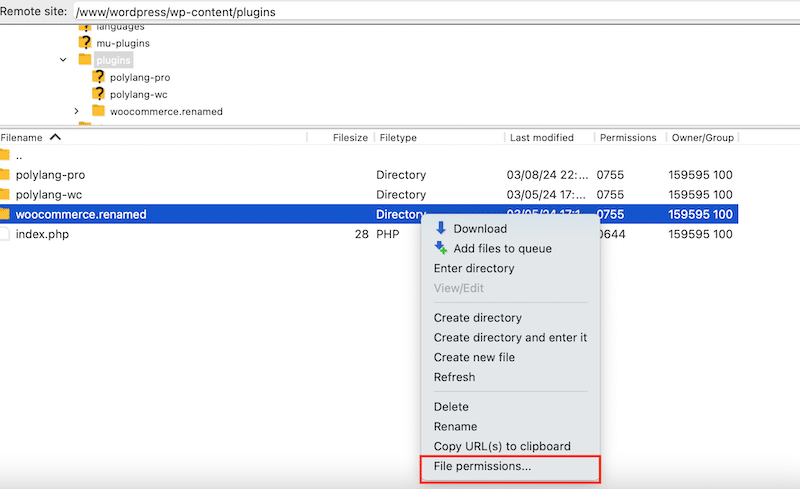
For example, I’m using Filezilla to access my test site, where permissions are set to 755 for folders:
7. Reinstall WordPress Core Files
Reinstalling the core WordPress files can often resolve the 500 Internal Server Error. There are two options you can follow to reinstall these files, both of them will replace the core files with fresh copies without affecting your content or settings:
Option 1: Reinstalling via the WordPress Dashboard
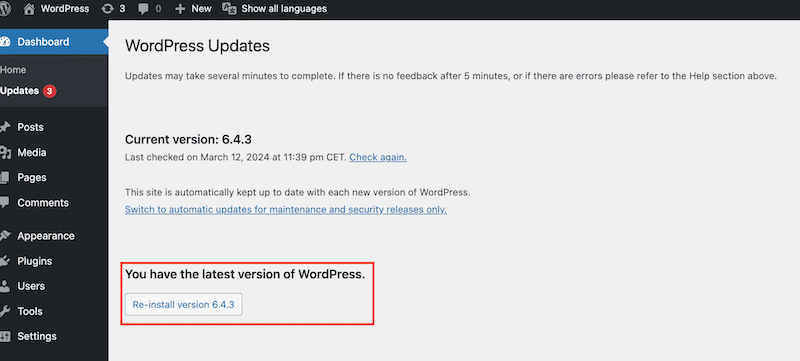
- In the WordPress dashboard, navigate to the Updates section.
- From there, you can initiate the reinstall process by clicking on the Re-install version X.X.X button.
Option 2: Reinstalling via FTP
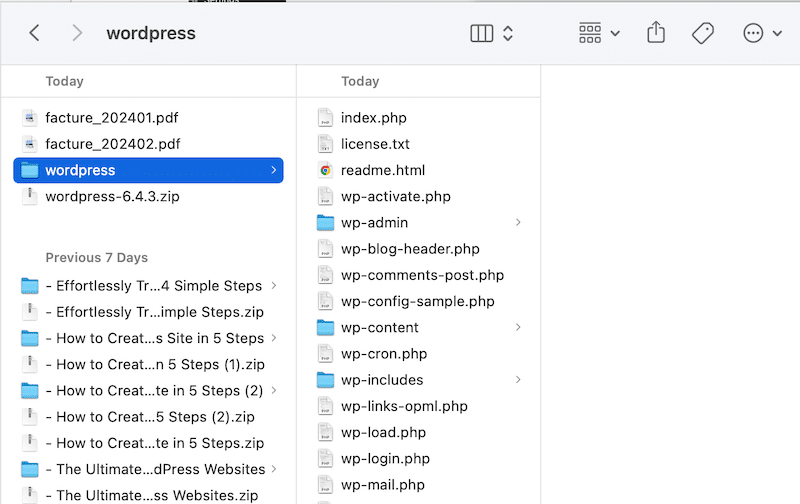
- Go to the download page of WorPress.org and download the WordPress .zip file to your computer.
- Unzip the file and delete the wp-content directory from within these files.
- Log in to your site using FTP.
- Upload all the files and directories you just downloaded in the wp-content directory.
8. Contact Your Web Host
If the problem persists after implementing all our suggestions, we recommend contacting your hosting provider to resolve the 500 Internal Server Error. You can submit a request to their experts, who will review your server settings and make any necessary adjustments to address the issue.
Wrapping Up
In conclusion, the 500 Internal Server Error can be a frustrating issue because of its generic nature, as it doesn’t explicitly state the underlying problem. However, with the help of our comprehensive troubleshooting checklist, we aim to help you pinpoint the source of the error. Remember to clear the cache using a plugin like WP Rocket. Plus, systematically check your plugins and themes by deactivating them one by one to identify the culprit, ensure your PHP memory limit is sufficient, and verify that your .htaccess file is not corrupted.
By following these steps, you can effectively diagnose and resolve the 500 Internal Server Error, restoring your website’s functionality and ensuring a smooth user experience.
WP Rocket is the simplest caching plugin on WordPress, and its benefits go beyond cache management. Thanks to its powerful features, WP Rocket improves your website performance and helps optimize your PageSpeed performance grade and Core Web Vitals scores. You don’t need coding skills: WP Rocket implements 80% of performance best practices upon activation, immediately making your website faster! On top of that, you don’t take any risks as there is a 14-day money-back guarantee.
